

Introduction to Complete Portrait Photography for Beginner’s Guide: How to Create Stunning Portraits
Portrait photography for beginners guide will teach you everything you need to know about camera settings, lighting, lenses, composition, and posing. Portrait photography is much more than taking a picture of a person. It is the art of telling a story through facial expressions, body language, lighting, composition, and the relationship between the subject and the camera. A successful portrait captures personality, emotion, and character rather than simply recording appearance.
Whether you are photographing family members, professional models, business executives, couples, or strangers on the street, the principles remain the same. The photographer must learn to observe people, understand light, communicate effectively, and compose images that naturally guide the viewer’s attention.
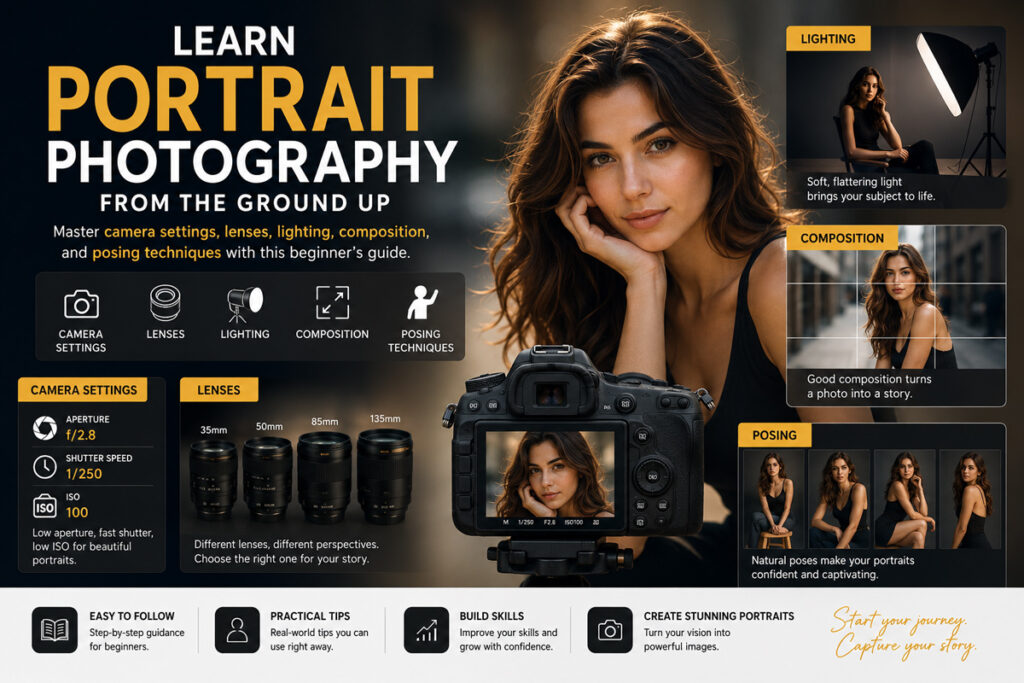
This guide introduces the essential concepts every portrait photographer should master before learning advanced posing techniques.
What Makes a Great Portrait?
A technically perfect photograph is not always a great portrait. Great portraits connect emotionally with viewers.
A memorable portrait combines several elements:
- Genuine expression
- Comfortable body posture
- Attractive lighting
- Effective composition
- Clean background
- Proper camera settings
- Sharp focus on the eyes
- Appropriate lens choice
- Natural interaction between photographer and subject
Professional photographers rarely rely on expensive equipment alone. Instead, they understand how these elements work together.
Understanding Body Language
Body language communicates emotion before facial expression does. Even subtle changes in posture can completely transform the mood of a portrait.
Why Body Language Matters
- Imagine photographing two people with identical smiles. One stands stiffly with crossed arms and locked knees. The other relaxes their shoulders, shifts their weight to one leg, and gently tilts their head. Although both people smile, the second portrait appears much warmer and more inviting. The human brain instinctively interprets posture.
- Relaxed posture creates comfort.
- Rigid posture creates tension.
- Open body language communicates confidence.
- Closed body language often suggests insecurity or reservation.
- Learning to recognize these differences is one of the most valuable skills a portrait photographer can develop.
Reading Natural Poses
Rather than forcing your subject into uncomfortable positions, observe how they naturally stand while talking.
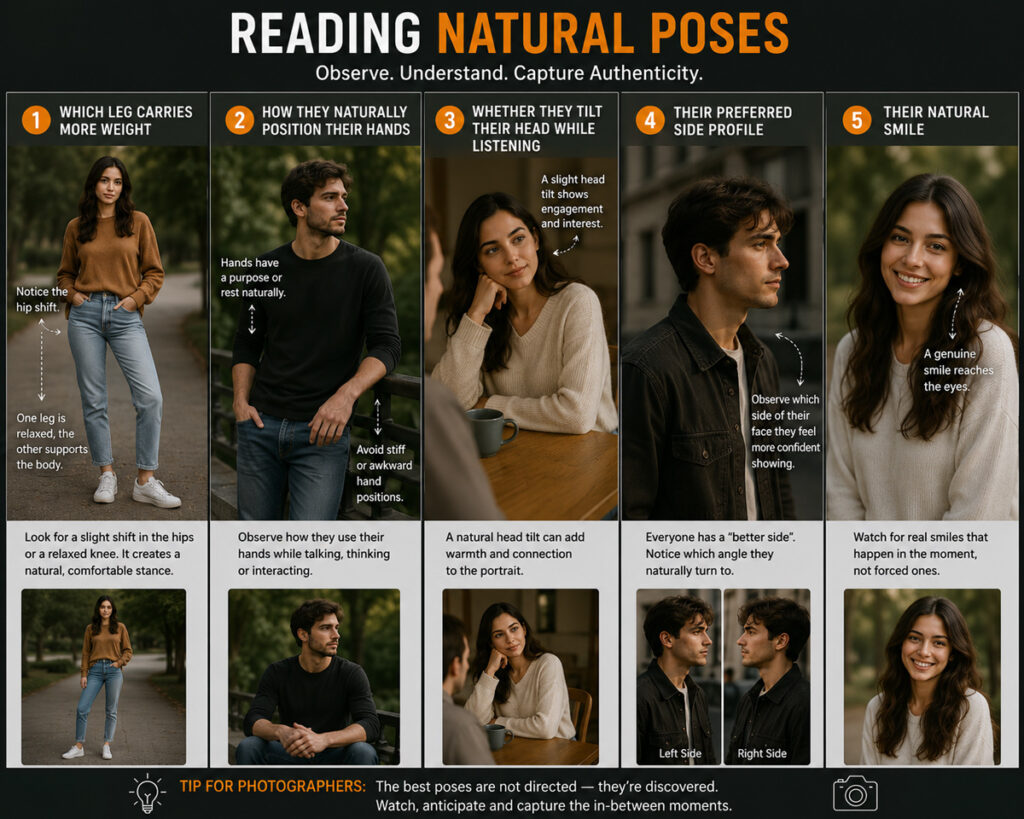
Notice:
- Which leg carries more weight
- How they naturally position their hands
- Whether they tilt their head while listening
- Their preferred side profile
- Their natural smile
These observations often become the best starting point for posing.
Common Body Language Signals
Confidence
- Straight back
- Relaxed shoulders
- Chin slightly raised
- Hands relaxed
- Feet shoulder-width apart
Ideal for:
- Corporate portraits
- Business professionals
- Athletes
- Personal branding
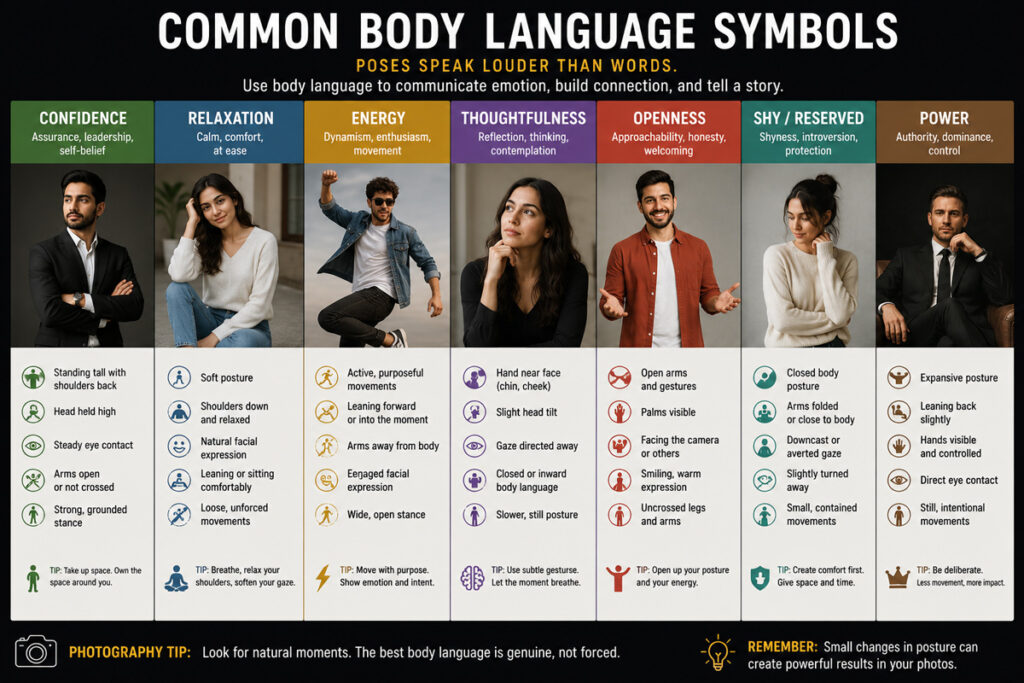
Relaxation
- Weight on one leg
- Slight bend in knees
- Soft shoulders
- Gentle smile
Ideal for:
- Lifestyle photography
- Outdoor portraits
- Family sessions
Energy
Movement creates dynamic portraits.
Examples include:
- Walking toward camera
- Turning naturally
- Looking over shoulder
- Adjusting clothing
- Playing with hair
- Laughing naturally
Movement often produces more authentic expressions than asking someone to stand perfectly still.
Understanding Facial Expressions
- Expressions should match the purpose of the photograph.
- Corporate portraits may require confidence.
- Wedding portraits require affection.
- Fashion portraits often emphasize elegance.
- Lifestyle portraits highlight authenticity. Rather than saying: “Smile.” Try giving a reason to smile.
For example:
“Think about your happiest vacation.” Natural emotions produce genuine expressions.
Working with Clients
Technical knowledge alone does not create successful portraits. Communication does. Many people feel nervous in front of a camera. Your responsibility is to help them become comfortable.
Before the Session
Discuss:
- Purpose of the photographs
- Clothing choices
- Location
- Time of day
- Makeup
- Hair
- Accessories
Clarifying expectations before the shoot prevents confusion later.
Building Trust
- Introduce yourself warmly.
- Explain what will happen during the session.
- Encourage conversation.
- Avoid long periods of silence.
- Compliment genuine moments rather than offering constant generic praise.
- People photograph better when they feel respected and relaxed.
Giving Directions
Avoid vague instructions like: “Look natural.” Instead give simple, specific guidance.
Examples:
- Turn your shoulders slightly left.
- Shift your weight to your back leg.
- Relax your hands.
- Lower your chin slightly.
- Look just above the camera.
- Take one step forward.
- Breathe slowly.
Small adjustments produce dramatic improvements.
Camera Settings for Portrait Photography
Understanding camera settings allows photographers to control exposure, sharpness, and artistic style. The three primary exposure settings work together:
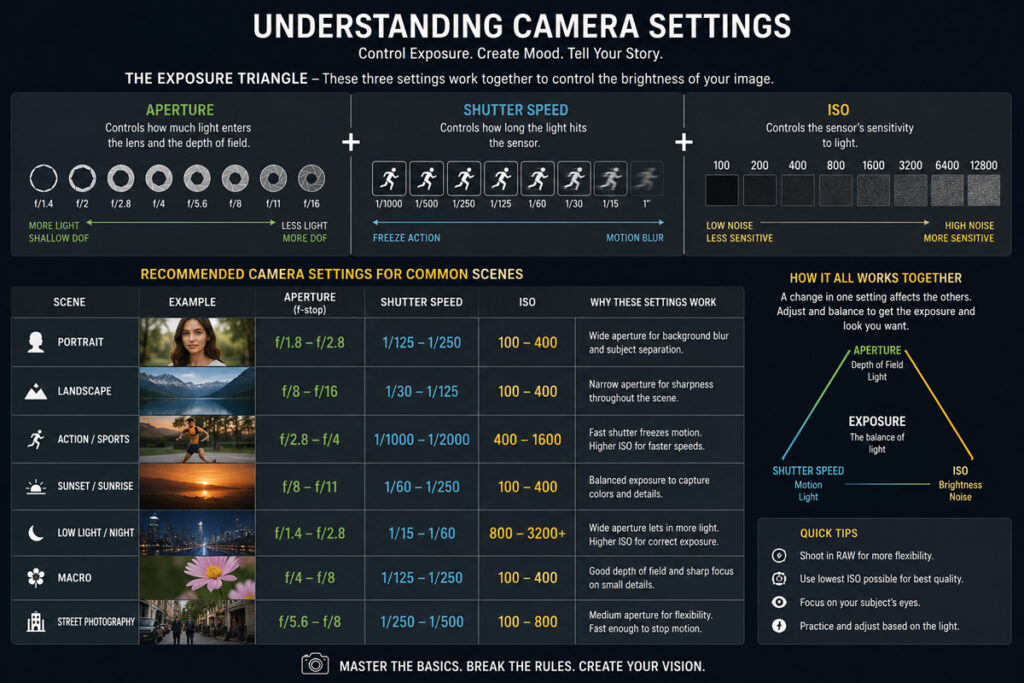
Aperture
Aperture controls how much light enters the camera and determines depth of field. A wide aperture creates blurred backgrounds.
Examples:
- f/1.4
- f/1.8
- f/2
- f/2.8
A narrow aperture keeps more of the scene in focus.
Examples: f/8 or f/11
Portrait Recommendations
- Individual portraits: f/1.8 to f/2.8
- Couples: f/2.8 to f/4
- Families: f/5.6 to f/8
Shutter Speed
Shutter speed controls how long the sensor records light.
- Too slow: Motion blur
- Too fast: Freezes movement
Recommended Values
- Standing portraits: 1/200 second
- Walking portraits: 1/500 second
- Children: 1/800 second
- Sports portraits: 1/1000 second
ISO
ISO controls sensor sensitivity. Lower ISO provides cleaner images.
Recommended:
- Bright daylight: ISO 100
- Cloudy weather: ISO 200–400
- Indoor window light: ISO 400–800
- Dark interiors: ISO 800–1600
Raise ISO only when necessary to maintain an appropriate shutter speed.
Focusing Techniques
Portrait photographers almost always focus on the subject’s nearest eye. Sharp eyes create engaging portraits.
Use:
- Single-point autofocus
- Eye-detection autofocus (if available)
- Continuous autofocus for moving subjects
Lens Selection
Different focal lengths create dramatically different portraits.
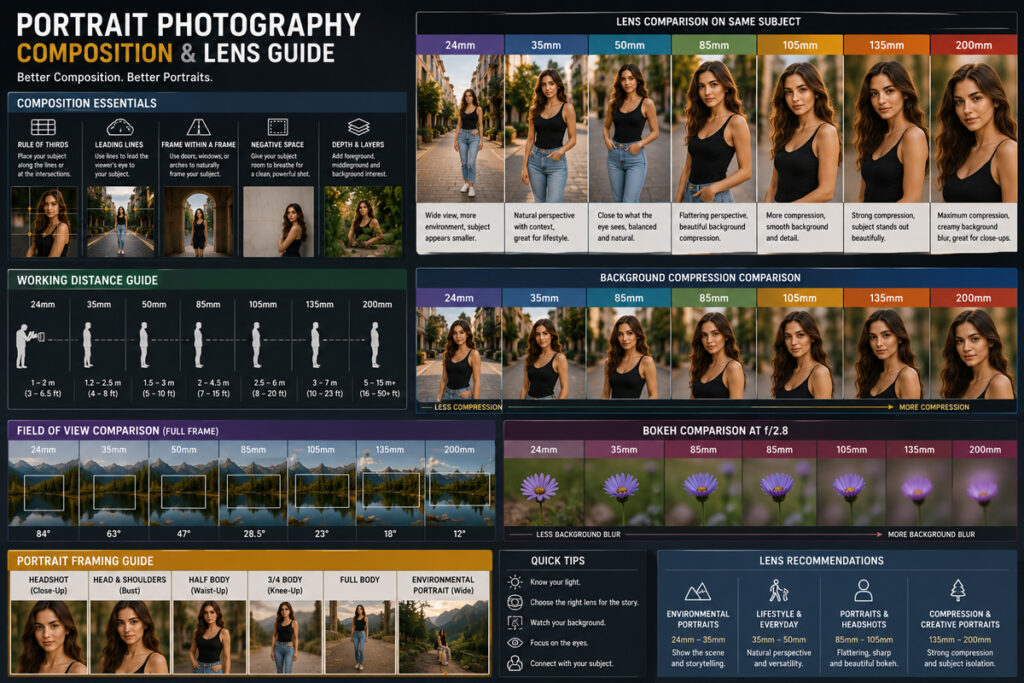
24mm
Excellent for:
- Environmental portraits
- Travel
- Storytelling
Pros ->Shows surroundings. Cons -> Can distort facial features if used too closely.
35mm
Popular among documentary photographers.
Ideal for:
- Lifestyle portraits
- Street photography
- Weddings
Provides a natural balance between subject and environment.
50mm
- Often called the “standard lens.”
- Excellent for beginners.
Suitable for:
- Indoor portraits
- Couples
- Everyday photography
Produces a natural perspective similar to human vision.
85mm
The classic portrait lens.
Advantages:
- Beautiful background blur
- Minimal facial distortion
- Comfortable working distance
- Flattering facial proportions
Many professionals consider the 85mm lens the ideal choice for headshots.
135mm
Excellent for outdoor portraits.
Creates:
- Strong background compression
- Creamy bokeh
- Excellent subject isolation
- Requires greater shooting distance.
70–200mm Zoom
A favorite among wedding photographers.
Benefits:
- Flexible framing
- Fast autofocus
- Excellent compression
- Comfortable distance from subjects
Choosing the Right Lens
| Portrait Type | Recommended Lens |
|---|---|
| Environmental Portrait | 24mm–35mm |
| Lifestyle | 35mm |
| General Portrait | 50mm |
| Professional Headshot | 85mm |
| Fashion | 85mm – 135mm |
| Outdoor Portrait | 70–200mm |
Lighting Basics
Photography literally means “drawing with light.” Understanding light is far more important than owning expensive cameras.
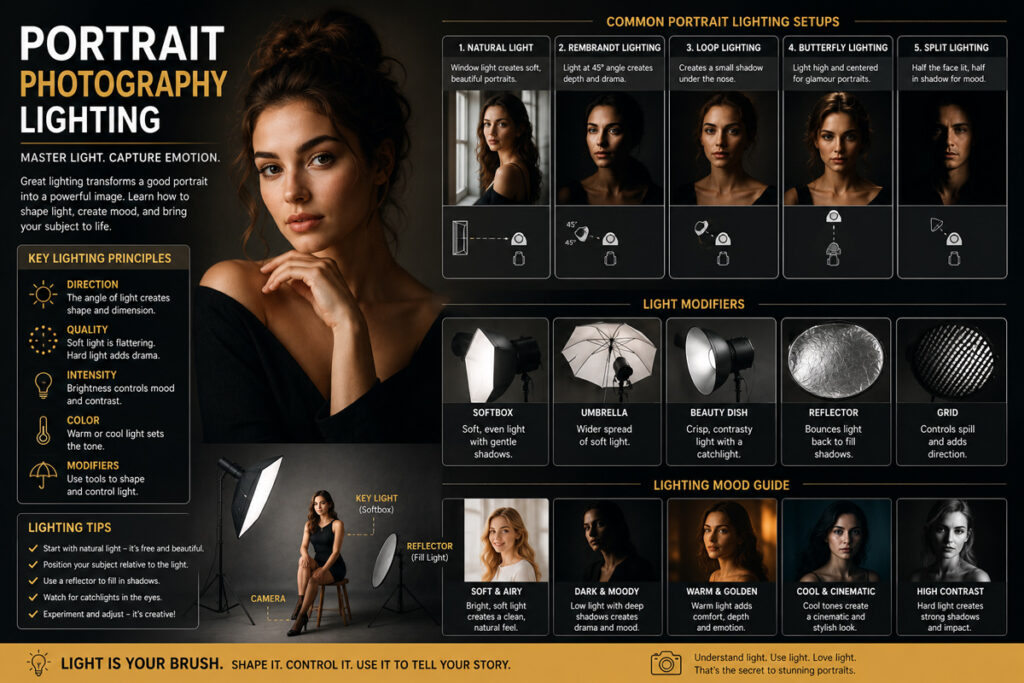
Characteristics of Light
Every light source has four qualities:
- Direction
- Intensity
- Color
- Softness
Changing any one of these changes the portrait completely.
Natural Light
Natural light is ideal for beginners.
Best times:
- Golden Hour
- Just after sunrise
- Just before sunset
Benefits:
- Soft light
- Warm colors
- Long shadows
- Pleasant skin tones
Window Light
- Window light behaves like a giant softbox.
- Position the subject approximately 45 degrees from the window.
- This creates gentle shadows that add depth to the face.
Open Shade
Open shade provides even lighting without harsh shadows.
Excellent locations include:
- Under trees
- Covered walkways
- Building entrances
- Verandas
Hard Light
Midday sunlight creates:
- Strong shadows
- Squinting
- High contrast
If shooting at noon:
- Move into shade.
- Use reflectors.
- Diffuse the light whenever possible.
Artificial Light
Studio lighting provides complete control.
Common modifiers include:
- Softboxes
- Umbrellas
- Beauty dishes
- Strip lights
- Reflectors
- Grids
Each modifier changes the quality and direction of light.
Basic Lighting Patterns
Front Lighting
- Even illumination.
- Good for beginners.
Side Lighting
- Adds depth and texture.
- Suitable for dramatic portraits.
Rembrandt Lighting
- Creates a small triangle of light beneath one eye.
- Widely used in professional portrait photography.
Butterfly Lighting
- Light placed above the camera.
- Creates a butterfly-shaped shadow beneath the nose.
- Popular in beauty and fashion photography.
Rim Lighting
- Light positioned behind the subject.
- Separates the subject from the background.
- Excellent for dramatic portraits.
Background Selection
Backgrounds should support the subject, not compete with them.
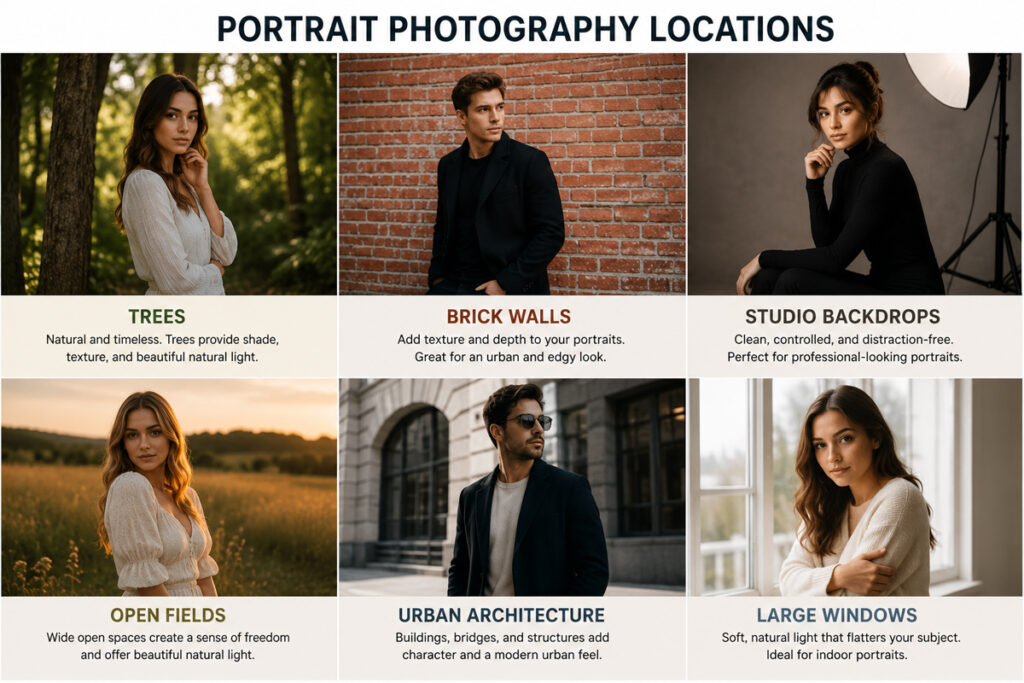
Good backgrounds include:
- Trees
- Brick walls
- Studio backdrops
- Open fields
- Urban architecture
- Large windows
Avoid distracting objects such as poles, signs, bright vehicles, or clutter that appear to emerge from the subject’s head.
Common Beginner Mistakes
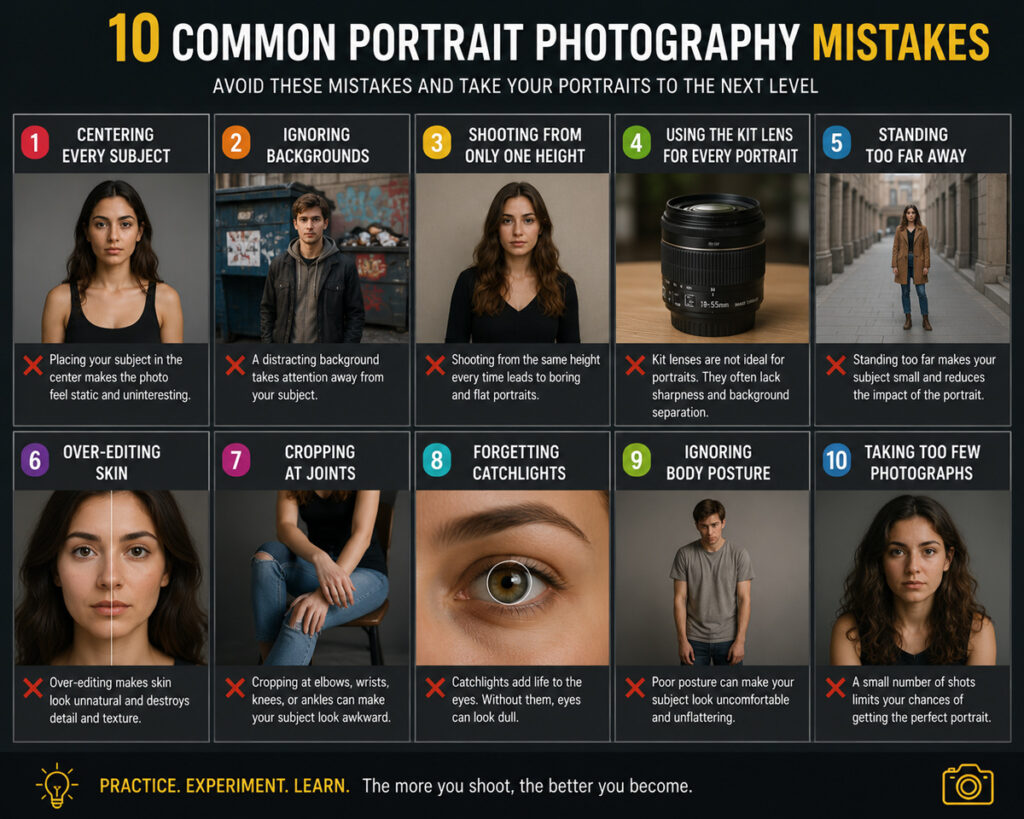
- Centering every subject
- Ignoring backgrounds
- Shooting from only one height
- Using the kit lens for every portrait
- Standing too far away
- Over-editing skin
- Cropping at joints
- Forgetting catchlights in the eyes
- Ignoring body posture
- Taking too few photographs
Practice Exercises
Before moving on to posing, spend time practicing these skills.
- Photograph the same person using a 35mm, 50mm, and 85mm lens (or equivalent focal lengths).
- Capture portraits in open shade, direct sunlight, and window light.
- Practice focusing on the nearest eye.
- Photograph standing, sitting, and walking subjects.
- Compare images made at f/2, f/4, and f/8 to understand depth of field.
These exercises build a strong technical foundation that will make posing far easier.
Final Thought
Portrait photography is a blend of technical skill, observation, and human connection. Cameras and lenses are only tools; the photographer’s ability to understand people, shape light, and compose a thoughtful frame is what creates memorable images.
In the next article of this series, we will move from theory to practice by exploring male, female, couple standing and sitting poses, including body positioning, hand placement, head angles, camera height, lens recommendations, composition techniques, and practical examples for beginners and professionals alike.
Learn how to pose Male in our Male Portrait Poses Guide ->
Learn how to pose women naturally in our Female Portrait Poses Guide ->
You may be interested in Camera Angles, Compositions and Lighting in Portrait Photography posing ->
It is essential to know about the Professional Portrait Photography Workflow: Directing Models, Posing and Final Retouch ->

Well designed and informative.
It is really worthy. Well documented. Waiting for the next issues like poses. Please provide pose images to understand it better.