

Male Portrait Photography Guide: 10 Classic Standing Poses
Standing poses are the foundation of male portrait photography. Whether you’re photographing a business executive, a groom, a fashion model, an athlete, or someone who has never stood in front of a camera before, mastering a few versatile standing poses will dramatically improve your portraits.
The key to a successful standing pose is making it look natural. Most people instinctively stand stiffly when a camera is pointed at them. Your role as the photographer is to guide them into relaxed, confident positions that suit their personality and the purpose of the portrait.
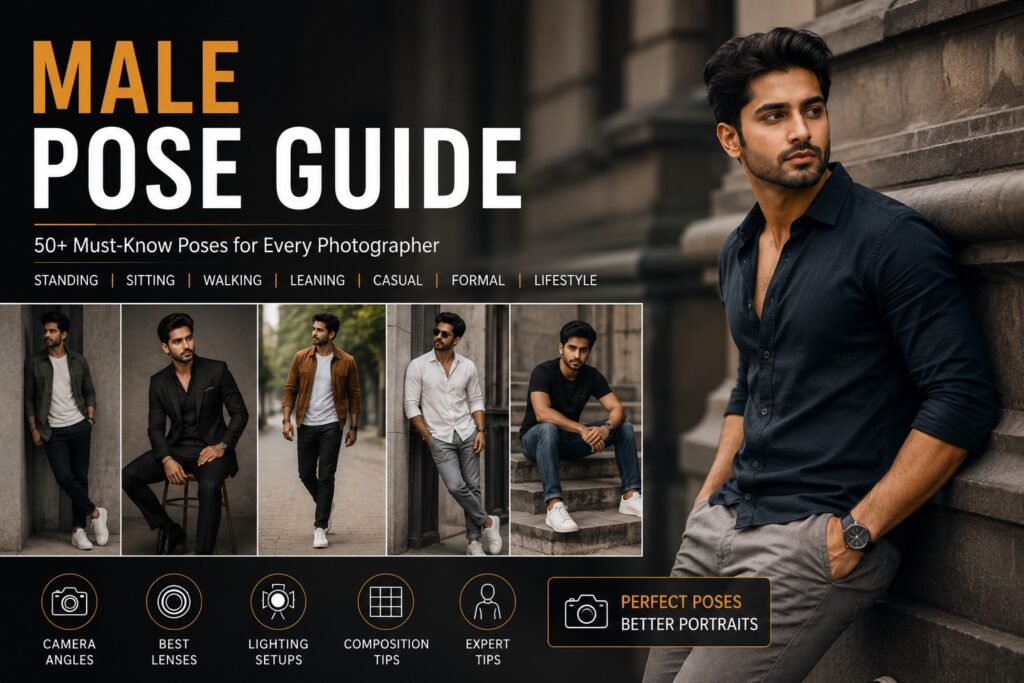
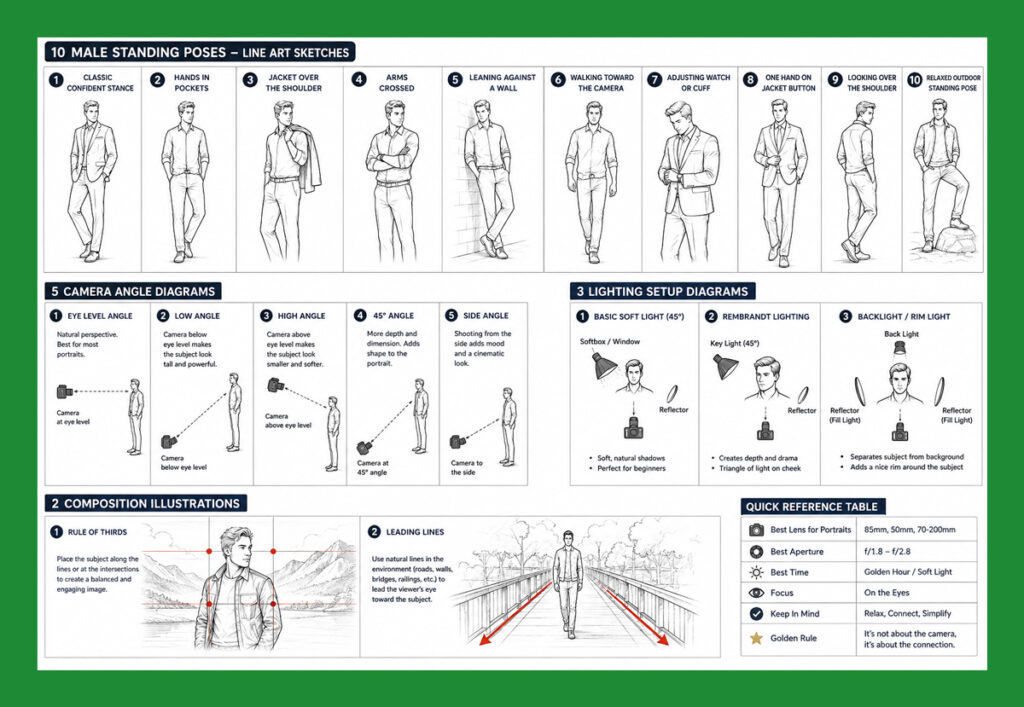
In this guide, each pose includes body positioning, camera placement, lens recommendations, composition tips, lighting suggestions, common mistakes, and professional advice.
Pose 1 – The Classic Confident Stance
Best For
- Business portraits
- Corporate headshots
- Personal branding
- Formal portraits
Body Position
Stand upright with feet about shoulder-width apart. Shift approximately 70% of the body weight onto the back leg while relaxing the front leg slightly. Turn the shoulders about 20–30 degrees away from the camera instead of facing it directly.
Hands
One hand may rest in a trouser pocket with the thumb outside, while the other hand hangs naturally or adjusts a jacket.
Head Position
Turn the head back toward the camera. Lower the chin slightly to define the jawline.
Eye Direction
Look directly into the camera to convey confidence.
Camera Position
- Height: Eye level
- Angle: Straight-on or about 15° to one side
- Distance: 2–3 m (6–10 ft)
Recommended Lens
- 85 mm prime
- 70–200 mm at approximately 135 mm
Suggested Camera Settings
- Aperture: f/2–f/2.8
- Shutter Speed: 1/250 s
- ISO: 100–200
Composition
Use the Rule of Thirds with extra space in the direction the subject is facing.
Lighting
A large softbox or window light positioned at 45° creates flattering facial shadows.
Common Mistakes
- Locked knees
- Square shoulders
- Both hands buried in pockets
- Chin lifted too high
Professional Tip
Ask the subject to inhale, then slowly exhale before you take the photo. This naturally relaxes the shoulders and neck.
Pose 2 – Hands in Pockets
Best For
- Casual portraits
- Lifestyle photography
- Outdoor sessions
Body Position
Turn the body about 45° from the camera. Shift weight onto one leg and let the opposite knee bend naturally.
Hands
Place both hands partially inside the front pockets with thumbs visible.
Head Position
Tilt the head slightly toward the camera.
Eye Direction
Look toward the camera or slightly off into the distance.
Camera Position
Eye level with a slight side angle.
Recommended Lens
50 mm or 85 mm.
Composition
Leave negative space around the subject when photographing in parks, streets, or architectural settings.
Lighting
Soft natural light during the golden hour.
- Common Mistakes
- Pushing hands too deeply into pockets
- Standing perfectly symmetrical
- Tense shoulders
Professional Tip
Ask the subject to walk into the pose rather than stepping directly into position. The resulting posture looks more natural.
Pose 3 – Jacket Over the Shoulder
Best For
- Fashion
- Editorial portraits
- Lifestyle branding
Body Position
Stand upright with relaxed posture. Place most of the weight on one leg.
Hands
One hand holds a jacket over the shoulder while the other rests naturally.
Head Position
Turn slightly away from the camera.
Eye Direction
Look into the distance for a cinematic feel.
Camera Position
Shoot slightly below eye level to add presence.
Recommended Lens
85 mm or 135 mm.
Composition
Use leading lines from roads, hallways, or buildings to guide the viewer toward the subject.
Lighting
Backlight during sunset with a reflector filling the face.
Common Mistakes
- Holding the jacket too tightly
- Stiff elbows
Professional Tip
Encourage subtle movement in the jacket between shots for variety.
Pose 4 – Arms Crossed
Best For
- Corporate portraits
- CEOs
- Entrepreneurs
- Authors
Body Position
Stand with shoulders angled approximately 30° from the camera.
Hands
Cross the arms loosely without gripping the upper arms tightly.
Head Position
Keep the chin level or slightly lowered.
Eye Direction
Direct eye contact projects confidence.
Camera Position
Eye level or just below eye level.
Recommended Lens
85 mm.
Composition
A tight half-body crop emphasizes facial expression and posture.
Lighting
Butterfly or Rembrandt lighting enhances facial structure.
Common Mistakes
- Arms squeezed tightly
- Raised shoulders
- Closed facial expression
Professional Tip
Leave a small gap between the arms and torso to avoid a bulky appearance.
Pose 5 – Leaning Against a Wall
Best For
- Urban portraits
- Street fashion
- Editorial photography
Body Position
Lean one shoulder lightly against a wall while keeping the spine straight.
Hands
One hand in a pocket; the other relaxed or touching the wall.
Head Position
Tilt slightly toward the camera.
Eye Direction
Look at the camera or downward for a reflective mood.
Camera Position
Shoot from a 45° angle to reveal depth.
Recommended Lens
35 mm for environmental context or 85 mm for tighter portraits.
Composition
Use walls or alleyways as leading lines.
Lighting
Natural side light produces pleasing texture.
Common Mistakes
- Leaning too heavily
- Flattening the shoulders
Professional Tip
Keep a small gap between the back and the wall for a more relaxed appearance.
Pose 6 – Walking Toward the Camera
Best For
- Lifestyle
- Travel
- Street portraits
Body Position
Walk naturally at a comfortable pace with relaxed shoulders.
Hands
Allow the arms to swing naturally.
Head Position
Keep the chin level.
Eye Direction
Look slightly above the camera or toward the lens.
Camera Position
Eye level, using continuous autofocus.
Recommended Lens
70–200 mm or 85 mm.
Suggested Camera Settings
- Aperture: f/2.8
- Shutter Speed: 1/500–1/1000 s
- ISO: Adjust to available light
Composition
Center the subject along a path or use converging lines.
Lighting
Golden-hour sunlight adds warmth and depth.
Common Mistakes
- Looking at the feet
- Taking exaggerated steps
Professional Tip
Take a burst of images as the subject approaches. The most natural stride often occurs between steps.
Pose 7 – Adjusting the Watch or Cuff
Best For
- Groom portraits
- Luxury branding
- Business professionals
Body Position
-> Stand at a 45° angle to the camera.
Hands
-> One hand adjusts a watch, cufflink, or sleeve.
Head Position
-> Look down briefly, then back toward the camera for a series of images.
Camera Position
-> Slightly above waist level to emphasize the hands and accessories.
Recommended Lens
-> 85 mm.
Composition
-> Crop to include the upper body and hands.
Lighting
-> Soft side lighting highlights textures and details.
Common Mistakes
- Overly exaggerated movements
- Hands covering the face
Professional Tip
-> Capture the adjustment mid-action for authenticity.
Pose 8 – One Hand on Jacket Button
Best For
- Formal portraits
- Business
- Weddings
Body Position
-> Stand upright with one foot slightly forward.
Hands
-> One hand lightly touches or fastens the jacket button.
Head Position
-> Turn slightly toward the camera.
Eye Direction
-> Maintain direct eye contact.
Camera Position
-> Eye level.
Recommended Lens
-> 85 mm or 135 mm.
Composition
-> Frame from mid-thigh upward to emphasize posture.
Lighting
-> Window light or a large softbox.
Common Mistakes
- Pulling the jacket tightly
- Tense fingers
Professional Tip
Ask the subject to straighten the jacket slowly while you shoot continuously.
Pose 9 – Looking Over the Shoulder
Best For
- Environmental portraits
- Travel
- Editorial work
Body Position
-> Turn the body away from the camera and glance back over the shoulder.
Hands
-> Keep the hands relaxed at the sides or in pockets.
Head Position
-> Rotate the head just enough to reveal both eyes.
Eye Direction
-> Look toward the camera.
Camera Position
-> Shoot from behind at shoulder height.
Recommended Lens
-> 85–135 mm.
Composition
-> Leave space in front of the subject’s gaze to create balance.
Lighting
-> Backlighting works particularly well, creating a subtle rim light.
Common Mistakes
- Turning the head too far
- Raising the shoulders
Professional Tip
-> Use this pose to tell a story by incorporating the surrounding environment.
Pose 10 – Relaxed Outdoor Standing Pose
Best For
- Lifestyle
- Travel
- Social media branding
- Personal portraits
Body Position
-> Stand naturally with one foot resting on a step, curb, or small rock. Keep the shoulders relaxed and the torso angled slightly.
Hands
-> One hand in a pocket, the other holding a bag, jacket, or camera.
Head Position
-> Face the camera with a slight head tilt.
Eye Direction
-> Alternate between looking at the camera and looking into the distance for a variety of images.
Camera Position
-> Eye level or slightly below eye level to create a stronger stance.
Recommended Lens
-> 35 mm for environmental context or 50 mm for a natural perspective.
Composition
-> Use foreground elements such as flowers, railings, or foliage to add depth.
Lighting
-> Photograph during the golden hour or in open shade for soft, flattering light.
Common Mistakes
- Standing completely straight with both feet parallel
- Ignoring distracting background elements
Professional Tip
Encourage the subject to shift their weight and make small adjustments between frames. Tiny changes in posture often produce the strongest images.
Final Thoughts
These ten standing poses form the foundation of male portrait photography. Once you are comfortable directing these positions, you can combine them with different expressions, lighting setups, and environments to create a wide variety of portraits without overwhelming your subject.
Male Portrait Photography Guide: 8 Professional Sitting Poses
Sitting poses are among the most versatile in portrait photography. They create a relaxed, approachable appearance while giving the subject a stable position, making them ideal for beginners and experienced models alike. A good sitting pose should look effortless, with natural posture, relaxed hands, and a clear connection between the subject and the camera.
This guide covers eight classic sitting poses that work well for business portraits, fashion, lifestyle, editorial, and environmental photography.
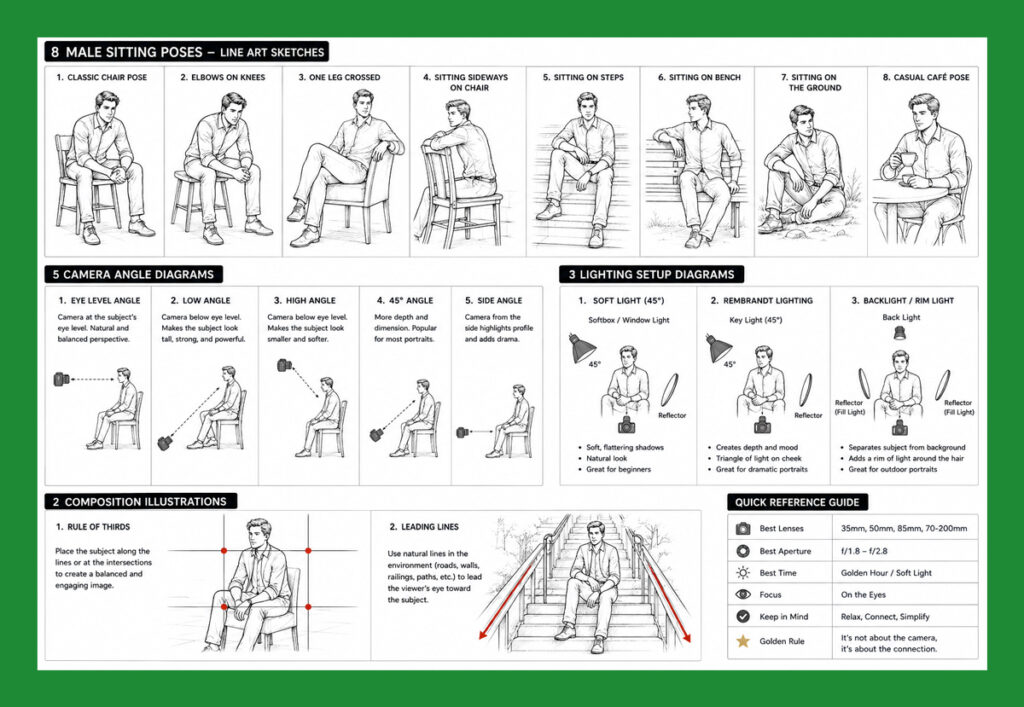
Pose 1 – Classic Chair Pose
Best For
- Corporate portraits
- Business executives
- Authors
- Formal headshots
Body Position
Sit on the front one-third of the chair rather than leaning back. Keep the spine straight with shoulders relaxed. Turn the torso about 20–30° away from the camera.
Legs
Both feet flat on the ground with knees shoulder-width apart.
Hands
Rest one hand on the thigh and the other lightly on the chair arm or knee.
Head Position
Lean slightly toward the camera with the chin lowered a little.
Eye Direction
Look directly into the lens.
Camera Position
- Eye level
- Slightly above seated eye level for a flattering perspective
Recommended Lens
- 85mm
- 70–200mm at 100–135mm
Camera Settings
- Aperture: f/2.8
- Shutter Speed: 1/200 sec
- ISO: 100–200
Composition
Frame from the waist upward or include the entire chair for environmental portraits.
Lighting
45° softbox or window light.
Common Mistakes
- Sitting too far back
- Rounded shoulders
- Feet tucked under the chair
Professional Tip
Ask the subject to lean forward slightly from the hips. This creates a more engaged and confident appearance.
Pose 2 – Elbows on Knees
Best For
- Editorial portraits
- Lifestyle photography
- Men’s fashion
Body Position
Sit with feet apart and lean forward naturally.
Hands
Rest forearms lightly on the knees. Hands can remain relaxed or loosely clasped.
Head Position
Keep the neck long and chin slightly forward.
Eye Direction
Look into the camera or slightly off to one side.
Camera Position
Shoot at eye level or just below for a stronger look.
Recommended Lens
- 50mm
- 85mm
Composition
A medium crop works best to emphasize expression and posture.
Lighting
Natural window light or soft directional lighting.
Common Mistakes
- Slouching excessively
- Hands covering the face
Professional Tip
Maintain a straight back even while leaning forward.
Pose 3 – One Leg Crossed Over the Other
Best For
Formal portraits
- Business professionals
- Magazine editorials
Body Position
Sit upright with one ankle resting comfortably over the opposite knee.
Hands
One hand rests on the crossed leg while the other rests on the chair.
Head Position
Face slightly toward the camera.
Eye Direction
Direct eye contact conveys confidence.
Camera Position
Eye level.
Recommended Lens
85mm.
Composition
Use a three-quarter body crop to include the crossed-leg position.
Lighting
Butterfly lighting or window light.
Common Mistakes
- Crossing both knees tightly
- Leaning backward too much
Professional Tip
Keep the shoulders relaxed to avoid a stiff appearance.
Pose 4 – Sitting Sideways on a Chair
Best For
- Creative portraits
- Casual branding
- Lifestyle sessions
Body Position
Turn the chair sideways and sit with the torso angled toward the camera.
Hands
Rest one arm casually over the chair back.
Head Position
Rotate gently toward the camera.
Eye Direction
Alternate between looking at the camera and looking away.
Camera Position
Approximately 45° from the subject.
Recommended Lens
50mm or 85mm.
Composition
Include negative space opposite the direction of the gaze.
Lighting
Side lighting enhances facial depth.
Common Mistakes
- Twisting the torso too far
- Raising the shoulders
Professional Tip
A wooden or metal chair often adds character to the image.
Pose 5 – Sitting on Steps
Best For
- Outdoor portraits
- Travel photography
- Urban lifestyle
Body Position
Sit naturally on a staircase with one knee slightly higher than the other.
Hands
Rest elbows lightly on the knees or let the hands relax beside the body.
Head Position
Keep the chin level.
Eye Direction
Look toward the camera or down the staircase.
Camera Position
Shoot from below to emphasize the staircase leading toward the subject.
Recommended Lens
35mm for environmental portraits or 85mm for tighter compositions.
Composition
Use the staircase as leading lines.
Lighting
Golden-hour sunlight or open shade.
Common Mistakes
- Sitting too stiffly
- Uneven posture
Professional Tip
Take both symmetrical and diagonal compositions for variety.
Pose 6 – Sitting on a Bench
Best For
- Park portraits
- Couples (individual portraits before pairing)
- Lifestyle sessions
Body Position
Sit near one end of the bench rather than in the center.
Hands
One hand on the bench, the other on the thigh or pocket.
Head Position
Relax and turn slightly toward the light.
Eye Direction
Natural gaze toward the camera.
Camera Position
Eye level or slightly above.
Recommended Lens
50mm or 85mm.
Composition
Leave empty space along the bench to create balance.
Lighting
Soft natural light.
Common Mistakes
- Sitting rigidly
- Feet dangling unnaturally
Professional Tip
Benches surrounded by greenery create pleasing environmental portraits.
Pose 7 – Sitting on the Ground
Best For
- Adventure photography
- Outdoor branding
- Travel
- Fitness portraits
Body Position
Sit with one knee raised and the other leg bent comfortably.
Hands
Rest one arm casually on the raised knee.
Head Position
Keep the back straight and chin slightly lowered.
Eye Direction
Look toward the horizon or directly at the camera.
Camera Position
Shoot at the subject’s seated eye level.
Recommended Lens
35mm or 50mm.
Composition
Include surrounding scenery to tell a story.
Lighting
Golden hour or soft overcast light.
Common Mistakes
- Rounded shoulders
- Legs positioned awkwardly
Professional Tip
Use rocks, grass, or wooden decks for added texture and context.
Pose 8 – Casual Café Pose
Best For
- Lifestyle branding
- Social media content
- Editorial portraits
Body Position
Sit naturally at a café table with a relaxed posture.
Hands
Hold a coffee cup, book, or laptop naturally.
Head Position
Slight tilt toward the camera.
Eye Direction
Alternate between looking at the camera and interacting with the surroundings.
Camera Position
Slightly above table height.
Recommended Lens
35mm for storytelling or 50mm for a balanced perspective.
Composition
Use foreground elements such as cups, menus, or plants to add depth.
Lighting
Window light from the side.
Common Mistakes
- Looking overly posed
- Cluttered table distracting from the subject
Professional Tip
Capture candid moments between posed shots for the most authentic images.
Quick Reference Table
| Pose | Best Genre | Lens | Camera Angle |
|---|---|---|---|
| Classic Chair | Corporate | 85mm | Eye Level |
| Elbows on Knees | Editorial | 50–85mm | Eye Level |
| Crossed Leg | Business | 85mm | Eye Level |
| Sideways Chair | Lifestyle | 50–85mm | 45° Angle |
| Steps | Outdoor | 35–85mm | Slight Low Angle |
| Bench | Lifestyle | 50–85mm | Eye Level |
| Ground | Adventure | 35–50mm | Seated Eye Level |
| Café | Branding | 35–50mm | Slight High Angle |
Final Thoughts
Sitting poses provide stability and variety while allowing the subject’s personality to shine through. By paying attention to posture, hand placement, and camera position, you can create portraits that look natural and confident across a wide range of styles.
Male Walking and Leaning Poses: Add Movement and Storytelling to Your Portraits
Static poses create polished portraits, but walking and leaning poses introduce life, movement, and emotion. They help subjects appear more relaxed while allowing photographers to incorporate the surrounding environment into the story. Whether you’re photographing a businessman on a city street, a traveler exploring a historic alley, or a fashion model against an urban backdrop, these poses create natural interactions that feel authentic rather than staged.
Walking and leaning poses are ideal for lifestyle, travel, fashion, environmental, and editorial portrait photography because they combine body language with the location, giving viewers a stronger sense of place and personality.
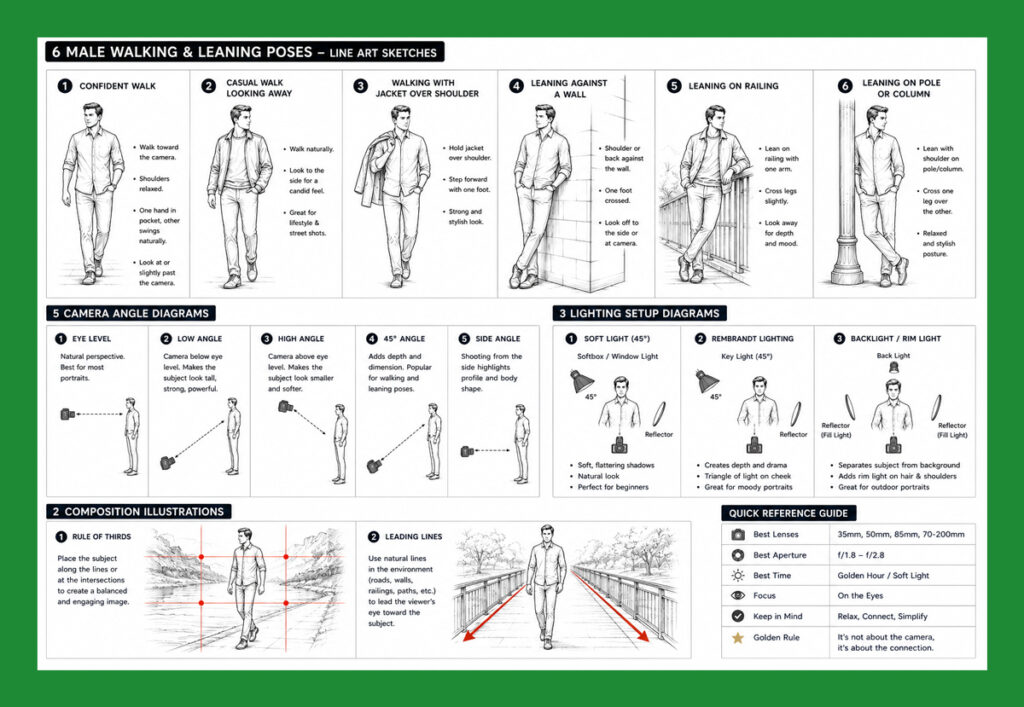
Pose 1: Natural Walk Toward the Camera
Purpose / Best Use
Lifestyle portraits, travel photography, fashion shoots, urban portraits.
Step-by-Step Positioning
- Ask the subject to walk naturally toward the camera.
- Keep shoulders relaxed.
- Swing the arms naturally.
- Maintain a comfortable walking pace.
- Look either at the camera or slightly past it.
Body Language & Emotion
Confident, approachable, relaxed, energetic.
Camera Angle
Eye-level provides the most natural perspective.
Recommended Lens
- 50mm
- 85mm
- 70–200mm for background compression
Lighting Setup
Natural daylight, golden hour, or open shade.
Composition Techniques
- Leading lines
- Rule of Thirds
- Depth using foreground elements
Common Mistakes
- Walking too fast.
- Looking down at the ground.
- Holding the arms stiffly.
- Taking unnaturally large steps.
How to Correct the Mistakes
Ask the model to imagine taking a casual walk rather than “posing.” Shoot continuously to capture the most natural stride.
Pro Photographer Tips
Walk backward while photographing to maintain consistent framing. Use Continuous AF (AI Servo/AF-C) and burst mode.
Pose 2: Walking Across the Frame
Purpose / Best Use
Street portraits, environmental portraits, storytelling images.
Step-by-Step Positioning
- Subject walks across the scene instead of toward the camera.
- Keep the head facing the walking direction.
- Maintain natural arm movement.
- Allow comfortable spacing around the subject.
Body Language & Emotion
Freedom, exploration, confidence.
Camera Angle
Eye-level or slightly lower.
Recommended Lens
35mm or 50mm.
Lighting Setup
Natural side light.
Composition Techniques
- Leading lines
- Negative space
- Layering
Common Mistakes
- Cropping the feet.
- Walking too close to the frame edge.
- Busy backgrounds.
How to Correct the Mistakes
Leave space in front of the subject so they appear to have somewhere to walk.
Pro Photographer Tips
Use a slower shutter speed (around 1/125 sec) with panning to create motion blur in the background while keeping the subject sharp.
Pose 3: Leaning Against a Wall
Purpose / Best Use
Urban portraits, fashion photography, business portraits.
Step-by-Step Positioning
- Lean one shoulder lightly against the wall.
- Shift body weight onto one leg.
- Bend the opposite knee slightly.
- Relax the hands in pockets or cross the arms naturally.
Body Language & Emotion
Confident, casual, modern.
Camera Angle
Eye-level or slightly below eye-level.
Recommended Lens
- 50mm
- 85mm
Lighting Setup
Soft side lighting or window light.
Composition Techniques
- Leading lines
- Symmetry
- Rule of Thirds
Common Mistakes
- Pressing the entire back flat against the wall.
- Locked knees.
- Stiff shoulders.
How to Correct the Mistakes
Maintain a slight gap between the back and the wall while allowing only one shoulder to make contact.
Pro Photographer Tips
Brick walls, textured concrete, and industrial architecture create excellent backgrounds that complement this pose.
Pose 4: Leaning on a Railing
Purpose / Best Use
Travel photography, waterfront portraits, bridges, rooftop sessions.
Step-by-Step Positioning
- Rest forearms lightly on the railing.
- Lean slightly forward.
- Turn the shoulders about 45 degrees.
- Keep fingers relaxed.
Body Language & Emotion
Thoughtful, calm, reflective.
Camera Angle
Eye-level.
Recommended Lens
- 85mm
- 105mm
Lighting Setup
Golden hour or soft natural light.
Composition Techniques
- Leading lines
- Framing
- Negative space
Common Mistakes
- Gripping the railing too tightly.
- Rounded shoulders.
- Looking uncomfortable.
How to Correct the Mistakes
Encourage the subject to rest gently on the railing and focus on a distant point to create a relaxed expression.
Pro Photographer Tips
Photograph from slightly below eye level to make the subject appear stronger while preserving the scenic background.
Pose 5: Leaning Against a Tree
Purpose / Best Use
Outdoor portraits, nature photography, engagement sessions.
Step-by-Step Positioning
- Rest one shoulder lightly against the tree.
- Cross one foot over the other.
- Keep one hand in a pocket or gently touch the bark.
- Turn the face toward the available light.
Body Language & Emotion
Relaxed, peaceful, natural.
Camera Angle
Eye-level.
Recommended Lens
- 85mm
- 135mm
Lighting Setup
Soft woodland light or backlit golden hour.
Composition Techniques
- Natural framing
- Rule of Thirds
- Depth using foreground leaves
Common Mistakes
- Leaning too heavily.
- Harsh sunlight on the face.
- Distracting branches behind the head.
How to Correct the Mistakes
Rotate the subject slightly until the face receives soft, even light and separate the head from the background.
Pro Photographer Tips
Use a wide aperture (f/2 to f/2.8) to blur foliage and create a clean, professional-looking background.
Pose 6: One Foot Against the Wall
Purpose / Best Use
Editorial, fashion, casual portraits.
Step-by-Step Positioning
- Stand beside a wall.
- Lift one foot and place the sole lightly against the wall.
- Shift weight onto the supporting leg.
- Relax the shoulders and hands.
Body Language & Emotion
Cool, stylish, youthful.
Camera Angle
Eye-level or slightly lower.
Recommended Lens
- 50mm
- 85mm
Lighting Setup
Soft directional light.
Composition Techniques
- Leading lines
- Negative space
Common Mistakes
- Raising the knee too high.
- Leaning too far backward.
- Tension in the shoulders.
How to Correct the Mistakes
Keep the lifted leg relaxed and maintain a comfortable bend.
Pro Photographer Tips
This pose works particularly well with textured walls, murals, and modern architecture.
Quick Reference Table
| Pose | Best For | Recommended Lens | Difficulty |
|---|---|---|---|
| Walk Toward Camera | Lifestyle | 50–200mm | Easy |
| Walk Across Frame | Street & Travel | 35–50mm | Moderate |
| Lean Against Wall | Urban & Fashion | 50–85mm | Very Easy |
| Lean on Railing | Waterfront & Travel | 85–105mm | Easy |
| Lean Against Tree | Outdoor Portraits | 85–135mm | Easy |
| One Foot Against Wall | Fashion & Editorial | 50–85mm | Easy |
Final Thoughts
Walking and leaning poses transform a portrait from a static image into a visual story. They encourage genuine expressions, natural body language, and meaningful interaction with the surroundings. By combining thoughtful composition, appropriate camera angles, flattering light, and clear posing direction, photographers can create portraits that feel authentic, dynamic, and memorable. Practice these six foundational poses in different environments, and you’ll quickly develop the confidence to adapt them for every client and location.
Formal/Casual/Business/Fashion/Fitness & Environmental
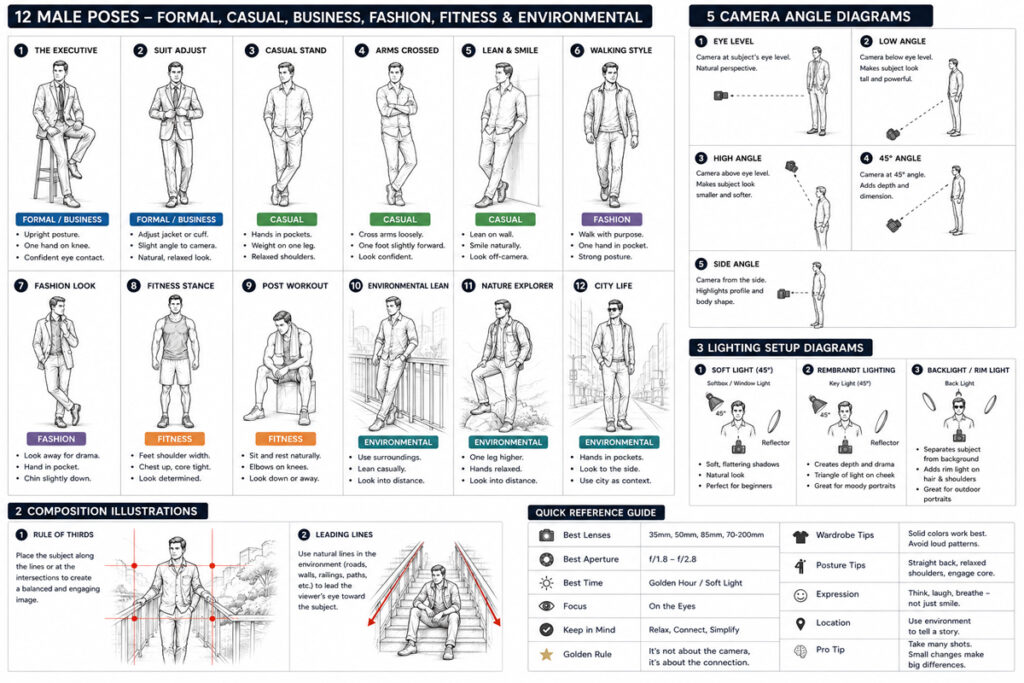
Bonus
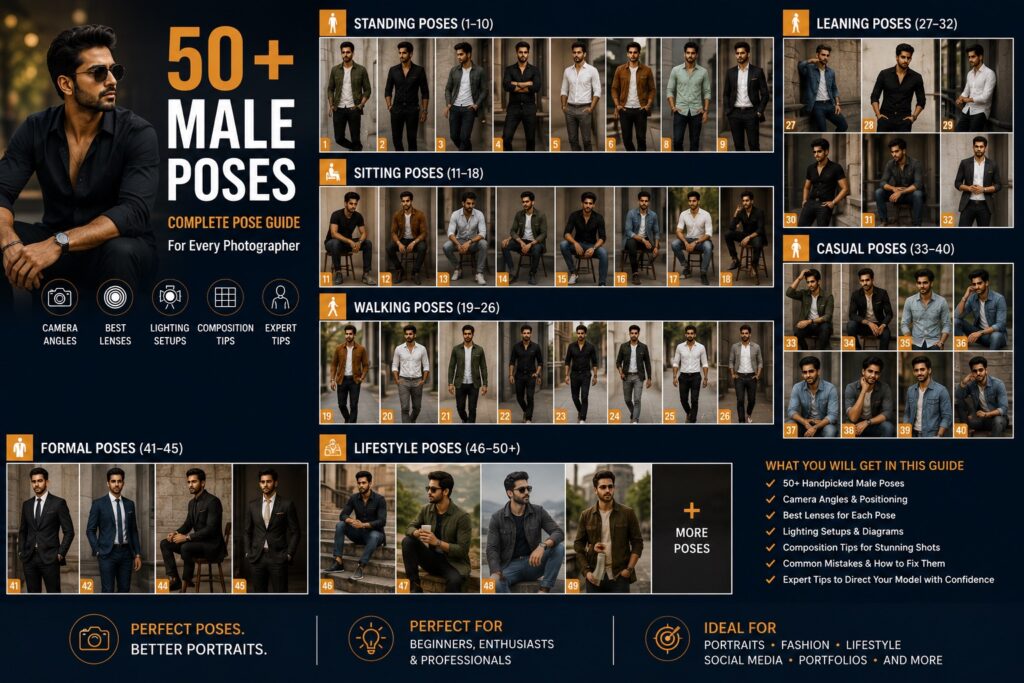
Main Article about Portrait Posing Guide ->
Learn how to pose women naturally in our Female Portrait Poses Guide ->
You may be interested in Couple Portrait Posing Guide ->
It is essential to know about Camera Angles, Compositions and Lighting in Portrait Photography posing ->
A final touch: Professional Portrait Photography Workflow: Directing Models, Posing and Final Retouch ->
