

A Place Never Waits for Your Camera
Imagine walking through an old city just after sunrise. Narrow streets are still quiet, shopkeepers are opening their shutters, and warm sunlight is reaching the upper floors of weathered buildings. A cyclist enters the frame, a woman carrying flowers crosses the street, and a patch of light falls across a colourful doorway.
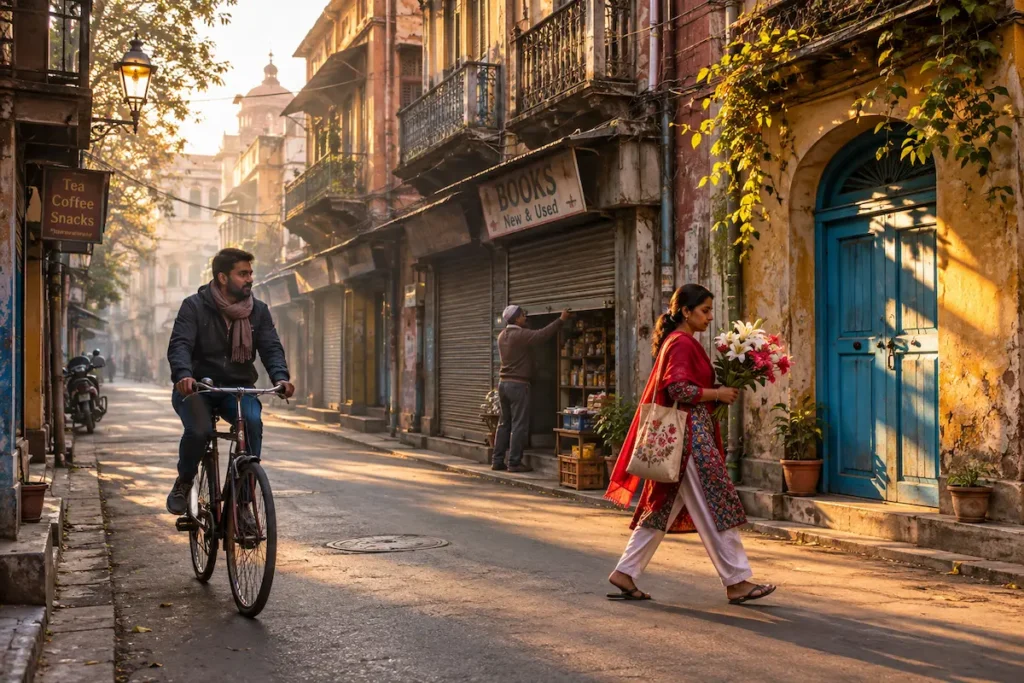
You raise your camera, but the scene changes before you can decide what to do. Should you use a fast shutter speed to freeze the cyclist? Should you stop down to keep the buildings sharp? Is there enough light to keep ISO low? And if you spend another minute adjusting your settings, will the moment disappear?
You find yourself asking the familiar question: What camera settings should I use?
Travel photography makes this question particularly difficult because it rarely gives you complete control. You might photograph a mountain landscape in bright daylight, a crowded market under mixed lighting, a moving train through a window, and a dimly lit restaurant within the same afternoon. The camera settings that work beautifully in one situation may produce disappointing results in the next.
The challenge is not simply learning which numbers to select. It is learning to recognise what each photograph needs before the opportunity disappears.
The best camera settings for travel photography are not a fixed combination of numbers; they are decisions shaped by the place, the light, the movement, and the story you want to bring home.
The Question Photographers Keep Asking
“What are the best camera settings for travel photography?”
It is a sensible question, especially if you are travelling with a new camera or trying to improve your photographs beyond ordinary holiday snapshots. You want sharp images, attractive colours, manageable noise, and enough detail to remember the experience as you saw it.
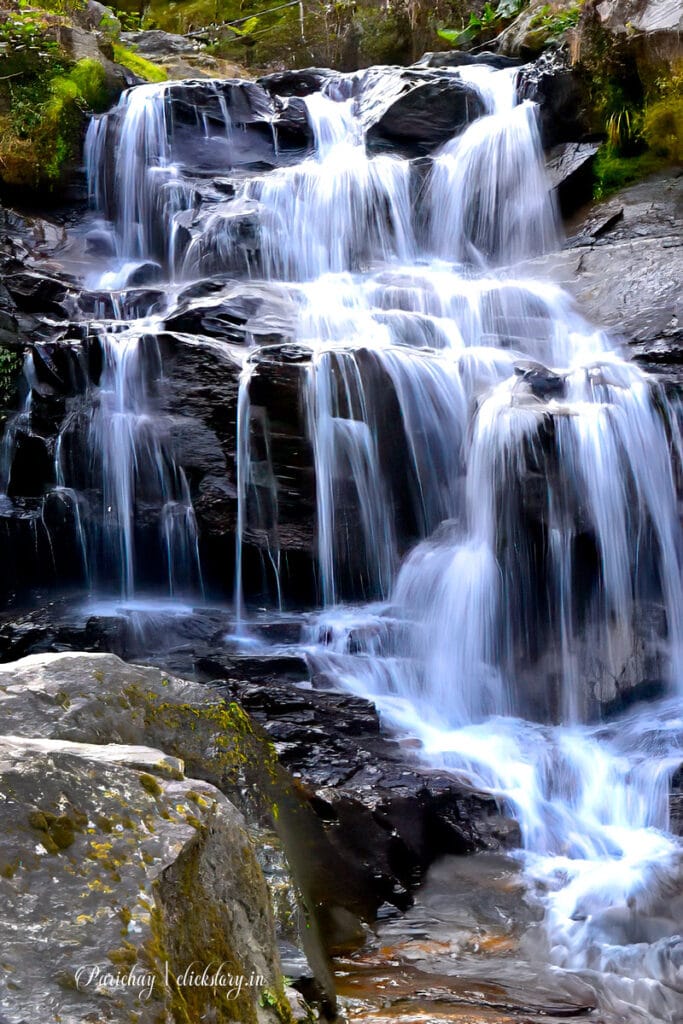
However, travel photography includes several different photographic challenges. A wide landscape may need considerable depth of field, while a portrait of a local artisan might benefit from a softer background. A busy street scene may require a fast shutter speed, whereas a waterfall could look more interesting with a slower exposure. A historic building may remain still for hours, but the people passing in front of it will not.
There are also practical considerations. You may be carrying only one lens, travelling without a tripod, working in unfamiliar light, or trying to photograph respectfully without interrupting someone’s daily life.
A universal preset cannot account for all these differences.
Instead of asking which settings are best for travel photography in general, ask a more useful question:
What does this particular photograph require from my camera?
That change in thinking makes it easier to decide which setting deserves your attention first.
The First Decision Is Not on Your Camera
Before changing the aperture, shutter speed, or ISO, take a moment to observe the scene. This does not mean delaying every photograph while you analyze it. With experience, these observations become almost automatic.
Start by identifying the main subject. Is it the landscape itself, a person within the landscape, an architectural detail, or the interaction between people and their surroundings? The answer influences how you frame the photograph and which parts need to remain sharp.
Next, consider movement. A stationary temple does not require the same shutter speed as a passing motorbike. If the photograph depends on a fleeting expression or a person walking through a patch of light, movement may be the first technical problem to solve.
Then look at the light. Is the subject illuminated by direct sunlight, shaded by buildings, backlit by a window, or surrounded by dim artificial lights? Light determines how much freedom you have to choose your aperture and shutter speed without raising ISO too far.
Finally, think about the story. A photograph of a crowded market can communicate energy and activity, or it can isolate one vendor from the surrounding crowd. Both approaches may be successful, but they require different compositional and technical decisions.
This gives you a simple framework:
Observe the scene, decide what matters, and then choose the settings that support that intention.
When You Find Yourself in This Situation
Photographing a busy street in an unfamiliar city
You are walking through a crowded street market in the late afternoon. The light is attractive, but people are moving in every direction. A vendor is arranging fruit while customers pass in front of the stall. You want to capture the atmosphere without turning every moving person into an unwanted blur.
In this situation, shutter speed deserves your attention first. A useful starting point might be around 1/250 sec to 1/500 sec if you want to freeze ordinary walking movement. If the people are moving quickly or you want to capture a cyclist sharply, you may need a faster shutter speed. If the people are relatively still and you want a more relaxed scene, you may be able to use a slower one.
Suppose your lens is set to f/5.6 and the light is fading. You select 1/500 sec, but the resulting image is too dark at ISO 100. The problem is not that your shutter speed is wrong; it is that the scene does not provide enough light for that combination. You could open the aperture if the lens allows it, raise ISO, or choose a slightly slower shutter speed if the movement permits.
If you lower the shutter speed too much, faces and hands may become blurred. If you insist on keeping ISO extremely low, you might end up with an underexposed photograph or an unnecessarily slow shutter speed.
An alternative is to wait for a moment when the vendor pauses, move closer to a stationary detail, or photograph the relationship between the stall and the surrounding architecture rather than trying to freeze every person in the crowd.
The lesson is simple: the best setting is the one that solves the main problem in the scene, not necessarily the one that keeps every number at its lowest or highest possible value.
Understanding the Camera Settings That Matter Most
Travel photography requires flexibility, but you do not need to change every camera setting for every photograph. Understanding the role of a few important controls will cover most everyday situations.
Shutter speed: Decide what happens to movement
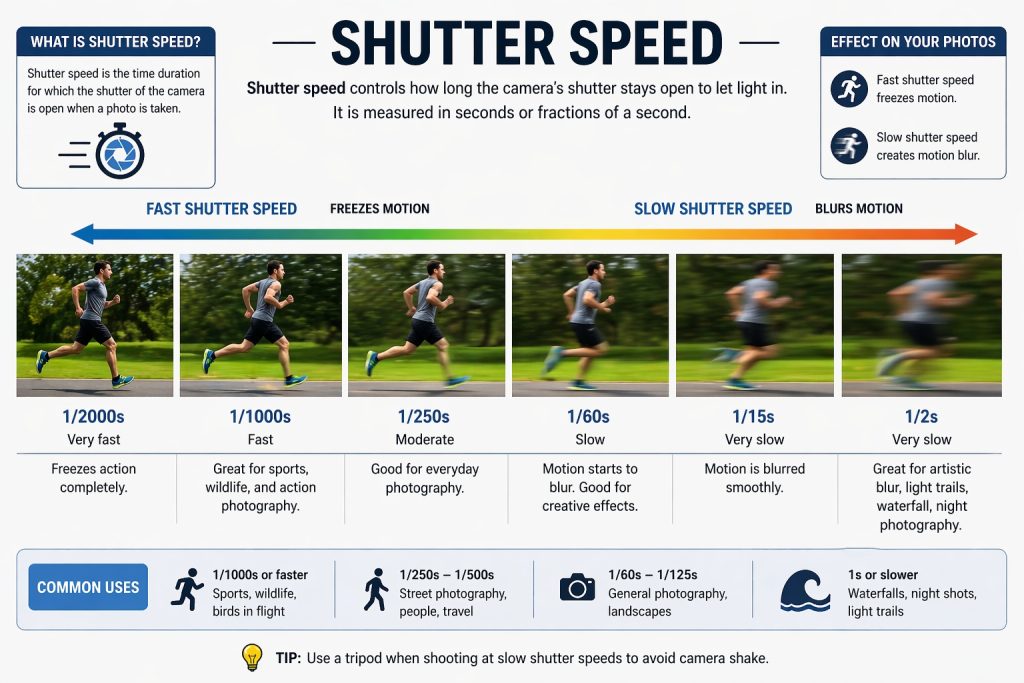
Shutter speed controls how long the camera records light. It also determines how movement appears in the final photograph.
A fast shutter speed helps freeze movement, while a slower shutter speed can introduce blur. Neither result is automatically better. The important question is whether the movement supports the photograph you want to create.
Fast shutter speed — around 1/500 sec or faster
Useful for cyclists, busy markets, moving vehicles, children playing, and fleeting expressions. It reduces motion blur, but faster speeds allow less light to reach the sensor, which may require a wider aperture or higher ISO.
Moderate shutter speed — around 1/60 to 1/250 sec
Useful for many everyday travel scenes, depending on movement and focal length. It can preserve a natural sense of activity, but moving subjects may blur at the slower end.
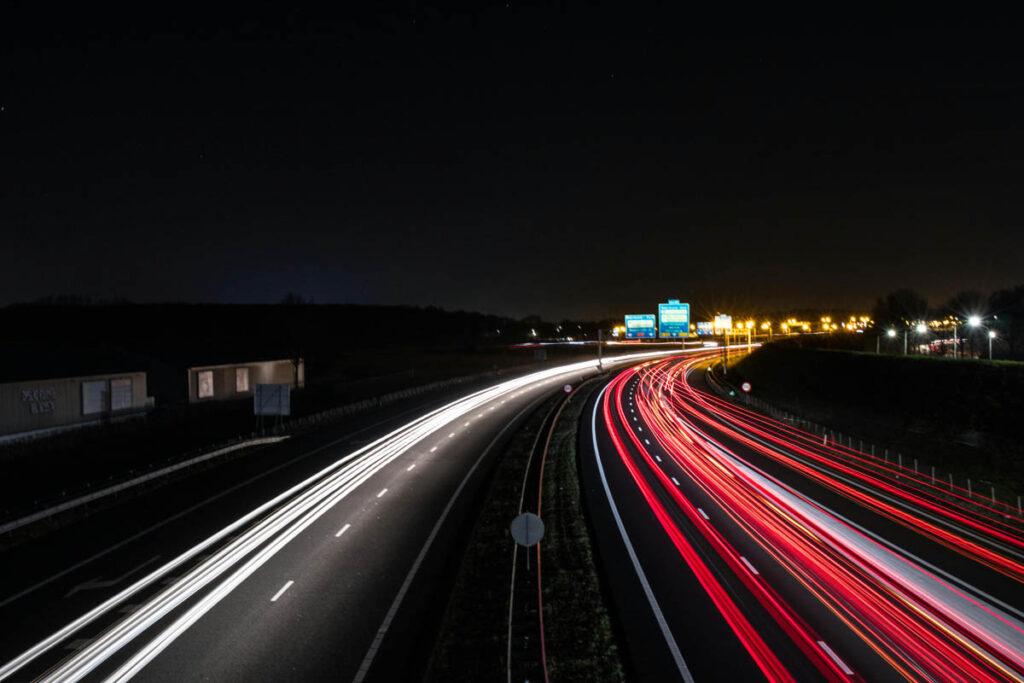
Slow shutter speed — around 1/4 sec to several seconds
Useful for smoothing waterfalls, recording light trails, or creating motion in a scene. A tripod is usually helpful, and moving people or foliage may blur. Stabilization can reduce camera shake but cannot freeze a moving subject.
For handheld photographs, a useful starting point is to choose a shutter speed fast enough for both the subject’s movement and your ability to hold the camera steady. Longer focal lengths often require extra care because small camera movements become more visible.
Aperture: Decide how much of the scene should look sharp
Aperture is the opening in the lens through which light enters. It also influences depth of field, which is the range of distances that appear acceptably sharp.
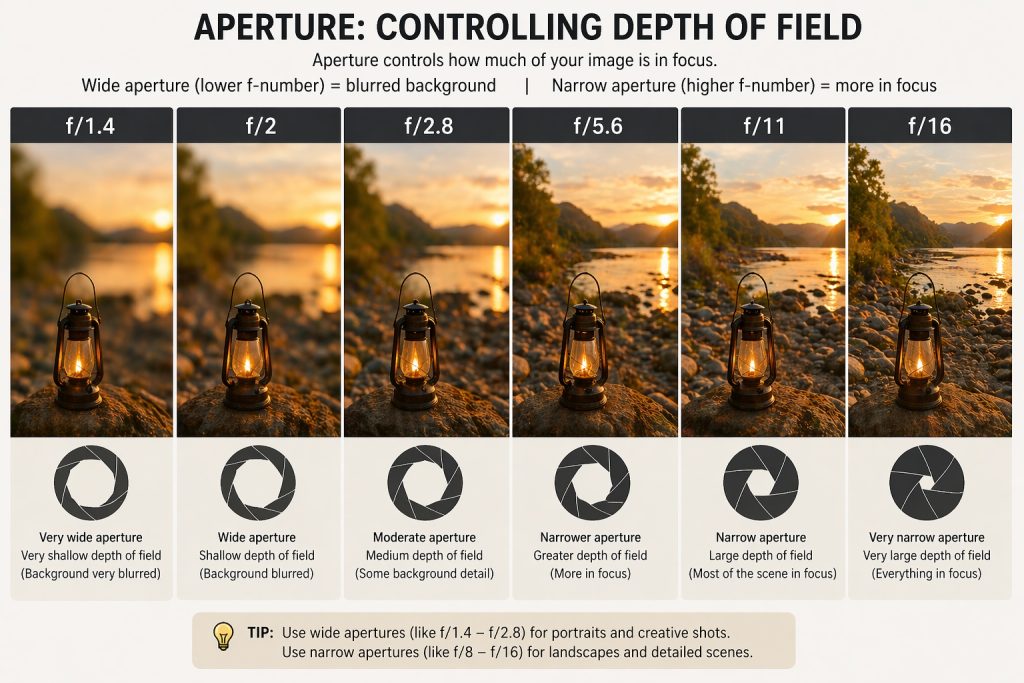
A wider aperture, represented by a smaller f-number such as f/2.8, lets in more light and can create a softer background. This is useful when photographing a person against a busy street or a small detail in a crowded market.
A narrower aperture, such as f/8 or f/11, generally provides greater depth of field. It can be useful for landscapes, architecture, and scenes in which both the foreground and background contribute to the story.
However, stopping down reduces the amount of light reaching the sensor. You may need a slower shutter speed or a higher ISO to compensate. Very small apertures, such as f/22, can also reduce fine detail because of diffraction, so they are not automatically the best choice when maximum sharpness matters.
For general travel photography, f/5.6 to f/8 is a useful starting range when you want a reasonably broad area of sharpness without sacrificing too much light. Open the aperture when light is limited or subject separation matters; stop down when greater depth of field is more important.
ISO: Decide how much noise you are willing to accept
ISO influences the camera’s sensitivity setting and the brightness of the recorded image for a given exposure. Raising ISO makes it possible to use faster shutter speeds or smaller apertures when light is limited, but it can also increase visible image noise and reduce fine detail, depending on the camera and exposure.
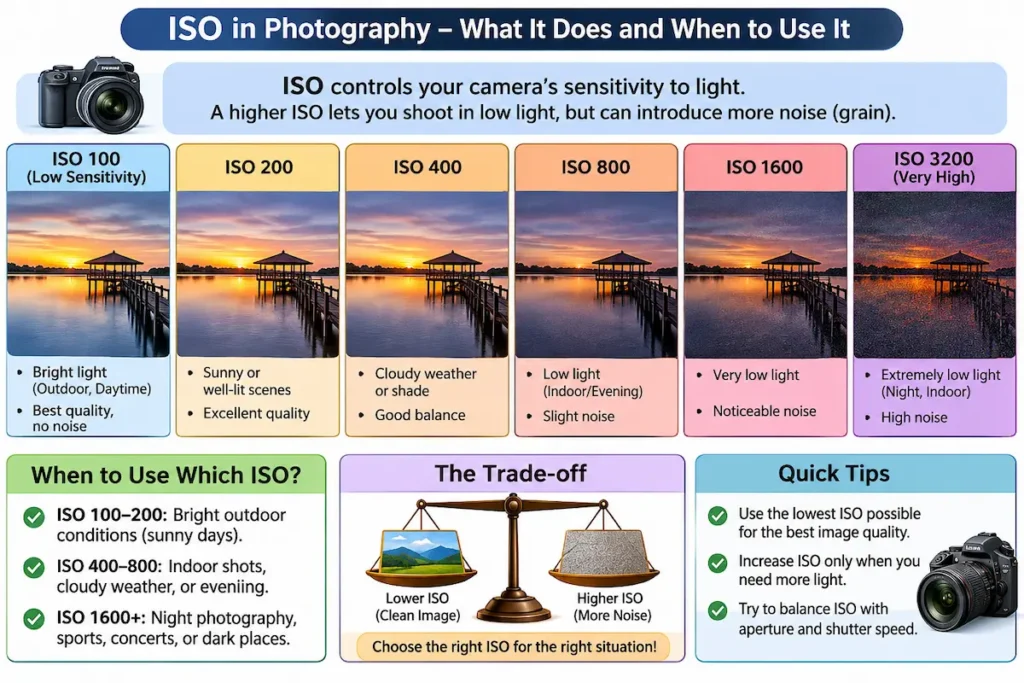
In bright daylight, ISO 100 or 200 may be perfectly adequate. In a shaded street, ISO 400 or 800 might help you maintain a suitable shutter speed. In a dimly lit market or evening scene, ISO 1600, 3200, or higher may be necessary, depending on the camera and the result you need.
Do not assume that ISO 100 always produces the best photograph. A slightly noisy image of an important moment is often more useful than a perfectly clean image ruined by motion blur.
Auto ISO can be particularly helpful while travelling because lighting conditions change quickly. You can select a minimum shutter speed appropriate to your subject and allow the camera to raise ISO when necessary. Check how your camera handles Auto ISO, especially if it allows you to set a maximum ISO or minimum shutter speed.
Focus: Decide what deserves attention
Travel photographs often contain several possible subjects: people, signs, buildings, vehicles, food, and details in the foreground. Correct exposure cannot compensate for focus landing on the wrong element.
For stationary subjects such as architecture, monuments, and carefully arranged food, single autofocus is often a good choice. For moving people, cyclists, or vehicles, continuous autofocus can help the camera track movement.
If your camera offers subject or eye detection, it can be useful for portraits and candid photographs of people. However, these features may not always recognise the subject you intend to emphasise, especially in crowded scenes. Check the focus point when the composition is complicated.
Manual focus is useful when autofocus struggles in very low light, when photographing through glass, or when you want precise control over a particular detail. For landscapes, focusing at an appropriate distance and using a suitable aperture can help keep more of the scene sharp.
The goal is not to make every element sharp. It is to make the important element sharp enough for the photograph to work.
Other settings that make travel easier
A few additional controls can make a noticeable difference.
- Exposure compensation: Use positive compensation when the camera makes a bright subject look too dark, or negative compensation when bright areas risk losing detail. Check the result rather than applying a fixed correction everywhere.
- White balance: Auto White Balance is convenient when moving between daylight, shade, and artificial lighting. Shooting RAW gives you more flexibility to adjust colour later.
- Image stabilization: Lens or in-body stabilization can help reduce camera shake for stationary scenes. It does not freeze moving people or vehicles.
- Drive mode: Single-frame shooting suits deliberate compositions. Continuous shooting can help when timing is critical, but it is not a substitute for anticipating the moment.
- RAW or JPEG: RAW files preserve greater flexibility for editing exposure and colour, while JPEG files are convenient when you want ready-to-share images with smaller file sizes. Some cameras also allow you to record both.
You Don’t Need the Ideal Equipment
Travel photography often involves carrying everything yourself. A heavy camera bag can become uncomfortable during a long walking tour, and changing lenses repeatedly can mean missing moments or attracting unwanted attention.
A standard kit lens can photograph landscapes, architecture, street scenes, food, and travel portraits. A prime lens can offer a wider maximum aperture and a compact size, although it may require you to move your position rather than zoom. A telephoto zoom helps isolate distant details, but it can be heavier and more difficult to use in cramped streets.

Older cameras can still produce excellent travel photographs when the exposure, focus, and light are handled well. Their high-ISO performance or autofocus may not match newer models, but these limitations do not prevent you from creating meaningful images.
Learn the strengths of the equipment you already own. If your lens is sharpest around f/5.6 or f/8, use that knowledge when light allows. If its maximum aperture is limited, pay closer attention to shutter speed and look for brighter positions. If your camera struggles in very low light, make more use of daylight, stable surfaces, and scenes with less movement.
Good travel photography depends more on understanding your equipment than on owning the most expensive equipment.
When the Equipment Becomes a Limitation
Every photographer eventually encounters a scene that the equipment cannot capture exactly as imagined. A distant mountain detail may remain too small in the frame, an evening street may be too dark for a slow kit lens, or a crowded market may make it impossible to find a clean background.
Before buying something new, consider what else you can change.
If a landmark looks too small, try a different position, use a longer focal length if you have one, or make the surrounding landscape part of the composition. If a street portrait has a distracting background, move sideways until the subject is separated from signs, bright windows, or passing vehicles.
When the lens cannot open wide enough for a dark interior, look for light falling through a doorway or window. You may be able to photograph the subject near that light rather than trying to record the entire room. If your camera cannot maintain a fast shutter speed at an acceptable ISO, wait for a stationary moment or deliberately create a photograph that includes movement.
A tripod is valuable for certain long exposures, but a stable wall, bench, or other safe support may help when photographing a stationary scene. Remember that stabilization and support reduce camera shake, not the movement of the subject.
Sometimes the most useful decision is to accept a different photograph. A wide scene that does not work as a complete composition may contain a beautiful detail, reflection, shadow, or human interaction.
Equipment creates possibilities, but it does not decide what is worth photographing.
Three Photographers, Three Different Photographs
Imagine three photographers standing in the same historic market square. The light is fading, people are walking between old buildings, and a street vendor is preparing a display.
Photographer 1: Telling the story of the place
Purpose: Show the relationship between the market, its buildings, and the people who use it.
Approach: Use a relatively wide focal length and include enough surroundings to establish context.
Possible settings: f/8, 1/250 sec, ISO 400–800.
Why: The narrower aperture helps maintain depth of field, while a moderate-to-fast shutter speed reduces unwanted blur among moving people. ISO is adjusted to suit the fading light.
Photographer 2: Showing a human story
Purpose: Emphasize the vendor’s expression and concentration.
Approach: Move closer, choose a less distracting background, and use a wider aperture if the lens allows it.
Possible settings: f/2.8–f/4, 1/250 sec, ISO 800–1600.
Why: A wider aperture can separate the vendor from the surroundings, while a suitable shutter speed helps preserve facial detail. The photographer must still focus carefully on the important part of the face.
Photographer 3: Showing the rhythm of the market
Purpose: Communicate movement and the passage of time.
Approach: Keep the architecture relatively stable in the composition while allowing moving people to blur.
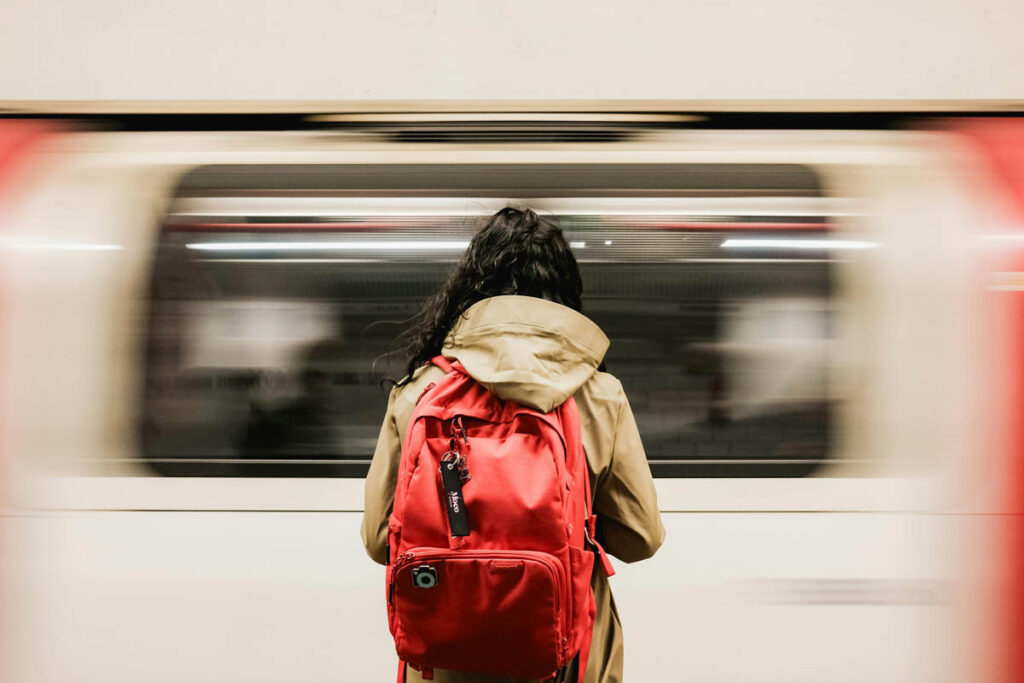
Possible settings: Around 1/8–1/30 sec, f/8, ISO 100–400, depending on the light and whether the camera is supported.
Why: The slower shutter speed introduces motion blur. A stable camera or tripod helps keep stationary buildings sharp, although moving subjects will remain blurred.
The square has not changed. The photographers’ intentions have changed, so their settings have changed too. None of these approaches is automatically superior. Each creates a different interpretation of the same place.
The Light Changes Everything
Travel often means moving between lighting conditions without time to prepare. The useful skill is recognizing what the light demands.
Early morning and golden hour
The low sun creates warm colour, long shadows, and attractive side lighting. You may be able to keep ISO low while using f/5.6–f/8 for a broad area of sharpness. If the light is fading, however, watch your shutter speed rather than letting it become too slow for moving subjects.
Bright midday sun
The main challenge is often contrast rather than a lack of light. Protect important highlights, use a suitable aperture, and consider changing your position to find more even light. Open shade can work well for portraits when direct sunlight creates harsh shadows.
Overcast light
Clouds soften shadows and can make portraits, street scenes, and colourful details easier to photograph. Because the light may be less intense, check whether you need a wider aperture or higher ISO to maintain a suitable shutter speed.
Night markets and dim interiors
Artificial lights can create beautiful colours but uneven exposure. If people are moving, prioritise a shutter speed that limits blur and raise ISO as needed. For stationary architecture, a slower shutter speed and a stable support may allow lower ISO.
Backlight and strong contrast
When the light comes from behind your subject, decide whether you want a recognisable, detailed subject or a silhouette. Exposure compensation may help, but exposing for the subject can cause bright areas to lose detail. There may not be enough dynamic range to preserve everything, so choose which part matters most.
The same camera can produce very different results in each situation. Instead of memorising a separate preset for every type of light, learn to identify whether your main challenge is movement, contrast, depth of field, or available light.
The Mistake Photographers Often Notice Too Late
A common travel photography mistake is concentrating so heavily on the main subject that you forget to examine everything around it.
You might photograph a beautiful doorway, only to discover later that a bright sign competes with it. A portrait may have a pole appearing to grow out of someone’s head. A mountain landscape may be technically sharp and correctly exposed but contain too many unrelated elements to guide the viewer’s attention.
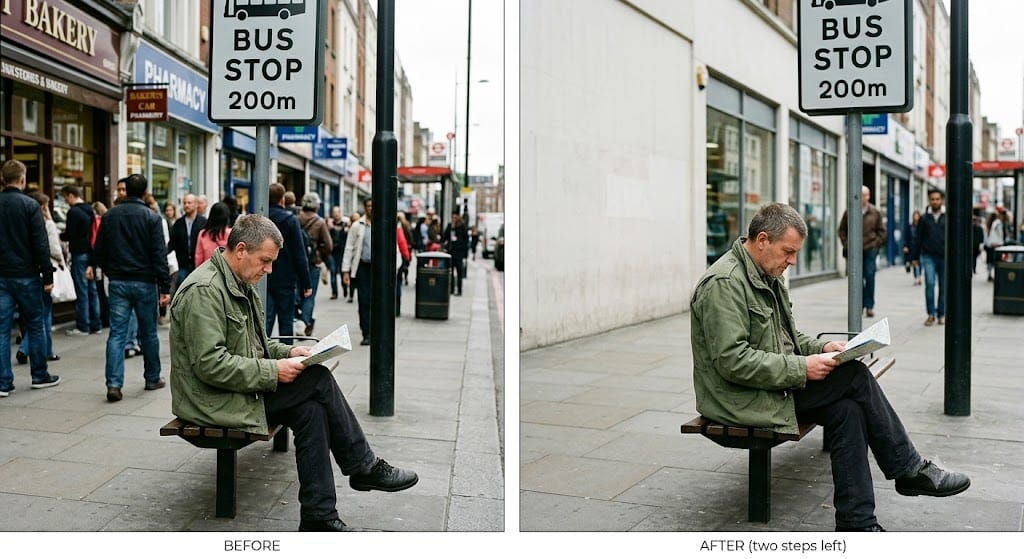
These problems often become obvious only when you review the image on a larger screen. Through the viewfinder, your attention naturally follows the subject, while distracting objects remain in your peripheral vision.
Before taking the photograph, make a quick check of the frame. Look at the edges, the background, and the areas of strong contrast. Ask yourself whether the brightest object is also the most important one. Check that the main subject has enough space around it and that nothing competes unnecessarily with the story.
For travel photography, this is especially important because you cannot always rearrange the scene. Moving one step to the side may remove a distracting object, change the background, or place a person against a darker wall. Waiting a few seconds may allow a passer-by to leave the frame.
A useful checklist is:
- What will the viewer notice first?
- Is anything distracting from the subject?
- Are the edges of the frame clean?
- Is the subject positioned effectively?
- Is the light helping or hurting the photograph?
- Does the photograph communicate what I intended?
Sometimes the strongest improvement comes not from changing the camera settings but from changing where you stand.
What Changes When You Change Shutter Speed?
Shutter speed is one of the most useful variables to practise in travel photography because it changes how movement is recorded.
Imagine photographing people walking through a sunlit square. Keep your position and composition as consistent as possible, then experiment with four shutter speeds.
1/1000 sec — Freeze the moment
People and gestures can appear crisp, making this useful for fleeting expressions, cyclists, and quick movement. Because the shutter is open briefly, you may need a wider aperture or higher ISO, especially in shade.
1/250 sec — Preserve everyday movement
This is a useful starting point for many street scenes. It can freeze ordinary walking movement in favourable circumstances, although faster subjects may still blur.
1/30 sec — Introduce movement
Walking people may show visible blur, especially if they move across the frame. This can suggest a busy, constantly changing place, but camera shake may also soften stationary details.
1 second — Emphasise the passage of time
Moving people can become streaks or partly disappear while stationary architecture remains visible if the camera is supported. This approach is better suited to deliberate long exposures than ordinary handheld snapshots.
These examples assume the other exposure settings are adjusted as needed. If you change shutter speed without changing aperture or ISO, brightness will change too. For a fair comparison of motion, compensate exposure where possible.
The purpose is not to find one perfect number. It is to understand what happens when you change the number.
Practical Camera Settings for Travel Photography
The following table offers useful starting points for common travel situations. The exact settings depend on the camera, lens, focal length, light, and intended result.
| Situation | Aperture | Shutter speed | ISO | Focus | Other setting | Main purpose |
|---|---|---|---|---|---|---|
| Daylight landscape | f/8–f/11 | 1/125–1/500 sec | 100–400 | Single AF or manual | Low ISO if light permits | Maintain depth of field |
| Historic architecture | f/5.6–f/8 | 1/125–1/250 sec | 100–800 | Single AF | Watch vertical lines | Preserve architectural detail |
| Street photography | f/4–f/8 | 1/250–1/500 sec | Auto ISO or 200–1600 | Continuous AF for moving subjects | Minimum shutter speed | Capture decisive moments |
| Travel portrait | f/2–f/5.6 | 1/250 sec or faster | Auto ISO or 100–1600 | Eye AF or single AF | Check the background | Emphasise the person |
| Night market | f/2–f/4 | 1/125–1/250 sec for moving people | 800–6400+ as needed | Continuous or single AF, depending on movement | RAW can help with editing | Balance movement and low light |
| Waterfall or flowing water | f/8–f/11 | 1/4 sec to several seconds for blur | 100–400 | Single AF or manual | Tripod and possibly an ND filter | Create smooth water |
| Museum or dim interior | f/2–f/4 | 1/60–1/250 sec, depending on movement | Auto ISO or 800–6400+ | Single or continuous AF as needed | Respect photography rules | Record indoor details |
These are starting points, not fixed rules.
A landscape with wind-blown foliage may require a faster shutter speed than a completely still scene. Architecture in dim light may benefit from a tripod and a slower exposure. A portrait of a moving child needs a faster shutter speed than a posed portrait.
ISO ranges also depend heavily on your camera. Some cameras produce very usable results at ISO 6400, while others show noticeable noise at much lower values. Review your own files rather than assuming that one ISO limit applies to every camera.
The most important decision is which part of the photograph must be protected. If movement matters, begin with shutter speed. If depth of field matters, begin with aperture. If the light is poor, determine which adjustments you can make without losing the effect you want.
If You Have Only One Lens
A general-purpose zoom lens is a practical travel companion because it allows you to photograph a variety of subjects without carrying several lenses.
Consider an 18–105mm zoom lens with a variable maximum aperture of approximately f/4–f/5.6, depending on the focal length and specific model. Such a lens can be useful for landscapes, architecture, street scenes, environmental portraits, and distant details.
At 18mm, you can include a broad section of a city street, a large building, or a landscape. However, a very wide composition can become cluttered if too many unrelated elements enter the frame. Move closer to the part of the scene that matters, and check whether the foreground strengthens the photograph.

At 50–105mm, you can isolate architectural details, compress elements in a distant landscape, or photograph people from farther away when appropriate. The narrower angle of view can help simplify a scene, although you may need to step back when space is limited.
The maximum aperture becomes more important in low light. If the lens cannot open beyond f/5.6 at the long end, you may need to increase ISO or choose a slower shutter speed. For moving subjects, raising ISO is often the more useful option because it helps maintain a shutter speed that reduces blur.
If you do not own a tripod, you can still photograph stationary subjects using a stable stance and good handholding technique. For landscapes, wait for better light when possible. For portraits, look for a window or doorway that provides enough illumination.
You do not need to make the same photograph as someone using specialist equipment. Find the photographs that your equipment allows you to make well.
What About the Photographer Who Is Just Starting?
If you are new to travel photography, do not begin by trying to master every setting at once. Start by understanding shutter speed and aperture, then learn how ISO helps you balance them when the light changes.
Aperture Priority mode, usually marked A or Av, is a useful starting point. You select the aperture to control depth of field, and the camera chooses a shutter speed. Auto ISO can help when you move between bright streets and shaded interiors, although you should check that the shutter speed remains suitable for your subject.
For your first few outings, try keeping the camera in Aperture Priority mode, using f/5.6 or f/8 for general scenes when the light permits, and allowing Auto ISO to respond to changing conditions. Review the shutter speed before photographing moving subjects. If it becomes too slow, increase ISO or open the aperture.
The most common mistake is assuming that a photograph is sharp simply because the camera focused somewhere. Zoom in on the important part of the image and check whether the subject is actually sharp. If it is not, determine whether the problem was missed focus, camera shake, subject movement, or insufficient depth of field.
Once you understand how these factors interact, move towards Manual mode when you want more direct control over exposure. There is no need to use Manual mode simply to prove that you understand photography. Use the mode that helps you respond confidently to the scene.
A Simple Exercise to Understand Travel Photography
You can complete this exercise with a phone that offers manual controls or with almost any camera. No specialist lens or expensive accessory is required.
Exercise: Photograph the same street in five different ways
- Find a street, market, courtyard, or public square where you can photograph safely and respectfully.
- Begin with a shutter speed of around 1/250 sec, an aperture around f/5.6 if available, and ISO adjusted for a good exposure.
- Take a photograph that shows the overall atmosphere of the place.
- Change the shutter speed to around 1/1000 sec and adjust aperture or ISO to maintain a similar exposure. Photograph a moving person or vehicle.
- Change the shutter speed to around 1/30 sec and photograph movement deliberately. Keep the camera steady and observe how the moving elements change.
- Take a portrait or detail photograph using a wider aperture if your lens allows it. Then take another at f/8, adjusting ISO or shutter speed to maintain a similar exposure.
- Compare the images on a larger screen and identify which technical and compositional decisions made the biggest difference.
Look for changes in sharpness, motion, background, exposure, noise, composition, mood, and subject separation.
Ask yourself which photograph communicates the atmosphere of the place most effectively. The sharpest image may not be the most interesting, and the photograph with the cleanest background may not tell the fullest story.
The goal is not to discover one perfect setting. The goal is to understand how your decisions change the photograph.
If You Remember Only Five Things
1. Start with the subject’s movement.
If you need to freeze a passing cyclist or capture an expression, choose a shutter speed that suits the action. A sharp background cannot rescue a photograph when the important subject is blurred unintentionally.
2. Use aperture to support the story.
A wider aperture can separate a person from a busy background, while f/8 or f/11 may help keep more of a landscape or architectural scene sharp. Choose according to what the photograph needs, not according to a fixed rule.
3. Do not be afraid of increasing ISO.
A higher ISO can introduce noise, but an unnecessarily slow shutter speed can destroy important detail. Choose the compromise that preserves the photograph’s essential qualities.
4. Read the light before changing everything else.
Bright sun, open shade, backlight, and night markets create different exposure challenges. Understanding the light helps you decide whether to change shutter speed, aperture, ISO, position, or timing.
5. Composition can solve problems that settings cannot.
Move to simplify the background, wait for a person to enter the right patch of light, or use a different focal length to isolate a detail. Many disappointing travel photographs are improved more by a change in position than by a technical adjustment.
The Best Travel Photographs Begin Before You Press the Shutter
Return to the old city street from the beginning. The cyclist is approaching, the shopkeeper is arranging flowers, and the sunlight is beginning to disappear from the upper floors. You could try to remember a recommended travel photography preset, but the scene has already changed since the last time you used your camera.
Instead, look at what is happening. If the cyclist is the main subject, choose a shutter speed that helps freeze the movement. If the architecture tells the story, allow more depth of field. If the light is fading, decide whether opening the aperture or raising ISO will preserve the result you want. Then consider whether your position gives the scene a clear composition.
This process becomes quicker with practice. You will begin to recognise familiar situations and know which settings are likely to work before lifting the camera. You will also learn when those familiar settings are no longer appropriate because the light, movement, or subject has changed.
Travel photography is not simply a record of the places you visit. It is a collection of decisions about what deserves attention, which moments are worth preserving, and how you want someone else to experience the place through your photographs.
The camera helps you translate those decisions into an image, but it cannot make the decisions for you.
Observation → Intention → Camera Decision → Photograph.
The best camera setting is not the one you memorised before leaving home. It is the one that makes sense for the place, the light, and the moment in front of you.
