

The Mystery of the Blurry Photograph
You have set your camera to 1/1000 second. The shutter speed is fast enough to freeze a running person, a jumping dog, or even a bird taking flight. You hold the camera carefully, press the shutter button, and review the photograph.
The result is disappointing.
The subject looks soft. The eyes are not sharp. Perhaps the background appears clearer than the person you intended to photograph. You take another picture, increase the shutter speed to 1/2000 second, and try again.
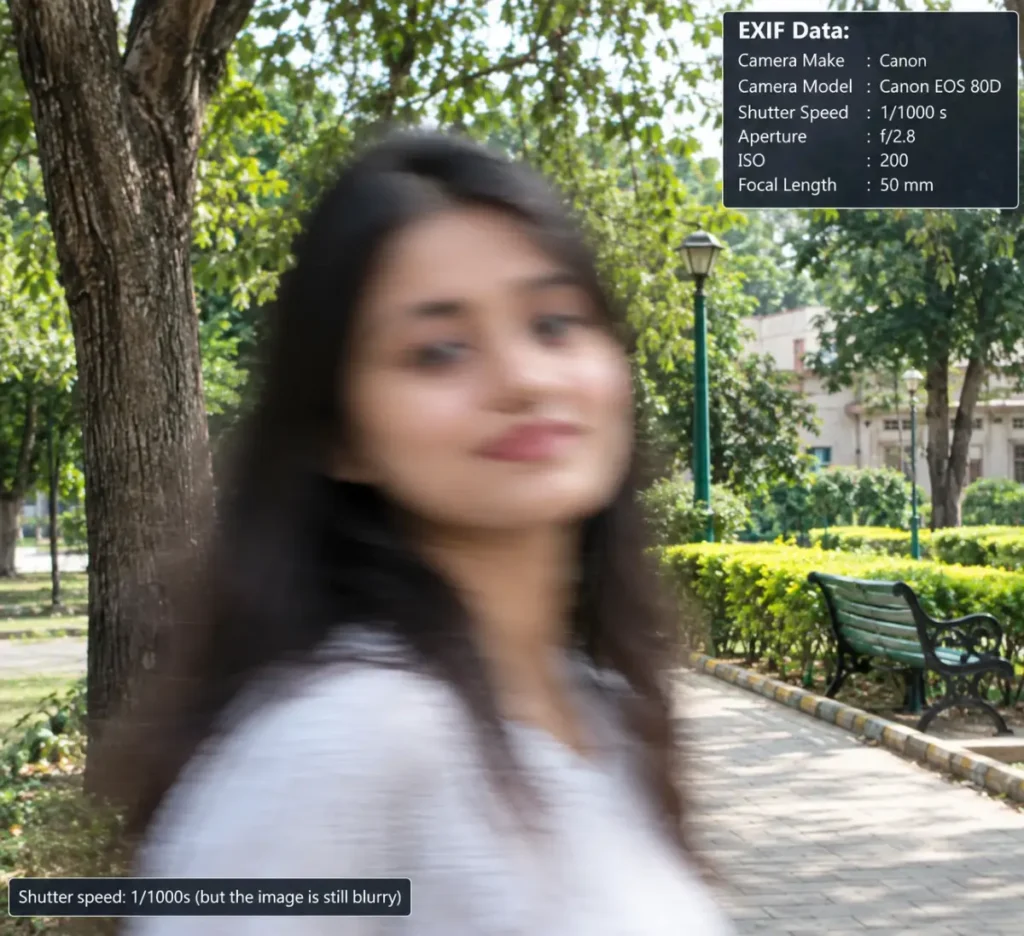
The photograph is still blurry.
What went wrong?
This is one of the most frustrating experiences for photographers, particularly those who have recently moved beyond automatic camera settings. The natural reaction is to assume that the shutter speed was not fast enough. However, a fast shutter speed cannot correct every cause of an unsharp photograph.
A fast shutter speed freezes movement during the exposure. It does not guarantee that your camera focused on the correct subject.
A photograph can be unsharp because the autofocus system selected the wrong object, the focus point was positioned incorrectly, the subject moved away from the focus plane, the depth of field was too shallow, or the camera and lens produced an optical result that was not as sharp as expected.
To understand these problems, we need to look beyond the shutter speed and examine how a camera actually focuses.
1. What Does a Fast Shutter Speed Actually Do?
Before discussing autofocus, it helps to understand what shutter speed controls.
The shutter determines how long the camera’s sensor is exposed to light. Depending on the camera, this may involve a mechanical shutter, an electronic shutter, or a combination of the two.
Consider three photographs of the same moving subject.
- At 1/30 second, a walking person may appear blurred because they move significantly during the exposure.
- At 1/250 second, the person’s movement may be rendered more sharply.
- At 1/1000 second, the movement may be frozen much more effectively.
These are illustrative examples, not universal settings. The required shutter speed depends on the subject’s speed, direction of movement, focal length, and how much motion you want to show.
However, there is an important distinction: freezing movement and focusing accurately are two different operations.
Imagine that you are photographing a bird sitting on a branch. Your camera focuses on the branch slightly behind the bird. You then use a shutter speed of 1/4000 second.
The exposure records the branch sharply because that is where the lens is focused. The bird remains out of focus, even though neither the bird nor the camera moved enough to produce noticeable motion blur.
Increasing the shutter speed will not solve the underlying problem.
The same principle applies to portraits. If your autofocus locks onto a person’s ear instead of their nearest eye, a fast shutter speed may freeze every movement perfectly while leaving the most important part of the photograph soft.
The four different problems photographers often call blur
| Type of problem | What happens | Will a faster shutter speed help? |
|---|---|---|
| Camera shake | The camera moves during exposure | Often, yes |
| Subject motion blur | The subject moves during exposure | Often, yes |
| Missed focus | The camera focuses at the wrong distance | No, not by itself |
| Insufficient depth of field | Some parts of the subject fall outside the acceptably sharp zone | No, not by itself |
There are also optical limitations, atmospheric effects, and processing issues that can make an image look soft. Identifying the actual cause is the first step toward fixing it.
2. How Autofocus Actually Works
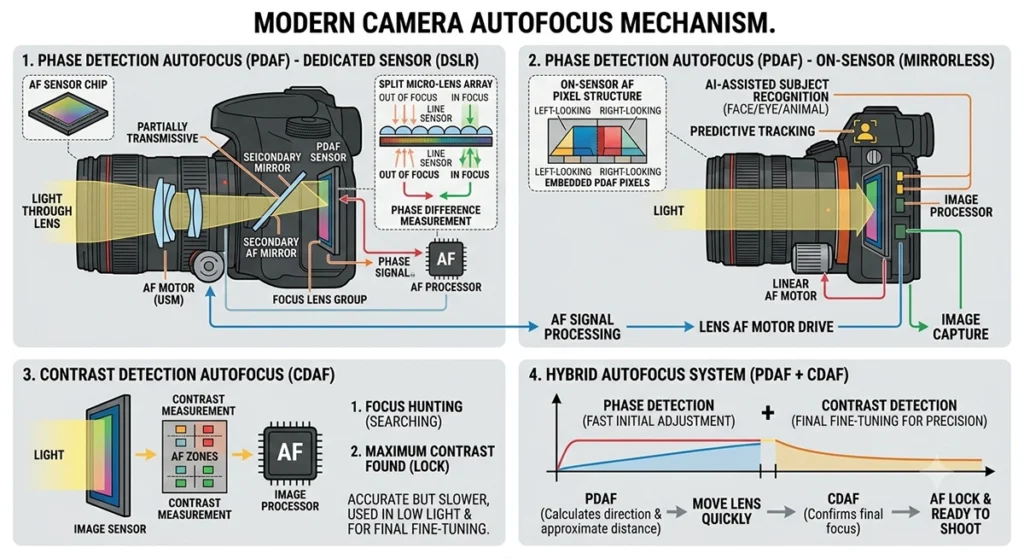
Autofocus is not simply a function that makes everything sharp. It is a system that estimates where the subject is, determines whether the lens needs to adjust, and attempts to place the desired subject within the camera’s focus range.
To understand why autofocus sometimes fails, imagine that your camera lens is looking at three objects:
- A flower 50 centimetres away.
- A person 3 metres away.
- A tree 15 metres away.
All three objects occupy the frame, but the camera cannot make all three distances perfectly sharp at the same time under every shooting condition.
The autofocus system must determine which object you want to photograph.
This involves two separate questions:
- Where should the camera focus? This is influenced by the selected focus point, autofocus area, subject detection, and photographer’s intention.
- How should the lens reach that focus distance? This is where the camera’s autofocus technology and lens motors come into play.
A camera may focus its lens accurately on the wrong object. That is not necessarily a failure of the lens motor; it may be a subject-selection problem.
Step 1: The camera receives information about the scene
The camera needs information about the subject’s distance or focus accuracy. Modern autofocus systems can obtain this information through different methods.
Phase-detection autofocus
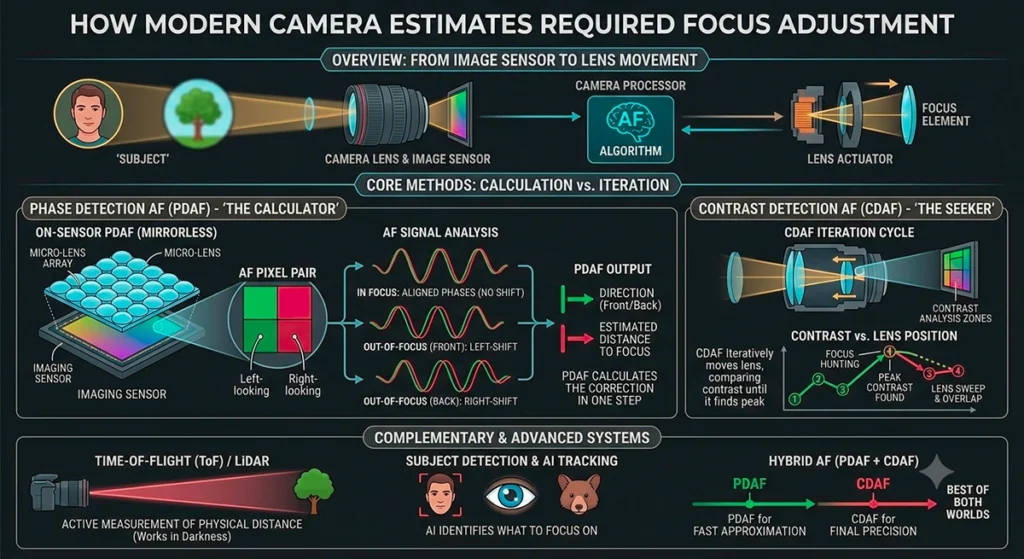
Phase detection compares light information from different positions in the optical system to determine the direction and approximate amount of defocus.
In simple terms, it can often tell the camera not only that the image is out of focus, but also which direction the lens needs to move.
This makes phase detection particularly useful for tracking moving subjects.
Many DSLRs use a dedicated phase-detection autofocus module when their optical viewfinder is being used. Most modern mirrorless cameras use phase-detection pixels or related phase-detection technology on the imaging sensor.
Contrast-detection autofocus
Contrast detection evaluates image contrast to find a position where detail appears most distinct.
The camera may move the lens, evaluate the result, and adjust again. This can be highly accurate in suitable conditions, but the process may be slower or less decisive when tracking fast-moving subjects.
Contrast-detection autofocus has been used extensively in compact cameras and older mirrorless systems. Some modern cameras combine contrast and phase detection.
Hybrid autofocus
Many modern cameras combine phase detection and contrast detection, along with subject-recognition algorithms.
Depending on the camera, these systems can detect and track eyes, faces, animals, vehicles, aircraft, or other subjects. The precise implementation varies by manufacturer and model, so not every camera offers the same autofocus capabilities.
Step 2: The camera estimates the required focus adjustment
Suppose you are photographing a person standing 4 meters away while the lens is focused at 2 meters. The camera’s autofocus system determines that the current focus is incorrect and instructs the lens to adjust. The lens motor moves the focusing elements until the camera estimates that the subject is in focus.
Different lenses use different motor designs, and their speed and precision can vary. A fast, accurate autofocus system depends on the camera, lens, available light, subject contrast, settings, and the demands of the scene.
Step 3: The camera evaluates focus
In a single-autofocus mode, the camera generally attempts to acquire focus and then reports or indicates that focus has been achieved.
Depending on the camera settings, the shutter may be prevented from releasing until focus is confirmed, or it may release even when focus has not been confirmed.
In continuous-autofocus mode, the camera repeatedly evaluates the subject’s position and adjusts focus as the subject moves.
This distinction becomes crucial when photographing moving people, sports, birds, or children.
Step 4: The shutter opens and the photograph is recorded
Once you press the shutter button fully, the camera makes the exposure according to your settings. At that point, the image records whatever focus accuracy the system has achieved at the relevant moment.
The camera cannot magically correct a missed focus point merely because the shutter speed is 1/2000 second.
It is also important to understand that autofocus does not always finish instantly when you half-press the shutter. Some cameras acquire focus quickly, while others may take longer in low light or with low-contrast subjects. Continuous autofocus continues updating, and the final focus may depend on the timing of the exposure.
3. What Happens When You Half-Press the Shutter Button?
For many beginners, half-pressing the shutter button is the first autofocus technique they learn.
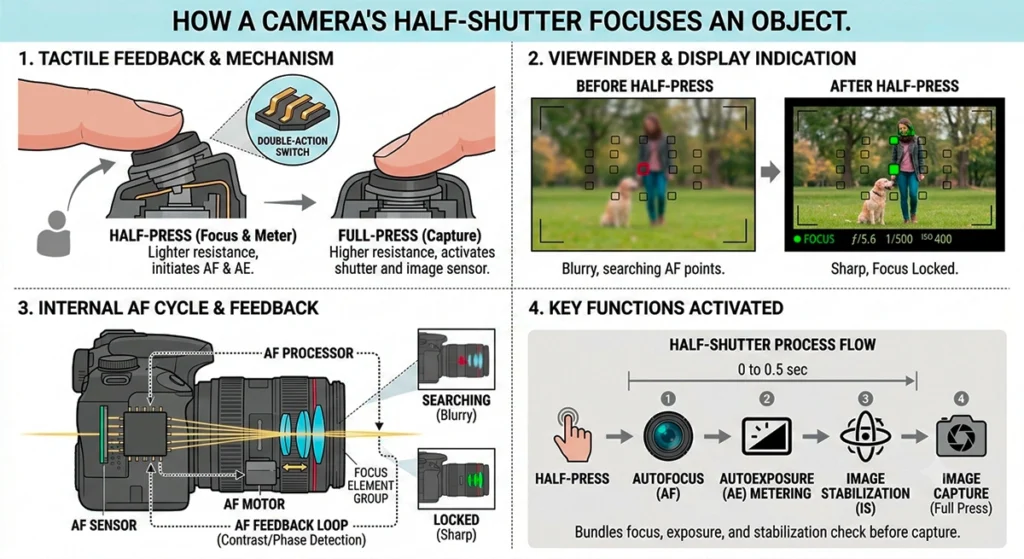
The button usually has two stages.
- Half-press: The camera may activate autofocus, meter the scene, and perform other configured functions.
- Full press: The camera takes the photograph, subject to the camera’s settings and release conditions.
On many cameras, half-pressing activates autofocus and holds focus in single-autofocus mode once focus is acquired. In continuous-autofocus mode, autofocus may continue operating while the button remains half-pressed.
The precise behaviour depends on the camera’s autofocus mode and custom settings.
A beginner example: Photographing a stationary flower
Imagine you are photographing a flower in your garden.
Your settings are:
- Shutter speed: 1/500 second.
- Aperture: f/2.8.
- ISO: 200.
- Autofocus mode: AF-S or One-Shot AF.
- Focus area: a single selected focus point.
You place the focus point over the flower’s central details and half-press the shutter button.
The camera activates autofocus. The lens adjusts until the selected detail is in focus, and the camera indicates focus confirmation.
You then press the button fully.
If the flower remains stationary, the camera has acquired focus correctly, and the selected area falls within sufficient depth of field, you should obtain a sharp result.
But consider a different situation.
You half-press the shutter button while the focus point rests on a leaf behind the flower. The camera confirms focus, and you take the picture.
The camera has done exactly what you asked it to do. The problem is that you selected the wrong detail.
Autofocus confirmation does not necessarily mean your intended subject is in focus. It means the camera has judged focus according to its active settings and selected target.
The danger of focus and recompose
A common beginner technique is to point the central focus point at a person’s eye, half-press the shutter, and then move the camera to improve the composition before taking the picture.
This is called focus and recompose.
It can work well in many situations, but it becomes less reliable at close distances and with shallow depth of field.
Imagine photographing a face at f/1.4. You focus on the eye and then rotate the camera to place the person toward the edge of the frame. That rotation changes the geometry between the camera, subject, and original focus plane.
The eye may no longer lie within the sharpest part of the image. The effect is particularly noticeable in close-up portraits because the depth of field is extremely shallow.
A better approach is often to select a focus point near the eye’s intended position or use a suitable eye-detection autofocus mode.
Focus and recompose remains useful when the camera has limited focus-point coverage or the subject is stationary, but it should not be treated as a universal solution.
4. What Is Back-Button Focus, and How Does AF-ON Work?
Back-button focus is a technique that separates autofocus activation from the shutter release.
Instead of using the shutter button to activate autofocus, you assign the autofocus-start function to a button on the back of the camera, commonly labelled AF-ON.
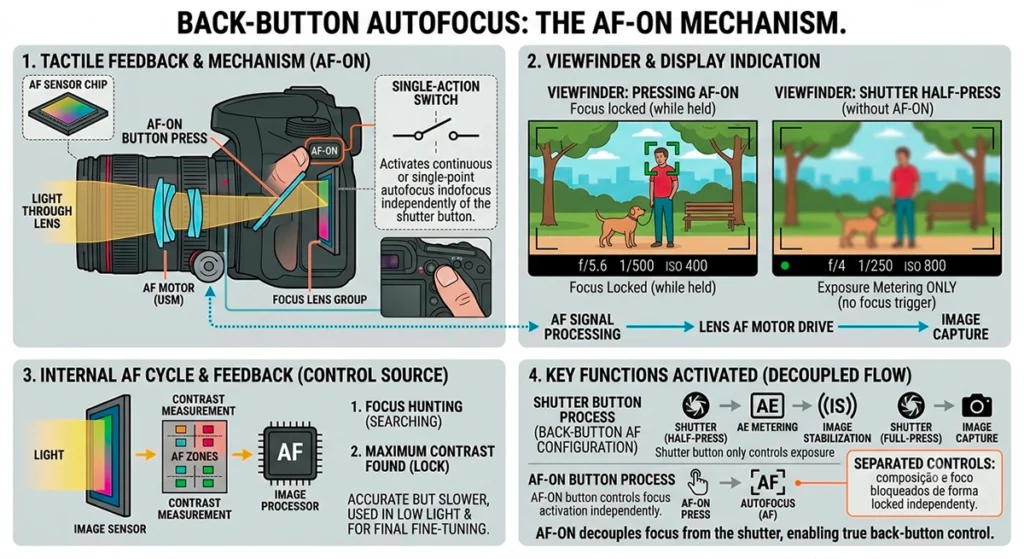
The shutter button can then be configured to take the photograph without automatically initiating autofocus.
This configuration is not identical on every camera. Some models require you to change the shutter-button autofocus setting or customise button functions. If you simply press AF-ON without changing the default shutter behaviour, the shutter button may still activate autofocus.
How the two systems differ
| Action | Shutter-button autofocus | Back-button focus |
|---|---|---|
| Activate autofocus | Half-press the shutter | Press AF-ON or the assigned rear button |
| Take the photograph | Fully press the shutter | Fully press the shutter |
| Keep tracking a moving subject | Hold half-press in continuous AF | Hold AF-ON in continuous AF |
| Separate focus from the shutter release | Usually not by default | Yes, when configured appropriately |
The essential difference is not that back-button focus is inherently more accurate. Both methods can use the same autofocus system.
The difference is control. Back-button focus allows you to decide when autofocus starts and when it stops without having to change your grip on the shutter button.
Example 1: Photographing a stationary subject
You are photographing a statue in a garden. You place the autofocus point over a detailed area and press AF-ON. The camera focuses on the statue.
You release AF-ON. If autofocus is configured to be controlled only by that button, the camera will not automatically refocus when you press the shutter release.

You can now take several photographs from the same position without repeatedly activating autofocus. This is useful when the camera and subject remain stationary and the composition does not change. However, if you move closer, move farther away, or change the composition in a way that alters the subject’s position relative to the focus plane, you may need to refocus.
Example 2: Photographing a running child
Imagine a child running toward you. You set the camera to continuous autofocus, often called AF-C or AI Servo, depending on the manufacturer.
You hold AF-ON to activate autofocus and track the child. The camera repeatedly updates the focus distance as the child approaches.

You press the shutter button fully when the child reaches an expressive moment.
As long as you continue holding AF-ON, the camera can continue tracking the child between exposures and while shooting a burst.
If you release AF-ON, autofocus stops updating under this configuration. The lens generally remains at its last focus position until autofocus is activated again or another operation changes it.
That can be useful when you deliberately want to stop refocusing, but it is a potential mistake if you release the button while the subject is still approaching.
Example 3: Photographing a bird on a branch
You photograph a bird sitting on a branch. The camera focuses on the bird’s eye. The bird remains still, so you release AF-ON and take several photographs. The camera does not need to reacquire focus for every frame, provided that the focus configuration is set up correctly and the relative positions remain unchanged.
Then the bird takes flight.
You immediately hold AF-ON again to activate continuous autofocus and track the bird as it moves. This technique can make it easier to move between stationary-subject and moving-subject situations without constantly switching autofocus behaviour.
Is back-button focus better than half-press autofocus?
Not automatically.
Back-button focus can be especially useful for wildlife, sports, events, and photographers who frequently switch between stationary and moving subjects.
Half-press autofocus is often simpler for beginners and can work extremely well for everyday photography.
The best method is the one that lets you activate, maintain, and release autofocus reliably without missing photographs.
Do not switch to back-button focus merely because professionals use it. Learn the underlying autofocus behaviour first, then decide whether separating the controls makes your workflow easier.
5. AF-S, AF-C, and Automatic Autofocus Modes
The autofocus mode determines how the camera behaves after autofocus begins. Different manufacturers use different names, but the core concepts are similar.
AF-S: Single autofocus
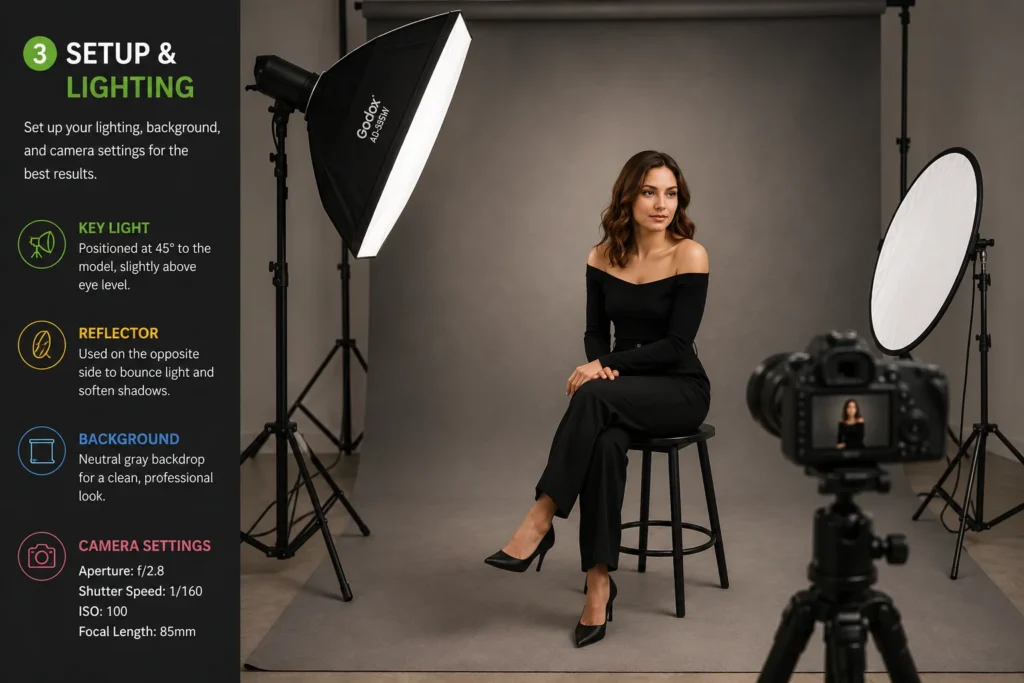
AF-S, also called One-Shot AF on many Canon cameras, is designed primarily for stationary subjects.
You activate autofocus, the camera attempts to focus, and focus generally remains locked while you maintain the relevant focus operation, unless the system or settings behave differently.
Useful subjects include:
- Landscapes.
- Buildings.
- Still-life arrangements.
- Stationary portraits.
- Flowers that are not moving significantly.
Example: You are photographing a building with a tripod. You select a focus point on a detailed architectural feature, acquire focus, and take the photograph. AF-S can be an appropriate choice because the building is not moving toward or away from you.
AF-C: Continuous autofocus
AF-C, also called AI Servo AF on many Canon cameras, is designed to keep adjusting focus while the subject moves.
The camera repeatedly estimates the subject’s distance and drives the lens to maintain focus.

Useful subjects include:
- Sports.
- Wildlife.
- Running children.
- Moving vehicles.
- Walking subjects.
- Birds in flight.
Example: You photograph a footballer running toward you. If you use single autofocus, the camera may focus correctly at the start but the player may move closer before the exposure. Continuous autofocus is better suited to updating the focus distance as the player approaches.
AF-A or automatic subject-dependent modes
Some cameras offer an automatic mode that attempts to decide whether the subject is stationary or moving and adjust autofocus behaviour accordingly.
The convenience is appealing, but the camera may not always interpret your intentions correctly. For unpredictable movement, choosing continuous autofocus yourself often gives you more control.
A useful rule
- If the subject is stationary, begin with single autofocus.
- If the subject may move unpredictably, begin with continuous autofocus.
- If your camera offers subject detection, test it with the actual type of subject you photograph. Face, eye, and animal detection can be extremely useful, but detection performance depends on the model, subject, lighting, and how clearly the subject is visible.
6. Why Your Photos Look Blurry Even at 1/1000 Second
Now we can investigate the main problem: why a photograph may look unsharp even when the shutter speed seems fast enough.

Cause 1: Your camera focused on the wrong subject
This is one of the most common reasons for a photograph that looks sharp in the wrong place.
Imagine photographing a person standing in front of a wall covered with posters. Your autofocus area is relatively large, and the camera selects a high-contrast poster behind the person.
You take the photograph at 1/2000 second. The poster is sharp. The person’s face is soft.
Your shutter speed did its job. Your autofocus system also found a subject it could focus on. The problem was subject selection.
How to fix it:
- Select a smaller autofocus area when appropriate.
- Position the focus point over the important part of the subject.
- Use eye detection for portraits when your camera supports it.
- Check the playback image at magnification rather than judging sharpness from the full-frame thumbnail.
For a stationary subject, a single point can give you precise control. For a moving subject, a tracking area or suitable subject-detection mode may be more effective.
Do not assume that a larger autofocus area is always better. A large area can help the camera track movement, but it may also give the camera more opportunities to select an unintended object.
Cause 2: Your subject moved after focus was acquired
This problem often appears when photographers use single autofocus to photograph moving subjects. Suppose you photograph a dancer at 1/1000 second. You focus when the dancer is 4 meters away, but the dancer moves toward you before the shutter opens.
The photograph may be unsharp because the subject is no longer at the distance where the lens was focused. The exposure might be short enough to freeze the dancer’s movement, yet the focus distance may still be incorrect.
This is where continuous autofocus becomes important.
How to fix it:
- Use AF-C or the equivalent continuous autofocus mode.
- Keep the autofocus area over the subject.
- Begin tracking before the critical moment.
- Use a burst when the action is unpredictable.
- Practise maintaining consistent subject coverage instead of moving the focus point erratically.
Continuous autofocus improves your chances of success, but it cannot guarantee perfect focus on every frame. Rapid changes in movement, obstructions, poor light, and the camera’s tracking limitations can still cause missed shots.
Cause 3: Your depth of field is too shallow
Depth of field is the range around the focus distance that appears acceptably sharp in the photograph. It is influenced primarily by aperture, focusing distance, focal length, and the viewing conditions used to judge sharpness. At f/1.4, a portrait taken from close range may have very little depth of field. The nearest eye can be sharp while the far eye, nose, or ears look softer.
This may be intentional. However, it can also make a technically accurate focus result look like an autofocus failure.
Consider this example:
You photograph a person’s face at f/1.4, focusing accurately on the nearest eye. When you examine the image, the eye is sharp but the ears are not.
The autofocus may have worked perfectly.
If you want both eyes to appear sharper, consider moving slightly farther away, using a narrower aperture such as f/2.8 or f/4, or positioning the face so that both eyes lie closer to the same focus plane.
The exact aperture required depends on the distance, focal length, sensor format, and desired appearance.
Remember that a smaller aperture reduces the amount of light reaching the sensor. You may need a slower shutter speed or a higher ISO to maintain the exposure.
Cause 4: You are using focus and recompose at a shallow depth of field
You focus on a subject using the centre focus point, then rotate the camera to compose the image. At f/8, the change may not be noticeable. At f/1.4, especially at close range, it can be significant.
This happens because the original focus plane changes relative to the subject when you rotate the camera.
For critical portraits, macro photography, and other shallow-depth-of-field situations, select an appropriate focus point or use subject detection rather than relying on focus and recompose.
Cause 5: Your autofocus area is not appropriate for the subject
A camera may offer several autofocus area options:
- Single-point autofocus.
- Expanded or surrounding-point autofocus.
- Zone autofocus.
- Wide-area autofocus.
- Subject-tracking autofocus.
- Face and eye detection.
The exact names vary by manufacturer.
Imagine photographing a small bird against a busy background. A large autofocus zone may select a branch, leaf, or another high-contrast object instead of the bird.
A smaller area or animal-detection mode may help you target the bird more precisely.
Now imagine photographing a football match. A single autofocus point may be difficult to keep on a rapidly moving player. A tracking area may be more practical.
The objective is not to find one autofocus area that works for every subject. It is to select an area suited to the size, movement, and surroundings of the subject.
Cause 6: The light is poor or the subject lacks contrast
Autofocus systems need usable information to identify and focus on a subject. A black bird against a dark background, a white wall with no detail, or a face in extremely low light can be challenging. Even a camera with advanced autofocus may struggle when the scene provides little contrast.
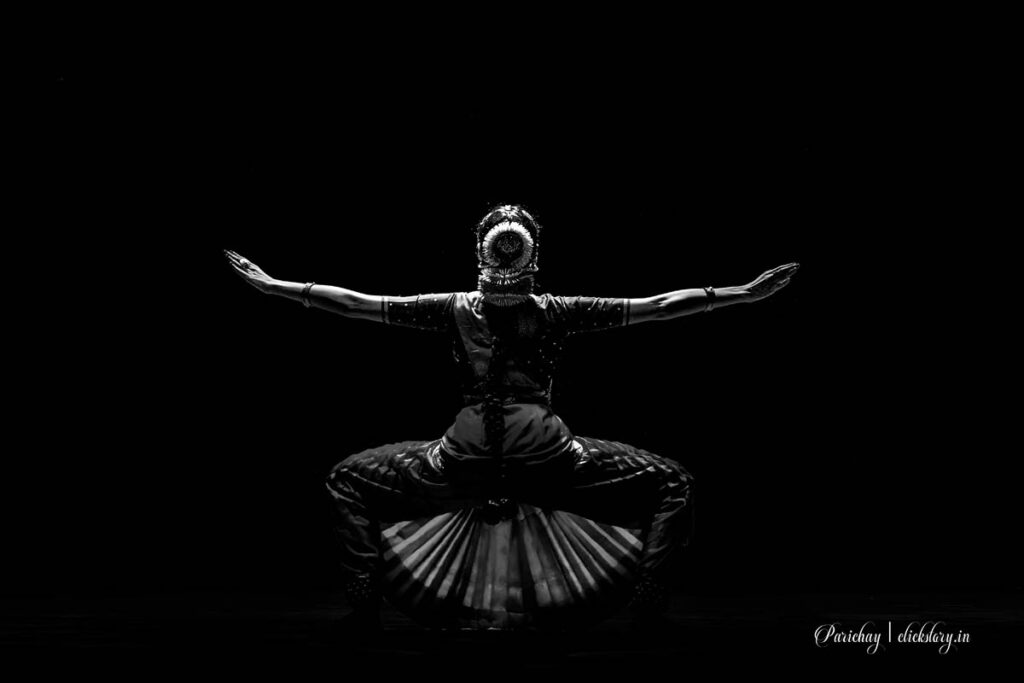
In low light, the lens may move back and forth as the camera searches for a focus position. This behaviour is commonly called focus hunting.
Try these solutions:
- Focus on a detailed edge within the subject.
- Use an autofocus-assist function if your camera and shooting conditions permit it.
- Select an autofocus area suited to the available detail.
- Add light when practical.
- Use manual focus when autofocus cannot acquire the desired subject reliably.
For critical static subjects, manual focus with magnified live view can be useful. For moving subjects, however, manual focusing requires practice and may be less practical than continuous autofocus.
Cause 7: Your camera is moving even at a fast shutter speed
A shutter speed of 1/1000 second greatly reduces the effect of ordinary hand movement, but it does not make camera shake impossible.
Long telephoto lenses magnify small angular movements. High-resolution sensors can also reveal softness that may be less obvious in a smaller image.
Camera shake may remain visible when:
- You are using a very long focal length.
- You are photographing from an unstable position.
- You are using a heavy lens without adequate support.
- Your technique introduces significant movement.
- You are working at extreme magnification.
Image stabilisation can help reduce blur caused by camera movement. However, stabilisation does not freeze a moving subject, and its effectiveness varies by system and shooting conditions.
For example, a stabilised 200 mm lens may help you photograph a stationary building handheld. It will not necessarily freeze a bird flying across the frame.
Cause 8: Your lens or optical setup is limiting sharpness
Not every soft photograph is caused by autofocus.
Some lenses are softer at particular apertures or focal lengths. An inexpensive filter may reduce contrast or introduce reflections. A dirty lens element, condensation, or a poorly seated accessory can also degrade the image.
Very small apertures, such as f/22, introduce diffraction that reduces fine-detail contrast. This is a physical optical effect, not a focusing error.
A lens may also need service or adjustment if you consistently observe front-focus or back-focus errors in particular DSLR phase-detection configurations. On-sensor mirrorless autofocus often avoids the traditional separate-sensor calibration mismatch, although lens, camera, or tracking problems can still occur.
To separate an optical problem from an autofocus problem, photograph a detailed stationary subject in good light using a stable support. Compare results at several apertures and focal lengths.
If the same part of the image consistently looks soft despite accurate focus, investigate the lens and optical setup.
Cause 9: You are confusing noise with blur
At high ISO, digital noise can make an image look rough, mottled, or lacking in fine detail. Aggressive noise reduction can also smear small details, especially feathers, hair, foliage, and skin texture. These problems may be mistaken for missed focus.
Inspect the photograph carefully. If edges are displaced or doubled, movement may be responsible. If one distance plane is sharp while another is soft, focus or depth of field may be the issue. If the image looks uniformly waxy or grainy, image quality and processing may be contributing.
7. The Relationship Between Shutter Speed, Aperture, and ISO
When a photograph is blurry, photographers sometimes change several settings at once. That makes it difficult to identify what actually improved the result.
A better approach is to understand what each setting controls.
| Setting | Primary role | Common mistake |
|---|---|---|
| Shutter speed | Controls exposure duration and motion rendering | Increasing it to fix missed focus |
| Aperture | Controls light, depth of field, and diffraction effects | Using an extremely wide aperture for a group portrait |
| ISO | Adjusts the sensor’s amplification or output sensitivity setting | Avoiding higher ISO at the cost of motion blur |
| Autofocus mode | Determines how focus is acquired and updated | Using single AF for a subject moving toward the camera |
| Focus area | Influences which part of the scene the camera targets | Letting the camera choose the background |
Consider photographing a moving child indoors.
You might choose 1/500 second, f/2.8, and ISO 3200 rather than 1/125 second, f/2.8, and ISO 800.
The higher ISO may produce more visible noise, but the faster shutter speed may reduce motion blur.
The best exposure is not necessarily the one with the lowest ISO. It is the one that balances motion rendering, depth of field, image quality, and the light available.
For a static landscape on a tripod, the priorities may be entirely different.
8. How to Diagnose Blur by Examining the Photograph
Experienced photographers do not simply increase shutter speed whenever an image looks soft. They inspect the pattern of blur to identify its likely cause.
Pattern A: The background is sharp, but the subject is blurry
This often indicates that the camera focused on the wrong distance.
Example: You photograph a person against a brick wall. The brickwork is sharp, but the person’s eyes are soft.
Investigate the autofocus area, focus-point placement, and subject detection settings.
Pattern B: The subject has directional streaks
This suggests movement during the exposure.
Example: A runner’s arm has a streak trailing behind it, while the stationary surroundings remain sharp.
Try a faster shutter speed if you want to freeze the movement. If you want a deliberate sense of motion, the streak may be desirable.
Pattern C: The eye is sharp, but the ear is soft
This may indicate shallow depth of field rather than an autofocus failure.
Try a narrower aperture or adjust the subject’s position relative to the camera.
Pattern D: Everything appears slightly doubled or smeared
Camera movement, subject movement, or a combination of the two may be responsible.
Use a more stable shooting position, increase the shutter speed when appropriate, and check stabilisation settings.
Pattern E: The whole image looks soft despite accurate focus
Investigate lens performance, diffraction, atmospheric distortion, motion, filters, image processing, and the conditions under which the image was viewed.
A single photograph may not provide enough evidence to identify the cause. Repeating a controlled test is often more informative.
9. A Practical Autofocus Setup for Beginners
If you are learning photography, avoid changing every autofocus setting simultaneously.
Begin with a simple setup.
For a stationary subject:
- Autofocus mode: AF-S or One-Shot AF.
- Focus area: single point.
- Focus target: a detailed, important part of the subject.
- Shutter speed: sufficiently fast for your focal length and any subject movement.
- Aperture: enough depth of field for the subject.
For a moving subject:
- Autofocus mode: AF-C or AI Servo AF.
- Focus area: tracking, zone, or another area suitable for the subject.
- Subject detection: enable the relevant option if it works well with your camera and subject.
- Shutter speed: choose it according to the speed and direction of movement.
- Drive mode: use continuous shooting when a sequence of frames is useful.
Take a series of photographs and review the results at high magnification. Look at the intended focus target, not merely the overall composition.
The purpose of this exercise is to learn how your camera behaves, not to memorise a universal set of settings.
10. Intermediate Technique: Use AF-ON with Continuous Autofocus
Once you understand the difference between single and continuous autofocus, try separating autofocus from the shutter release.
First, consult your camera manual to find the custom control settings. Assign autofocus activation to AF-ON or another suitable rear button, then disable shutter-button autofocus if your camera allows it.
Set autofocus to AF-C.
Now practise three actions:
- Press and hold AF-ON to acquire and track the subject.
- Press the shutter button to take a photograph without interrupting the AF-ON operation.
- Release AF-ON when you deliberately want autofocus to stop updating.
Practise with a person walking toward you.
Begin tracking when the person is relatively far away. Continue holding AF-ON as the person approaches, and take several photographs at different distances.
Then repeat the exercise using half-press autofocus.
Compare the two methods. Which makes it easier to keep the subject sharp? Which feels more natural? Do you accidentally release autofocus when your attention shifts to composition?
The best method is the one you can operate consistently under pressure.
11. Advanced Technique: Understanding Autofocus Tracking
For experienced photographers, autofocus is not just about acquiring focus. It is about predicting and following a subject whose distance or position may change.
A modern tracking system can use information about movement, subject appearance, and the selected tracking area. Some systems can recognise a person or animal and attempt to maintain focus on a specific feature.
However, tracking is not flawless. A bird may pass behind a branch. A footballer may disappear into a group of players. A cyclist may move from bright sunlight into a dark background.
When the subject becomes obscured, the camera may lose it or switch to another target.
Professional photographers improve their results by anticipating these situations.
Use the appropriate tracking sensitivity
Some cameras allow photographers to adjust how readily autofocus responds when an obstacle appears or how quickly it changes focus as subject distance changes.
These controls have different names and behaviours across camera systems.
For a football match with players frequently crossing one another, you may want the camera to resist immediately abandoning the selected subject when another player briefly passes in front.
For a subject whose distance changes abruptly, a more responsive setting may be appropriate.
Do not assume that the most responsive setting is always best. The right configuration depends on the sport, subject behaviour, and camera.
Choose an autofocus area that matches the subject’s movement
A bird flying across a clear sky may be easy to keep within a relatively broad area.
The same bird flying through dense branches presents a different problem. A broad area may encourage the camera to focus on foreground obstructions.
The practical lesson is to change the autofocus area when the shooting environment changes.
Understand focus priority and release priority
Some cameras allow you to prioritise focus confirmation or shutter release in continuous autofocus. With focus priority, the camera may delay or restrict release when it judges focus is not sufficiently confirmed. With release priority, it may take the photograph more readily, even when focus is uncertain. These choices involve a trade-off.
For a critical portrait, you may prefer to maximise the likelihood of a sharp eye. During an unpredictable sporting moment, you may prefer to capture the decisive action rather than risk the camera delaying the exposure.
Neither option guarantees a perfect result. Learn how your camera behaves before an important shoot.
12. Professional Example: Photographing Birds in Flight
Bird photography combines nearly every autofocus challenge: unpredictable movement, small subjects, changing distances, complex backgrounds, and demanding timing.
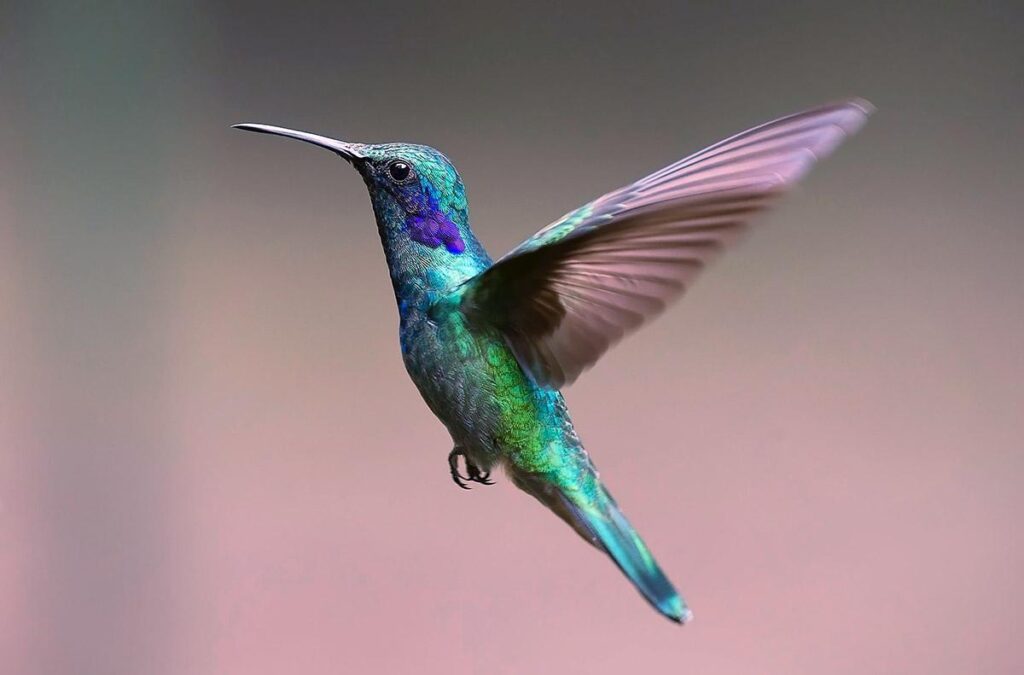
Imagine photographing a bird flying toward you. A possible starting setup might be:
- Autofocus: AF-C.
- Shutter speed: around 1/2000 second or faster, depending on the bird’s movement and desired result.
- Aperture: a relatively wide setting, such as f/4 or f/5.6 if your lens permits it and depth of field is sufficient.
- ISO: Auto ISO within a range that gives you usable image quality.
- Autofocus area: tracking or an area suited to the bird’s size and background.
- Subject detection: animal or bird detection if supported and reliable.
- Drive mode: continuous shooting.
These settings are a starting point, not a formula.
A large bird gliding steadily may be photographed sharply at a slower shutter speed. A small bird flapping rapidly may require a much faster one. The lens’s maximum aperture, light, and desired depth of field also influence the result.
Start tracking before the bird reaches the ideal composition. Keep the autofocus area on the bird and maintain a smooth camera movement.
If the camera repeatedly focuses on the background, examine the autofocus area and tracking behaviour before simply increasing shutter speed.
When the bird is stationary, you may use a different focus strategy. Back-button focus can make it convenient to stop continuous autofocus and take several frames without immediately refocusing, provided the bird and camera remain in the same relative positions.
13. Professional Example: Portrait Photography at f/1.4
Portrait photography presents the opposite challenge: the subject may be almost stationary, but the depth of field can be extremely shallow.
Imagine photographing a person using an 85 mm lens at f/1.4. Your shutter speed is 1/1000 second, so camera shake is unlikely to be the main issue. Yet the photograph is soft.
First, inspect the eye closest to the camera.
If the eyelashes are sharp but the far eye is soft, autofocus may have succeeded and the depth of field may simply be insufficient to keep both eyes acceptably sharp.

If the ear is sharp but the eyes are not, you may have missed the intended focus target.
If the entire face appears smeared, investigate movement, image processing, and optical performance.
For a person who is holding still, AF-S with a carefully selected focus point may work well. For someone who is walking, turning, or moving unpredictably, AF-C with eye detection can be more useful.
For group portraits, consider stopping down to f/4, f/5.6, or another suitable aperture, depending on the arrangement and distance. The aim is to keep the relevant faces within sufficient depth of field.
14. A Controlled Test to Find Your Camera’s Autofocus Weakness
You can learn more from a carefully controlled experiment than from dozens of random photographs.
Test 1: Stationary subject
Place a detailed object on a table in good light. Position another object slightly behind it.
Use a tripod or stable support and photograph the front object using a single focus point.
Check whether the selected detail is sharp.
Repeat the test several times. If the camera consistently focuses on the background, investigate focus-point placement and autofocus behaviour.
Test 2: Half-press versus AF-ON
Configure back-button focus correctly, including disabling shutter-button autofocus if required.
Photograph the same stationary object with both methods.
Keep the focus area, lens, aperture, shutter speed, and position the same.
Compare the results.
If both methods produce similarly sharp images, that is expected: the technique itself does not automatically improve autofocus accuracy.
Test 3: Moving subject
Ask someone to walk slowly toward you.
Photograph a sequence using single autofocus, then repeat with continuous autofocus.
Keep your framing and other settings as consistent as possible.
Review the images to see how well each mode maintains focus as the distance changes.
Test 4: Depth of field
Photograph a stationary face at f/1.8 and then at f/5.6, adjusting shutter speed or ISO to maintain appropriate exposure.
Compare the eyes, nose, and ears.
You should see that the narrower aperture generally provides greater depth of field, although the exact result depends on your shooting distance and composition.
Test 5: Shutter speed
Photograph a moving subject at 1/125, 1/500, and 1/2000 second, using exposure adjustments where necessary.
Keep autofocus mode and focus area consistent.
Compare the motion rendering. If the subject is sharp in some frames but not others, examine both movement and focus accuracy rather than attributing every difference to shutter speed alone.
15. Common Autofocus Mistakes to Avoid
Even advanced photographers occasionally make these mistakes.
Mistake 1: Using AF-S for every subject. Single autofocus can be excellent for stationary subjects but may not update focus when the subject moves.
Mistake 2: Assuming eye detection cannot fail. Eye detection can select the wrong eye, lose the subject, or struggle when the face is obscured.
Mistake 3: Using the widest aperture automatically. A wide aperture can create beautiful separation, but it also reduces depth of field.
Mistake 4: Changing too many settings at once. If you change shutter speed, aperture, autofocus mode, focus area, and tracking sensitivity simultaneously, you may not know which adjustment helped.
Mistake 5: Assuming back-button focus is inherently sharper. It changes the way you control autofocus, not the fundamental optical capabilities of the camera.
Mistake 6: Judging sharpness only from the camera’s rear screen. A small preview may hide missed focus. Inspect the intended detail at magnification when critical sharpness matters.
Mistake 7: Ignoring the lens. A focusing problem may actually be an optical limitation, dirty element, unsuitable filter, or lens fault.
Conclusion: Sharp Photography Begins With Understanding Focus
A fast shutter speed is an important tool, but it solves only part of the problem of photographic sharpness.
To produce consistently sharp photographs, you need to understand what is moving, where the camera is focusing, how much depth of field you have, and whether the autofocus system is keeping up with the subject.
Start by identifying the type of blur. Learn how half-press autofocus works, understand the difference between AF-S and AF-C, and practise selecting the correct focus area.
When you are comfortable with these fundamentals, experiment with AF-ON and back-button focus. They can give you greater control over when autofocus starts and stops, particularly when photographing unpredictable subjects.
Finally, review your images carefully. A sharp background and blurry face suggest a different problem from a sharp eye and soft ear. Learning to recognise these differences is what turns trial and error into deliberate photographic technique.
The next time your photograph looks blurry at 1/1000 second, resist the temptation to increase the shutter speed immediately.
Ask yourself three questions:
- Did the camera focus on the correct subject?
- Was the subject in the sharpest part of the depth of field when the exposure was made?
- Is the softness caused by movement, focus, optics, or image processing?
Those questions will often lead you to a better photograph much faster than changing settings at random.
