

A Tiny Subject Can Make Every Camera Setting More Difficult
It is early morning, and a small spider has settled on a garden leaf. Dew covers its legs, tiny droplets cling to the web, and the soft light gives the scene a delicate appearance. You bring your camera closer, hoping to capture the fine hairs on its body and the reflections inside the droplets.
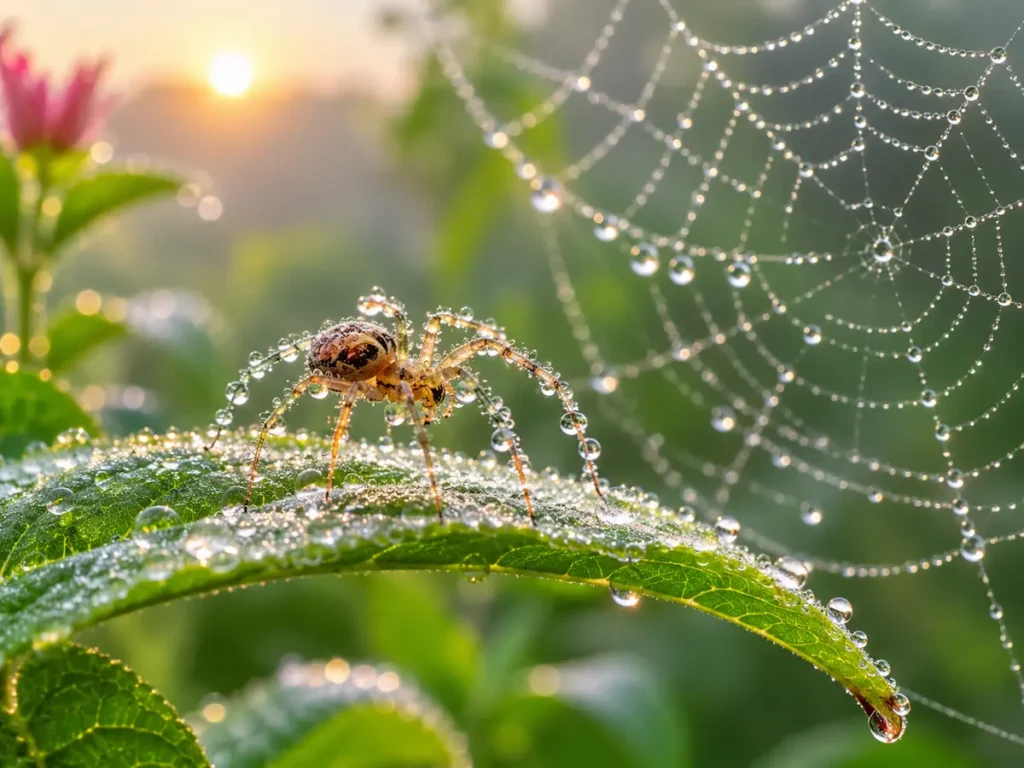
The photograph looks promising on the camera screen, but when you zoom in, the spider’s eye is sharp while most of its head appears soft. You close the aperture to f/11, hoping to bring more detail into focus. The next image has greater depth of field, but it is darker and requires a slower shutter speed. A slight breeze moves the leaf, and the photograph becomes blurred.
You begin to wonder: what are the best camera settings for macro photography?
The difficulty is that close-up photography changes the relationship between the camera, the subject, and the available depth of field. At high magnification, even a small movement can shift the plane of focus away from the detail you want to preserve. Increasing depth of field may require a smaller aperture, but that reduces the light reaching the sensor. Raising ISO can help, yet excessive noise may hide some of the fine texture you wanted to record.
There is no single combination that solves every macro situation. A motionless flower, a moving insect, a water droplet, and a textured object each create different demands.
The best camera settings for macro photography depend on which details you want to reveal, how much of the subject must remain sharp, and how much movement the photograph can tolerate.
Once you understand these relationships, macro photography becomes less about memorizing numbers and more about making deliberate decisions.
The Question Photographers Keep Asking
“What are the best camera settings for macro photography?”
It is a natural question because macro photography can be unforgiving. A photograph that looks sharp at normal viewing size may reveal missed focus when enlarged. A tiny change in camera position can alter the composition, and a lens that works beautifully for ordinary subjects may behave differently at close focusing distances.
Many photographers begin with a familiar recommendation: use f/8 or f/11, keep ISO low, and choose a shutter speed that prevents camera shake. That is a reasonable starting point for some subjects, but it does not account for everything.
Magnification also matters. At greater magnification, depth of field becomes extremely shallow, and effective aperture can differ from the nominal aperture displayed by the camera. The amount of light reaching the sensor may decrease as you focus closer, depending on the lens and camera system.
Instead of asking only which numbers are best, ask:
“What does this particular photograph require from my camera?”
That question helps you decide whether to prioritize sharpness, movement, depth of field, background separation, or a particular visual detail.
The First Decision Is Not on Your Camera
Before choosing your aperture or shutter speed, observe the subject.
Start by identifying the detail that makes the subject interesting. Is it the texture of a petal, the structure of an insect’s eye, the pattern on a butterfly’s wing, or the reflection inside a water droplet? If you do not know which detail matters most, it becomes difficult to decide where the focus should fall.
Next, consider movement. A flower may appear stationary, but its petals can move in a light breeze. An insect may pause briefly before walking away, and a spider may move whenever the web vibrates. Even your own breathing or the pressure of a finger on the shutter button can disturb a close-up composition.
Then examine the available light. Bright sunlight can help you use a faster shutter speed, but it may produce harsh shadows and bright reflections. Shade creates softer light but can make it difficult to maintain both a small aperture and a fast shutter speed.
Finally, decide how much of the subject needs to be sharp. Do you want one eye in focus with a soft background? Do you need the entire insect’s face to appear detailed? Or are you photographing a small object for documentation, where more of its surface should be clearly visible?
These observations should guide your settings. A photograph of one sharply rendered detail may be more successful than an image with greater overall sharpness but no clear point of interest.
When You Find Yourself in This Situation
Imagine that you are photographing a butterfly resting on a flower in the early morning. You are using a camera with an ordinary zoom lens and a dedicated close-up filter, or a macro lens if one is available. The butterfly is relatively still, but its wings move slightly as the breeze passes.
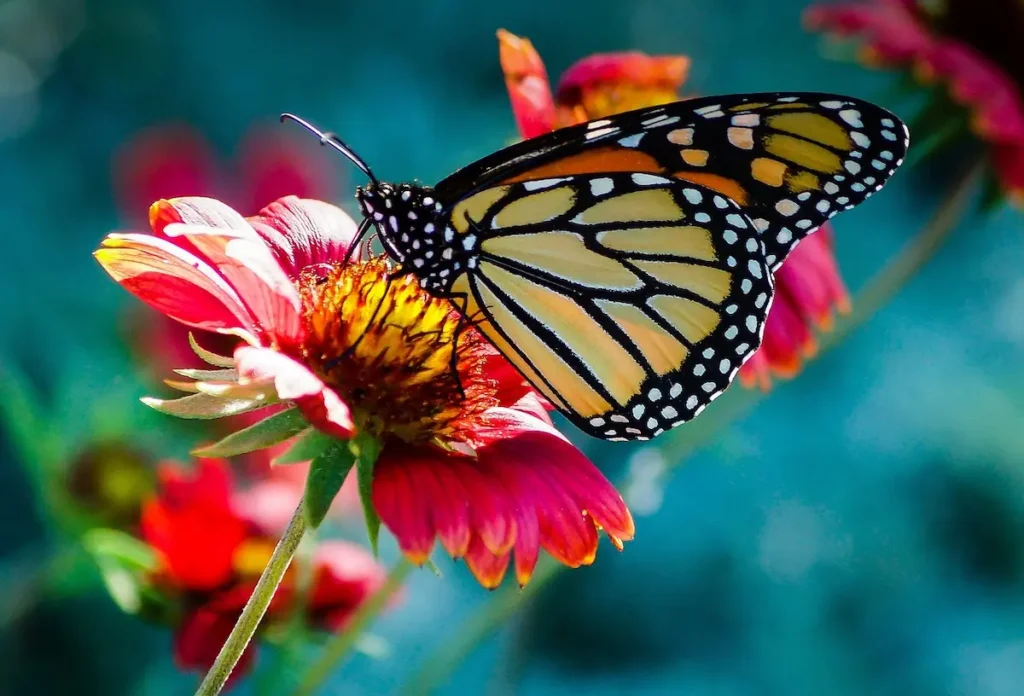
You begin at f/8, 1/125 second, and ISO 400. The body looks reasonably sharp, but the photograph reveals slight movement around the wing edges. You consider closing the aperture to f/16 to bring more of the butterfly into focus.
The problem is that f/16 allows less light through the lens than f/8. If you keep ISO at 400, you may need to slow the shutter speed, which increases the risk of movement blur. At close focusing distances, f/16 can also produce some diffraction softness, depending on the camera and magnification. A smaller aperture does not guarantee a sharper final photograph.
A more useful approach is to decide which problem matters most. If movement is the main issue, try 1/250 or 1/500 second and raise ISO as needed. If the butterfly is completely still, f/8 or f/11 may provide a useful balance between depth of field and light. If the subject’s head is sharp but the wings are not, changing your shooting angle so that more of the butterfly lies parallel to the sensor may improve the result without requiring a smaller aperture.
You could also wait for the butterfly to settle, choose a moment when the breeze drops, or take several photographs with slightly different focus positions. Each option solves a different part of the problem.
The lesson is not that one setting is correct. It is that every adjustment has a cost, and the best decision is the one that protects the detail that matters most.
Understanding the Settings That Matter Most
Shutter Speed: Protecting Detail from Movement
Shutter speed controls how long the sensor records light. In macro photography, it also determines how effectively you can freeze subject movement and reduce the effect of camera shake.
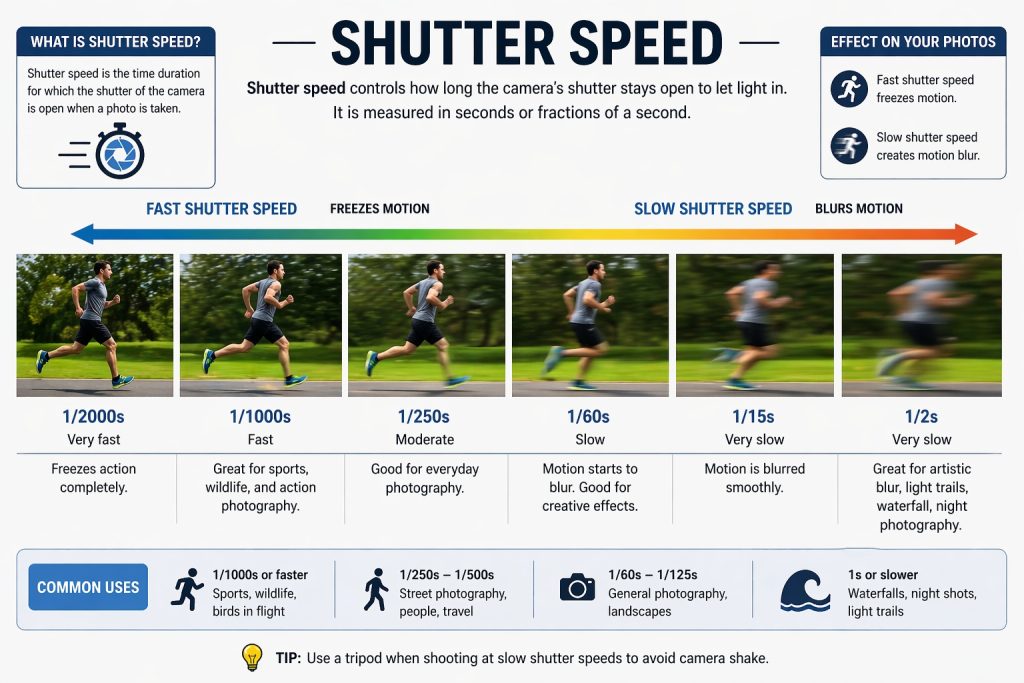
Because you are working close to the subject, small movements become more noticeable. A hand-held camera may shift enough to move the plane of focus, even when the subject appears stationary. An insect can move its head or legs during a seemingly quiet moment.
For a still flower or a motionless object, a shutter speed around 1/125–1/250 second may be a useful starting point for hand-held work, depending on magnification and stabilization. For insects that move, you may need 1/500 second or faster. Very rapid movement can require 1/1000 second or more.
These are starting points, not guarantees. A stabilized lens can reduce some camera movement, but stabilization does not freeze a moving insect. At high magnification, even a fast shutter speed may not solve every focus problem if the camera moves forward or backward.
A tripod can be useful for still subjects because it allows precise composition and a low ISO. However, a tripod does not eliminate movement in flowers, insects, or other living subjects.
Slower shutter speeds can also be used creatively. If you deliberately want the movement of a butterfly’s wings to appear soft, a longer exposure may communicate motion rather than simply record a failure of sharpness.
Aperture: Controlling How Much of the Subject Appears Sharp
Aperture is one of the most important settings in macro photography because depth of field becomes very shallow at high magnification.
At f/2.8, you may be able to isolate a small detail against a beautifully blurred background, but only a thin portion of the subject may remain sharp. At f/8, more of the subject may appear in focus. At f/11 or f/16, depth of field can increase further, although the amount of light decreases and diffraction can reduce fine detail.
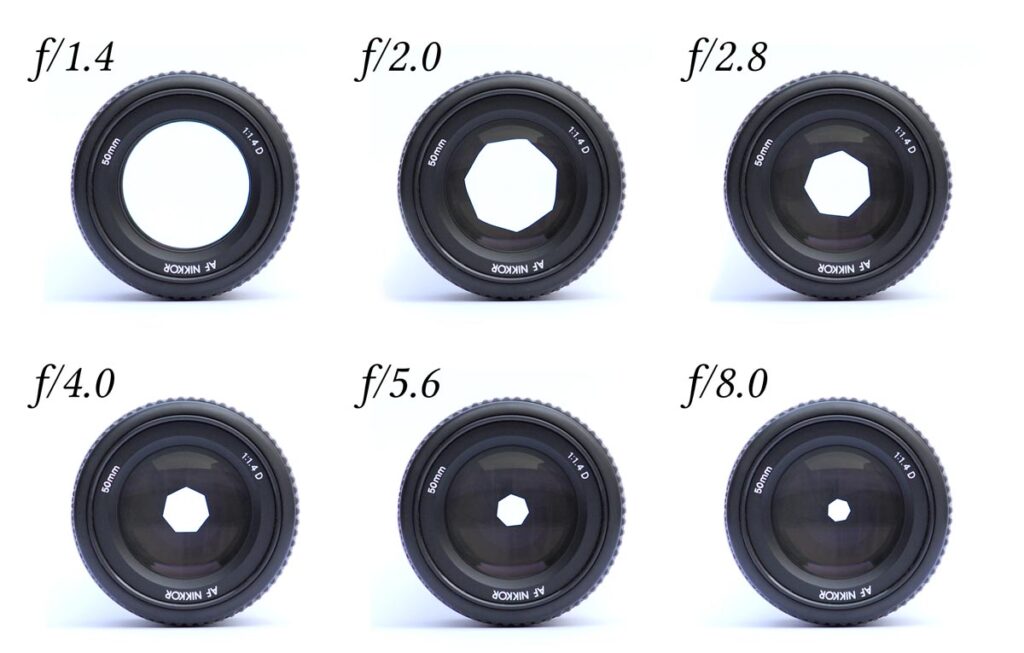
For many close-up photographs, f/5.6–f/11 is a useful range to explore. The best choice depends on magnification, lens performance, subject shape, and how much of the subject must be sharp.
Consider a flower photographed from the front. A wider aperture may keep the central detail sharp while allowing the petals to fade gently into the background. If you are photographing the flower for botanical identification, a smaller aperture may help reveal more of its structure.
Macro photography has an important limitation: even f/16 may not provide enough depth of field when magnification is very high. For a stationary subject, focus stacking can be a better solution. This technique combines several photographs taken at different focus distances to create an image with greater apparent depth of field.
Do not stop down automatically because you want more sharpness. Ask whether greater depth of field will improve the photograph and whether the loss of light is acceptable.
ISO: Keeping the Photograph Bright Enough
ISO controls how the camera processes or amplifies the recorded signal. Raising ISO can help you maintain a faster shutter speed or use a smaller aperture when light is limited, although it does not increase the amount of light physically captured.
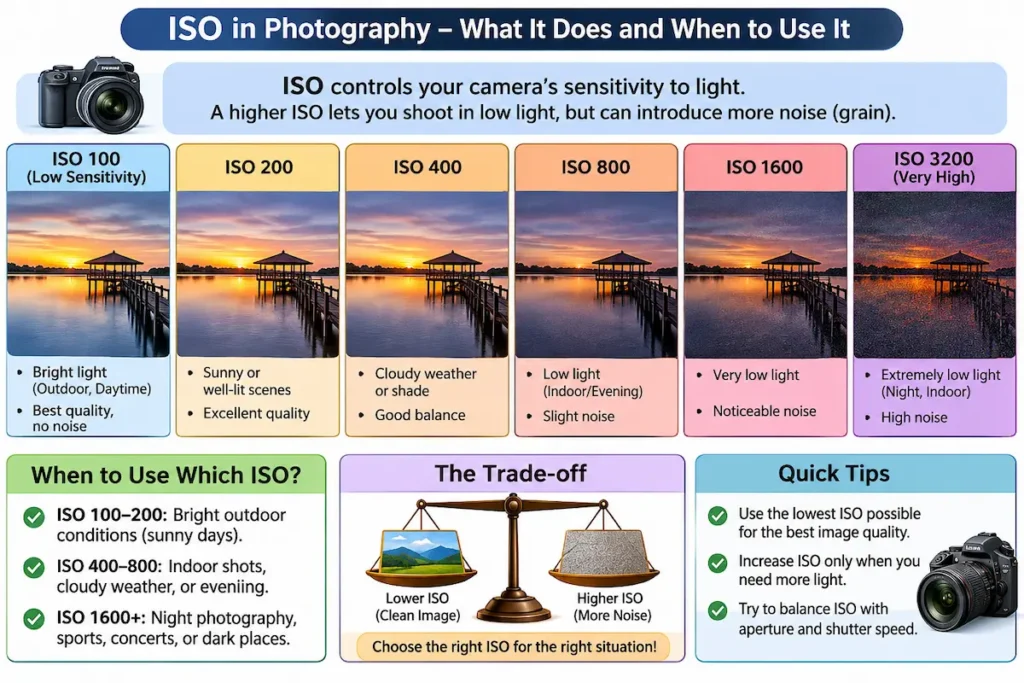
Suppose you are photographing a moving insect at 1/500 second and f/8. If the photograph is too dark at ISO 400, increasing ISO to 800 or 1600 may give you a more usable exposure without changing the shutter speed or aperture.
A higher ISO can introduce more visible noise, particularly in shadow areas. However, a noisy photograph with sharp detail may be more useful than a cleaner image in which the insect is blurred. Excessive underexposure followed by heavy brightening during editing can also reveal noise.
For macro photography, ISO 100–400 can be useful for still subjects in bright light, while ISO 800–3200 may be appropriate for moving subjects or shaded environments. The practical range depends on your camera and how large the final image will be viewed.
Auto ISO can be helpful when the light changes quickly, especially when you want to maintain a minimum shutter speed. Set a sensible maximum ISO for your camera, then review the results to see whether it is producing the balance you want.
Focus: Decide Which Detail Deserves Sharpness
In macro photography, correct focus is often more important than choosing the theoretically perfect exposure.
Autofocus can work well for larger subjects or modest close-ups, especially when the subject has clear contrast. Single autofocus is useful when photographing a stationary flower or object. Continuous autofocus can help when the subject or camera-to-subject distance changes, although its success depends on the camera, lens, and magnification.
For very close subjects, manual focus can offer greater control. One effective technique is to set the lens near the desired magnification and gently move the camera forward or backward until the important detail becomes sharp. A focusing rail can make this easier for stationary subjects on a tripod.
For insects, continuous autofocus or a combination of autofocus and small body movements may be more practical than repeatedly turning the focus ring. If the camera offers subject tracking that works at your focusing distance, test it, but do not assume that an eye-detection feature will reliably recognize every small insect.
Always inspect the focus on the captured photograph. If the eye is sharp but the rest of the head is soft, you may need a different aperture or shooting angle. If nothing is consistently sharp, camera movement or inaccurate focus may be the real problem.
Other Settings That Make a Difference
Drive mode: Burst shooting can increase your chances of capturing a sharp expression, a moment when an insect pauses, or a particular wing position. It is especially useful when subjects move unpredictably.
Image stabilization: Stabilization can help with hand-held camera movement, but its effectiveness varies with magnification and shooting conditions. It does not freeze subject movement. Follow your camera or lens manufacturer’s guidance for tripod use.
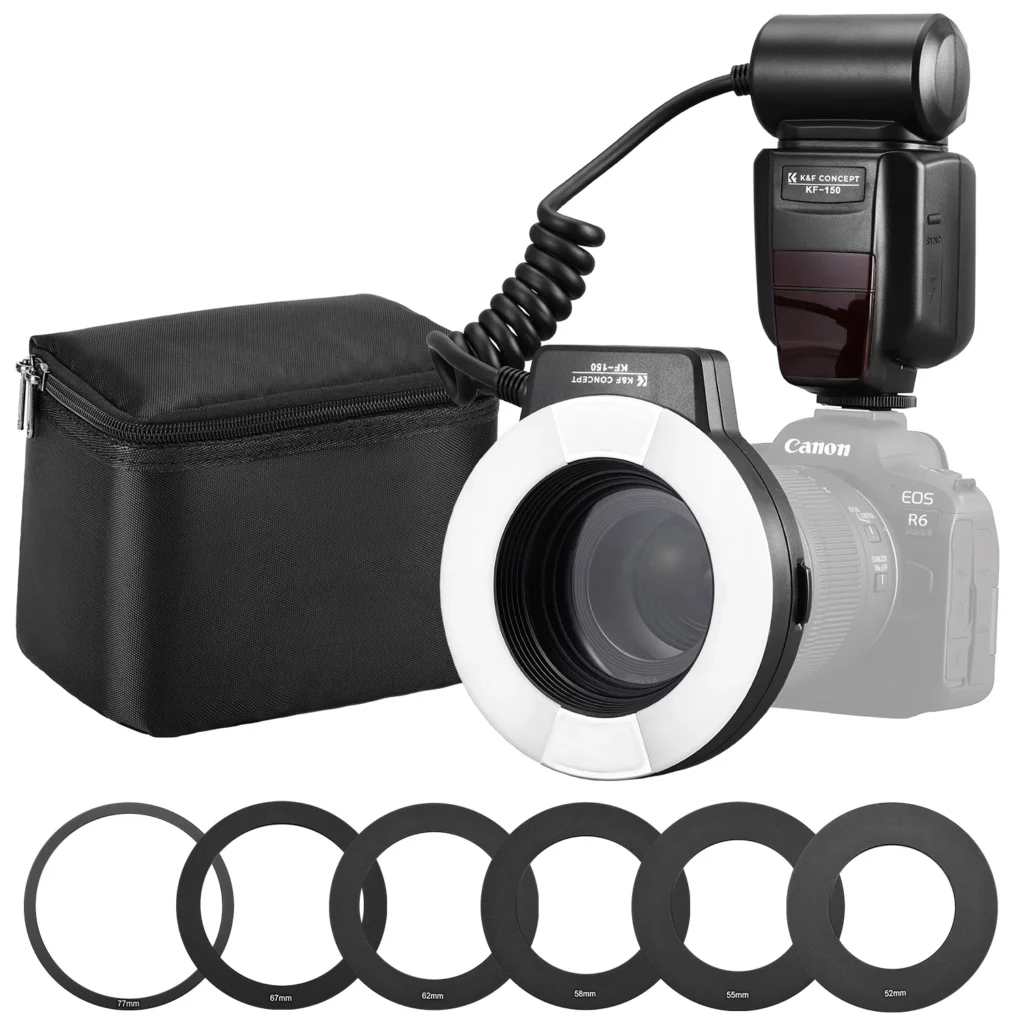
Flash: A suitable macro flash or diffused speedlight can provide enough light to use a smaller aperture and faster shutter speed. Diffusion is important because direct flash can create harsh highlights on shiny insects and reflective surfaces.
Exposure compensation: If you use aperture priority or another automatic exposure mode, bright white flowers against dark backgrounds or dark insects against bright leaves can mislead the meter. Exposure compensation helps you correct the camera’s exposure estimate.
White balance: RAW capture gives you flexibility to adjust colour later. In mixed light, a fixed white balance may provide more consistent results across a series.
Focal length and working distance: A longer macro lens can provide more distance between you and a subject at similar magnification, which is valuable for skittish insects and lighting arrangements. However, the right working distance depends on your lens and the subject.
You Don’t Need the Ideal Equipment
Macro photography is often presented as a specialist pursuit requiring an expensive macro lens, a dedicated flash, a focusing rail, and a high-resolution camera. These tools can be useful, but they are not essential for learning the fundamentals.
A standard kit lens can photograph flowers, textured objects, food, and larger insects at relatively close distances. Some kit lenses offer a surprisingly useful close-focusing ability, even if they cannot reproduce the magnification of a dedicated macro lens.
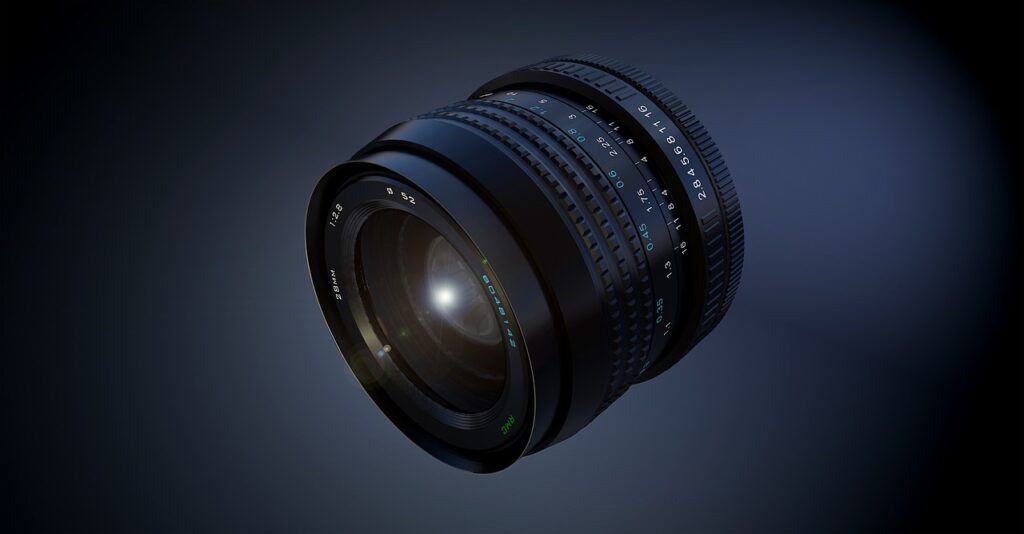
A close-up filter can reduce the minimum focusing distance of a compatible lens and allow you to photograph smaller subjects. Extension tubes can also increase magnification by moving the lens farther from the camera sensor, although they reduce focusing flexibility and can reduce the amount of light reaching the sensor.
Older cameras can produce excellent close-up images when focus, light, and composition are controlled. You do not necessarily need the highest resolution because many macro photographs are successful due to their subject, timing, and visual design rather than extreme pixel detail.
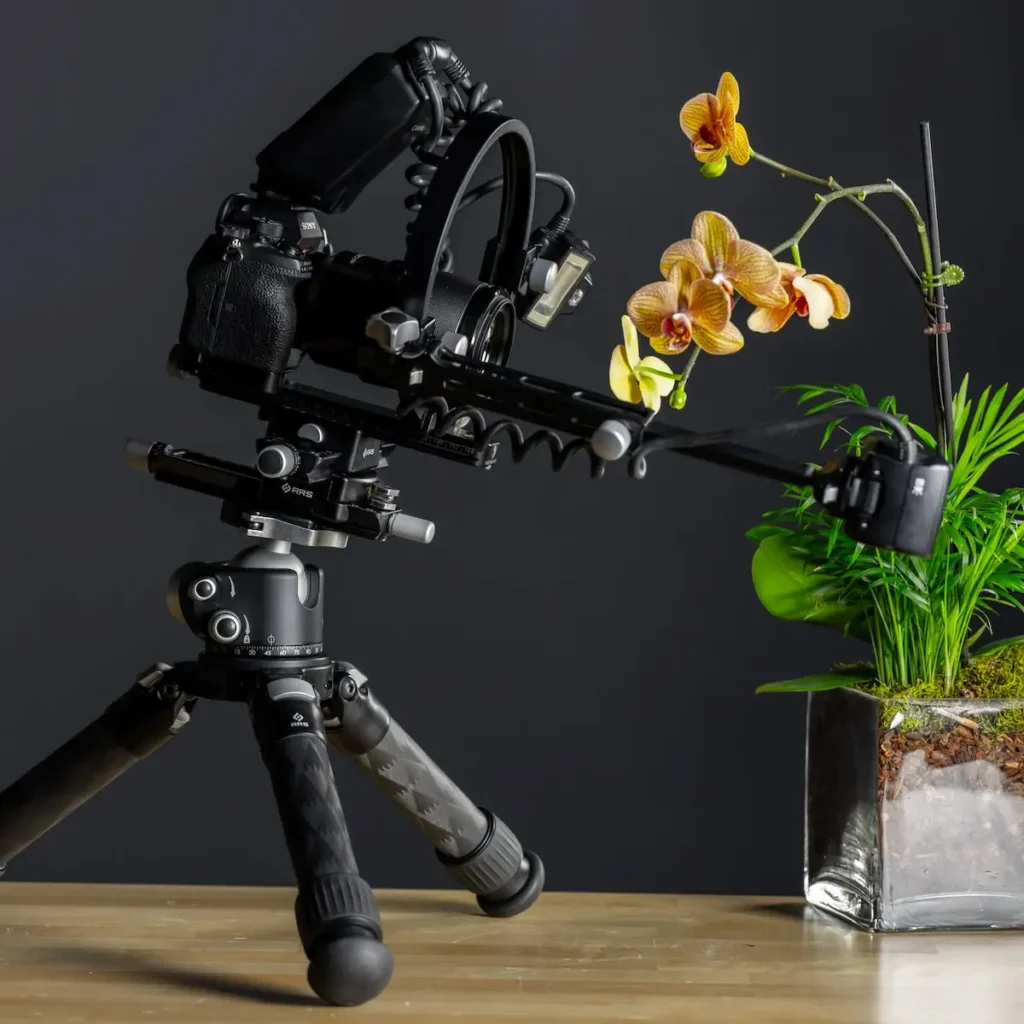
A tripod is valuable for still subjects, but hand-held macro photography is possible with suitable shutter speeds and careful technique. A simple white card can reflect light into shadows, while a piece of translucent material can soften harsh sunlight when used safely and appropriately.
The most important skill is learning to work with the equipment you have. A basic lens may not deliver the same magnification as a dedicated macro lens, but it can still teach you how aperture, focus, distance, and light influence the final image.
When the Equipment Becomes a Limitation
When your lens cannot focus closely enough
You may find that the lens refuses to focus when you move closer to a tiny subject. Rather than continuing to move toward it, step back slightly and use the lens’s closest focusing distance. You can crop the image later, provided you have enough resolution for your intended output.
A close-up filter or extension tube may offer a relatively affordable way to increase magnification if your lens is compatible. You can also choose a larger subject, such as a flower or a larger insect, while learning the fundamentals.
When your lens has a narrow maximum aperture
A lens that opens only to f/5.6 may make it difficult to photograph small subjects in shade. You can compensate by finding brighter light, increasing ISO, using a suitable flash, or allowing a slower shutter speed when the subject is still.
Remember that opening the aperture also reduces depth of field. A brighter photograph is not necessarily a better macro photograph if the important details fall outside the focus plane.
When autofocus struggles
Small subjects can be difficult for autofocus systems to identify, particularly against busy backgrounds. Try placing the focus point on a distinct feature, reducing unnecessary background detail, or switching to manual focus.
For a stationary subject, you can set the magnification first and move the camera slightly until the detail becomes sharp. This can be more reliable than allowing autofocus to repeatedly search across a very narrow focus range.
When you do not have a tripod
A tripod is useful for still-life macro photography, but you can still work hand-held. Choose a shutter speed that accounts for movement, support your arms against a stable surface when possible, and take several frames to improve your chances of capturing a sharp image.
For a moving insect, a tripod may actually make it harder to respond quickly. Hand-held shooting can be the more practical choice when the subject changes position frequently.
When the light is too harsh
Bright midday sunlight may produce strong shadows, blown highlights, and reflections on shiny surfaces. You do not always need additional equipment to improve the light. Move the subject into open shade, photograph from a different angle, or wait for softer conditions.
A small reflector can help brighten a shadowed part of a flower, while a diffuser can soften direct light. Be careful not to damage plants or disturb wildlife when arranging the scene.
The key is to identify the actual limitation. Sometimes you need more light; sometimes you need a different focus strategy, a more suitable angle, or a simpler composition.
Three Photographers, Three Different Photographs
Imagine three photographers photographing the same ladybird resting on a green leaf. They are standing in the same garden, using similar cameras, but they want to communicate different things.
Photographer 1: Reveal the Ladybird’s Face
Purpose: Show the eyes, antennae, and fine surface details.
Approach: Move into a position where the front of the head is visible. Place the focus carefully on the eye and use an aperture that provides enough depth of field for the important facial details.
Possible settings: f/8, 1/250 second, ISO 800, with manual or carefully selected autofocus.
Why: The face is the visual centre of the photograph. A faster shutter speed helps reduce movement, while f/8 offers a compromise between depth of field and light. The precise aperture may need to change with magnification.
Photographer 2: Show the Ladybird in Its Environment
Purpose: Photograph the insect together with the leaf, veins, and surrounding garden.
Approach: Step back slightly and include more of the plant. Use the background to explain where the insect lives, while keeping distracting shapes away from the main subject.
Possible settings: f/8–f/11, 1/200 second, ISO 400–1600.
Why: More of the scene needs to contribute to the photograph, so greater depth of field may be helpful. The background should remain recognizable without competing with the ladybird.
Photographer 3: Create an Abstract Close-Up
Purpose: Turn the ladybird’s shell into a study of colour, texture, and shape.
Approach: Frame a small portion of the shell and use shallow depth of field to simplify the surrounding details.
Possible settings: f/4–f/5.6, 1/250 second, ISO 400–1600.
Why: The photograph is about a small visual detail rather than the entire insect. A softer background helps separate the pattern from surrounding shapes.
The subject has not changed, but the photographers are trying to tell three different stories. Their settings change because their intentions change.
The Light Changes Everything
Early morning
What changes? The light is often soft, and dew may add texture and reflections to flowers and insects. However, temperatures can be low, and moving subjects may be less active or may still move unpredictably.
Which setting matters? Shutter speed becomes important if a breeze moves leaves or petals.
What adjustment might help? Use a shutter speed that protects the details you want, then raise ISO if the image becomes too dark. Take advantage of the soft light rather than automatically opening the aperture to its widest setting.
Midday sunlight
What changes? There is more light available, but strong highlights and harsh shadows can make small subjects look less attractive.
Which setting matters? Exposure becomes important, especially with bright petals, shiny shells, and reflective water droplets.
What adjustment might help? Use open shade or soften the light with a suitable diffuser. Check highlights and adjust exposure compensation when necessary.
Overcast light
What changes? Clouds act as a large natural diffuser, reducing harsh shadows and often producing pleasing colour and texture.
Which setting matters? Shutter speed may become a challenge because the scene is darker than it would be in direct sunlight.
What adjustment might help? Increase ISO or use a tripod for stationary subjects. For moving insects, prioritize a shutter speed that prevents blur.
Shade
What changes? The light becomes less intense, and colour may appear cooler depending on the environment and white balance.
Which setting matters? ISO and shutter speed often need adjustment to maintain a useful exposure.
What adjustment might help? Use a reflector to return light to the subject or move to a brighter area of shade. Avoid reducing shutter speed too much if the subject is moving.
Backlight
What changes? Light comes from behind the subject, revealing translucent petals, fine hairs, wings, and water droplets. It can also create bright backgrounds and dark subject details.
Which setting matters? Exposure and focus placement become especially important.
What adjustment might help? Change your angle slightly, protect important highlights, and use exposure compensation if the camera underexposes the subject. A reflector can help lift shadows without removing the backlit effect.
Artificial light or flash
What changes? You gain more control over the direction and intensity of the light, which can be especially useful in dim conditions.
Which setting matters? Flash output, aperture, and shutter speed work together, depending on whether the exposure is dominated by flash, ambient light, or both.
What adjustment might help? Use a diffuser and begin with modest flash power. Test the result on reflective subjects, because shiny surfaces can produce distracting highlights.
The important lesson is that light does not simply determine how bright the photograph becomes. It changes texture, colour, contrast, and the way a small subject separates from its background.
The Mistake Photographers Often Notice Too Late
Avoid Distracting Backgrounds in Macro Photography
- Do not concentrate only on focus and exposure; pay attention to the background as well.
- Avoid bright leaves, thin branches, or patches of sunlight that compete with the main subject.
- Make small adjustments to your camera position to improve the background.
- Shift the camera slightly left or right to replace distracting bright areas with darker, cleaner backgrounds.
- Move the camera higher or lower to separate the subject from distracting stems or objects.
- Inspect the entire frame before taking the photograph, including the edges and corners.
- Ask yourself:
- What will the viewer notice first?
- Does the background support the main subject?
- Is the focus placed on the most interesting detail?
- Consider the contrast between the subject and the background.
- Avoid placing a dark insect against a similarly dark background.
- Use a bright background behind translucent wings to create attractive separation.
- Take a test photograph and review the composition before continuing.
- Remember that changing your camera position can improve a macro photograph more effectively than adjusting the aperture.
What Changes When You Change Aperture?
Aperture has a strong visual effect in macro photography because it controls both the amount of light entering the camera and the depth of field.
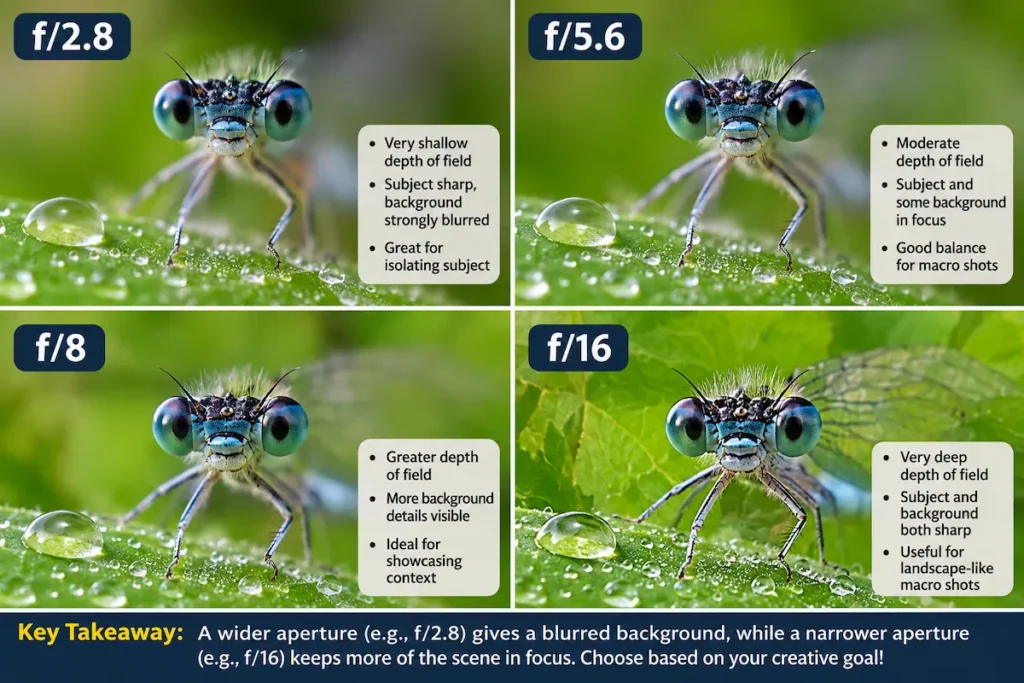
Imagine photographing the head of a small insect from a fixed position. You keep the shutter speed and ISO as consistent as possible by adjusting the other settings when necessary, then compare four apertures.
f/2.8 — A Very Thin Focus Area
At a wide aperture, the eye may be sharp while the rest of the head quickly becomes soft. This can produce a beautiful, simple image when one detail is the main subject, but it may be unsuitable if you want the insect’s entire face to be recognizable.
f/5.6 — More Detail Without Losing All Separation
At f/5.6, more of the head may appear sharp, depending on magnification and focus distance. The background can remain soft, which helps isolate the insect without making the photograph look overly busy.
f/8 — A Practical Compromise
At f/8, you may gain useful depth of field for a small subject while retaining a relatively soft background. This is a good aperture to test when you want a balance between detail and subject separation.
f/16 — More Depth of Field, Less Light
At f/16, the depth of field may increase further, but you will need more light, a higher ISO, or a slower shutter speed to maintain exposure. Diffraction can also soften fine detail, and the effect becomes more noticeable as magnification and image enlargement increase.
These results depend on the lens, camera, and subject distance. At high magnification, depth of field can remain extremely shallow even at small apertures.
The purpose is not to find one perfect aperture. It is to understand what changes when you choose a different one.
Practical Camera Settings for Macro Photography
The following settings are starting points for common macro situations. They assume an interchangeable-lens camera or another camera with meaningful manual controls.
| Situation | Aperture | Shutter speed | ISO | Focus | Other setting | Main purpose |
|---|---|---|---|---|---|---|
| Flowers in still air | f/5.6–f/11 | 1/125–1/250 sec | 100–800 | Single AF or manual | Tripod if needed | Balance detail and depth of field |
| Moving insects | f/5.6–f/8 | 1/500–1/1000 sec | 400–3200 | Continuous AF or manual technique | Burst mode | Reduce subject movement |
| Butterfly or dragonfly portraits | f/5.6–f/11 | 1/250–1/1000 sec | 200–1600 | Focus on the eye | Check wing position | Preserve important details |
| Water droplets | f/8–f/11 | 1/200–1/500 sec | 200–1600 | Manual or single AF | Diffused light | Capture droplet shape and reflections |
| Macro still life on a tripod | f/8–f/11 | 1/2 sec or longer if needed | 100–400 | Manual | Remote release or timer | Maximize detail in a still subject |
| Close-up in low light | f/4–f/8 | 1/125–1/500 sec, depending on movement | 800–3200 | Appropriate AF or manual | Consider diffused flash | Retain useful shutter speed |
These are starting points, not fixed rules.
At high magnification, even 1/250 second may not prevent every kind of blur. A subject moving toward or away from the camera can shift out of the narrow focus plane, even when its movement across the frame seems minimal. Similarly, f/11 may be useful for one close-up but unnecessarily small for another.
If you are photographing a stationary subject, a tripod and lower ISO may give you a cleaner file. If you are photographing an insect, a faster shutter speed may matter more than minimizing ISO. If the light is too weak, a suitable flash can provide the additional illumination needed to use both a smaller aperture and a faster shutter speed.
Use the table as a starting point, then adjust according to what you see in the photograph.
What About the Photographer Who Is Just Starting?
If you are new to macro photography, begin by learning two things: where to focus and how aperture changes depth of field.
Choose a flower or another stationary subject in soft, bright light. Set the camera to aperture priority and start around f/8. Select a single autofocus point or use manual focus, placing the focus on the detail you want the viewer to notice first.
Take one photograph, then try f/5.6 and f/11. Compare the results. Look at how much of the subject appears sharp and how the background changes. Do not assume that the photograph with the most detail everywhere is automatically the best.
Once you understand aperture, pay attention to shutter speed. If you are photographing a moving insect, use a faster shutter speed and increase ISO if necessary. If you are photographing a motionless object on a tripod, you may be able to use a slower shutter speed instead.
The biggest beginner mistake is changing too many settings at once. If you change aperture, shutter speed, ISO, focus distance, and camera position simultaneously, it becomes difficult to identify what improved the result.
Learn one relationship at a time, then combine the decisions as your confidence grows.
A Simple Exercise to Understand Macro Photography
Exercise: Discover How Aperture Changes a Close-Up
You can complete this exercise with a flower, a leaf, a coin, or another small stationary object. A dedicated macro lens is not essential.
- Place the subject near a window or in soft outdoor light.
- Stabilize the camera on a tripod or solid surface if possible.
- Focus carefully on one identifiable detail, such as the centre of a flower or a mark on a coin.
- Take a photograph at f/4 or the widest available aperture.
- Without changing your composition or focus position, take another photograph at f/5.6.
- Repeat at f/8 and f/11, adjusting shutter speed or ISO to maintain a suitable exposure.
- Compare the images at the same magnification on your camera or computer.
- Repeat the exercise with a slightly different camera angle to see how the focus plane affects the subject.
Look for changes in depth of field, background appearance, fine detail, exposure, and noise. Notice whether the subject becomes more recognizable as more of it appears sharp, or whether the softer images communicate the subject more effectively.
If you have a moving subject, repeat a similar exercise with different shutter speeds while keeping the aperture appropriate for the desired depth of field.
The goal is not to discover one perfect setting. The goal is to understand how your decisions change the photograph.
If You Remember Only Five Things
1. Choose the detail before choosing the aperture.
Decide whether the photograph is about an insect’s eye, the texture of a petal, or the shape of a water droplet. Your intended point of focus helps determine how much depth of field you need.
2. Treat shutter speed as protection against movement.
Macro subjects can move more than you expect, and camera movement becomes especially noticeable at high magnification. Use a faster shutter speed when the subject or camera is moving, and raise ISO if necessary.
3. A smaller aperture does not guarantee a sharper photograph.
Stopping down can increase depth of field, but it reduces light and may introduce diffraction softness. Test apertures such as f/5.6, f/8, and f/11 rather than automatically selecting f/16.
4. Focus accuracy matters more as magnification increases.
Use an appropriate autofocus point or manual focus, and check the captured image carefully. A sharp eye or other key detail can make a photograph successful even when the rest of the subject is softly rendered.
5. Change your position before assuming you need new equipment.
A small change in camera angle can improve the background, make the light more attractive, and place more of the subject within the focus plane. Better positioning can be more valuable than a new lens.
The Smallest Details Often Require the Biggest Decisions
Macro photography is a reminder that even the smallest details can tell a beautiful story. Whether you are photographing a spider’s delicate eyes, the texture of a flower, or tiny droplets of water on a leaf, the right camera settings help bring those details to life.
Instead of relying on fixed settings, pay attention to your subject, available light, movement, and background. Adjust your aperture, shutter speed, ISO, and focus according to what you want to highlight. Sometimes, changing your shooting angle or waiting for a still moment can make a greater difference than changing your settings.
Ultimately, successful macro photography is not about capturing everything in perfect detail. It is about knowing which details matter and making them stand out.
