

A practical guide to choosing shutter speed, aperture, ISO, focus, and exposure settings based on what is actually happening in front of you.
You are walking down a busy street in the late afternoon when something catches your attention.
A man is standing beneath the edge of a shop awning, separated from the crowd by a narrow patch of sunlight. People are moving past him every few seconds. The background is cluttered with signs, vehicles, wires, and shop fronts, but for a moment the light makes the scene feel unusually simple.
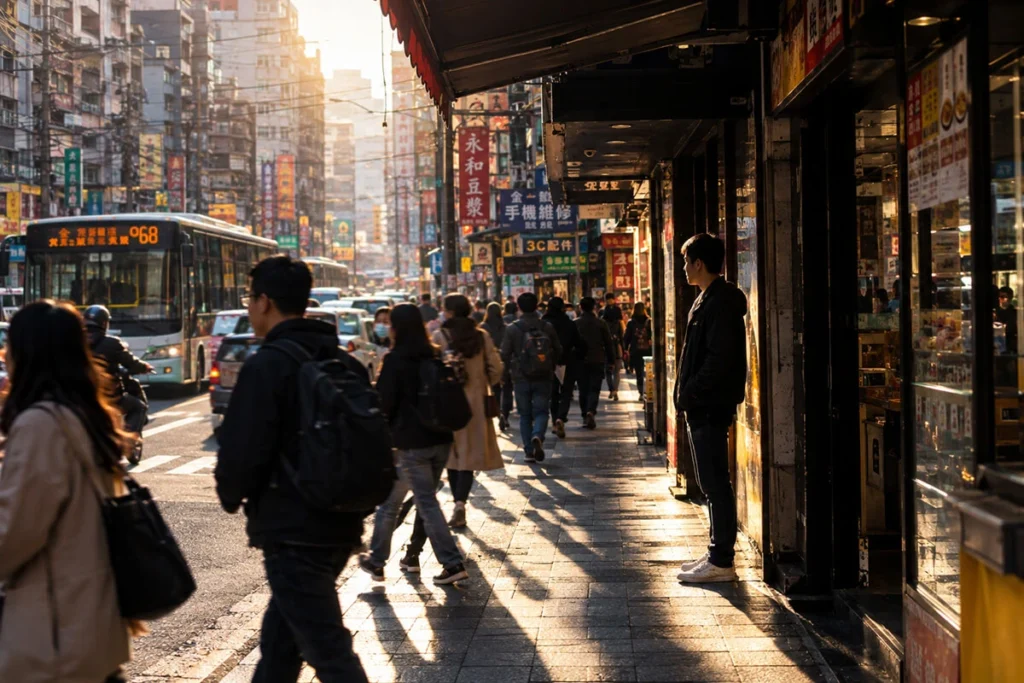
You raise the camera.
The subject might move. The light might disappear. Someone may walk between you and the scene. You may have only a second to make the photograph.
And then comes the familiar question:
What camera settings should I use?
It is tempting to look for a perfect combination of shutter speed, aperture, ISO, and autofocus mode before going out to photograph. But street photography rarely gives you the luxury of working with one predictable situation.
A quiet street and a crowded market may require completely different decisions. A person standing still in soft evening light presents a different problem from a cyclist passing through a patch of sunlight. A photograph made deliberately with motion blur may require settings that would be considered “wrong” for a sharp documentary image.
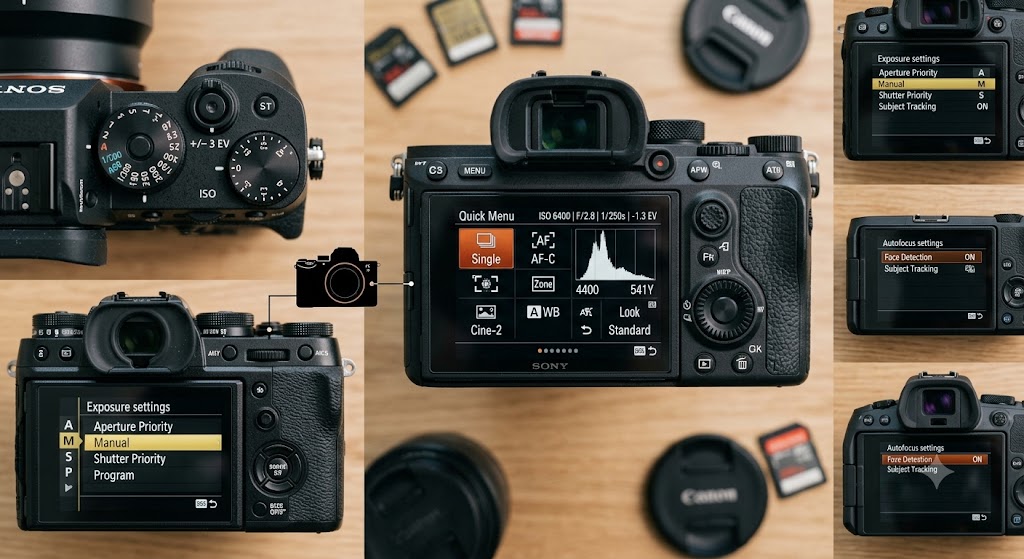
That is why the best camera settings for street photography are not fixed numbers. They are decisions based on what you are trying to capture, how quickly the scene is changing, and what the available light allows.
The central idea is simple: the best street photography settings are not the numbers you memorize; they are the settings that give you enough control to respond to the moment in front of you.
The Question Street Photographers Keep Asking
“What are the best camera settings for street photography?”
It is a reasonable question, especially when you are starting.
You want to know which aperture to use, how fast the shutter should be, whether Auto ISO is acceptable, which metering mode is best, and whether you should shoot manually or use one of the semi-automatic modes.
The problem is that street photography does not have one consistent photographic situation.
You might photograph someone sitting quietly at a café in the morning. Ten minutes later, you could be photographing cyclists moving through traffic. In the evening, you may find an interesting scene under artificial lights. At night, you may deliberately allow motion blur to become part of the photograph.
The subject, light, movement, distance, and background can all change within seconds.
So instead of asking:
“What are the best settings for street photography?”
try asking:
“What does this particular photograph require from my camera?”
That small change in thinking is surprisingly useful.
- If the subject is moving, shutter speed becomes important.
- If the background is distracting, aperture and your physical position may matter more. If the light is disappearing, ISO becomes part of the decision.
- If you want several elements of the street to remain recognizable, depth of field may matter more than background blur.
The settings should follow the photograph—not the other way around.
The First Decision Is Not on Your Camera
Before touching a dial or menu, look at the street.
Street photography rewards observation because the camera cannot tell you what the photograph is supposed to mean. It can only respond to the information you give it.
Ask yourself what is actually happening.
- Is someone moving quickly through the frame?
- Is the subject standing still? Is there an interesting relationship between a person and the background?
- Is the light changing? Is the scene likely to disappear in a second?
- Also look at the distance.
A person several meters away behaves differently photographically from someone walking directly toward you. A wide-angle photograph of a crowded street may need a very different approach from a close portrait made with a longer focal length.
Then consider your intention.
Perhaps you want a clean, sharp photograph that records a moment. Perhaps you want to show the energy of the street through motion blur. Maybe you are interested in shadows and silhouettes rather than facial detail.
The camera settings become much easier to choose once you know what you are trying to preserve.
A useful mental sequence is:
Observe → Decide what matters → Choose the setting that protects it → Photograph.
When You Find Yourself in This Situation
Imagine walking through a busy market just before sunset.
The light is warm but fading. People are moving in different directions, and you notice a man walking through a narrow patch of sunlight while the background remains considerably darker.
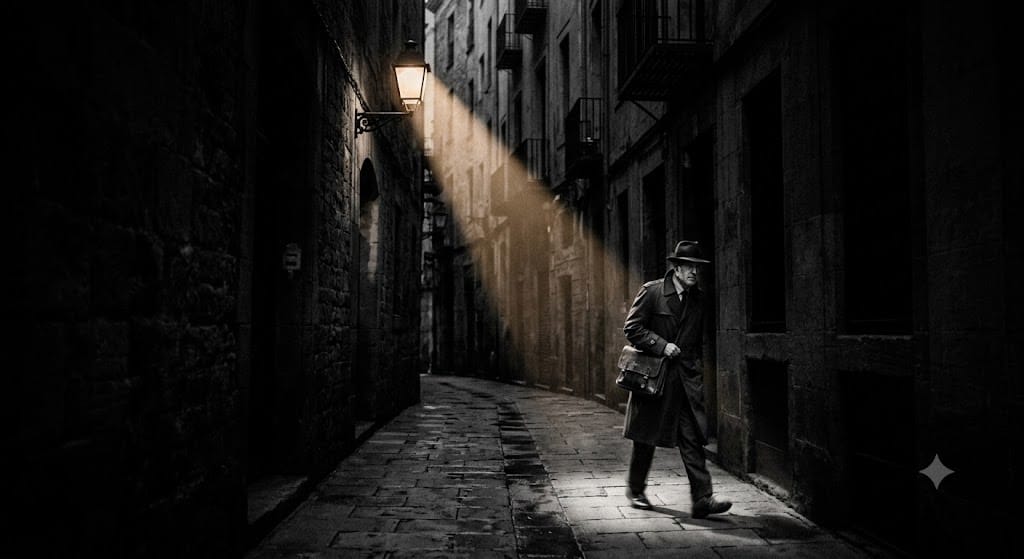
You have perhaps two or three seconds before she reaches the edge of the light.
The first problem is not aperture. It is timing and movement.
If you use a very slow shutter speed because the light is fading, you may end up with a photograph in which the person’s face and body are blurred. If the subject is walking at a normal pace, something around 1/250 second can be a useful starting point for keeping ordinary human movement reasonably sharp.
If the person is moving quickly, you may need something closer to 1/500 second or faster. If the subject is relatively still, you can use a slower shutter speed and allow the camera more light.
Now consider aperture.
If the background is distracting, something around f/2.8 to f/4 can help separate the subject, particularly when you are relatively close and the background is farther away. But you should not automatically open the lens as wide as possible.
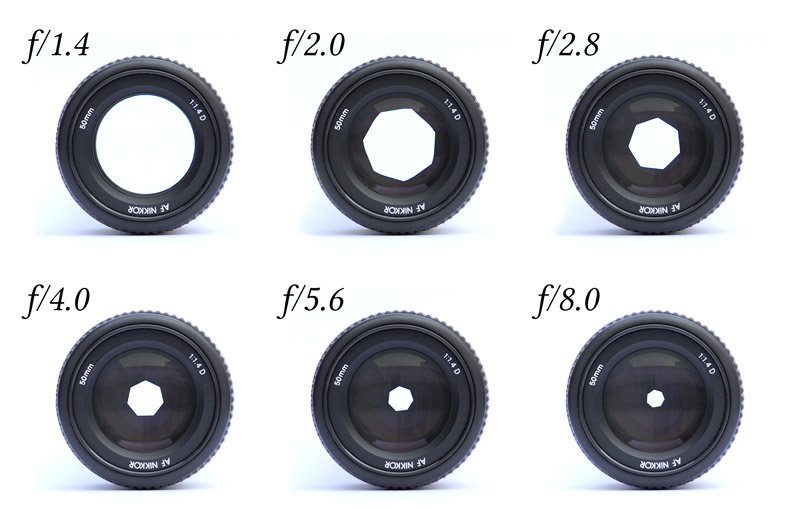
If the scene contains several important elements at different distances, f/5.6 or f/8 may make more sense because you want more of the street to remain recognizable.
Then there is ISO.
If the light is fading and you need 1/250 second, increasing ISO may be the simplest solution. A photograph with some ISO noise is often more useful than a photograph ruined by subject movement.
For this kind of situation, a useful starting point might be:
- Shutter speed: around 1/250 sec
- Aperture: around f/2.8–f/4
- ISO: Auto ISO or adjusted as needed
- Focus: Continuous autofocus if the subject is moving
- Drive mode: Single or short burst depending on your timing
These are not rules. They are a response to the particular problem.
- If the subject stops, you can slow down.
- If the subject starts running, you can speed up.
- If the background becomes an important part of the story, you may stop down.
The photograph tells you what needs to change.
Understanding the Settings That Matter Most
Shutter Speed: Decide How Much Movement You Can Accept
For street photography, shutter speed is often the setting that deserves your attention first.
The street is full of movement: people walking, bicycles passing, buses arriving, hands gesturing, clothes moving in the wind, and cars crossing the frame.
- A useful starting point for ordinary walking subjects is around 1/250 second.
- For faster movement, you might try 1/500 second or faster.
- For relatively still subjects, you can often go lower.
- But there is another possibility: you can deliberately use a slow shutter speed.
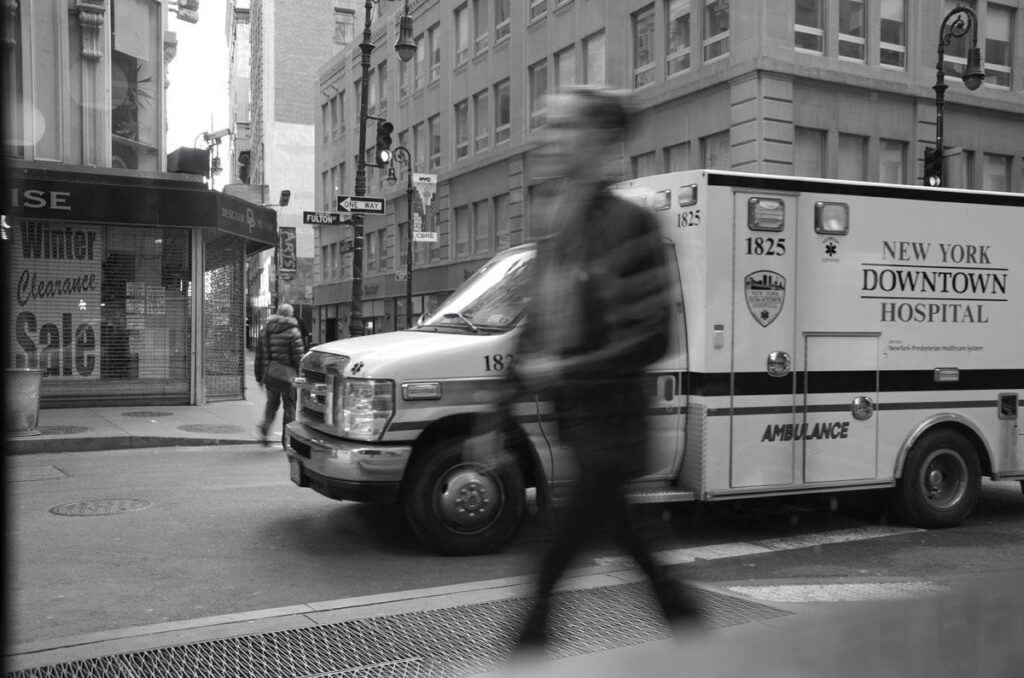
For example, a person standing still while pedestrians move around them can create an interesting contrast between stability and movement. Something around 1/15, 1/8, or even slower may produce motion blur depending on the situation and your technique.
The important question is not:
“What shutter speed is correct for street photography?”
It is:
“Do I want this movement to be frozen or shown?”
If you want a person’s expression and gesture to remain sharp, a faster shutter speed is usually the safer choice.
If movement itself communicates the atmosphere of the street, blur can become part of the photograph.
Aperture: Decide How Much of the Street Belongs in the Photograph
Aperture controls depth of field, but in street photography it also affects how the viewer understands the relationship between the subject and the environment.
A wide aperture such as f/1.8, f/2, or f/2.8 can separate a person from a busy background. That can be useful when the background contains distracting signs, vehicles, or crowds. But street photography does not always benefit from strong background blur.
Sometimes the environment is the story.
A person standing beside a particular building, a worker surrounded by objects, or someone waiting at a bus stop may become more interesting when the surroundings remain visible.
In those cases, something around f/5.6 to f/8 may be more appropriate.
If you are photographing quickly and do not have time to think about depth of field, an aperture around f/5.6 can be a practical compromise in good light, although the best choice depends heavily on your lens and the scene.
ISO: Let the Camera Help When the Street Changes
Street photography can move from bright sunlight to deep shade within a few steps.
You might photograph a person in open daylight and then turn toward a narrow alley where the available light is dramatically lower. This is where Auto ISO can be extremely useful. Instead of constantly changing three exposure settings, you can decide that shutter speed and aperture are the priorities and let ISO respond to the changing light.
For example, you might use:
- Aperture: f/4
- Minimum shutter speed: 1/250 sec
- ISO: Auto
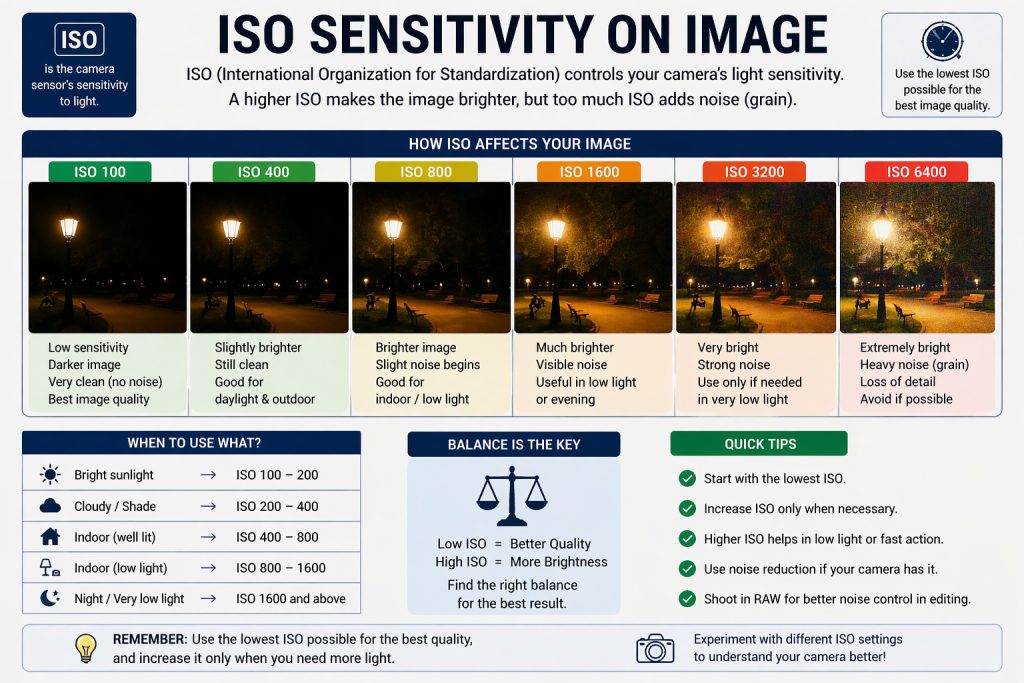
In bright conditions, the camera may use a low ISO. As the light disappears, ISO increases to maintain your chosen shutter speed. Higher ISO inevitably introduces more noise, but there is a practical point worth remembering:
A noisy photograph can often still be a good photograph. A blurred photograph caused by an unnecessarily slow shutter speed may not be.
Do not be afraid of ISO simply because a lower number looks better on a specification sheet.
Focus: Decide What Needs to Be Sharp
Autofocus is usually the practical choice for street photography, but the best focus behaviour depends on the situation. For moving people, continuous autofocus can be useful because the camera keeps adjusting focus as the subject moves.
For a relatively static subject, single autofocus can be simpler.

Modern cameras with subject or eye detection can also be extremely helpful, particularly when the person is moving unpredictably. But do not assume that automatic subject detection will always understand your intention.
If you are photographing a busy street with many people, the camera may choose the wrong person. Sometimes a smaller autofocus area gives you more control.
Manual focus also has a place in street photography. If you know where people are likely to enter the frame, you can pre-focus on a particular distance and wait for the right moment. This can be particularly effective with a wider lens and a reasonably small aperture.
The important question is:
What needs to be sharp in this photograph, and how predictable is its position?
You Don’t Need the Ideal Equipment
Street photography is one of the genres where photographers can easily convince themselves that they need a particular camera or lens before they can begin.
You do not.
- A compact camera can make excellent street photographs. So can an entry-level DSLR. So can a mirrorless camera with a kit lens.
- A small camera may even have an advantage because it can be less intimidating and easier to carry for several hours.
- A zoom lens gives you flexibility. A prime lens may encourage you to move and become familiar with one particular perspective.
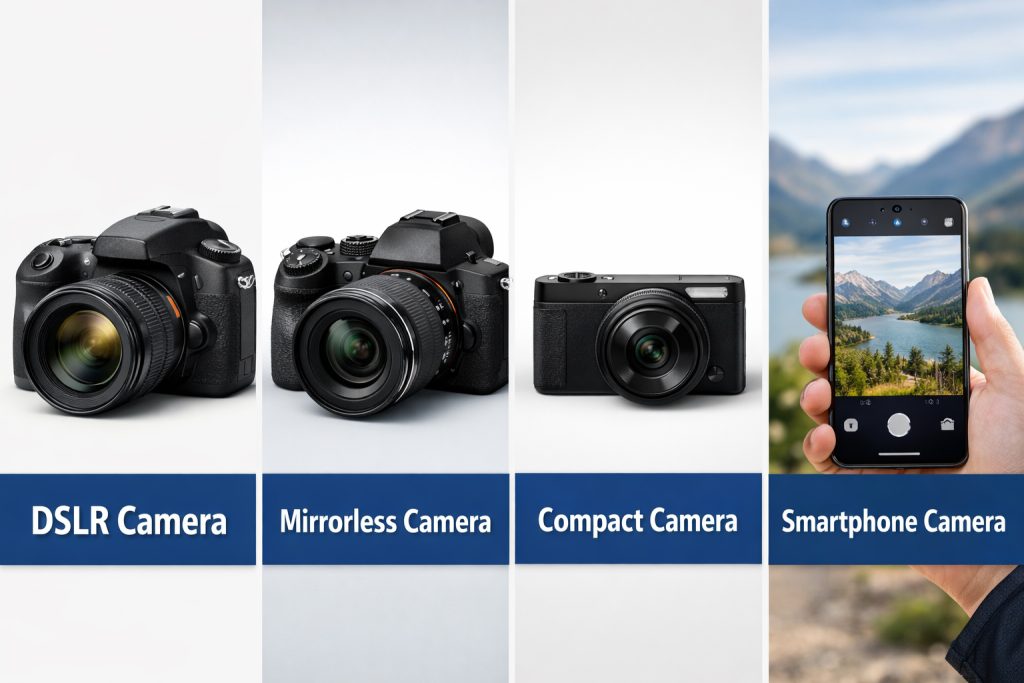
Neither approach automatically produces better photographs. Your equipment determines what is easy and what is difficult. It does not determine whether you can make an interesting photograph.
A useful way to think about equipment is:
What does this camera and lens allow me to do well?
That question is more productive than asking whether your equipment is good enough.
When the Equipment Becomes a Limitation
Every camera and lens eventually presents a problem.
Suppose you are using a kit lens whose maximum aperture is only f/5.6 at the longer end. You are photographing on a dim street at dusk. You want to keep the shutter speed around 1/250 second, but the camera is pushing ISO higher than you would like.
You have several choices.
- You could increase ISO.
- You could move closer and use a wider focal length.
- You could wait for a brighter section of the street.
- You could look for subjects standing beneath better light.
- You could accept some motion blur.
- You could change the photograph completely.
This is an important part of street photography: sometimes the solution is not another camera setting. If you cannot isolate a distant subject because your lens does not have enough reach, perhaps the better photograph is the wider environmental scene.
- If your lens is not bright enough for a dark alley, perhaps the available light itself can become part of the photograph.
- If autofocus struggles in very low light, perhaps you can pre-focus on a particular area and wait.
Photography becomes much more interesting when limitations force you to look for another solution.
Three Photographers, Three Different Photographs
Imagine three photographers standing at the same busy intersection. The subject is a man waiting to cross the road. The light, location, and subject are exactly the same. But the photographs do not need to be.
Photographer 1 — Freeze the Moment
Purpose: Capture the man’s expression and gesture clearly.
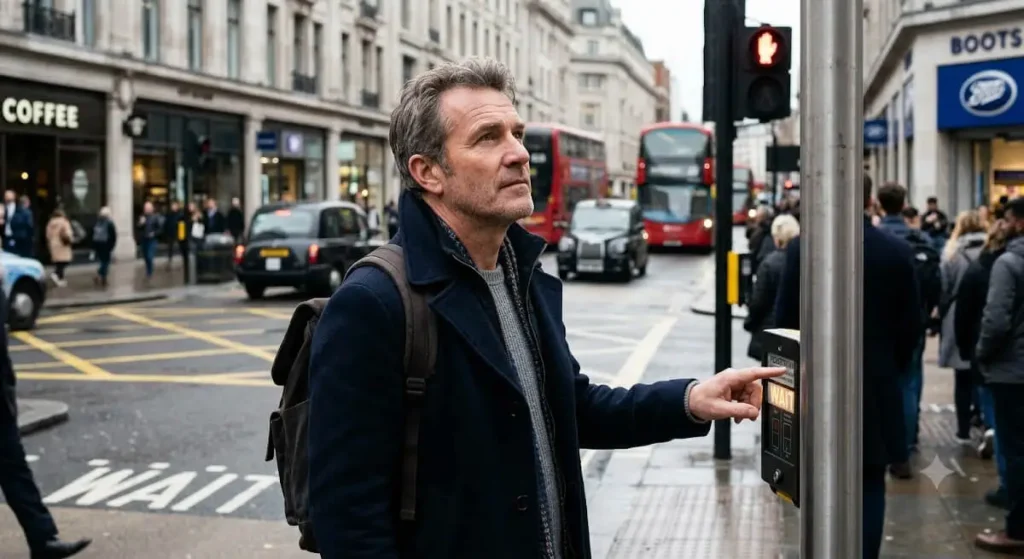
Approach: Wait until he looks toward the traffic and press the shutter as he prepares to cross.
Possible settings:
- Shutter: around 1/500 sec
- Aperture: around f/4
- ISO: Auto
- Focus: Continuous AF
- Drive: Short burst if necessary
Why: The priority is sharpness. A faster shutter speed reduces the risk of movement blur while the moderate aperture provides some separation from the background.
Photographer 2 — Show the Environment
Purpose: Show the relationship between the man, the traffic, and the city around him.
Approach: Step farther back and include more of the intersection.
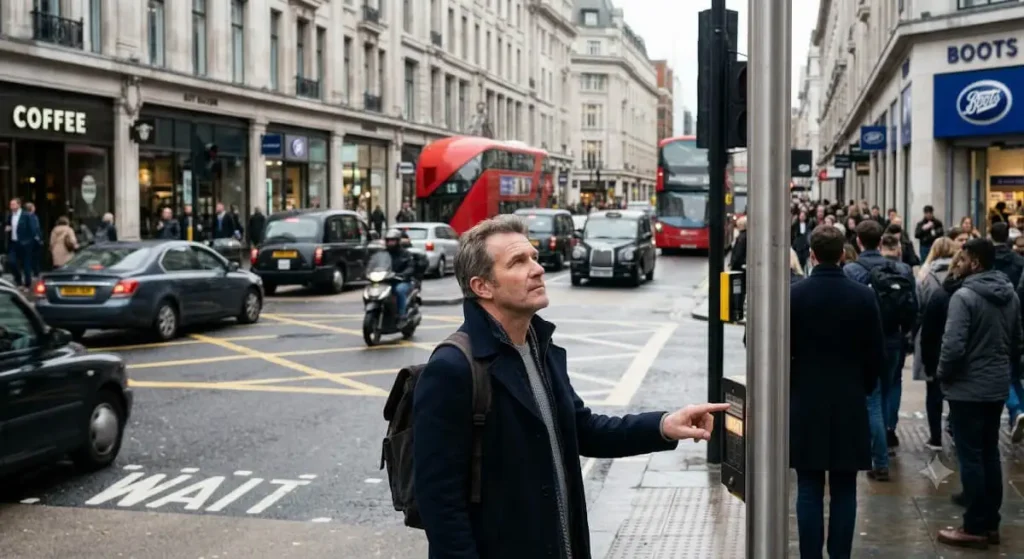
Possible settings:
- Shutter: around 1/250 sec
- Aperture: around f/5.6–f/8
- ISO: Auto or adjusted manually
- Focus: Single or continuous AF depending on movement
Why: The photographer is no longer trying to isolate the man. The environment is part of the story, so greater depth of field becomes useful.
Photographer 3 — Show the Energy of the Street
Purpose: Make movement part of the photograph.
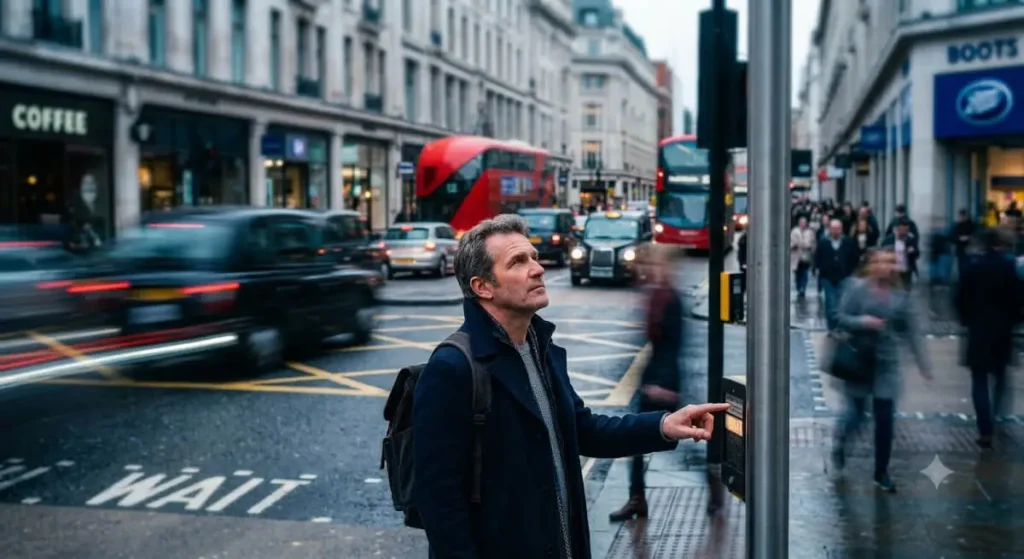
Approach: Use a slower shutter speed as the man and surrounding traffic move through the frame.
Possible settings:
- Shutter: around 1/15–1/30 sec
- Aperture: adjusted to maintain a suitable exposure
- ISO: Low if the light allows
- Focus: Pre-focus or autofocus depending on the situation
Why: Sharpness is no longer the only objective. Motion blur can communicate the energy and unpredictability of the intersection. The subject has not changed. The photographer’s intention has. And because the intention has changed, the camera settings change too.
The Light Changes Everything
Street photographers rarely control the light, which means learning to read it is more valuable than memorizing a fixed exposure.
Early Morning
Early morning streets may offer softer light and fewer people. If subjects are moving slowly, you may be able to use a moderate shutter speed. The softer light can also make wider apertures useful without producing extremely harsh highlights.
Midday
Bright midday light gives you plenty of exposure flexibility, but the harder problem may be contrast. Strong sunlight can create deep shadows beneath hats, buildings, and awnings.
You may want a faster shutter speed and a moderate aperture such as f/5.6 or f/8, particularly when you want environmental details to remain recognizable.
Golden Hour
Warm directional light can create strong relationships between people and shadows.
You may want to expose carefully for bright areas because highlights can disappear quickly.
A slightly faster shutter speed can also help when people are moving through changing patches of sunlight.
Overcast Light
Overcast conditions often produce soft, even illumination.
This can be excellent for observing people because you do not have to deal with extreme highlights and shadows.
You may be able to use a moderate aperture and allow the ISO to remain relatively low.
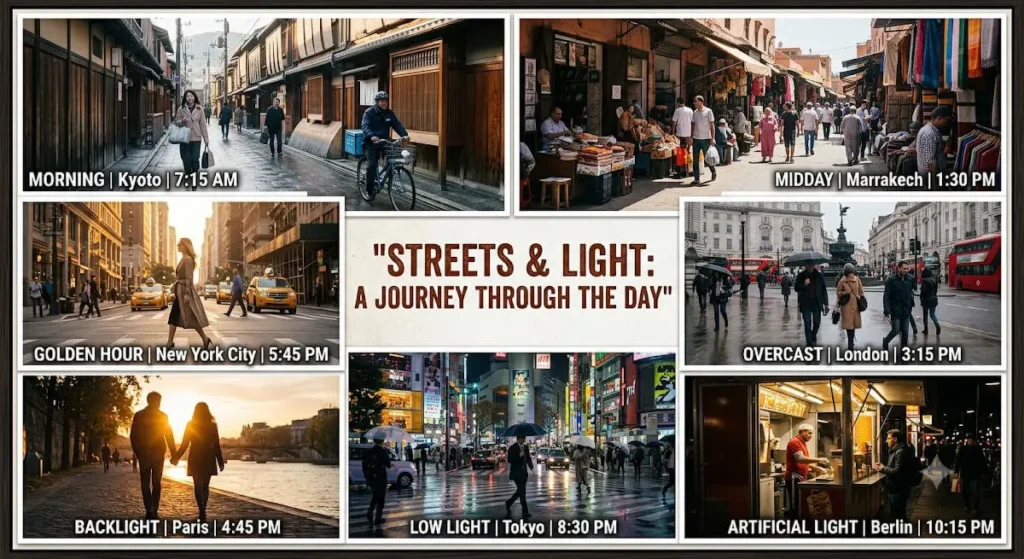
Backlight
When the sun is behind your subject, the exposure decision becomes more interesting.
You can expose for the person and potentially lose some background detail, or expose for the brighter background and allow the person to become a silhouette. Neither is automatically correct. The question is what you want the photograph to communicate.
Low Light
This is where shutter speed and ISO often become critical. If you want moving people to remain sharp, maintaining a useful shutter speed may require a higher ISO.
This is one situation where accepting ISO 1600, 3200, or higher can make more sense than lowering the ISO and accidentally creating motion blur.
Artificial Light
Street lamps, shop windows, signs, headlights, and illuminated advertisements can all become photographic elements. Mixed lighting can make automatic white balance unpredictable. Sometimes that is not a problem. Street photography does not always need perfectly neutral colour. The strange colour of artificial light may actually contribute to the atmosphere.
One Subject Can Give You Four Completely Different Photographs
Consider a person sitting alone outside a small tea shop.
The person is the same. The location is the same. But you could photograph the scene in completely different ways.
Photograph 1 — Isolate the Person
Approach: Move closer and use a wider aperture.
Possible settings: Around f/2.8, 1/250 sec, Auto ISO.
Reason: The goal is to separate the person from the clutter behind them and make their expression or posture the main point of attention.
Photograph 2 — Show the Place
Approach: Step back and include the shop, surrounding people, signs, and street.
Possible settings: Around f/5.6–f/8, 1/250 sec, Auto ISO.
Reason: The location now provides important information. More depth of field helps maintain recognizable environmental details.
Photograph 3 — Emphasize Light and Shadow
Approach: Wait until the person moves into a strong patch of light.
Possible settings: Around f/4, 1/500 sec, ISO adjusted to the light.
Reason: The contrast between light and shadow becomes more important than simply recording the entire scene.
Photograph 4 — Use Movement
Approach: Include passing pedestrians and allow some movement blur around the relatively stationary person.
Possible settings: Around 1/15–1/30 sec, with the aperture and ISO adjusted to suit the light.
Reason: The movement creates visual contrast between the still subject and the moving street.
The subject is the same, but the photograph changes because the photographer changes the intention.
The Mistake Street Photographers Often Notice Too Late
A street photograph can be perfectly exposed and technically sharp and still fail to hold your attention.
One of the most common reasons is background clutter.
You may see an interesting person and immediately concentrate on them. After taking the photograph, you notice a pole apparently growing from their head, a bright sign pulling attention away, a vehicle cutting through the frame, or another person standing awkwardly behind them.
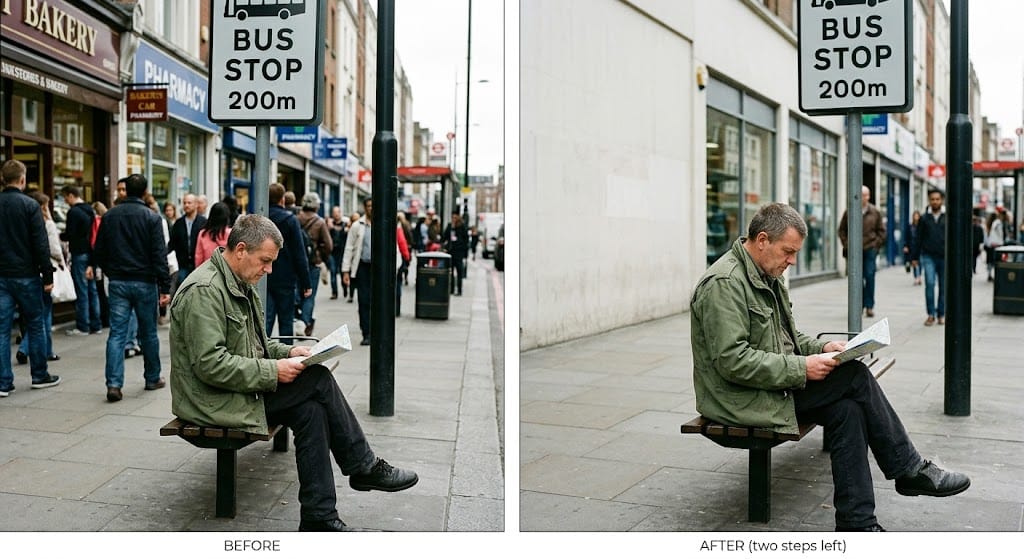
The camera recorded everything. Your eyes ignored most of it when you were standing there. This is why street photography requires attention to the entire frame.
Before pressing the shutter, ask:
- What will the viewer notice first?
- Is anything distracting from the subject?
- Are the edges of the frame clean?
- Is the subject positioned effectively?
- Is the light helping or hurting the photograph?
- Does the photograph communicate what I intended?
You do not need to answer every question consciously every time. With practice, you begin noticing these things almost automatically. And sometimes the solution is not a different setting. It may simply be one step to the left.
What Changes When You Change Shutter Speed?
Shutter speed is one of the easiest settings to experiment with in street photography because its visual effect is immediately noticeable.
1/1000 sec — Freeze Fast Movement
At around 1/1000 second, fast-moving people, cyclists, vehicles, and gestures can be frozen effectively.
The disadvantage is that the camera receives less light, so you may need a wider aperture or higher ISO.
1/500 sec — A Safe Starting Point for Faster Action
Around 1/500 second is useful when you want to reduce movement blur while still allowing reasonable exposure in many daylight situations.
It is particularly useful when people are walking quickly or moving toward you.
1/250 sec — General-Purpose Street Movement
Around 1/250 second is a practical starting point for ordinary human movement.
It will not guarantee sharpness in every situation, but it gives you a useful balance between freezing movement and allowing enough light.
1/30 sec — Let the Street Move
At around 1/30 second, movement becomes much more visible.
Walking people may show blur, while a relatively stationary subject can remain reasonably recognizable if your camera technique is good.
This can create photographs with a strong sense of movement.
The purpose is not to find one perfect number.
The purpose is to understand what happens when you change the number.
Practical Camera Settings for Street Photography
| Situation | Aperture | Shutter Speed | ISO | Focus | Other Setting | Main Purpose |
|---|---|---|---|---|---|---|
| People walking in daylight | f/4–f/5.6 | 1/250–1/500 sec | Auto/100–800 | Continuous AF | Single/burst | Keep ordinary movement sharp |
| Fast-moving subjects | f/2.8–f/5.6 | 1/500–1/1000 sec | Auto | Continuous AF | Burst if useful | Freeze movement |
| Environmental street scene | f/5.6–f/8 | 1/125–1/250 sec | Auto/100–800 | Single/Continuous AF | Exposure compensation | Keep subject and surroundings recognizable |
| Low-light street | f/1.8–f/4 | 1/125–1/250 sec | Auto/800–6400+ | Continuous AF | Auto ISO | Maintain usable shutter speed |
| Static subject | f/2–f/5.6 | 1/125–1/250 sec | Low/Auto | Single AF | Flexible | Control background and subject detail |
| Intentional motion blur | f/5.6–f/11 | 1/8–1/30 sec | Low if possible | AF/pre-focus | Stabilization if appropriate | Show movement creatively |
These are starting points, not fixed rules.
Bright midday light may allow ISO 100 at 1/500 second. A dark street may require ISO 3200 or higher at the same shutter speed.
Likewise, an environmental photograph might work beautifully at f/8 in one situation but require f/4 in another because the light has changed.
The settings should follow the conditions.
If You Have Only One Lens
Suppose your only lens is an 18–105mm f/4–f/16 zoom.
You can still do a great deal with it.
At 18mm, you can include more of the environment. This is useful when the architecture, street, crowd, or relationship between people is important.
Around the middle of the zoom range, you can make more natural-looking photographs without getting extremely close to your subject.
At 105mm, you can isolate details from farther away and compress the relationship between the subject and the background.
The f/4 maximum aperture gives you reasonable control in many situations, although low light becomes more challenging as you zoom toward the longer end.
If the light becomes too low, you may need to increase ISO.
If the background is too distracting, try moving rather than immediately looking for a faster lens.
If the subject is too far away, consider whether a wider environmental photograph might actually tell a better story.
And if you cannot get the shallow depth of field produced by an expensive prime lens, do not try to imitate that photograph exactly.
Find photographs that your lens is particularly good at making.
You do not need to make the same photograph as someone using specialist equipment. Find the photographs that your equipment allows you to make well.
What About the Photographer Who Is Just Starting?
If you are new to street photography, do not try to learn every camera function at once.
A Simple Exercise to Understand Street Photography
You do not need an expensive camera or a special location for this exercise.
Exercise
- Find a place where people are naturally moving—such as a market, pedestrian area, station entrance, or busy street.
- Set your shutter speed to around 1/250 second.
- Photograph several scenes without changing the shutter speed.
- Change it to around 1/500 second and photograph similar movement.
- Then try around 1/30 second.
- Compare the photographs on your computer or camera screen.
- Pay attention to what happens to people, vehicles, gestures, and the overall feeling of movement.
Then repeat the exercise with aperture.
Try something relatively wide, such as f/2.8 or f/4, and then something more closed down, such as f/8.
Look for changes in:
- Sharpness
- Motion
- Depth of field
- Background
- Exposure
- Noise
- Composition
- Mood
- Subject separation
The exercise is not about finding a magic setting.
It is about developing an instinct for what each setting does.
The goal is not to discover one perfect setting. The goal is to understand how your decisions change the photograph.
If You Remember Only Five Things
1. Shutter speed should respond to movement.
If you want people to remain sharp, start around 1/250 second and adjust according to how quickly they are moving. If movement adds something to the photograph, deliberately experiment with slower speeds.
2. Aperture should respond to how much of the environment matters.
A wider aperture can help isolate a subject, while f/5.6–f/8 can be useful when the surroundings are part of the story.
3. Do not be afraid of ISO.
When light disappears, raising ISO may be a much better solution than allowing your shutter speed to become too slow. Some noise is often preferable to unwanted motion blur.
4. Look at the entire frame, not just the subject.
Street photographs often become stronger when you notice distracting objects, bright areas, awkward edges, and background relationships before pressing the shutter.
5. Your intention determines your settings.
Two photographers can stand in exactly the same place, photograph exactly the same person, and need completely different settings because they are trying to say different things with the photograph.
The Street Is Not Waiting for Your Settings
Street photography rarely gives you complete control.
The light changes. People move. A bus arrives. Someone steps into your frame. A shadow disappears. A person turns their head at exactly the wrong—or right—moment.
That unpredictability is not a problem to eliminate.
It is part of what makes the genre interesting.
At the beginning of this article, we imagined a photographer seeing a person standing in a patch of late-afternoon light. The temptation was to ask immediately which settings should be used.
But the more useful question was something else.
What matters about this moment?
- If the person’s movement matters, protect it with shutter speed.
- If the background is distracting, consider aperture and your position.
- If the environment tells part of the story, give it enough depth of field.
- If the light is disappearing, let ISO help.
- If the scene is moving too quickly for careful exposure decisions, simplify your approach and prepare before the moment arrives.
This is the real progression:
Observation → Intention → Camera Decision → Photograph
The camera is not supposed to tell you what the photograph should be.
It should give you enough control to respond to what you have already seen.
That is why there is no single set of “best camera settings” for street photography.
There are only settings that make sense for the photograph you are trying to make.
The best camera setting is not the one you memorized. It is the one that makes sense for the street in front of you.
