The lenses which are mainly used in D-SLR cameras are not a single type of concave or convex lens. It is a biconcave (bi = double) and a biconvex lens. A group of lenses is used for converging the light for the proper focus of an image and diverging the light for magnifying the object.
Quick recap of concave and convex lens
Concave Lens
A concave lens is used for diverging light. It is also called a negative lens. It has at least one surface inward curve just like a spoon. The middle of the concave lens is thinner than the top and bottom areas. When the position of the object is in front of the concave lens, the position of the image is before the object on the same side. The image is virtual, upright, and smaller than the original object.
Convex Lens
The convex lens is used for converging light and it produces a proper focus image. It is relatively thick in the middle portion than the top and bottom. The image for a faraway object is real, inverted, diminished, and on the opposite side of the lens. As the object approaches the lens, the image remains real and inverted but eventually becomes magnified. When the object passes the focal point of the lens, the image becomes virtual, erect, magnified, and on the same side of the lens.
Let’s unmask the basics of photography more on lens
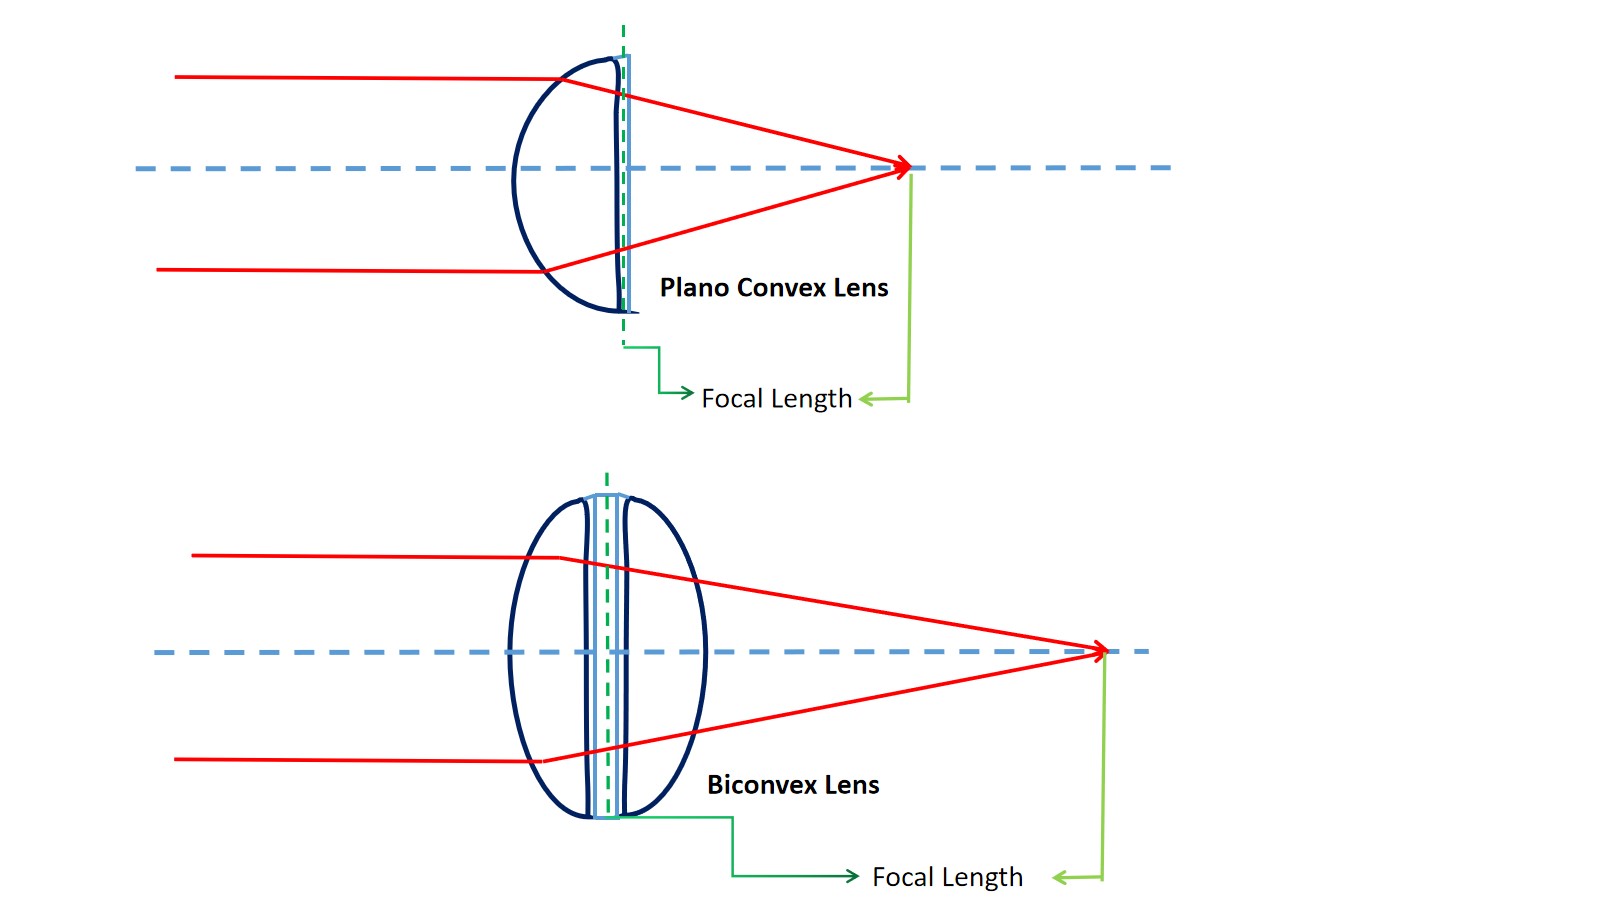
Plano-Convex & Biconvex Lenses
Both types of lenses are positive lenses or used for focusing the light. The lenses are thick in the center area and thin at the top and bottom. These lenses are used to focus a pre-defined point based on the amount of curvature of their surface.
In the Plano-Convex lens, one side is the flat type and the other side is curved. It is used for forming an image where the object is far away from the lens. This is also known as infinite conjugate. The star image in the night sky is the best example of using this type of lens.
In the Biconvex lens, both sides are curved. It is used for forming an image where the object is near the lens. This is also known as finite conjugate. Microscopic image is the best example for using this type of lens
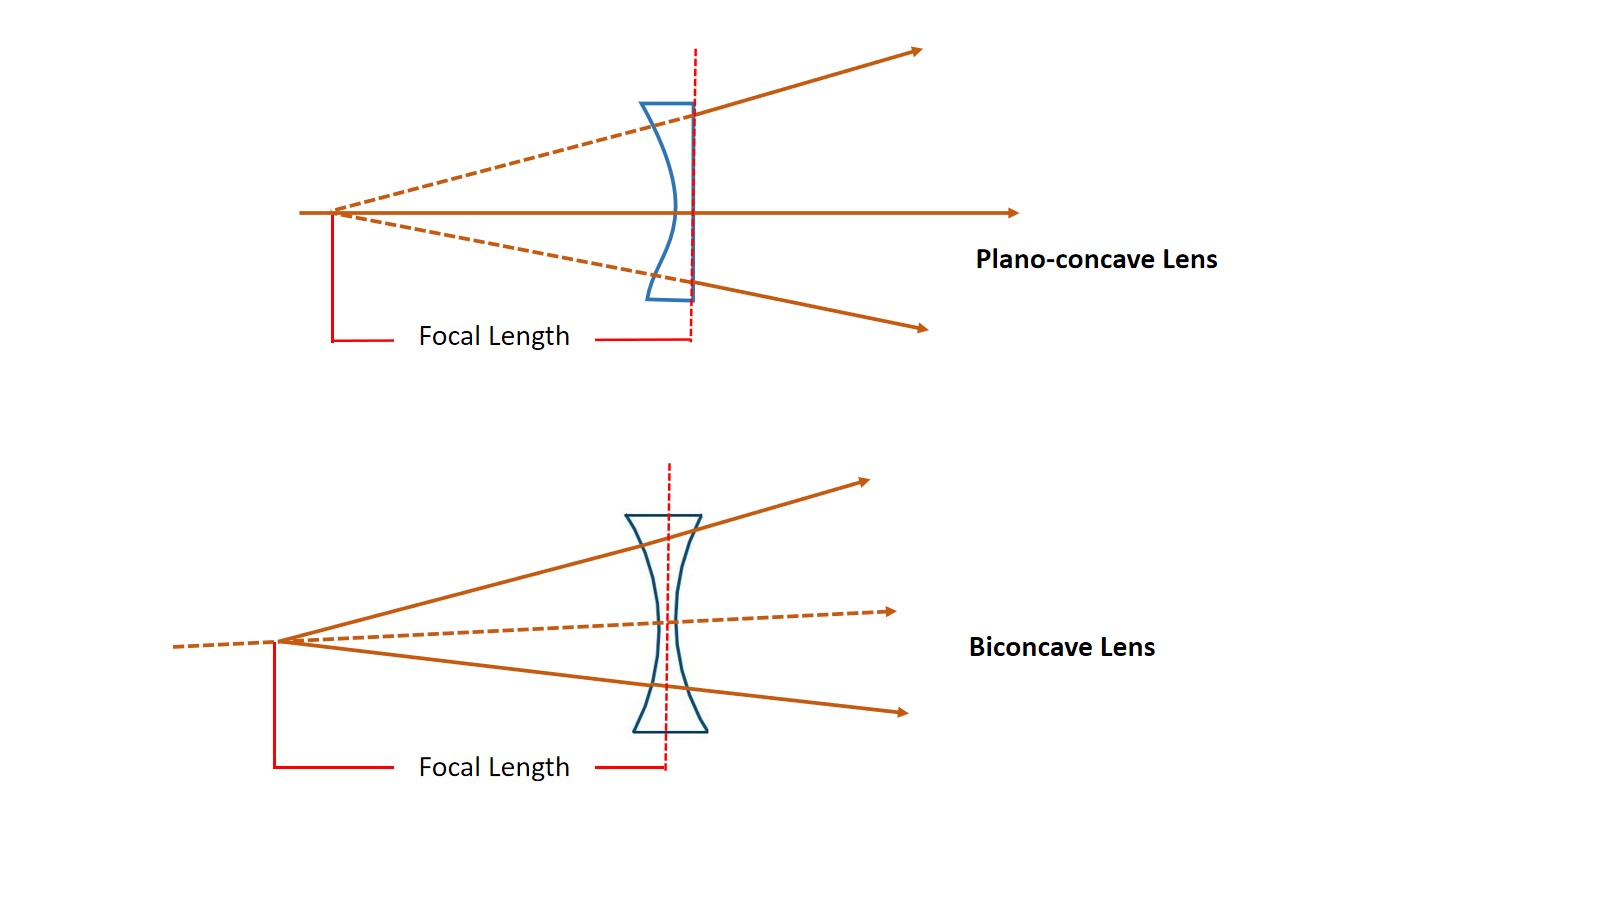
Plano-Concave & Biconcave Lenses
Both types of lenses are negative lenses or used to disperse more light. The lenses are thick at the top and bottom area and thin in the middle area.
In Plano Concave lens the spherical and coma aberration are significantly eliminated at the infinite conjugate when collimated at the curved area. It is used to increase the focal length. The infinite conjugate ratio of object and image is 5:1.
In Biconcave lens output beams diverge from the virtual image which is located on the object side. It is used where the infinite conjugate ratio with object and image is 1:1. The focal length is the distance between the virtual image and the lens.
Meniscus lens
It has two spherical curved surfaces, one side convex and the other side is concave. It is thicker at the center than at the edges. It is used for reducing spherical aberration. When a meniscus lens is combined with another lens, the focal length is shortened and the numerical aperture of the system is increased. This reduces image distortion and increases image resolution.
There are two types of meniscus lenses available.
- Positive meniscus lenses
- Negative meniscus lenses.

Positive meniscus lens
It is used in applications that require a small focal number, which is less than 2.5. For focal numbers ranging between 2.5 and 10, a meniscus lens can minimize spot size and enhance image quality. The concave side of the positive lens has a smaller curvature, and the convex side has a greater curvature.

Negative meniscus lens
It is used for applications using infrared materials with a high refractive index. The concave side of the negative lens has a greater curvature, and a smaller curvature on the convex side. They are used in beam-expanding applications that require minimal spherical aberration.
Lens basics for eye sight
Convex and concave lenses are vastly used for correcting the human eye’s sight problems. These lenses are the basics of photography too. The concave lens in the eyeglass is used for correcting nearsightedness. Because the distance between the eye’s lens and retina in nearsighted people is longer than it should be, such people are unable to make out distant objects clearly. Placing concave lenses in front of a nearsighted eye reduces the refraction of light and lengthens the focal length so that the image is formed on the retina.
Convex lenses are used in eyeglasses for correcting farsightedness. where the distance between the eye’s lens and retina is too short, as a result of which the focal point lies behind the retina. Eyeglasses with convex lenses increase refraction, and accordingly reduce the focal length.
When the Lens makers invented some formula only for the welfare of human beings, as a photographer you should know a little bit about the formula. I’m sure Soumik (my computer science student) says “Sir Sir oh! Sir, do you forget the first property of OOP (Object Oriented Programming)?” I am surely answered, “it is true you can drive a car without knowing the detailed mechanism of a car (abstraction – OOP first property) but as a photographer, if you know the detailed mechanism, it will help you click memorable moments with perfect exposure by sitting anywhere in the auditorium or open air.” Hence, Soumik agreed so, I have to tell you the formula.
Both the mirror equation and magnification equation are combined in lens and it is known as Lens maker’s equation.
I/f = 1/u + 1/v
[ f = focal length of the lens. v = the distance of the image formed from the lens and u = the distance of object from the lens. ]
Magnification formula
m = v/u
The object image size is larger or smaller based on the proportion of v and u where m = magnification. The magnification (m) produced by a lens is defined as ratio of the height of the image to the height of the object. Therefore, m = height of the image / height of the object or m = hi / h0
In terms of u and v: m = image distance / object distance or m = v / u. So, combining both for magnification:
m = v / u = hi / h0
Let’s unmask the basics of virtual and real image
Concave and Convex lens creates virtual and real image based on distance. In optics, an image is defined as the collection of focus points of light rays coming from an object.
Real image is the collection of focus points made by converging rays. Virtual image is the collection of focus points made by extensions of diverging rays.
Basics of photography
Magnification produced by Convex Lens
A convex lens can form virtual as well as real images, so the magnification produced by a convex lens can be either positive or negative.
Magnification is positive for virtual image and negative for real image.
When |m|>1 : the image is magnified.
When |m|<1 : the image is diminished.
When |m|=1 : the image is of the same size as that of the object.
Magnification produced by Concave Lens
Concave lenses always form virtual images, so magnification produced by a concave lens is always positive.
A concave lens always forms the image smaller than the object, so |m|<1
| Lens type | Object distance (v) | Image distance (u) | m = v / u | M = hi / h0 |
| Concave | – | – | + | |m|<1 |
| Convex | – | Real image +Virtual image – | Real image -Virtual image + | |m|=1, when hi=ho, |m|<1, when hi<ho|m|>1, when hi>ho |
Let’s solve a problem. Tea break? Okay I agree with your pov. Oh! I forget, you have two hands. Hold the cup in one hand and solve the problem with other hand. (Ssshhhh! I will solve the problem, you just go through it. Another unmasked basics of photography.)
Suppose an object is placed 20 cm from convex lens where +4 cm is the focal length. What will be the image distance.
As per formula,
1/f = 1/u + 1/v or 1/u + 1/v = 1/f
1/20 + 1/v = 1/4
1/v = 1/4 – 1/20
1/v = 1/5
So, the image distance (v) is 5 cm.
Unmask the basics of various lenses as group elements in the D-SLR camera

You may be interested to read the following articles.
Masked basics of photography part I


Absolutely fantastic information Sir.