

How direction, quality, colour and contrast transform the emotional character of a photograph
Photography begins with light.
Before the camera records a scene, before the lens determines perspective, before shutter speed freezes a moment and aperture controls depth of field, there is light. It is light that reveals the subject, creates shadows, separates foreground from background, gives colour its character and determines whether an ordinary scene feels peaceful, dramatic, mysterious or alive.
Yet photographers often learn light as a technical problem.
Is the photograph correctly exposed?
Is the ISO too high?
Should the shutter speed be faster?
Should the aperture be opened?
These questions matter. But they are only the beginning.
The deeper question is:
What is the light saying?
A photograph can be technically perfectly exposed and still feel lifeless. Another photograph may contain deep shadows, bright highlights and imperfect exposure by conventional standards, yet communicate extraordinary emotion.
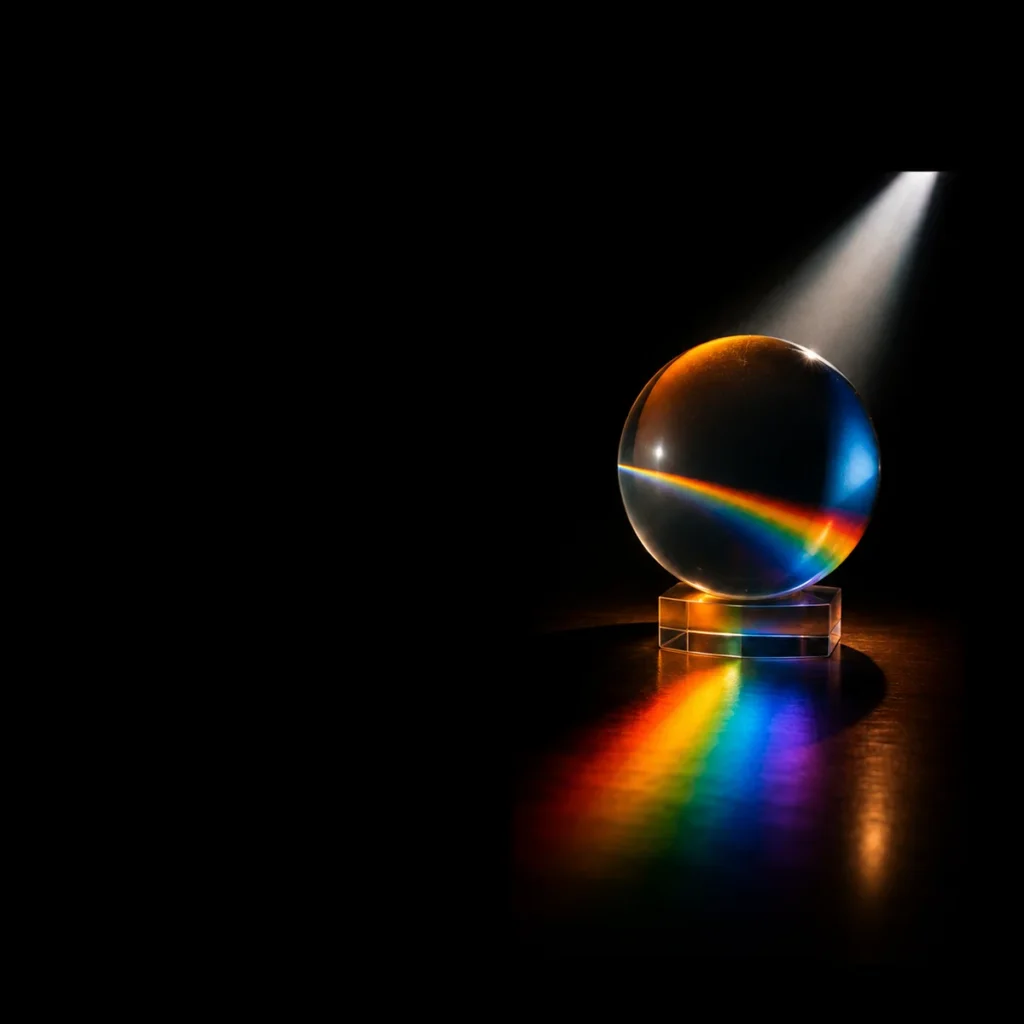
That difference comes from understanding light not merely as something that illuminates a subject, but as a creative language.
This is where photography moves from exposure to expression.
Light Is More Than Brightness
When beginners think about light, they often think about quantity.
There is too much light.
There is not enough light.
The photograph is dark.
The photograph is bright.
But light has many more qualities than brightness.
A photographer needs to learn to observe:
- Direction — where the light comes from
- Quality — whether the light is hard or soft
- Colour — whether the light is warm, cool or neutral
- Intensity — how strong the illumination is
- Contrast — the difference between light and shadow
- Distribution — where the light falls and where it doesn’t
- Duration — how the changing light alters the scene over time
Understanding these characteristics changes the way you see.
Instead of simply asking, “Is this a good time to take a photograph?”, you begin asking:
“What can this particular light allow me to say?”
That is a much more powerful question.
1. Direction: Where Light Comes From Changes Everything
The direction of light is one of the first things a photographer should learn to recognise.
Move the light, and you can completely change the character of the same subject.
Imagine a person standing beside a window.
If the person faces the window, the face may be evenly illuminated.
If the person turns sideways, one side of the face may become brighter while the other falls into shadow.
If the person turns away from the window, the face may become dark while the background remains bright.
The person hasn’t changed.
The light has changed.
And therefore, the photograph has changed.
Front Light: Clear and Direct
Front lighting occurs when the light comes from behind the photographer and illuminates the subject from the front.
This can produce relatively even illumination and make details easy to see.
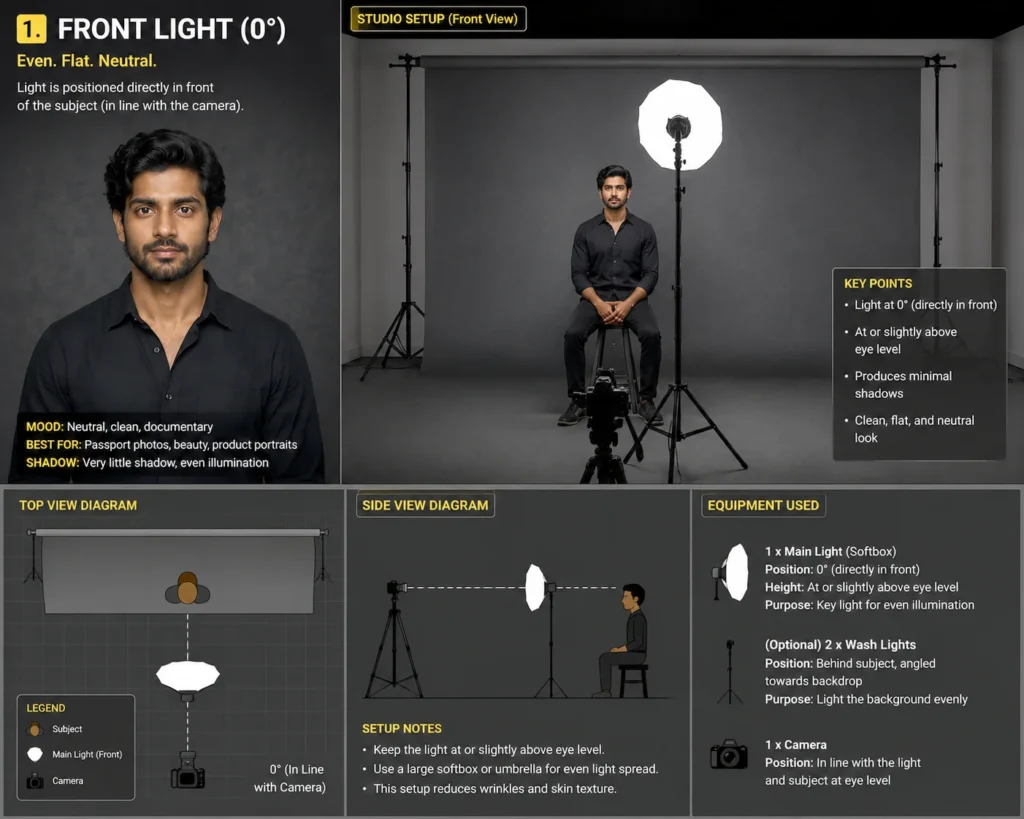
It is useful for:
- portraits where facial detail is important
- documentary photographs
- colourful subjects
- situations where you want a straightforward representation
Imagine photographing a brightly coloured market stall in the morning with the sun behind you.
The colours appear clear and the objects are easy to read.
But front light can sometimes reduce the sense of depth because shadows are less prominent.
The photograph may be informative without necessarily being dramatic.
That’s not a weakness. It simply means that the light is telling a particular kind of story.
2. Side Light: Revealing Shape and Texture
Side lighting is one of the most powerful forms of light for creating depth.
When light comes from one side of the subject, it creates a relationship between illumination and shadow.
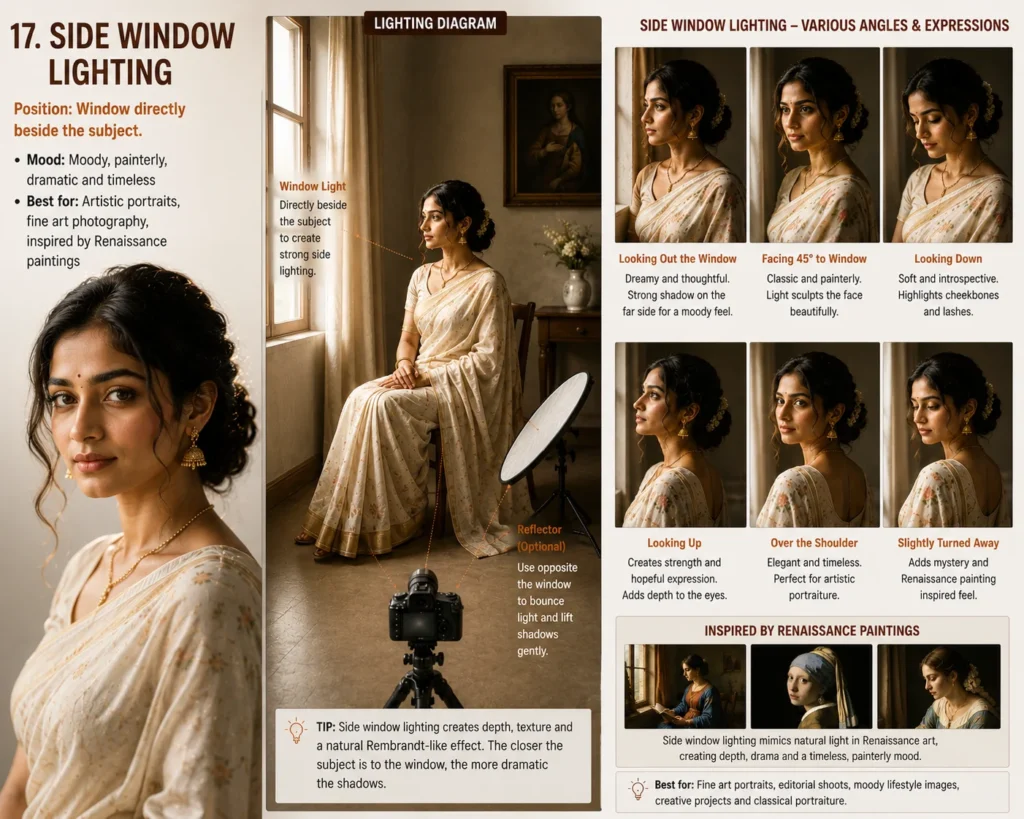
This is especially effective for:
- portraits
- architecture
- landscapes
- textured surfaces
- still life
- street photography
Imagine an old stone wall in Rajasthan.
Under flat midday light, the wall may look relatively ordinary.
Now imagine the same wall shortly after sunrise, when sunlight arrives from the side.
Suddenly every crack and uneven surface produces tiny shadows.
The wall appears older.
More tactile.
More three-dimensional.
The subject hasn’t changed.
The shadows have revealed information that flat light was hiding.
This is one of the most important lessons in photography:
Shadows are not the absence of information. They are information.
3. Backlight: When Light Becomes Atmosphere
Backlighting occurs when the main light source is behind the subject and faces toward the camera.
Many photographers initially avoid this situation because the subject can become underexposed.
But backlight can create some of the most emotional photographs.
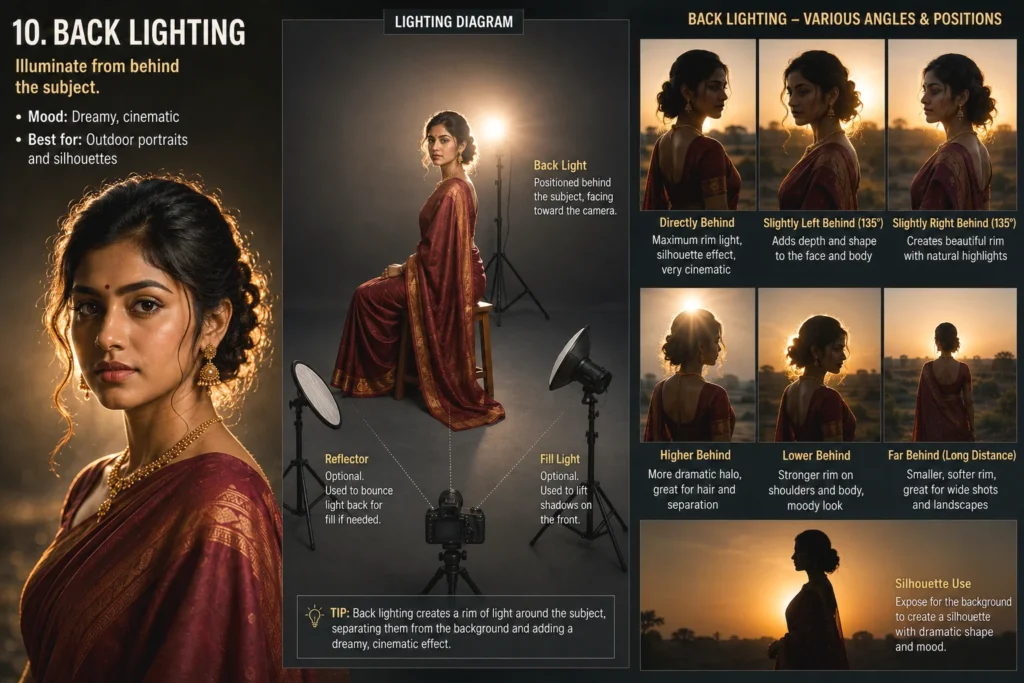
Think about a person standing beneath a tree during late afternoon.
The sun is behind them.
Leaves glow around the edges.
The person’s hair catches a thin rim of light.
The face may fall partially into shadow.
Technically, you could brighten the entire subject.
But should you?
Sometimes the darkness is exactly what makes the photograph work.
The viewer doesn’t need every facial detail.
The silhouette and glowing edges may communicate solitude, memory or mystery much more effectively.
Backlight can create:
- silhouettes
- rim light
- glowing hair
- atmospheric haze
- flare
- translucent leaves
- dramatic separation between subject and background
The important thing is to stop thinking:
“My subject is too dark.”
and start thinking:
“Is this darkness helping my story?”
4. Top Light: Powerful but Difficult
When the sun is directly overhead, light comes from above.
This is common around midday and can create deep shadows under the eyes, nose and chin.
For portraits, this can be challenging.
But it isn’t useless.

Top light can be excellent for creating:
- harsh urban photographs
- graphic shadows
- strong architectural patterns
- documentary images
- high-contrast street photography
Imagine walking through an Indian city at noon and noticing the shadow of a bicycle falling sharply across a wall.
The light is harsh.
Instead of photographing the bicycle itself, you photograph the shadow.
Suddenly the “bad light” becomes the subject.
This is another important shift in thinking:
A photographer doesn’t always need to escape difficult light. Sometimes difficult light creates the photograph.
5. Soft Light vs Hard Light
Direction tells you where light comes from.
Quality tells you how that light behaves.
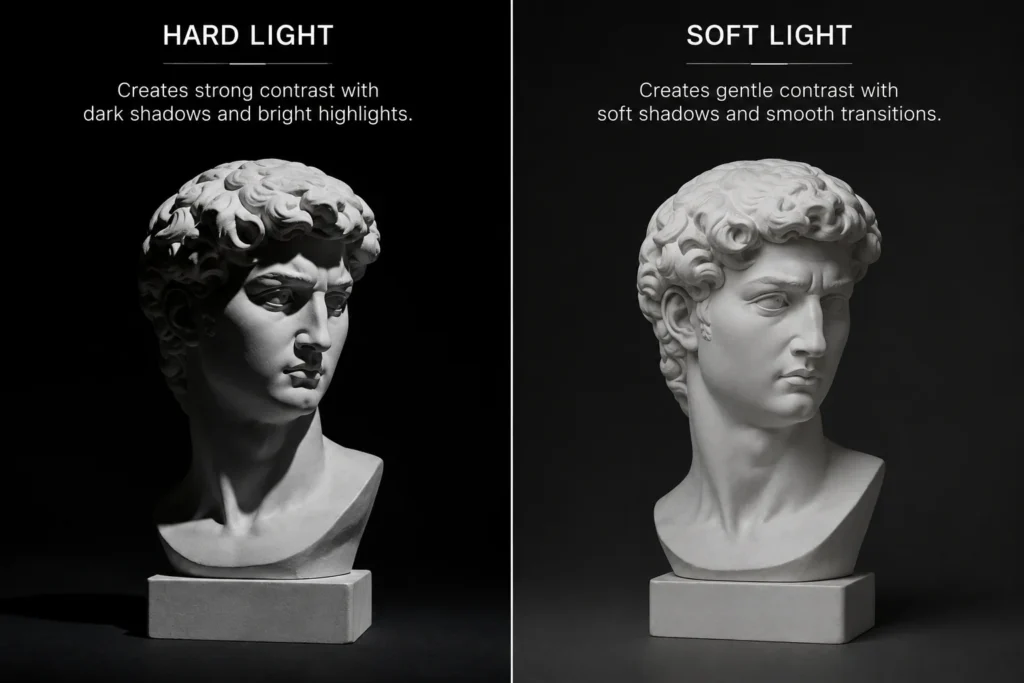
The most important distinction is between soft and hard light.
Soft light
Soft light produces gradual transitions between highlights and shadows.
Examples include:
- an overcast sky
- light coming through a large window
- open shade
- diffused artificial light
Soft light is often flattering for portraits because it reduces harsh shadows.
Imagine photographing an elderly person beside a large north-facing window on a cloudy day.
The wrinkles and features remain visible, but the transition from light to shadow is gentle.
The result can feel intimate and calm.
Hard Light
Hard light creates strong shadows and clear edges.
The midday sun is a common example.
A small artificial light source placed close to a subject can also produce hard light.
Hard light can communicate:
- tension
- energy
- isolation
- harshness
- drama
- intensity
Imagine photographing a narrow alley at noon.
Strong sunlight enters from above and creates bright patches separated by deep shadow.
Instead of trying to make the entire alley evenly exposed, you wait for someone to walk through the bright area.
Now the photograph has structure.
Light becomes a stage.
6. The Size of the Light Source Matters
One of the most useful principles in understanding soft and hard light is this:
The apparent size of the light source relative to the subject affects the softness of the light.
A large window close to a person’s face can produce soft light.
The same window viewed from much farther away becomes relatively smaller and produces harder-looking illumination.
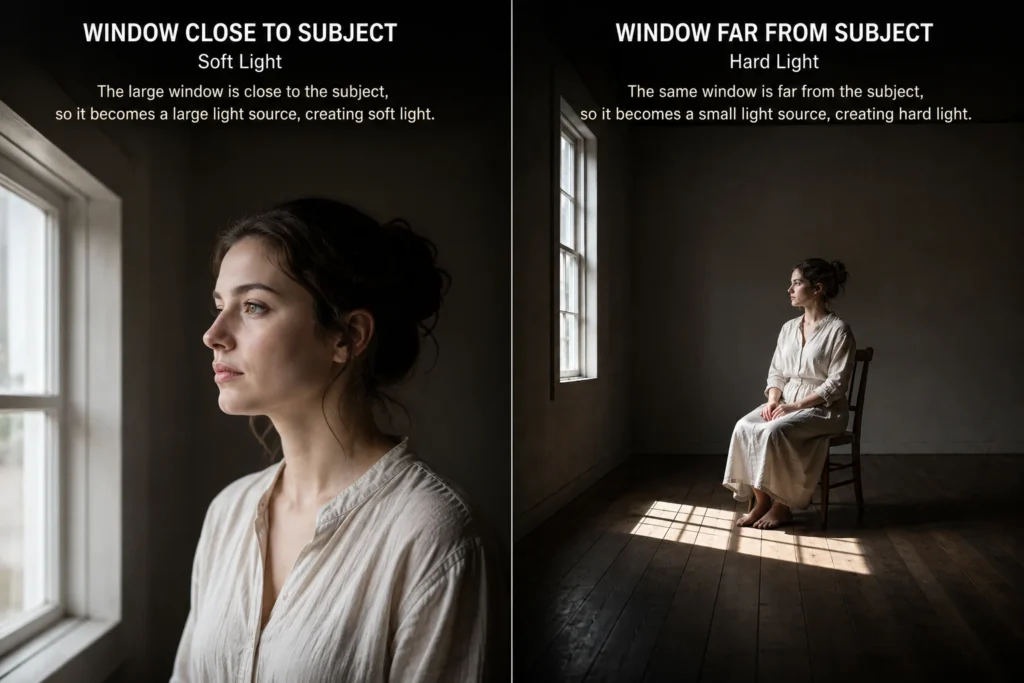
This principle applies to both natural and artificial light.
That means you can often change the quality of light without changing the subject.
Move the subject closer to a large window.
Move a light source closer.
Diffuse the light.
Change the angle.
Photography becomes an experiment.
7. Colour: Light Has a Temperature
Light is not always white.
Morning sunlight can appear warm.
A shaded area may appear blue.
A candle produces a strongly warm glow.
Fluorescent lighting can have a different colour character again.
Our eyes are remarkably good at adapting to these differences.
The camera is less forgiving.
This is why white balance matters.
But colour temperature isn’t merely a technical issue.
It can become part of the emotional vocabulary of a photograph.
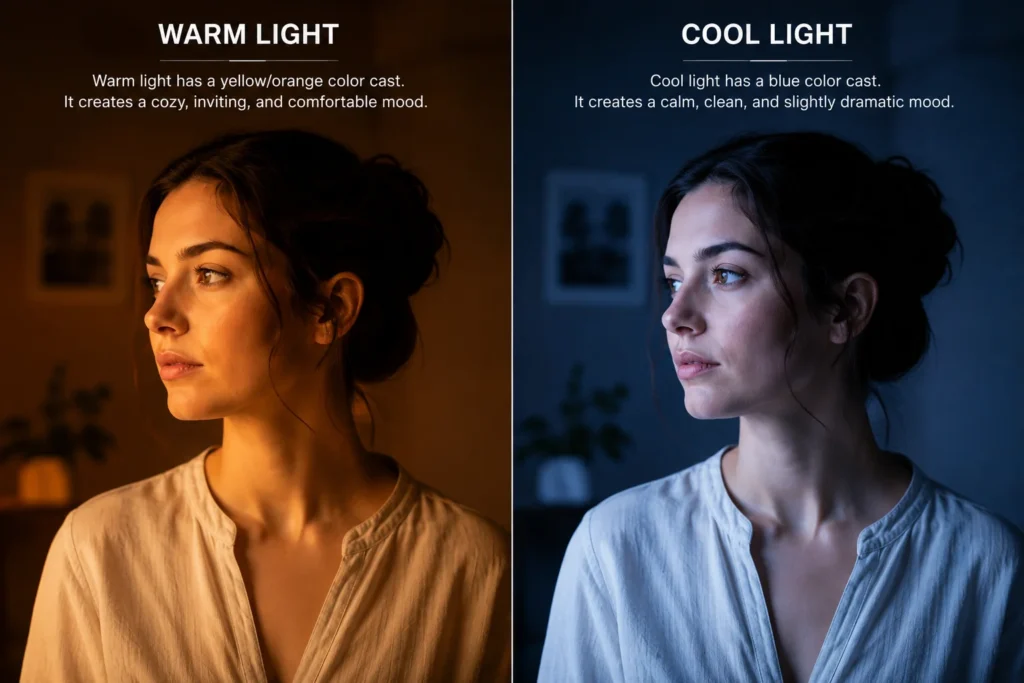
Warm Light
Warm light often contains yellow, orange or golden tones.
It can suggest:
- comfort
- nostalgia
- intimacy
- happiness
- warmth
- memory
Think of a small tea stall at sunset.
Golden light falls across a person’s face while steam rises from a cup.
The warmth of the light becomes part of the story.
The viewer doesn’t simply see a cup of tea.
They may feel the atmosphere of the evening.
8. Cool Light: Distance and Quiet
Cool blue light can produce an entirely different emotional response.
Think about a landscape shortly before sunrise.
The sun hasn’t appeared yet.
The sky is blue-grey.
The mountains are quiet.
The landscape may feel:
- peaceful
- lonely
- mysterious
- distant
- contemplative
Now imagine photographing the same landscape twenty minutes later when warm sunlight begins touching the peaks.
The geography hasn’t changed.
But the emotional character has changed dramatically.
Colour tells the viewer how a scene feels.
9. Golden Hour: Beautiful—but Don’t Stop There
Photographers frequently hear about golden hour.
And for good reason.
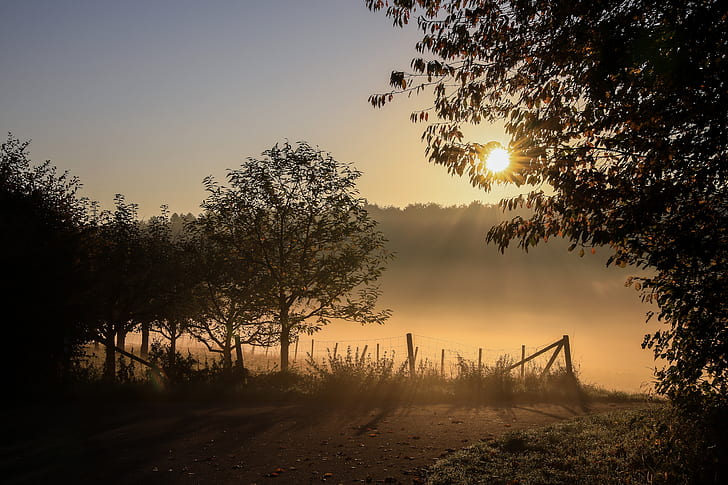
Low-angle sunlight creates warm tones, long shadows and beautiful directional illumination.
But one danger exists:
When everyone waits for golden hour, photographers can start believing that good photography only happens during golden hour.
It doesn’t.
Blue hour can be extraordinary.
Foggy mornings can be extraordinary.
Rain can be extraordinary.
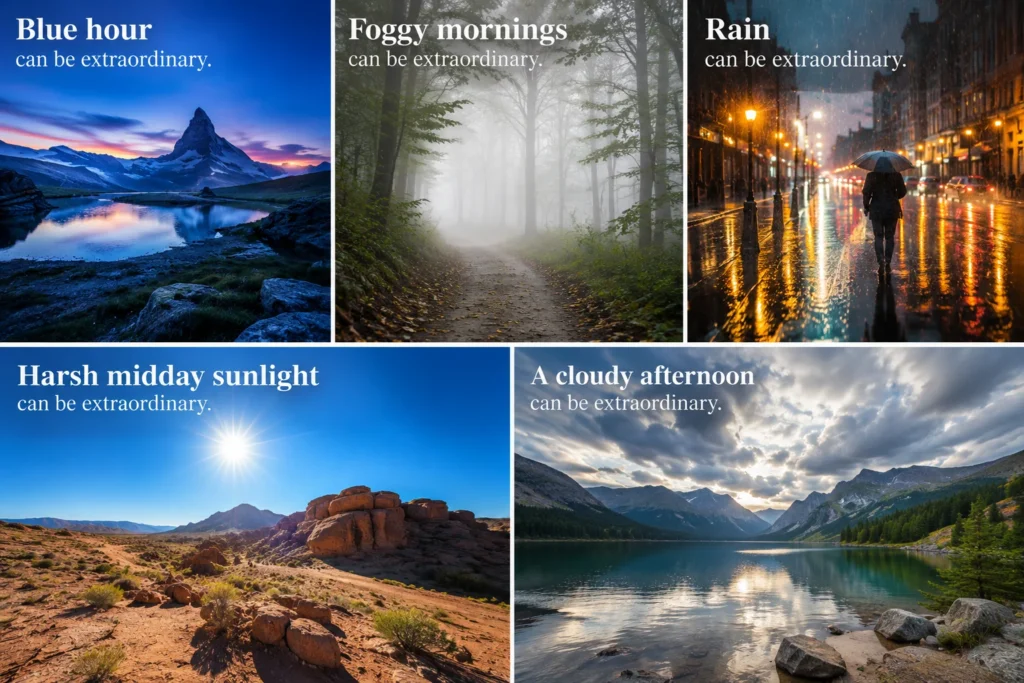
Harsh midday sunlight can be extraordinary.
A cloudy afternoon can be extraordinary.
The real skill isn’t finding perfect light.
It is learning to recognise what different light can do.
10. Contrast: The Conversation Between Light and Shadow
Contrast is one of the most important elements of visual storytelling.
High contrast means there is a significant difference between bright and dark areas.
Low contrast means the transition between tones is more gentle.
Neither is automatically better.
They communicate different things.
High Contrast
Imagine a person standing in a narrow doorway with strong sunlight outside.
The doorway is dark.
The street is bright.
The difference creates tension.
High contrast can make an image feel:
- dramatic
- powerful
- mysterious
- energetic
- cinematic
Street photographers often use this relationship between light and shadow to simplify complex environments.
Low Contrast
Now imagine a foggy morning.
The sky is bright but diffused.
The trees disappear gradually into the mist.
There are no deep blacks or brilliant highlights.
The scene feels quiet.
Soft.
Dreamlike.
Low contrast can communicate:
- peace
- softness
- nostalgia
- delicacy
- melancholy
Again, the technical characteristics of the light become emotional characteristics.
11. Exposure Is Not the Same as Expression
This is where many photographers become trapped.
Modern cameras are extraordinarily capable.
They can measure light.
They can suggest exposure settings.
They can preserve shadow detail.
They can recover highlights.
But a camera cannot decide what the photograph should feel like.
Suppose you photograph a lonely person sitting beside a window.
You expose the image so that every corner of the room is perfectly visible.
Technically, the exposure may be excellent.
But perhaps the photograph would be stronger if the room disappeared into darkness and only the person remained illuminated.
That is an artistic decision.
You are deliberately controlling exposure to control emotion.
This is why correct exposure and expressive exposure are not always the same thing.
12. Aperture, Shutter Speed and ISO Become Creative Tools
Once you understand light, the exposure triangle stops being merely a technical formula.
It becomes a creative vocabulary.
Aperture
A wide aperture can isolate a subject and reduce distractions.
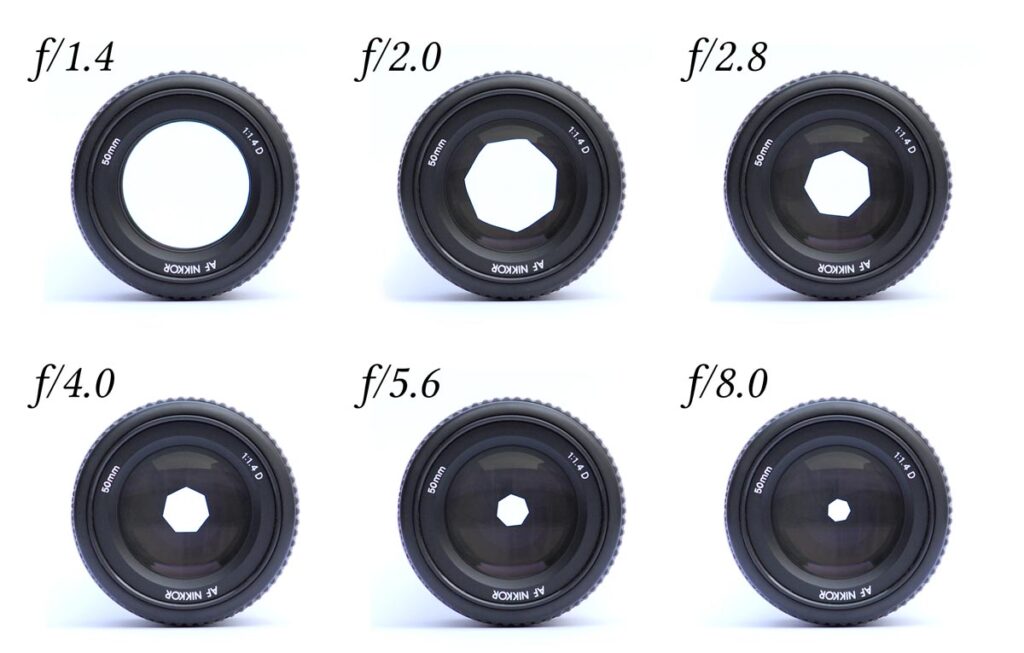
A narrow aperture can keep more of a scene sharp.
Shutter speed
A fast shutter speed can freeze motion.
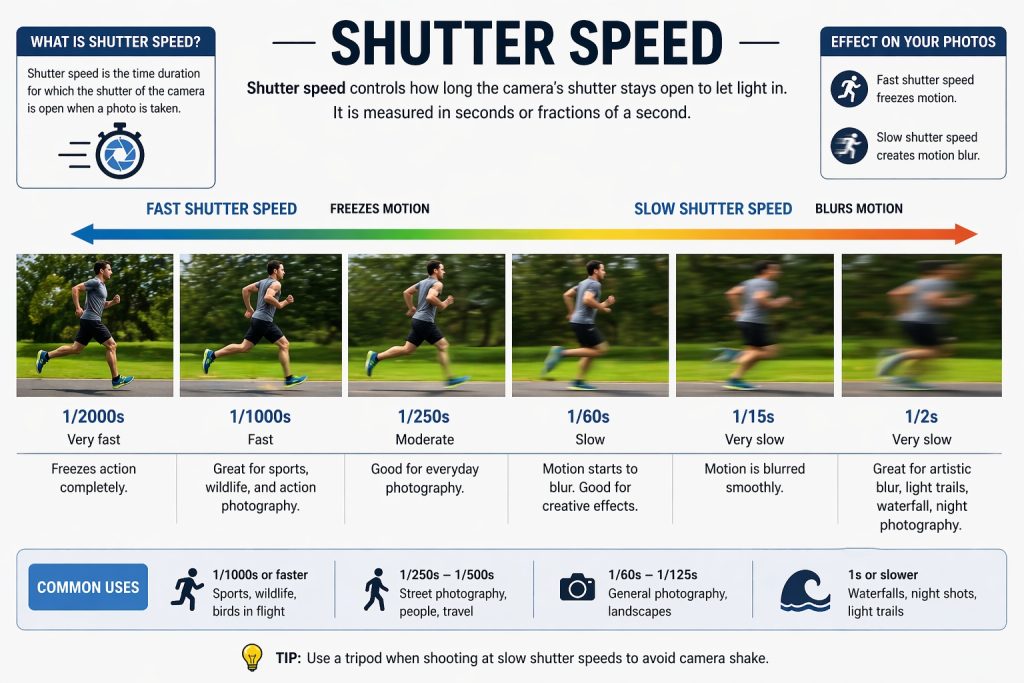
A slow shutter speed can turn movement into blur.
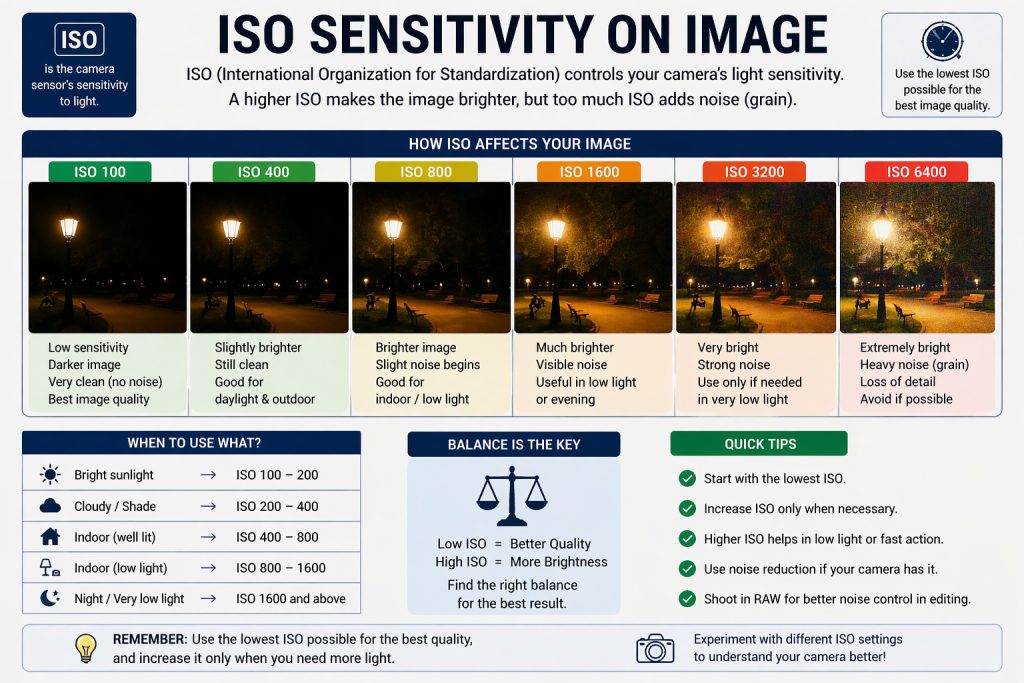
ISO
Increasing ISO allows you to work in darker conditions, but may introduce noise.
These aren’t simply settings.
They are choices.
Imagine photographing waves.
A fast shutter speed freezes individual drops of water.
A slow shutter speed turns the movement into flowing patterns.
The light may be exactly the same.
Your interpretation changes because your exposure choices change.
13. Look for Light Before You Look for Subjects
This is one of the exercises that can dramatically improve your photography.
Instead of walking around looking for interesting subjects, spend ten minutes looking only for interesting light.
Walk through a room.
Look at:
- the window
- the floor
- the wall
- curtains
- reflections
- shadows
- doorways
Watch what happens as the sun moves.
You may discover that an ordinary wall becomes fascinating when sunlight crosses it.
A staircase becomes interesting when shadows create geometric patterns.
A person’s face becomes expressive when they move from shadow into light.
The subject was always there.
You simply weren’t seeing the light.
14. Light Can Create a Visual Path
Light can also guide the viewer’s eye.
Imagine a dark street with a bright doorway at the far end.
Your eyes naturally move toward the doorway.
Now imagine a person standing inside that illuminated area.
The light has created a visual hierarchy:
dark street → bright doorway → human subject
Nothing needs to be explained.
The photograph itself directs the viewer.
This is one of the most powerful uses of light in composition.
Instead of adding more elements to a photograph, sometimes you can simply remove light from unnecessary areas.
Darkness can simplify.
Light can select.
15. Examples: One Subject, Four Different Stories
Imagine photographing the same person.
Example 1 — Soft window light
The person sits beside a large window on a cloudy afternoon.
The light is soft.
The photograph feels intimate and peaceful.
Example 2 — Hard side light
The same person stands beside the window when direct sunlight enters.
Half the face is illuminated.
The other half falls into shadow.
The photograph becomes dramatic and introspective.
Example 3 — Backlight
The person stands between you and the window.
The face becomes darker while the outline glows.
The photograph feels mysterious.
Example 4 — Warm evening light
The same person is photographed during sunset.
The light becomes golden.
The photograph feels nostalgic and emotional.
Same person. Same camera. Different light. Four different stories.
That is the power of understanding light.
16. Photographing Light in the Real World
You don’t need expensive studio equipment to practise.
Start with ordinary situations.
A window
Photograph the same object at:
- morning
- afternoon
- evening
Compare the shadows and colours.
A staircase
Look for sunlight creating geometric patterns.
A street
Watch how buildings create areas of light and shadow.
A tree
Backlight the leaves and observe how they become translucent.
A person
Photograph them facing the light, sideways to the light and with the light behind them.
Then compare the emotional character of each image.
This kind of exercise teaches more than simply memorising camera settings.
17. Don’t Be Afraid of Shadows
There is a tendency in digital photography to brighten everything.
Modern cameras and editing software make it easy.
But ask yourself before lifting the shadows:
Does this darkness belong in the photograph?
A shadow can hide distractions.
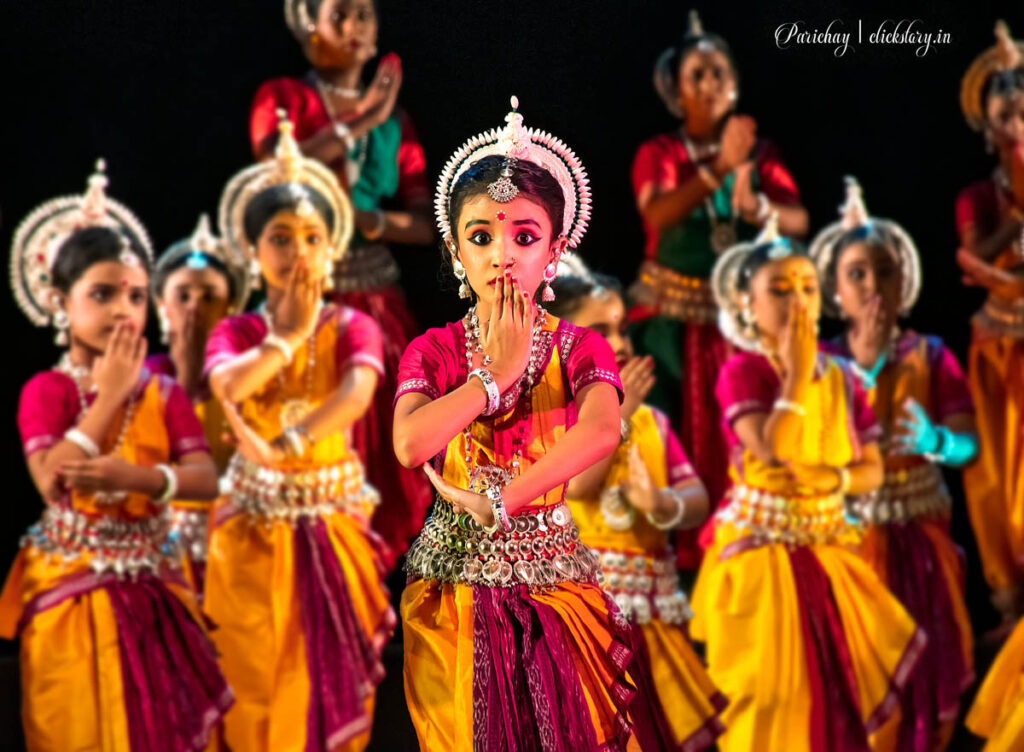
It can create mystery.
It can separate the subject.
It can suggest depth.
It can create tension.
It can make the viewer imagine what cannot be seen.
A photograph doesn’t have to reveal everything.
Sometimes what you conceal is as important as what you reveal.
18. Editing Should Respect the Light
Post-processing gives photographers enormous control.
But editing should ideally strengthen the light that already exists rather than completely replace it.
If a photograph was made with beautiful warm evening light, don’t automatically neutralise all the warmth.
If deep shadows create the atmosphere, don’t necessarily lift every shadow.
If the scene has gentle contrast, don’t automatically apply extreme clarity and contrast.
Ask:
What did the original light make me feel?
Then edit in a way that preserves or strengthens that feeling.
The goal isn’t to make the photograph look impressive.
The goal is to make the photograph communicate.
19. From Seeing Light to Feeling Light
The greatest change happens when you stop thinking about light only in technical terms.
You begin to notice it emotionally.
You walk into a room and immediately see the patch of sunlight on the floor.
You notice how clouds soften a landscape.
You see how evening light transforms an ordinary building.
You recognise that blue shadows and orange sunlight can create tension.
You understand why a silhouette can feel lonely.
You begin predicting how a scene will change before the light changes.
At that point, you are no longer merely recording light.
You are photographing with intention.
20. The Photographer’s Real Skill
A camera can measure light.
A light meter can measure light.
Software can analyse light.
But photography ultimately requires something none of these tools can provide:
– JUDGEMENT –
You have to decide:
Should I expose for the highlights?
Should I allow the shadows to become almost black?
Should the light remain warm?
Should I wait ten minutes?
Should I move?
Should my subject face the window?
Should I photograph the subject at all—or simply photograph the light falling across the wall?
These decisions transform technical knowledge into artistic expression.
A Simple Exercise: Learn to Read Light
The next time you go out with your camera, don’t immediately start photographing.
Spend five minutes observing.
Ask yourself:
-> Where is the light coming from?
-> Is it hard or soft?
-> What colour is it?
-> Where are the deepest shadows?
-> Where are the brightest highlights?
-> What is the contrast like?
-> What part of the scene attracts my eye because of the light?
Then make one photograph.
Move.
Make another.
Change your angle.
Make another.
Wait ten minutes.
Make another.
Later, compare all four.
You will begin to see that photography isn’t simply about finding subjects.
It is about finding relationships between light, subject and time.
From Exposure to Expression
Understanding light is one of the great turning points in a photographer’s development.
At first, we learn to control exposure.
Then we learn to control the camera.
Eventually, we begin to understand that these controls exist for a larger purpose.
We use exposure to control mood.
We use direction to create depth.
We use shadows to conceal and reveal.
We use colour to influence emotion.
We use contrast to create tension.
We use soft light to create tenderness.
We use hard light to create drama.
And sometimes, we deliberately allow the photograph to become dark, bright, warm, cool, sharp or blurred because that is what the story requires.
The advanced photographer doesn’t simply ask:
“How do I get the correct exposure?”
They ask:
“What kind of light does this photograph need?”
That is the beginning of expression.
Because once you learn to see light, you don’t simply see a brighter or darker world.
You begin to see possibilities.
Final Thought
Light changes constantly.
A mountain at sunrise is not the same mountain at noon.
A face beside a window is not the same face under an overhead lamp.
An old building in rain is not the same building beneath harsh summer sunlight.
The world is continuously being redesigned by light.
Your camera merely records one moment of that transformation.
So before pressing the shutter, pause. (Sometimes you need to put down your camera.)
Look at the shadows.
Look at the highlights.
Look at the colour.
Look at the direction.
Look at what the light reveals—and what it hides.
Then ask yourself one final question:
What do I want the viewer to feel?
Once you can answer that question, exposure stops being the destination.
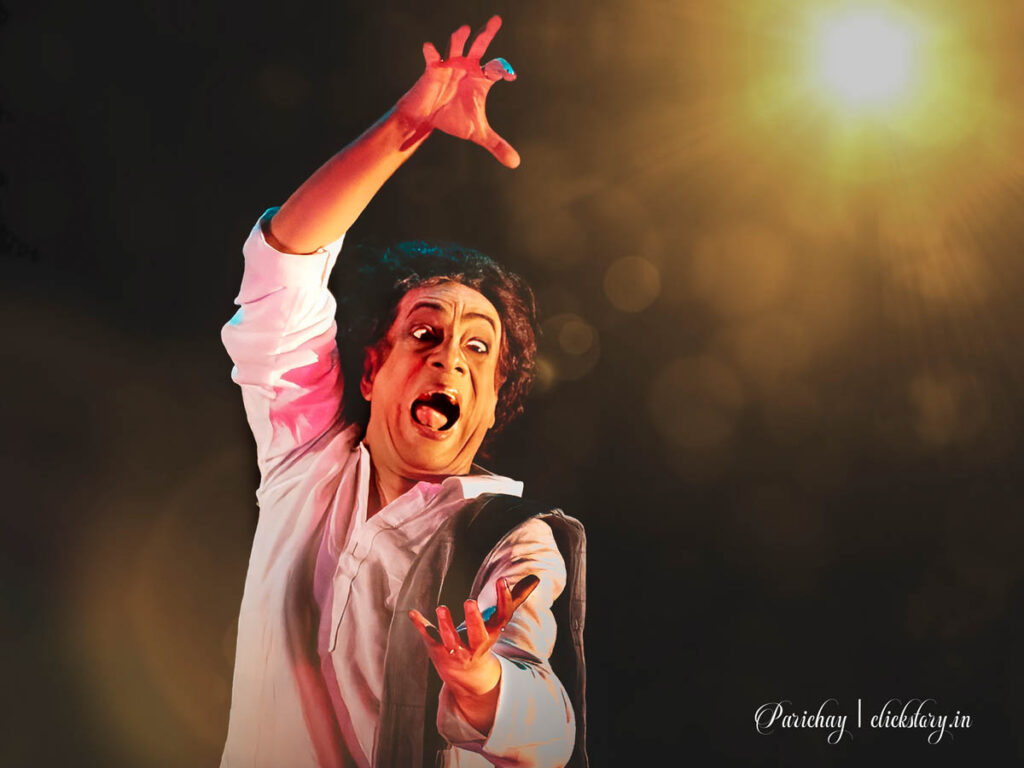
It becomes the beginning of expression.
