

What is White Balance in Photography?
White balance is a camera setting that controls how the colors in your photograph appear under different types of light. It helps neutral objects such as white and gray look neutral instead of appearing too orange, blue or green.
If your indoor photographs look orange, your shaded outdoor photographs look blue, or fluorescent lighting gives your images a green cast, white balance is usually the setting you need to understand.
In this guide, we’ll look at AWB, camera presets, Kelvin, custom white balance, RAW files and practical examples from real photographs.

Why Is White Balance Important?
Different source of light has different colors. Human eyes and brain are strong enough to detect the true color at ease. But, in camera, the light temperature may detect hue based on the color temperature. The reddish, dull yellow or orange shads might be included in a picture and produce an artificial hue in the composition. By adjusting the white balance setting of our digital camera, we can alter the required light or temperature to produce the most accurate colors in a digital image. In landscape photography the light is changing frequently. Watch the light and experienced it. Then set WB.
Color temperature and white balance
Now, the question appears to our mind is about color temperature. It is the color of light emitted in a non-reflective body at a particular temperature. Color temperature is the temperature at which a black body absorb all frequencies of light and emit the same color of a given object.
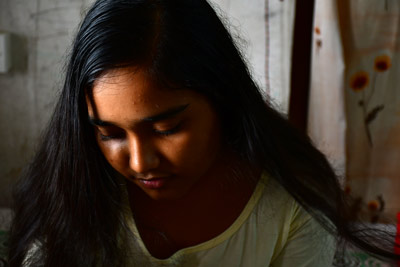
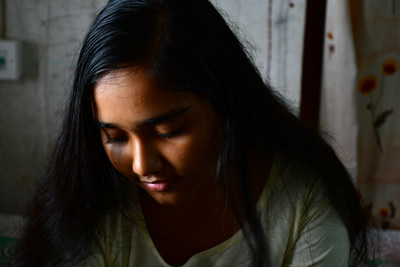
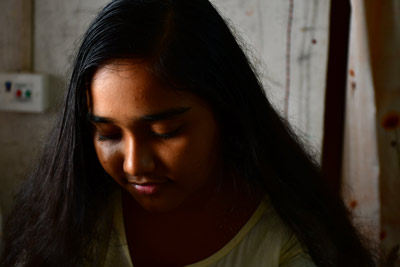
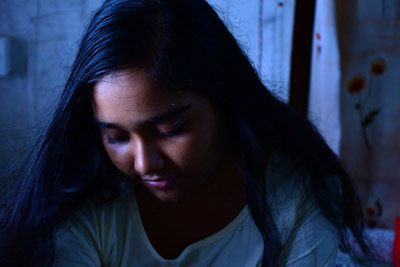
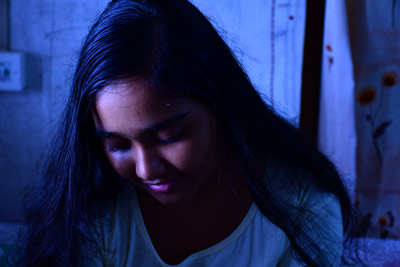
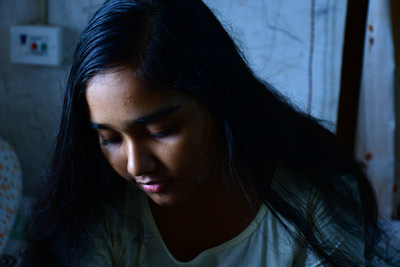
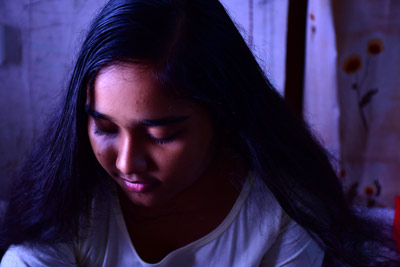
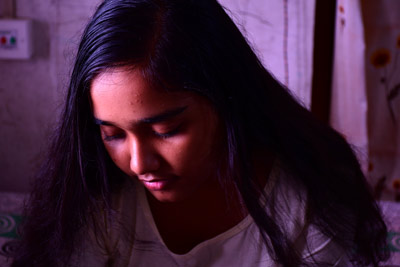
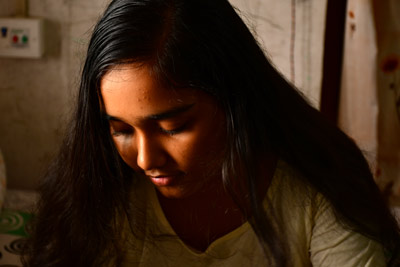
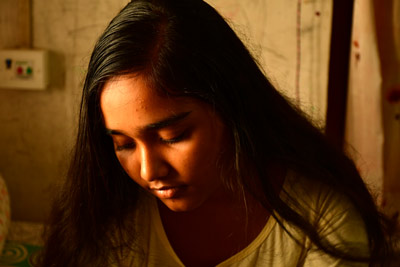
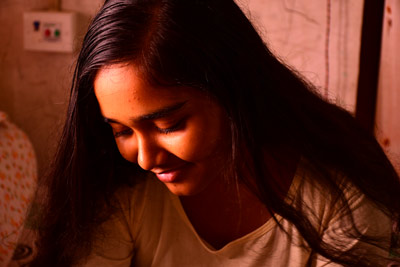
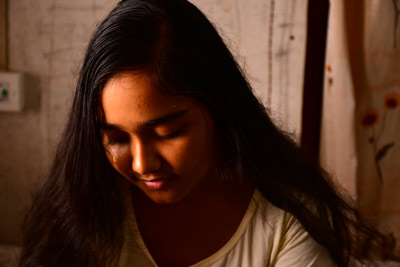
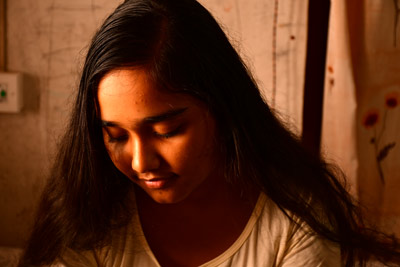
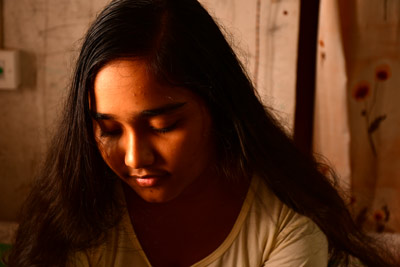
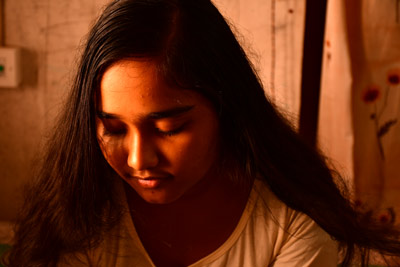
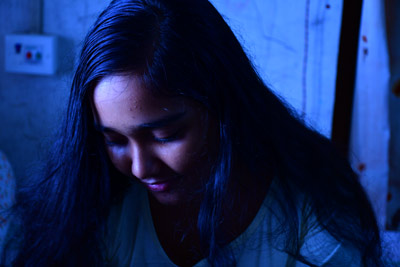
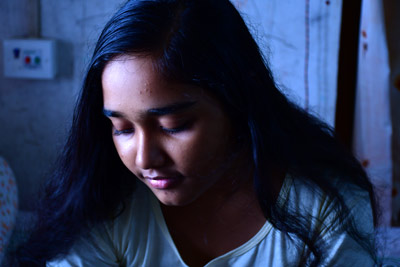
I use Nikon D500 with white balance in AWB mode. There are more options available in it. Based on options, I clicked some pictures of my daughter, Biyas. All are indoor shoots with natural window light.
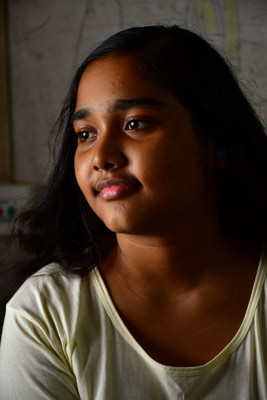

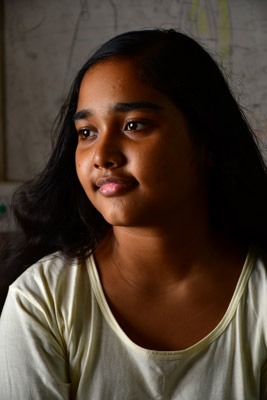


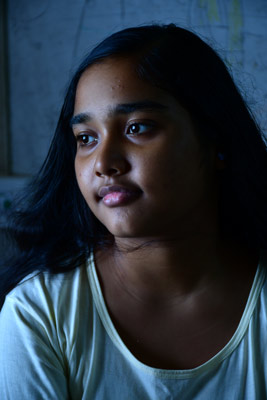


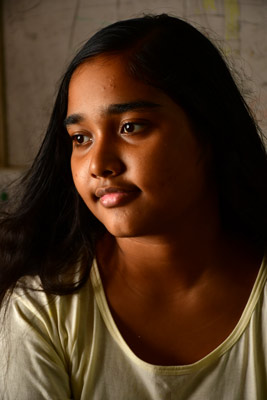
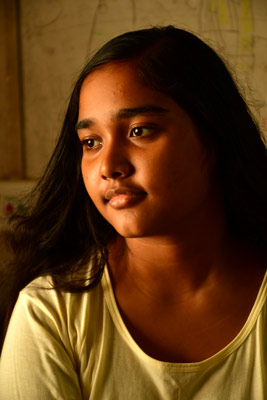
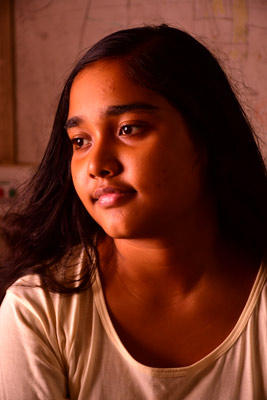
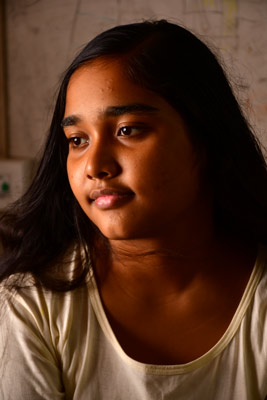
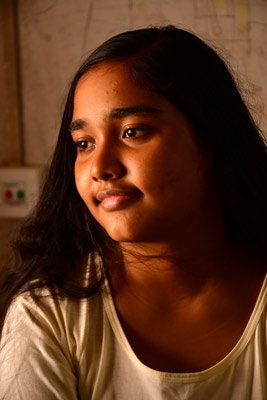
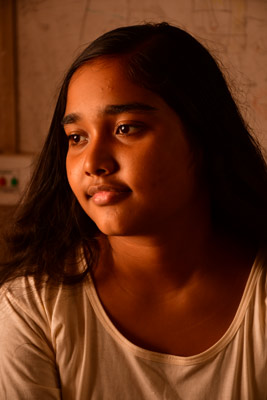


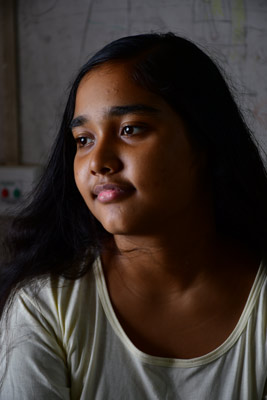
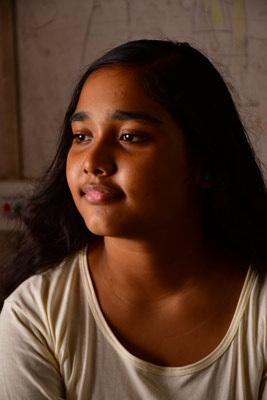
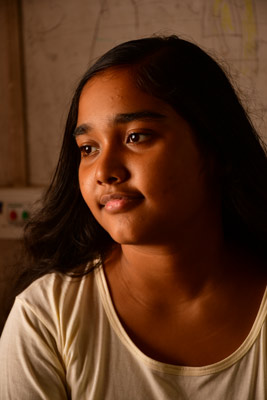
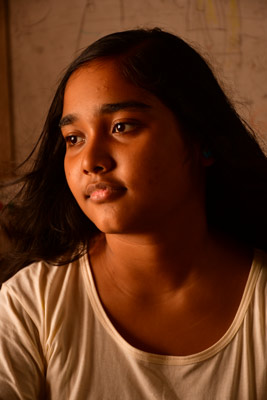
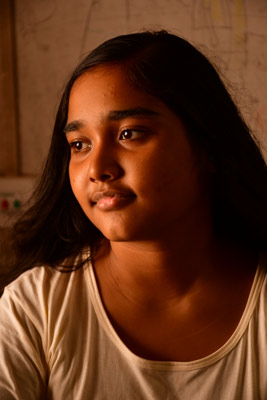
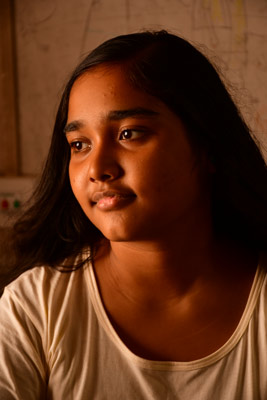
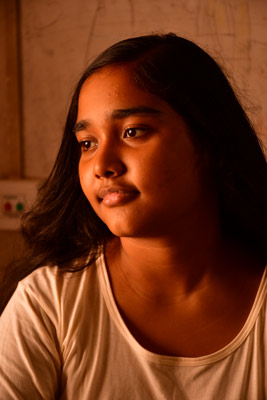
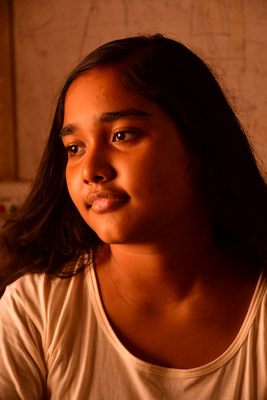
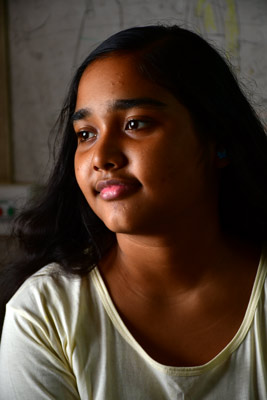
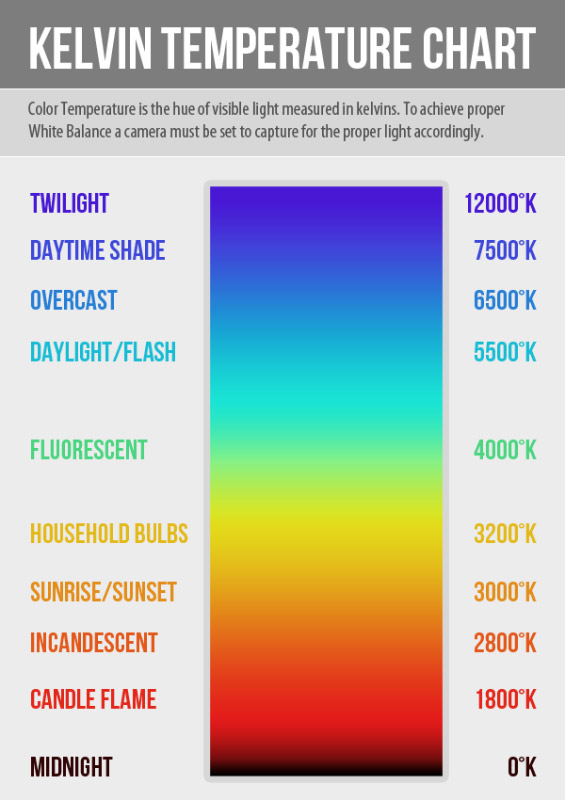
Color temperature is a useful description of light for photographers. The researchers help the camera industries and photographers to give some general light conditions which emit in the black bodies. Hence, a rule of thumb guide of those general light sources is properly measured. The measurement unit is known as Kelvin(K).
| Source of light | Temperature of color |
|---|---|
| Match Flame | 1000 – 2000K |
| Candle Flame | 1800 – 1930K |
| Sunrise / Sunset (clear sky) | 2000 – 3000K |
| Tungsten Bulb (Household variety) | 2500 – 2900K |
| Tungsten Bulb (500W to 1K) | 3000K |
| Fluorescent Lamps | 3200 – 7500K |
| Electronic Flash / Standard Day Light / CRT Light | 5000 – 5500K |
| Daylight with Clear Sky (Sun overhead) | 5000 – 6500K |
| Moderately Overcast Sky / Common Fluorescent Lamps | 6500 – 8000K |
| Shade or Heavy Overcast Sky | 7000 – 1000K |
Understanding Kelvin and Color Temperature
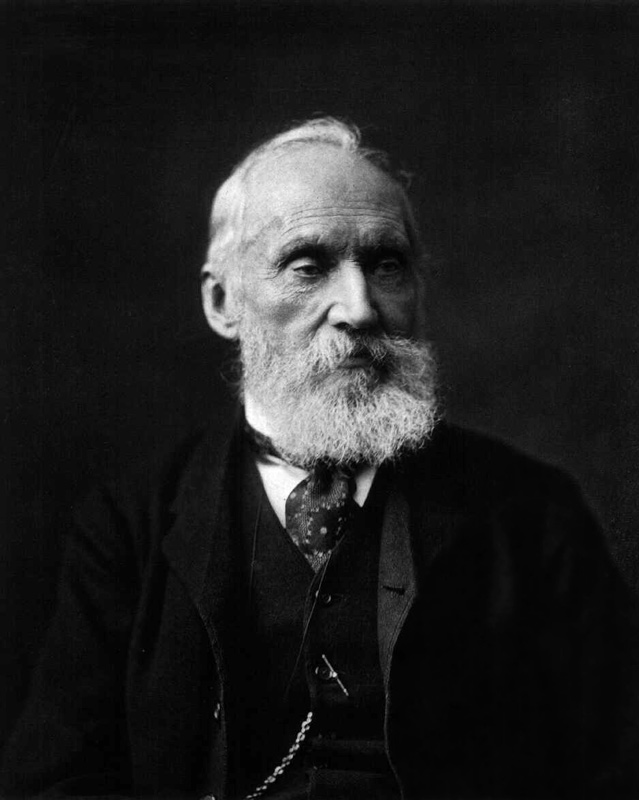
British physicist William Kelvin heated a block of carbon and it spread various colors in different temperatures. The black carbon glows with dim red. Temperature increases and the carbon turns into yellow. In maximum temperature the color glows with white-blue. Kelvin scale starts from zero or -273 degree centigrade.
A mathematical equation that gives the relationship between the Celsius and Kelvin scales is [ K = 0C + 273 ]. This scale is also called SI scale of temperature. It is mostly used by the scientific community.
Note: The Kelvin scale is the temperature scale that uses the Kelvin to denote the magnitude of the temperature. The Kelvin is the SI base unit of temperature as suggested by the International System of Units (SI).
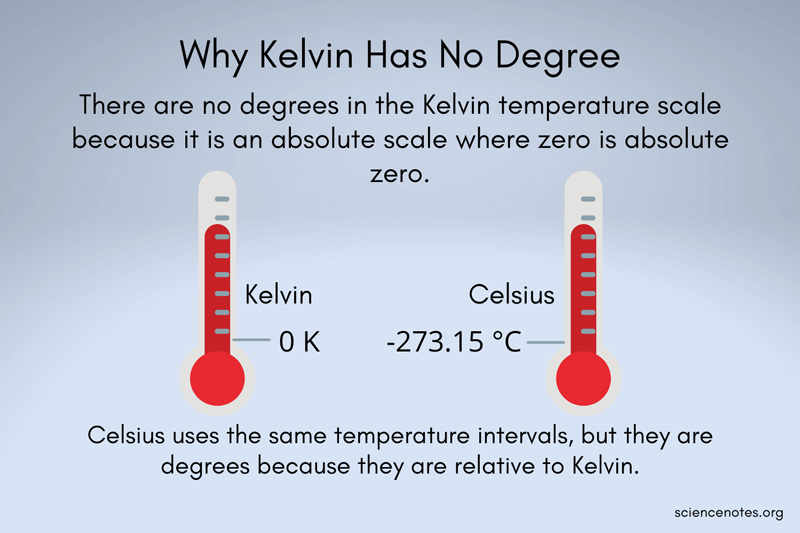
The lower standard point on this scale is 273K and upper standard point is 373K. There 273 divisions below lower standard point. Its 0K is equal to -273oC. To convert Celsius temperature to kelvin temperature following formulas is used. For example, 300C = (30+273) = 303K.
White Balance and Color Temperature: Important Note
White balance is a process through which we can detect white color as white. It set forth the opposite color to the image to bring back the true color of the object.
White Balance Camera Presets Explained
Though it is not the accurate measurement to bring out the true color from an object, but it minimizes the maximum color cast.
| White balance Presets in camera | Descriptions |
|---|---|
| Sunny | Photographers can set this white balance for rectifying morning and mid-afternoon sun light color from the object. |
| Shade | Photographers can set this white balance for rectifying an amount of dark color from object. |
| Cloudy | Photographers can set this white balance for rectifying outdoor overcast light from the object. |
| Flash | Photographers can set this white balance for rectifying camera speedlights and popup flashes from the object. |
| Incandescent | Photographers can set this white balance for rectifying indoor shots with standard warm blubs from the object. |
| Fluorescent | Photographers can set this white balance for rectifying indoor shots with fluorescent bulbs, tube or lamp from the object. |
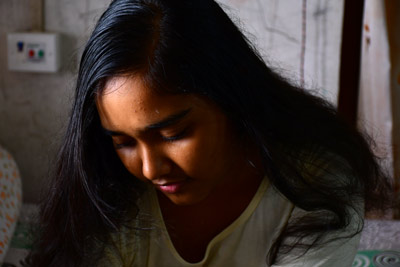
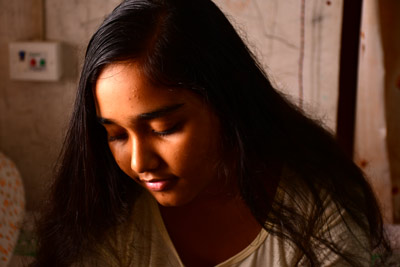
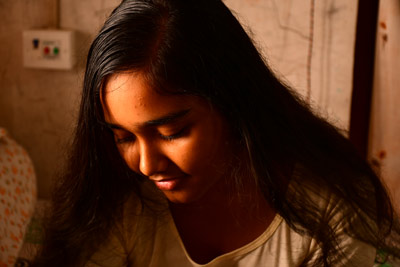
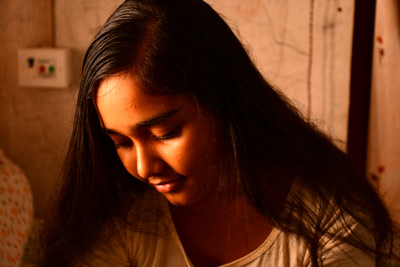
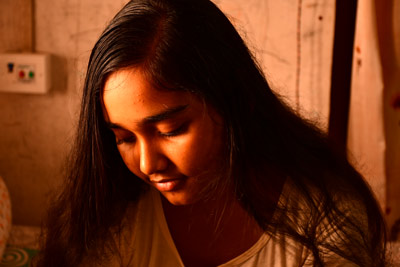
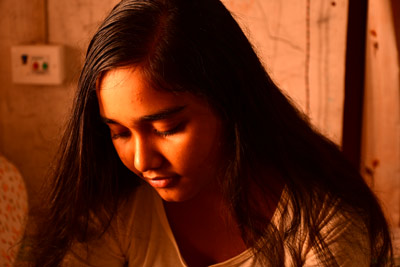
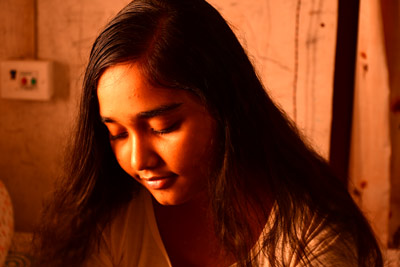
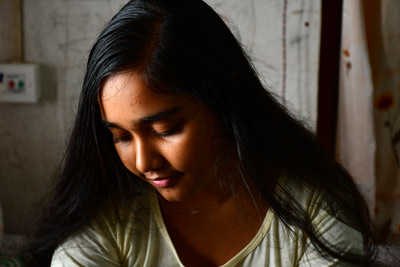
How to Set White Balance Manually
The experienced photographers may set their camera’s white balance with a specific kelvin to get the exact color from the object. They can increase or decrease the kelvin intentionally to give an extra effect in their composition. If you want to get the neutral color, then set the K to the exact color temperature of indoor or outdoor. For a warmer look, set the K higher than the color of indoor/outdoor color temperature and for cooler color, set K lower than the indoor/outdoor color of the light.
Auto white balance mode
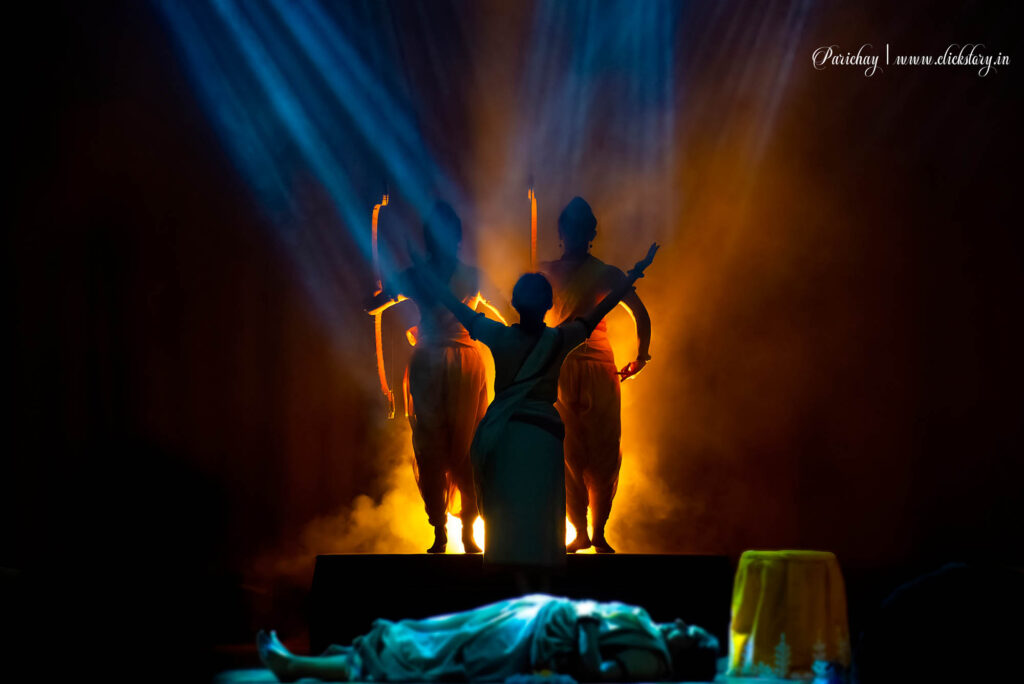
After a through survey and research work, the camera industries incorporate algorithms to get the true color of the object. It gives a satisfactory result from multiple light sources like a combination of artificial light and sun light. It gives a tends to perfect result to measure various sources of light, combine them and produce an average color temperature. In maximum cases auto white balance (AWB) is the ultimate than judging light sources and then frame and capture the moment. In dance/concert, street photography, measuring a kelvin based on light condition, it is obvious you will capture the next moment of the artist or street scene.
White Balance in RAW vs JPEG
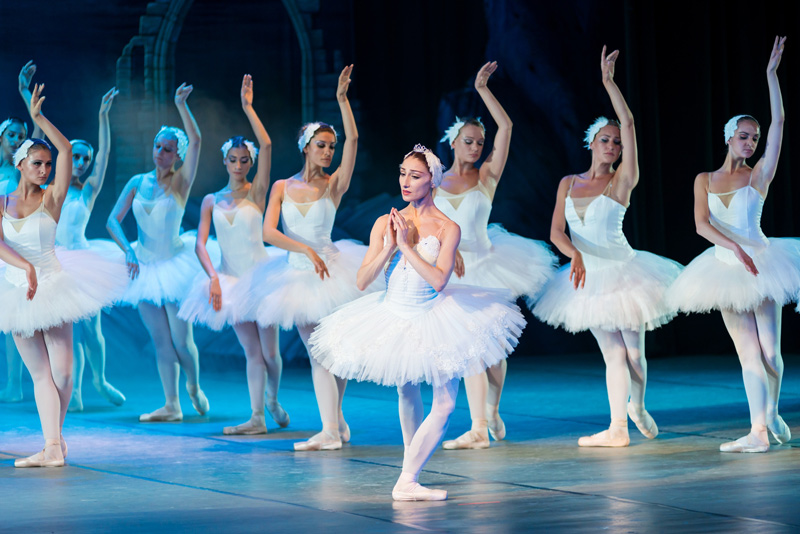
The high-end cameras can record an image in raw format. It is also known as raw file or raw data. It is equivalent to a database where all the colors are stored, and the photographers processed the image in post processing session as per his/her choice. It gives more flexibility to edit a raw image without hampering the original one.
Correcting White Balance in Post-Processing
There are a number of world class editing software available which supports raw file format for post processing of an image. You can either adjust the temperature and green-magenta sliders (tint) until color casts are removed or you can simply click on a neutral reference within the image. A neutral reference image can help to produce same color temperature to other images.
Important Note About RAW and White Balance
In color theory color tint means a mixture of a color with white. It increases lightness. Color shade is the mixture of a color with black. It increases darkness of a color. Color tone is the mixture of a color either with gray color or combining the color with tint and shade.
How to Use Kelvin for Creative White Balance
If you want to shoot with kelvin only as a pro, I repeat, need more experience with various lighting conditions and spent your valuable time at least 5-6 years to understand lighting condition of our nature every minute. Oh! you stick to kelvin only not AWB. Okay I hope the following statistic will help you to shoot an image with true color.
Around 3200K can be a useful starting point for warm tungsten lighting, while around 5500K is a useful starting point for direct daylight. These are approximate values, not universal settings. For example, if you want to shoot an indoor shot with candle lit and there is a lamp of 2800K, set your camera kelvin in 2800K. It will give you the true color.
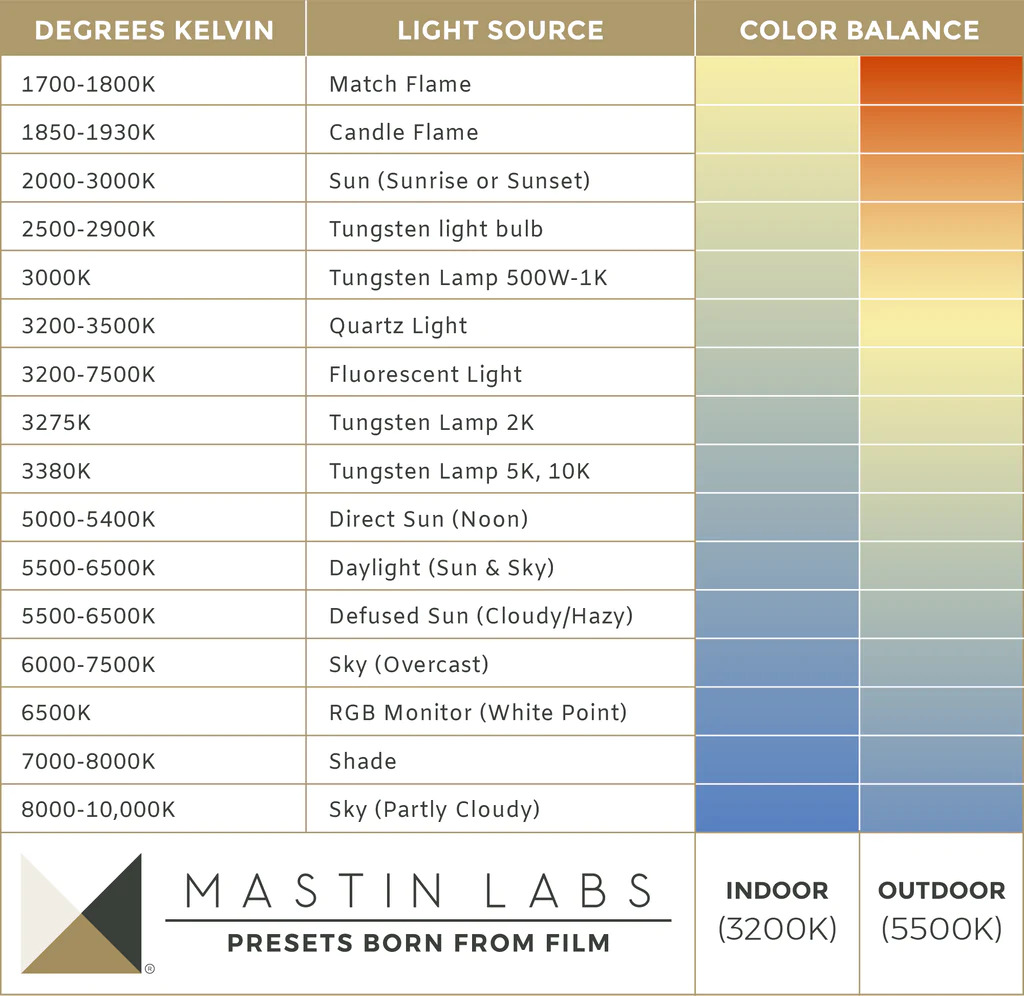
Hence, if you want to use only kelvin, switch off AWB and print kelvin scale. Remember three color temperature which you may experience maximum time. They are daylight (5500K), shade (7500K) and tungsten (2850K). Now practice more and more. I hope the scale and practice gives you the flexibility to shoot your composition in any light condition and probe out the true color in your image.
Common White Balance Mistakes
1. Always Relying on Auto White Balance (AWB)
Auto White Balance is convenient and works well in many situations, but it can sometimes make the wrong decision, especially when the scene contains unusual colors or mixed lighting.
For example, a sunset scene may intentionally contain strong orange light. AWB may try to neutralize that warmth, making the photograph look less atmospheric.
Tip: Use AWB when the lighting is changing quickly, but consider Daylight, Cloudy, Shade, or Kelvin when you want more consistent or intentional color.
2. Assuming 5500K Is Always Correct for Daylight
5500K is often used as a reference for daylight, but daylight does not always have the same color temperature.
The color of outdoor light changes with:
- Time of day
- Weather
- Season
- Direction of light
- Shade
- Surrounding surfaces
Direct midday sunlight may be around 5000–6000K, while shade can be much higher.
Tip: Treat Kelvin values as starting points rather than fixed rules.
3. Confusing White Balance With Exposure
White balance controls the color of the light, while exposure controls how bright or dark the photograph is.
Changing the white balance will not correct an underexposed or overexposed photograph.
For example:
- Too dark → adjust exposure.
- Too orange or blue → adjust white balance.
- Too green or magenta → adjust tint.
Understanding this difference makes camera settings much easier to manage.
4. Forgetting About Green and Magenta Tint
Many beginners think white balance only means changing from blue to orange.
In reality, white-balance correction also involves green and magenta.
A photograph taken under some fluorescent or artificial lights may have a green color cast even when the temperature looks reasonable.
Tip: If adjusting Temperature doesn’t remove the color cast, check the Tint setting.
5. Using One White Balance Setting in Changing Light
Light can change significantly during a photo session.
For example, a photographer may begin outdoors in sunlight, move into shade, and later photograph indoors. Using the same manual Kelvin value throughout the session can produce inconsistent colors.
Tip: Recheck your white balance whenever the lighting conditions change significantly.
6. Ignoring Mixed Lighting
Mixed lighting occurs when a scene contains different types of light, such as daylight coming through a window combined with a warm indoor bulb.
One white-balance setting may not make every part of the photograph look neutral because the different light sources have different color temperatures.
Tip: When possible, use one dominant light source, turn off competing lights, or correct different areas separately during post-processing.
7. Trying to Make Every Photograph Completely Neutral
Correct white balance does not always mean removing every trace of warmth or coolness.
A sunset naturally looks warm. A blue-hour photograph naturally looks cool. Making these scenes completely neutral can remove the mood of the photograph.
Tip: Use white balance to support the mood you want rather than automatically making every photograph look neutral.
8. Thinking Higher Kelvin Always Means a Warmer Photograph
This is one of the most confusing things about Kelvin settings.
When you increase the Kelvin setting on your camera, the camera generally adds warmth to compensate for cooler light.
For example, moving from 4000K to 6500K generally makes the photograph warmer.
However, remember that Kelvin describes the color temperature of the light, while the camera’s Kelvin setting is the correction you are telling the camera to apply. This is why the relationship can initially seem counterintuitive.
9. Forgetting to Change White Balance After Leaving a Different Lighting Condition
You may photograph indoors using Tungsten and then go outside, but forget that the camera is still set to Tungsten.
The outdoor photographs may then appear strongly blue.
This is an especially common mistake when using manual white-balance presets.
Tip: Before starting a new scene, quickly check your WB setting along with ISO, shutter speed, and aperture.
10. Assuming RAW Means White Balance Doesn’t Matter
RAW gives you much more flexibility to correct white balance during post-processing, but that doesn’t mean the in-camera setting is completely irrelevant.
The selected white balance can affect the preview on your camera and can also influence how the image initially appears when opened in some software.
Tip: Even when shooting RAW, choose a reasonable white-balance setting while photographing. It makes reviewing your images easier and gives you a useful starting point during editing.
11. Using JPEG Without Paying Attention to White Balance
With JPEG, the camera processes the selected white balance into the finished image.
If the WB is significantly wrong, correcting it later can be more difficult than with a RAW file.
Tip: If you shoot JPEG, pay closer attention to white balance while taking the photograph. When possible, use a suitable preset, Kelvin setting, or custom white balance.
12. Changing White Balance Without Looking at a Neutral Reference
Sometimes it’s difficult to judge color accurately just by looking at the entire photograph.
A white, gray, or neutral object can provide a useful reference.
For example, if a white wall appears orange, you know the image probably has a warm color cast.
Tip: When accuracy is important, photograph a gray card or another known neutral reference under the same lighting conditions.
White Balance Cheat Sheet for Beginners
| Lighting / Situation | Recommended WB | Approx. Kelvin | Result / Tip |
|---|---|---|---|
| Candlelight | Tungsten / Kelvin | 2,000–3,000 K | Helps control very warm light |
| Warm indoor bulbs | Tungsten / Incandescent | 2,700–3,200 K | Reduces orange/yellow cast |
| Cool indoor lighting | Fluorescent / Kelvin | 3,500–5,000 K | Adjust according to the actual light |
| Direct sunlight | Daylight | 5,000–6,000 K | Good starting point for midday sun |
| Cloudy sky | Cloudy | 6,000–7,000 K | Adds warmth to cool overcast light |
| Open shade | Shade | 7,000–8,000 K | Warmer setting helps compensate for blue shade |
| Heavy overcast | Kelvin | 7,000–10,000 K | May need a warmer setting |
| Flash | Flash | Around 5,500–6,000 K | Useful starting point for flash |
| Changing light | Auto WB (AWB) | Camera decides | Useful for street, events and moving between lighting conditions |
| Consistent controlled light | Custom WB / Gray Card | Depends on light | Best when accurate color is important |
| Creative warm effect | Higher Kelvin | 6,500–10,000 K | Can create a warmer mood |
| Creative cool effect | Lower Kelvin | 2,500–4,000 K | Can create a cooler/blue mood |
Quick Rule to Remember
- Light is too orange/yellow → lower the camera’s Kelvin setting.
- Light is too blue → raise the camera’s Kelvin setting.
- Light is too green → move Tint toward magenta.
- Light is too magenta → move Tint toward green.
Conclusion
White balance is one of the most important camera settings for controlling the color and mood of your photographs. Understanding how different types of light affect color will help you avoid unwanted blue, orange, green, or magenta color casts.
For everyday photography, Auto White Balance (AWB) is a convenient starting point, especially when the lighting changes quickly. When the lighting is consistent, you can use camera presets such as Daylight, Cloudy, Shade, Tungsten, or Fluorescent. For greater control, you can set a specific Kelvin value or use a custom white-balance setting with a neutral reference.
If you shoot in RAW, you have greater flexibility to fine-tune white balance during post-processing. However, choosing a reasonable white-balance setting while shooting is still useful for getting an accurate preview and a good starting point for editing.
Most importantly, don’t think of white balance only as a way to make every photograph look perfectly neutral. You can also use it creatively to make an image warmer or cooler and create the mood you want.
The best way to understand white balance is to experiment. Photograph the same subject using different white-balance presets and Kelvin values, compare the results, and observe how the color and mood change.
Frequently Asked Questions (FAQs)
What is white balance in photography?
White balance is a camera setting that controls how the colors in a photograph appear under different types of light. It helps neutral objects such as white and gray look neutral and prevents unwanted blue, orange, green, or magenta color casts.
Why is white balance important in photography?
White balance is important because different light sources have different colors. Setting the appropriate white balance helps produce natural-looking colors and accurate skin tones, while also allowing you to create a warmer or cooler mood intentionally.
What is the best white balance setting?
There is no single best white balance setting for every situation. Auto White Balance (AWB) is a good starting point for changing lighting conditions, while Daylight, Cloudy, Shade, Tungsten, Fluorescent, Kelvin, or Custom White Balance can provide more consistent results in specific lighting conditions.
Should I always use Auto White Balance?
No. AWB works well in many situations, especially when the light is changing quickly, but it can sometimes produce inconsistent results. When the lighting is stable, using a suitable preset or Kelvin value can give you more control over the color of your photographs.
What Kelvin should I use for daylight photography?
Around 5,000–6,000 K is a useful starting range for direct daylight. However, daylight changes throughout the day and with weather conditions, so the appropriate setting may be higher or lower.
Is higher Kelvin warmer or cooler?
When you increase the Kelvin setting on your camera, the resulting photograph generally becomes warmer (more yellow/orange). When you decrease the Kelvin setting, the photograph generally becomes cooler (more blue). This can seem counterintuitive because the physical color temperature of light behaves in the opposite direction.
Can I change white balance in a RAW file?
Yes, but JPEG files provide less flexibility than RAW files. A small white-balance correction is usually possible, but a large correction can affect color quality and may introduce unwanted artifacts. For this reason, getting the white balance reasonably close in-camera is more important when shooting JPEG.
What is the difference between white balance and color temperature?
Color temperature describes the color characteristics of a light source and is commonly expressed in Kelvin (K). White balance is the camera’s way of compensating for that color so that objects appear with the colors you expect.
What is the difference between Temperature and Tint?
Temperature controls the blue-to-yellow/orange side of the color balance. Tint controls the green-to-magenta side. If adjusting Temperature doesn’t remove a color cast, adjusting Tint may help correct it.
When should I use manual white balance?
Manual white balance is useful when you want consistent and predictable color under stable lighting. You can select a Kelvin value, choose a camera preset, or create a Custom White Balance using a neutral gray or white reference.
Is white balance important when shooting in RAW?
Yes, although RAW gives you much more freedom to correct white balance later. Choosing a reasonable white-balance setting while shooting can still help you judge the image correctly on your camera’s screen and gives you a useful starting point during editing.
Can I use white balance creatively?
Absolutely. White balance doesn’t always have to make an image completely neutral. A warmer setting can create a cozy or romantic feeling, while a cooler setting can create a calm, dramatic, or cool atmosphere. The best setting depends on the mood you want to create.
What should I do if my photograph looks too blue?
If the photograph looks too blue, try increasing the Kelvin setting when using manual Kelvin white balance. You can also choose a warmer preset such as Cloudy or Shade, depending on the lighting. When editing a RAW file, you can increase Temperature to make the image warmer.
What should I do if my photograph looks too orange?
If the photograph looks too orange or yellow, try decreasing the Kelvin setting when using manual Kelvin white balance. In post-processing, you can also lower the Temperature to make the photograph cooler.
What should I do if my photograph looks green or magenta?
If the photograph has a green or magenta color cast, adjust the Tint control rather than relying only on Temperature. Move Tint toward magenta to reduce a green cast, or toward green to reduce a magenta cast.
You may like to read another article for beginner’s guide

Picture helps me to understand it clearly.
sharing
Thank you for the tutorial
A depth knowledge work. Congrats.
Excellent
Oh! I understand the kelvin and degree relationship. thank you for the information.
Lovely info
information is really required