

Why Does Bit Depth Matter?
You may have seen camera specifications such as 8-bit JPEG, 10-bit video, 12-bit RAW, or 14-bit RAW and wondered what those numbers actually mean.
At first glance, bit depth sounds like a technical specification that only matters to engineers or professional photographers. In practice, however, it affects something very important: how much tonal information your camera can record and how much flexibility you have when processing the photograph later.
This becomes especially noticeable when you photograph:
- A sunrise with very bright clouds and dark foregrounds
- A portrait in difficult lighting
- A landscape with subtle color transitions
- A product against a smooth background
- A scene that requires significant exposure or color correction
- Images that will be heavily edited in Lightroom, Photoshop, Capture One, or another RAW processor
The key point is this:
Bit depth describes how many numerical levels are available to represent tonal information. It does not, by itself, determine how much dynamic range a camera has.
In this tutorial, you’ll learn what bit depth means, how 8-bit, 10-bit, 12-bit and 14-bit differ, what it means for RAW and JPEG files, when higher bit depth actually matters, and how to test the differences yourself.
1. What Is Bit Depth in Digital Cameras?
Bit depth is the number of binary bits used to represent the brightness or color information in a digital image.
A bit can have two possible values:
- 0
- 1
When you combine multiple bits, the number of possible numerical values increases rapidly.
The basic formula is:
Number of possible levels = 2^bits
That gives us:
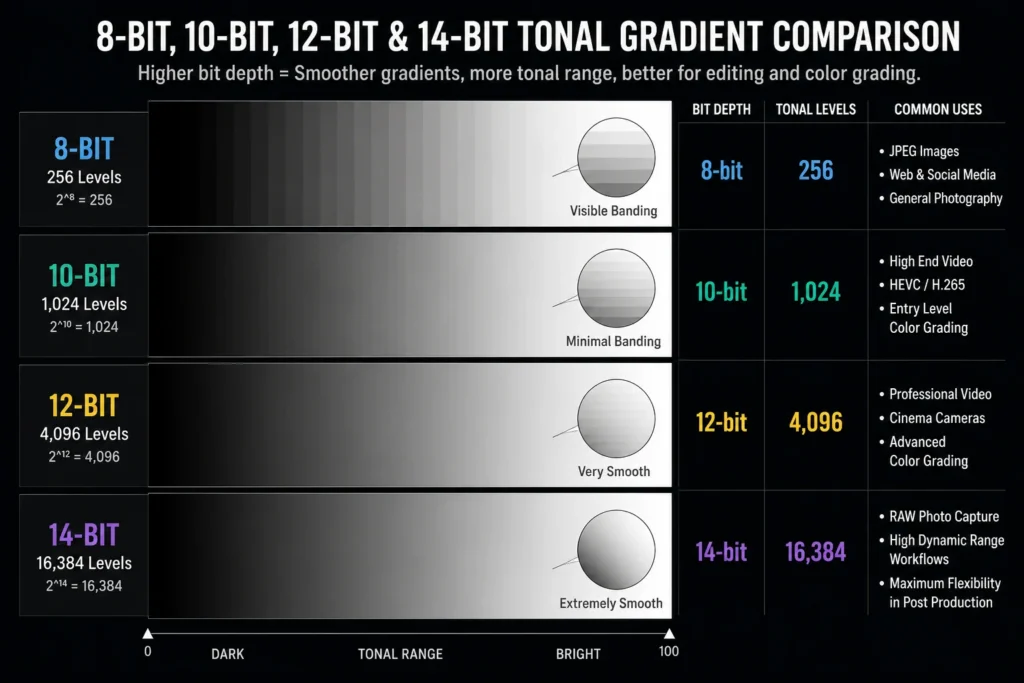
| Bit depth | Possible levels |
|---|---|
| 8-bit | 256 |
| 10-bit | 1,024 |
| 12-bit | 4,096 |
| 14-bit | 16,384 |
| 16-bit | 65,536 |
So a 14-bit system can represent far more numerical levels than an 8-bit system.
But what does that mean in a photograph?
Imagine photographing a smooth blue sky.
The sky doesn’t consist of only “blue.” It contains thousands of subtly different blue values.
If there aren’t enough tonal levels to represent those gradual changes, you can sometimes see visible steps between tones. This is called banding.
Higher bit depth gives the image more numerical levels with which to describe those transitions.
A critical distinction: bit depth is not the same as dynamic range
This is one of the most important concepts to understand.
Dynamic range describes how much difference there is between the darkest detail a camera can record and the brightest detail it can record.
Bit depth describes how finely the available tonal information can be divided into numerical values.
A camera can have 14-bit RAW recording without actually producing 14 stops of usable dynamic range.
In other words:
More bits give you more possible tonal values; they do not automatically give the sensor more captured light range.
Suggested visual
“An identical gradient from black to white represented at 8-bit, 10-bit, 12-bit and 14-bit precision, showing increasingly fine tonal steps.”
2. Why Is Bit Depth Important?
Bit depth matters most when you need to preserve and manipulate subtle tonal information.
For a correctly exposed photograph that receives little editing, you may not see a dramatic difference between formats.
But the differences become more useful when you start pushing the file.
For example, suppose you photograph a person standing beside a bright window.
The original image contains:
- Very bright window light
- Medium skin tones
- Dark clothing
- Shadows in the room
You later raise the shadows substantially and adjust the color.
A file containing more usable tonal information can give your editing software more information to work with.
Bit depth is particularly relevant for:
1. RAW photography
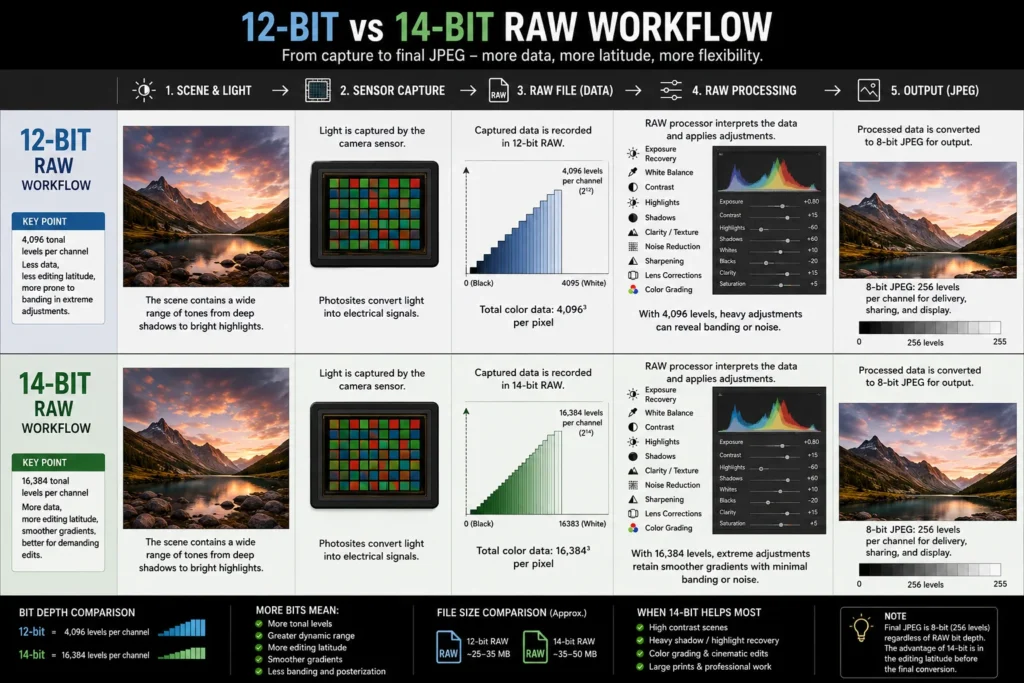
RAW files preserve much more sensor information than finished JPEG images and commonly use 12-bit or 14-bit encoding in still cameras.
2. Heavy editing
Large changes to exposure, shadows, highlights, curves, gradients and color can reveal weaknesses in highly compressed or lower-bit-depth files.
3. Smooth gradients
Skies, studio backdrops, skin tones and other areas with gradual tonal transitions can benefit from greater precision.
4. Color grading
Higher-bit-depth video is particularly useful when footage will be extensively color graded.
5. Professional workflows
Commercial, landscape, portrait, product and fine-art photographers often want maximum flexibility during post-processing.
3. The Core Principles
Principle 1: More Bits Mean More Tonal Levels
The simplest way to understand bit depth is to imagine a staircase.
- An 8-bit system has 256 possible levels.
- A 10-bit system has 1,024.
- A 12-bit system has 4,096.
- A 14-bit system has 16,384.
The increase is exponential rather than linear.
For example:
- 10-bit has four times as many possible levels as 8-bit.
- 12-bit has four times as many as 10-bit.
- 14-bit has four times as many as 12-bit.
This is why moving from 8-bit to 10-bit can be meaningful, and why RAW files with 12 or 14 bits can contain substantial tonal precision.
What the photographer sees
The difference isn’t necessarily obvious when simply viewing an untouched photograph.
It becomes more apparent when:
- You make strong adjustments
- You examine gradients closely
- You recover shadows
- You manipulate colors
- You apply curves
- You repeatedly process the image
Practical example
Photograph a clear blue sky and deliberately underexpose the image.
Later, increase the exposure significantly.
A high-quality RAW file may tolerate the adjustment gracefully, while an 8-bit JPEG can show more obvious tonal problems, depending on the scene and how aggressively it is edited.
Principle 2: Bit Depth and Dynamic Range Are Related—but Different
This is where many beginners get confused.
Imagine two cameras.
Camera A
- 14-bit RAW
- 11 stops of usable dynamic range
Camera B
- 12-bit RAW
- 13 stops of usable dynamic range
Camera B can potentially capture a wider brightness range despite having fewer bits.
Why?
Because dynamic range depends on the sensor’s physical and electronic characteristics, including:
- Sensor noise
- Read noise
- Full-well capacity
- Analog-to-digital conversion
- ISO and gain behavior
- Signal-to-noise ratio
Bit depth determines how precisely the captured signal is represented digitally.
So don’t interpret:
14-bit = 14 stops
That is incorrect.
Principle 3: JPEG and RAW Treat Bit Depth Differently
A typical JPEG photograph is stored as 8-bit per channel.
That means 256 possible values for each color channel.
RAW files from many modern cameras are commonly recorded at 12-bit or 14-bit precision.
This gives the RAW workflow considerably more numerical information to work with.
But there is an important detail:
A RAW file isn’t simply a finished RGB photograph with 14 bits per red, green and blue channel.
Most interchangeable-lens cameras use a Bayer or similar color filter array, meaning each photosite primarily measures one color component. The RAW processor later reconstructs the full-color image.
So when a camera specification says “14-bit RAW,” it is better understood as describing the precision of the sensor data’s digital representation rather than saying the final photograph contains 16,384 fully independent RGB colors per pixel.
Principle 4: More Bit Depth Does Not Mean More Detail
Bit depth primarily concerns tonal precision, not spatial resolution.
Consider two cameras:
- Camera A: 24 MP, 14-bit RAW
- Camera B: 45 MP, 12-bit RAW
Camera B has more pixels and may resolve finer spatial detail.
Camera A has greater numerical precision in its RAW representation.
These are different characteristics.
Think of it this way:
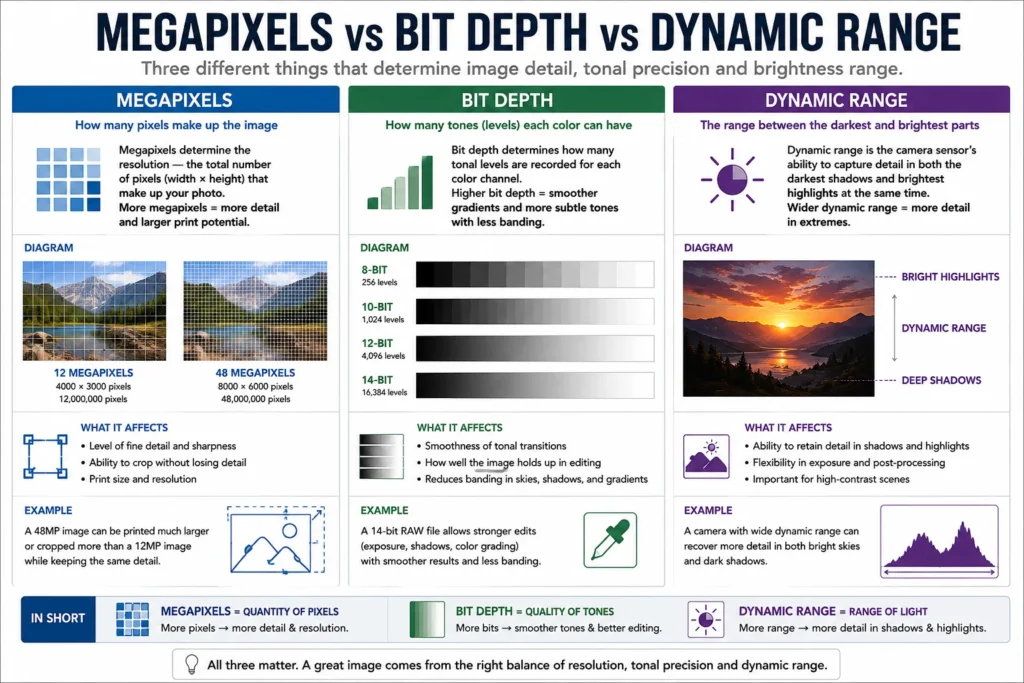
- Megapixels: How finely the image is divided spatially
- Bit depth: How finely tonal information is represented
- Dynamic range: How much brightness range can be captured
4. 8-Bit vs 10-Bit vs 12-Bit vs 14-Bit
Let’s compare the four bit depths from a photographer’s perspective.
| Bit depth | Levels | Typical photographic use | Main advantage |
|---|---|---|---|
| 8-bit | 256 | JPEG, many finished images | Small files, compatibility |
| 10-bit | 1,024 | Video, some HEIF/still workflows | Better grading and smoother tones |
| 12-bit | 4,096 | RAW still photography | High tonal precision with efficient files |
| 14-bit | 16,384 | Higher-end RAW still photography | Maximum tonal precision in many cameras |
8-bit
8-bit is common for finished JPEG images.
It’s perfectly capable of producing excellent photographs when:
- Exposure is correct
- White balance is correct
- The image doesn’t require extreme editing
- You want a ready-to-share file
An 8-bit JPEG is not automatically “bad.”
The limitation appears when you make substantial adjustments.
10-bit
10-bit provides four times as many levels as 8-bit.
It is particularly important in video because color grading can involve significant manipulation.
Some still-camera formats and workflows also support 10-bit images.
For photographers, 10-bit can be useful when working with:
- Smooth gradients
- Strong color grading
- HEIF workflows
- HDR-related imaging
- Video frames
12-bit RAW
12-bit RAW provides 4,096 possible numerical levels.
This is substantially more than 8-bit JPEG and is sufficient for many professional photographic applications.
Some cameras use 12-bit RAW in certain shooting modes to reduce file size or increase readout speed.
14-bit RAW
14-bit RAW provides 16,384 possible numerical levels.
This is commonly used in higher-end still photography when the camera’s processing pipeline supports it.
The advantage is greatest when the RAW file contains meaningful subtle tonal information that your editing workflow needs to preserve.
However, don’t expect a 14-bit RAW file to look four times better than a 12-bit file.
The number of numerical levels and the visible photographic difference are not the same thing.
5. When Will You Actually Notice the Difference?
This is the practical question.
You probably won’t look at two properly exposed photographs and immediately say:
“That one is 14-bit.”
The difference is more likely to appear when the file is challenged.
Situation A: Minimal editing
You shoot a portrait outdoors in soft light.
Exposure is correct.
White balance is correct.
You make minor adjustments.
Result: The difference between a good 12-bit and 14-bit RAW may be difficult to see.
Situation B: Aggressive shadow recovery
You underexpose a landscape and later raise the shadows by several stops.
Result: The RAW file’s quality, sensor noise performance and available tonal information become much more important.
Situation C: Strong color grading
You push colors and curves aggressively.
Result: Higher bit depth can provide more room for tonal and color manipulation before visible artifacts appear.
Situation D: Smooth studio gradient
You photograph a product against a seamless background.
You apply significant tonal adjustments.
Result: Banding can become easier to see, making tonal precision more valuable.
6. Camera Settings and Technical Considerations
Bit depth is not normally a setting such as aperture or shutter speed.
Instead, it is usually determined by your file format, recording mode, camera model and sometimes shooting mode.
Still, several camera settings affect how useful that bit depth becomes.
RAW vs JPEG
If maximum editing flexibility is the goal, select RAW rather than JPEG.
Look in your camera’s image-quality menu for options such as:
- RAW
- JPEG
- RAW + JPEG
- Lossless compressed RAW
- Compressed RAW
If the camera offers different RAW bit-depth or RAW recording modes, check the manual because implementation varies by model.
Aperture
Aperture does not directly change bit depth.
However, it affects exposure and therefore the amount of useful information captured.
For a landscape where you want deep depth of field, you might use:
f/8
rather than:
f/2.8
The important connection is that you need to maintain an appropriate shutter speed or ISO so that the image isn’t unnecessarily underexposed.
Shutter Speed
Again, shutter speed does not alter bit depth directly.
But it determines how much light reaches the sensor.
For example:
1/30 sec vs 1/500 sec
- 1/30 sec allows considerably more light
- 1/500 sec allows much less light
If the faster shutter causes you to underexpose the photograph substantially, you’ll have less useful signal to work with when lifting shadows.
ISO
ISO is especially important.
Raising ISO doesn’t magically give the camera more bit depth.
Instead, it changes the amplification/gain applied to the sensor signal.
At high ISO, noise becomes more prominent, reducing the practical benefit of having extremely fine numerical precision.
This is why:
14-bit RAW does not guarantee clean shadow recovery at high ISO.
Sensor performance still matters.
Focal Length
Focal length doesn’t affect bit depth.
But it changes composition and subject size, which can influence where tones and brightness extremes appear in your frame.
For example:
24mm: useful for including a large bright sky and foreground.
85mm: useful for isolating a subject and excluding distracting bright or dark areas.
This can indirectly make exposure easier to manage.
White Balance
White balance is particularly important when shooting JPEG.
A JPEG has already undergone significant processing and color rendering in-camera.
RAW gives you much greater flexibility to adjust white balance later.
Therefore, if you anticipate substantial color correction, RAW is generally the safer choice.
Exposure Compensation
Exposure compensation doesn’t change bit depth.
It changes your exposure target.
When shooting RAW, careful exposure is still essential because lifting severely underexposed shadows can reveal noise.
Don’t treat RAW as permission to ignore exposure.
Shooting Mode
For most bit-depth comparisons, Manual, Aperture Priority or another normal exposure mode is fine.
What matters is the file format and recording mode your camera uses.
7. Step-by-Step Shooting Tutorial: Test Bit Depth Yourself
The best way to understand bit depth is to perform a controlled test.
Step 1: Find a High-Contrast Subject
Choose a scene containing:
- Bright highlights
- Dark shadows
- A smooth gradient
- Several colors
A good example is a building with a bright sky behind it and deep shadows underneath.
Step 2: Use a Tripod
Put the camera on a tripod.
This keeps composition identical between photographs.
If you don’t have a tripod, place the camera on a stable surface.
Step 3: Choose a Moderate Aperture
Start around:
f/8
This provides a useful balance of depth of field and optical performance for many lenses.
Step 4: Use a Fixed Focal Length
Choose something like:
50mm
and don’t change it between exposures.
The goal is to control as many variables as possible.
Step 5: Keep ISO Low
Start at:
ISO 100
or your camera’s lowest practical native ISO.
This gives you the cleanest possible starting point.
Step 6: Shoot RAW
If your camera offers different RAW modes, record the highest-bit-depth RAW available.
If it offers 12-bit and 14-bit RAW, capture both if the camera permits identical comparisons.
Step 7: Take a Correctly Exposed Photograph
Meter the scene carefully.
For example:
Aperture: f/8
Shutter: 1/125 sec
ISO: 100
Focal length: 50mm
File: 14-bit RAW
The exact shutter speed will depend on the light.
Step 8: Deliberately Underexpose a Second Photograph
Take another image approximately 2–3 stops darker.
For example:
1/125 sec → 1/500 sec → 1/1000 sec
while keeping aperture and ISO unchanged.
Step 9: Repeat Using the Alternative RAW Mode
If your camera supports it, capture the same sequence using the lower-bit-depth RAW option.
Do not change composition or lighting.
Step 10: Process the Files
In your RAW editor:
- Return the underexposed image to normal brightness.
- Raise exposure.
- Increase shadows.
- Apply a moderate contrast adjustment.
- Increase saturation slightly.
- Inspect the darkest areas at 100% magnification.
- Inspect smooth gradients.
Look for:
- Shadow noise
- Banding
- Posterization
- Color shifts
- Loss of subtle tonal transitions
Step 11: Compare the Files
Don’t simply look at the original files.
The purpose of the exercise is to stress the files through editing.
You may discover that the difference between 12-bit and 14-bit is subtle in your particular camera.
That’s a useful result.
It teaches you that specifications don’t exist independently of sensor performance and real-world conditions.
8. Practical Examples
Example 1: Landscape at Sunrise
Situation: You are photographing a mountain landscape before sunrise.
Subject: Mountain, foreground trees and brightening sky.
Lighting: High contrast; sky significantly brighter than foreground.
Composition: Place the horizon around the lower third and include foreground detail.
Suggested settings:
- Aperture: f/8
- Shutter: approximately 1/15 sec
- ISO: 100
- Focal length: 24–35mm
- File: RAW
- Focus: single AF or manual focus after establishing focus
What to look for: Subtle color transitions in the sky and shadow detail in the foreground.
Expected result: A RAW file that gives you considerable flexibility when balancing the sky and foreground during processing.
Creative variation: Deliberately include a silhouette in the foreground and allow the sky to dominate the exposure.
Example 2: Backlit Portrait
Situation: Photograph a person standing near a large window.
Subject: Person facing away from or partially toward the window.
Lighting: Strong backlight with a darker face.
Composition: Medium portrait with the window occupying part of the frame.
Suggested settings:
- Aperture: f/2.8
- Shutter: 1/250 sec
- ISO: 400
- Focal length: 85mm
- File: RAW
What to look for: Skin-tone transitions and shadow detail.
Expected result: A RAW file that gives you room to brighten the face while retaining the character of the window light.
Creative variation: Allow the face to remain partially shadowed instead of fully recovering it.
Example 3: Studio Product Photography
Situation: Photograph a black product against a white background.
Subject: A black camera, bottle or electronic device.
Lighting: Large softbox from one side and controlled fill from the opposite side.
Composition: Product slightly off-center with clean negative space.
Suggested settings:
- Aperture: f/8
- Shutter: 1/160 sec
- ISO: 100
- Focal length: 70–100mm
- File: RAW
What to look for: Smooth background transitions and subtle reflections.
Expected result: Clean tonal transitions that survive moderate post-processing.
Creative variation: Introduce a strip light reflection to create a deliberate highlight along the product edge.
Example 4: Blue Hour Cityscape
Situation: Photograph buildings shortly after sunset.
Subject: Architecture, streetlights and sky.
Lighting: Mixture of cool ambient light and warm artificial light.
Composition: Use leading lines from a road or bridge.
Suggested settings:
- Aperture: f/8
- Shutter: 1/4 sec
- ISO: 100
- Focal length: 35mm
- File: RAW
What to look for: Smooth transitions in the dark blue sky and subtle color differences in the buildings.
Expected result: A file with considerable flexibility for adjusting the mixed-color lighting.
Creative variation: Wait until the sky is dark enough to create a stronger contrast between warm lights and cool surroundings.
Example 5: Indoor Window Light
Situation: Photograph a person beside a large window in a dim room.
Subject: Environmental portrait.
Lighting: Soft window light from one side, dark interior on the opposite side.
Composition: Place the person off-center and allow the room to remain visible.

Suggested settings:
- Aperture: f/2.8
- Shutter: 1/125 sec
- ISO: 800
- Focal length: 50mm
- File: RAW
What to look for: Shadow noise and subtle skin tones.
Expected result: A natural portrait with atmospheric shadows rather than completely flat lighting.
Creative variation: Underexpose slightly to make the window light feel more dramatic.
9. Common Mistakes
Mistake 1: Assuming 14-Bit Means 14 Stops of Dynamic Range
What goes wrong: You assume a 14-bit RAW file automatically contains 14 stops of usable exposure range.
Why it happens: The numbers look similar.
How to recognize it: You expect extreme shadow recovery simply because the file is 14-bit.
Fix: Treat bit depth and dynamic range as separate specifications.
Mistake 2: Thinking More Bits Always Produce a Visibly Better Photograph
What goes wrong: You expect a 14-bit image to look dramatically better than a 12-bit image straight out of camera.
Why: Bit depth primarily provides greater numerical precision.
Fix: Evaluate the difference after challenging the file with editing.
Mistake 3: Underexposing Because “RAW Can Fix Everything”
What goes wrong: You deliberately leave the image several stops too dark.
Why: RAW files have substantial editing flexibility.
Fix: Expose carefully. RAW improves recovery options; it doesn’t eliminate sensor noise.
Mistake 4: Comparing Different Exposures
What goes wrong: One image is brighter than another and you conclude the brighter file has better tonal quality.
Fix: Use a tripod and identical exposure/composition when testing bit depth.
Mistake 5: Ignoring ISO
What goes wrong: You compare 12-bit and 14-bit files at a very high ISO and attribute all differences to bit depth.
Fix: Start comparisons at low ISO, then repeat at higher ISO.
Mistake 6: Confusing Megapixels with Bit Depth
What goes wrong: You assume a higher-resolution camera must have greater tonal precision.
Fix: Treat resolution and bit depth as separate characteristics.
Mistake 7: Saving an Edited RAW as 8-Bit Too Early
What goes wrong: You convert your working file to an 8-bit format before finishing substantial adjustments.
Fix: Keep a high-bit-depth editing workflow where your software supports it, and create the 8-bit JPEG as an output file when appropriate.
Mistake 8: Choosing a Camera Solely Because It Has “14-Bit RAW”
What goes wrong: You prioritize one specification while ignoring sensor performance, lens quality, autofocus, ergonomics and workflow.
Fix: Evaluate the complete camera system.
10. Creative Techniques
Bit depth isn’t normally a “creative technique” in the same way as slow shutter photography or backlighting. Its creative value comes from how much freedom it gives you during image processing.
Here are five ways to exploit that freedom.
1. Create Dramatic Shadow-Lifted Images
Photograph a high-contrast scene in RAW.
During processing, lift the shadows while keeping highlights relatively controlled.
This can reveal details that weren’t obvious in the original exposure.
Try: Side-lit architecture or a forest with bright patches of sky.
2. Build Deliberate Color Grades
Shoot RAW and experiment with:
- Temperature
- Tint
- HSL adjustments
- Curves
- Color grading
- Contrast
Instead of trying to make the photograph look “correct,” create a deliberate color interpretation.
Try: Turn a neutral blue-hour photograph into a cooler, cinematic scene.
3. Preserve Smooth Skies for Aggressive Processing
Photograph a sunset with a large, smooth sky.
Then experiment with:
- Dehaze
- Contrast
- Curves
- Saturation
- Gradient masks
Watch carefully for banding.
This is an excellent way to learn why tonal precision matters.
4. Use Underexposure Creatively—But Intentionally
Instead of trying to recover every shadow, allow some areas to become genuinely dark.
The RAW file gives you the option to decide later how much information to reveal.
For example:
Expose for the bright window → preserve the luminous highlight → selectively lift the subject.
This produces a more controlled result than trying to make every part of the frame equally bright.
5. Combine Strong Light With Controlled Post-Processing
Use hard side light to create deep shadows.
Rather than eliminating those shadows, use RAW processing to control their density.
Experiment with:
- Subject placement
- Light direction
- Background brightness
- Lens choice
- Exposure
- Shadow recovery
The goal isn’t maximum information everywhere.
The goal is intentional information.
11. Understanding 8-Bit vs 10-Bit vs 12-Bit vs 14-Bit in Real Life
Here’s a useful way to think about the four formats.
8-bit
Think:
Finished image
Great for many JPEG delivery situations.
10-bit
Think:
More room for color and tonal manipulation
Particularly useful in video and certain advanced image/HDR workflows.
12-bit RAW
Think:
Strong photographic editing flexibility
A very capable RAW format.
14-bit RAW
Think:
Maximum numerical precision in cameras that support it
Particularly attractive when you want maximum RAW flexibility and your camera’s sensor/readout pipeline can make meaningful use of it.
But remember:
The difference between 12-bit and 14-bit is often much less visible than the difference between JPEG and RAW, or between a well-exposed and severely underexposed photograph.
12. Beginner vs Advanced Approach
Beginner approach
Don’t obsess over bit depth.
Set your camera to:
RAW or RAW + JPEG
when you want maximum editing flexibility.
Then concentrate on:
- Exposure
- Focus
- Composition
- Light
- Subject placement
- Timing
These will usually have a much greater effect on your photograph than choosing between two high-quality RAW bit depths.
Advanced approach
An experienced photographer can start thinking about the entire imaging pipeline.
For example:
Scene brightness → exposure → sensor signal → RAW bit depth → RAW conversion → editing bit depth → final output
They may deliberately compare:
- 12-bit vs 14-bit RAW
- Lossless vs compressed RAW
- Low ISO vs high ISO
- Shadow recovery limits
- Highlight preservation
- Different RAW processing software
- 8-bit vs 16-bit editing pipelines
- Output requirements for print, web and video
The advanced photographer isn’t simply chasing the largest number.
They’re asking:
Where in my workflow does additional information actually improve the final image?
13. Troubleshooting Guide
| Problem | Possible reason | Solution |
|---|---|---|
| Shadow recovery looks noisy | Image was severely underexposed | Improve exposure and avoid unnecessary shadow lifting |
| Sky shows banding | Strong gradient manipulation or limited tonal precision | Reduce aggressive adjustments; use a higher-bit-depth workflow |
| JPEG falls apart after editing | JPEG has limited tonal information and is already processed | Shoot RAW for images requiring significant editing |
| 14-bit file doesn’t look better | Scene doesn’t challenge tonal precision | Compare after substantial adjustments rather than straight out of camera |
| Colors change strangely during editing | Strong color manipulation or clipped channels | Make smaller adjustments and preserve a high-bit-depth working file |
| Dark areas contain little useful detail | Sensor noise/read noise is dominating | Improve exposure, use lower ISO where practical, and avoid extreme recovery |
| Images look different despite same bit depth | Exposure, ISO, sensor performance or processing differs | Control all variables during testing |
| RAW files are very large | Higher-precision and/or less compressed recording | Use appropriate compression or a lower-bit-depth mode when speed/storage matters |
| Camera slows during bursts | Large files and processing/write requirements | Use a suitable card and choose the camera’s faster RAW mode if necessary |
14. Photography Assignment
Assignment: The Bit-Depth Stress Test
Objective
Learn to identify when additional tonal information and RAW flexibility actually matter in a real photograph.
Task
Find a scene containing both very bright and very dark areas, plus at least one smooth tonal gradient.
Good subjects include:
- A building against a bright sky
- A person beside a window
- A sunset over a dark foreground
- A street scene with bright signs and dark alleys
- A product against a smooth background
Requirements
Take 12 photographs.
Create four groups of three:
Group 1 — Correct exposure
- Three compositions of the same general scene
- RAW format
- Carefully exposed
Group 2 — Deliberate underexposure
- Three photographs approximately 2 stops underexposed
- Keep composition similar
Group 3 — Shadow challenge
- Three photographs containing a strong shadow area
- Look for subtle texture within the shadows
Group 4 — Gradient challenge
- Three photographs containing a smooth sky, wall, curtain or other gradient
If your camera supports multiple RAW bit-depth options, repeat the experiment using those modes.
Required technique
For the controlled comparisons:
- Use a tripod if possible.
- Keep ISO constant.
- Keep aperture constant.
- Keep focal length constant.
- Avoid changing the lighting between comparison shots.
- Record the settings for every frame.
Challenge
Do not try to make every photograph look equally bright.
Instead, create one version in which the shadows remain dark and another in which you recover them.
Your goal is to learn when information should be recovered and when darkness should remain intentional.
Submission/Review Checklist
After processing the photographs, ask:
- Which image has the cleanest shadow detail?
- Which image shows the most visible noise?
- Can I see banding in any smooth gradient?
- Did I confuse increased bit depth with increased dynamic range?
- Which adjustments caused the greatest problems?
- Did correct exposure make a larger difference than bit depth?
- Does the higher-bit-depth file actually look better after my editing?
- Which photograph has the strongest visual intention?
- Did I preserve information that I actually needed?
- What would I change when shooting this scene again?
15. Advanced Challenge
Assignment: Push the RAW File to Its Limit
Find a high-contrast scene during golden hour or blue hour.
Make three exposures:
Exposure A
Expose normally.
Exposure B
Underexpose by approximately 2 stops.
Exposure C
Underexpose by approximately 4 stops.
Keep the aperture and ISO consistent where practical.
Process all three files so that the final brightness is approximately equivalent.
Then compare:
- Shadow noise
- Color accuracy
- Fine texture
- Tonal transitions
- Banding
- Highlight behavior
- Overall image quality
If your camera offers 12-bit and 14-bit RAW recording, repeat the test in both modes.
The advanced question
Don’t simply ask:
“Which file has more information?”
Ask:
“At what point does additional recorded information stop producing a meaningful improvement in my final photograph?”
That question will teach you much more about digital photography than memorizing camera specifications.
16. Final Takeaways
- Bit depth describes how many numerical levels are available to represent image information.
- 8-bit provides 256 levels.
- 10-bit provides 1,024 levels.
- 12-bit provides 4,096 levels.
- 14-bit provides 16,384 levels.
- Higher bit depth can provide smoother tonal transitions and more editing flexibility.
- Bit depth is not the same as dynamic range.
- A 14-bit RAW file does not automatically provide 14 stops of dynamic range.
- JPEG is commonly 8-bit per channel, while camera RAW files are commonly 12-bit or 14-bit.
- RAW is particularly valuable when you expect substantial exposure, color or tonal adjustments.
- Exposure, sensor noise, ISO and dynamic range still matter enormously.
- Don’t expect 14-bit RAW to look dramatically better than 12-bit RAW in every photograph.
- The best way to understand bit depth is to shoot controlled comparisons and aggressively process the files.
- For beginners, learning to expose and compose well is more important than obsessing over bit-depth specifications.
- For advanced photographers, bit depth becomes one part of a larger imaging workflow.
The practical lesson is simple:
Choose the highest-quality recording format that makes sense for the job, but don’t mistake a larger technical specification for a better photograph.
Your camera’s bit depth matters most when the photograph contains information that you actually need to preserve, manipulate or recover.
Frequently Asked Questions
1. Is 14-bit RAW better than 12-bit RAW?
Not necessarily in every photograph. A 14-bit RAW file contains more possible numerical levels, but the visible advantage depends on the camera’s sensor, exposure, ISO, scene and how heavily you process the image. For many normal photographs, the difference can be difficult to see.
2. Is JPEG 8-bit?
A standard JPEG is typically 8-bit per color channel. This provides 256 possible values for each channel. JPEG also applies processing and compression, which limits how much flexibility you have compared with RAW.
3. Does 14-bit mean 14 stops of dynamic range?
No. Bit depth and dynamic range are different measurements. A 14-bit RAW file can represent 16,384 numerical levels, but the camera’s actual usable dynamic range depends primarily on sensor and electronic performance.
4. Should beginners always shoot 14-bit RAW?
If your camera offers it and storage/workflow requirements aren’t a problem, it is a sensible choice when you intend to edit your photographs extensively. But beginners should prioritize exposure, focus, composition and lighting over bit-depth specifications.
5. Is 10-bit better than 8-bit?
For workflows involving significant color grading or tonal manipulation, 10-bit provides substantially more numerical levels than 8-bit and can reduce the risk of visible banding. However, an ordinary well-exposed photograph intended for straightforward sharing may not show an obvious difference.
6. Does higher bit depth reduce noise?
Not directly. Bit depth provides more numerical precision, but image noise is strongly influenced by the sensor, exposure, ISO and read-noise characteristics. A 14-bit RAW file can still have very noisy shadows if the photograph is severely underexposed.
7. Does bit depth affect image resolution?
No. Bit depth and spatial resolution are separate. Megapixels describe how many pixels the image contains, while bit depth describes how finely tonal information is digitally represented.
8. Should I use RAW or JPEG if I want to edit my photographs?
If you plan to edit your photographs, RAW is generally the better choice because it preserves substantially more image data and gives you greater control over exposure, highlights, shadows, white balance, color and detail during editing. JPEG files are already processed and compressed by the camera, so they offer less flexibility for major adjustments.
For casual photography or images you want to share immediately, JPEG can be more convenient because it is smaller, ready to use, and already has the camera’s color and sharpening applied.
Simple rule:
RAW = maximum editing flexibility
JPEG = convenience and ready-to-share images
