

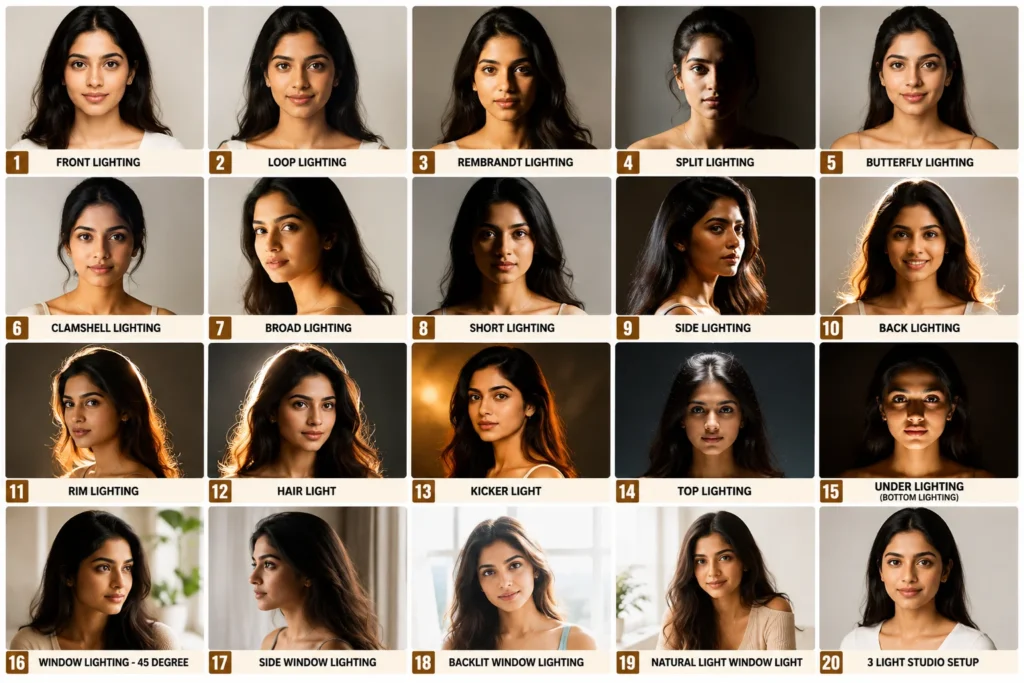
Portrait lighting is one of the most important elements of photography. The way you position your light can completely change the mood, depth, and impact of a portrait. Even a small adjustment in the light’s angle can transform a flat image into a dramatic, professional-looking photograph.
Whether you’re using natural window light, a single flash, or a full studio setup, understanding different lighting patterns will help you create more flattering and expressive portraits. In this guide, you’ll discover 20 essential portrait lighting setups, including Butterfly, Rembrandt, Loop, Split, Rim, and Three-Point Lighting, along with their ideal light positions, the mood they create, and the best situations to use them.
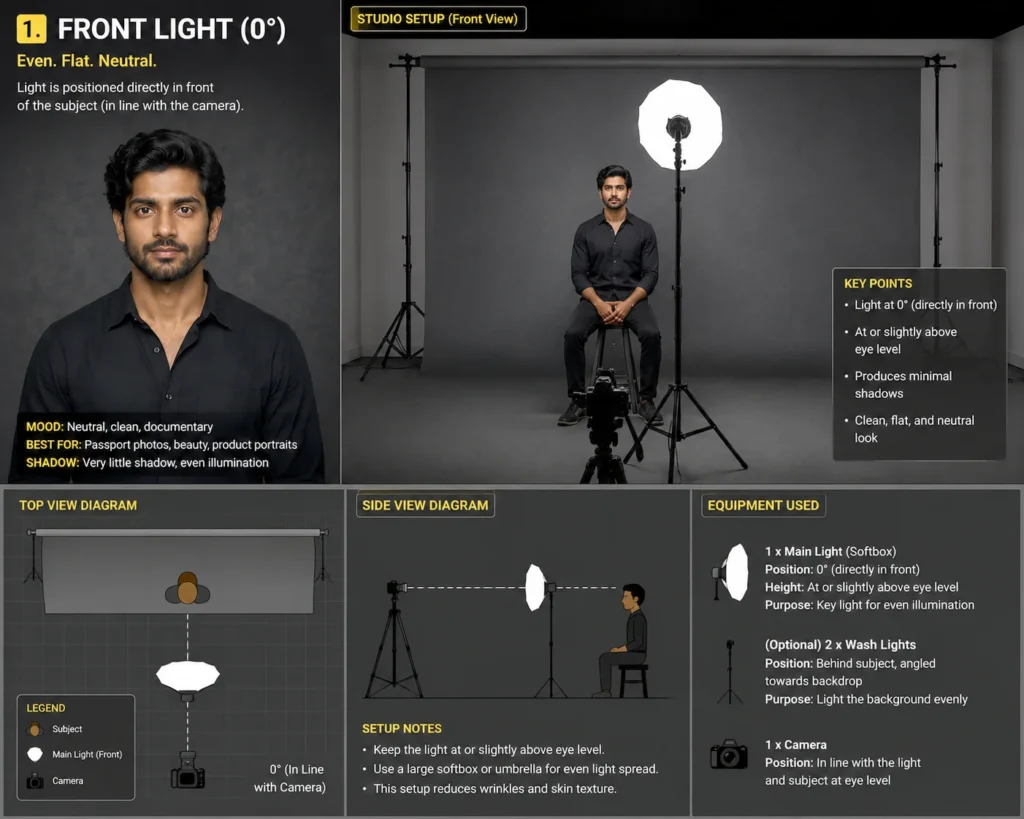
1. FRONT LIGHT (0°)
Even. Flat. Neutral.
The light is placed directly in front of the subject, aligned with the camera. This setup produces even illumination across the face with almost no visible shadows.
Mood
Neutral, clean, documentary style.
Best For
- Passport photographs
- Beauty portraits
- Product photography
- Corporate headshots
Shadow
Very little shadow with smooth, even illumination.
Key Points
- Light positioned at 0° (directly in front).
- Place the light at or slightly above eye level.
- Produces minimal facial shadows.
- Creates a clean and balanced look.
Equipment Used
- 1 × Main Light (Softbox)
- Position: 0° (directly in front)
- Height: At or slightly above eye level
- (Optional) Background lights for an evenly lit backdrop.
- Camera placed directly in line with the light.
Setup Notes
- Use a large softbox or umbrella for softer light.
- Position the light close to the subject for smoother skin tones.
- Ideal when shadow detail is not required.
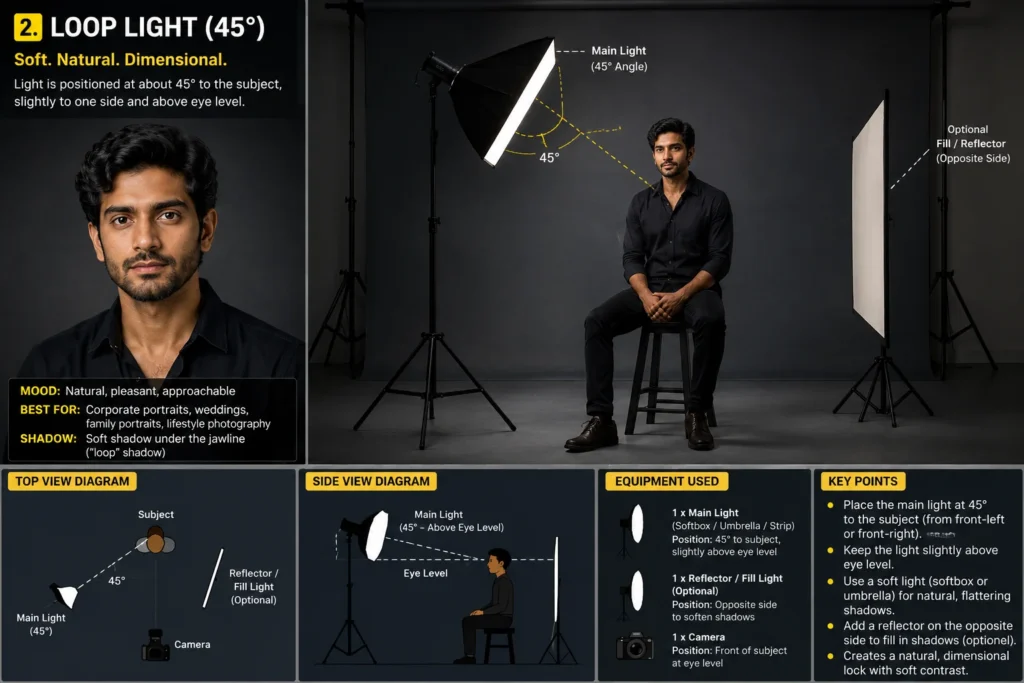
2. LOOP LIGHT (45°)
Soft. Natural. Dimensional.
The light is positioned about 45° to one side of the subject and slightly above eye level, creating a small loop-shaped shadow beside the nose.
Mood
Natural, pleasant, approachable.
Best For
- Corporate portraits
- Family portraits
- Wedding photography
- Lifestyle photography
Shadow
A small loop-shaped shadow beside the nose with gentle facial modeling.
Key Points
- Place the key light at 45° to the subject.
- Keep it slightly above eye level.
- Use soft modifiers like a softbox or umbrella.
- Add a reflector on the opposite side if softer shadows are desired.
Equipment Used
- 1 × Main Light (Softbox or Umbrella)
- (Optional) Reflector or Fill Light
- Camera positioned directly in front.
Setup Notes
- Keep the nose shadow short.
- The nose shadow should not touch the cheek shadow.
- This is one of the most flattering lighting patterns for portraits.
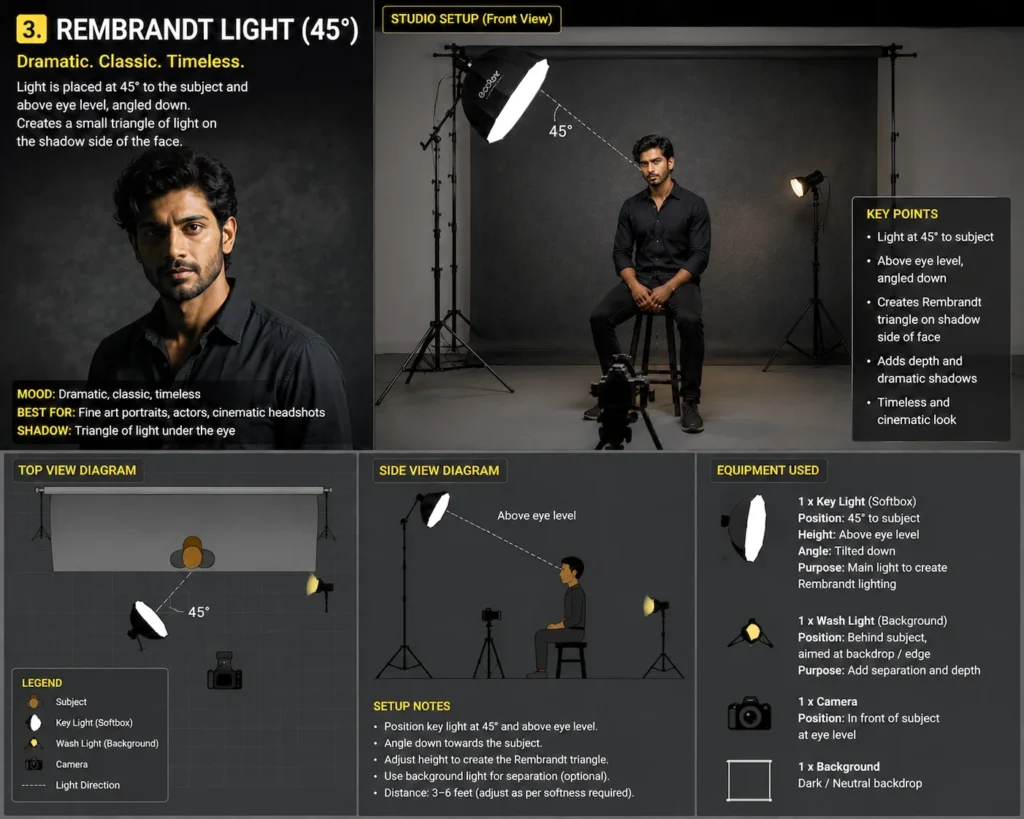
3. REMBRANDT LIGHT (45°)
Dramatic. Classic. Timeless.
The key light is placed at approximately 45° to the side and above the subject, angled downward. The signature feature is a small triangle of light on the shadow side of the face.
Mood
Dramatic, artistic, cinematic.
Best For
- Fine-art portraits
- Actor headshots
- Editorial photography
- Character portraits
Shadow
Distinct shadow across the face with a triangle of light beneath the eye.
Key Points
- Position the light at 45°.
- Raise it above eye level.
- Angle it downward.
- Create the classic Rembrandt triangle.
Equipment Used
- 1 × Key Light (Softbox)
- (Optional) Background or rim light
- Camera placed directly in front.
Setup Notes
- Adjust light height until the triangle of light becomes visible.
- Works best with darker backgrounds.
- Adds depth and strong facial definition.
4. SPLIT LIGHT (90°)
Dramatic. Mysterious. Powerful.
The light is positioned 90° to one side of the subject, illuminating only half of the face while the other half remains in shadow.
Mood
Bold, mysterious, intense.
Best For
- Dramatic character portraits
- Moody
- High-contrast portraits
- Low-key photography
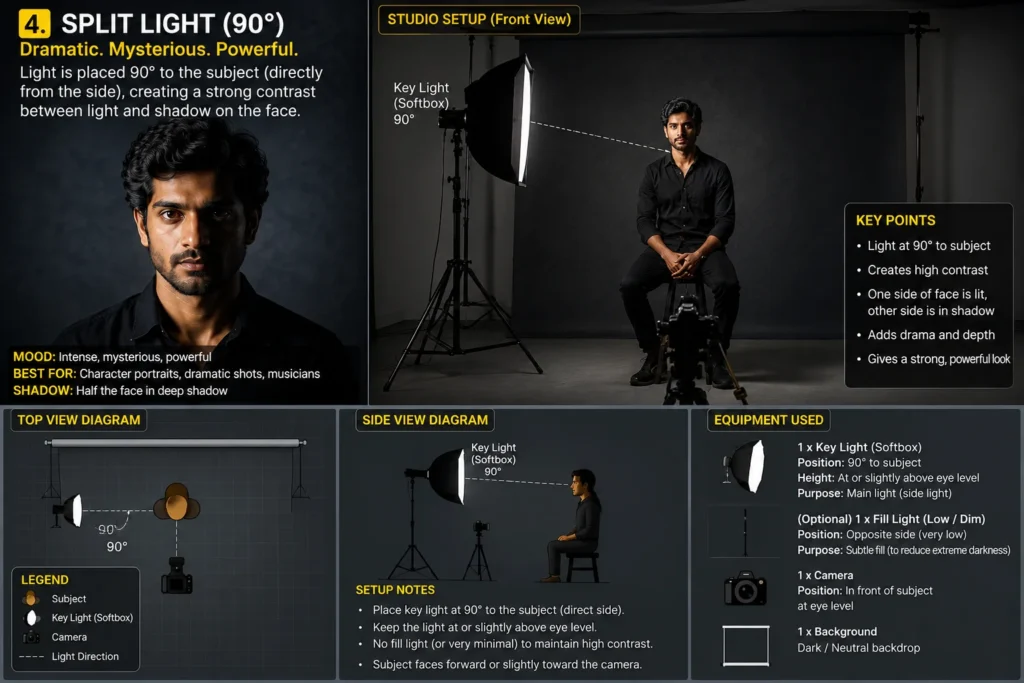
Shadow
One side of the face is brightly lit while the opposite side falls into deep shadow.
Key Points
- Position the key light at 90°.
- Keep it at or slightly above eye level.
- Avoid strong fill light to preserve contrast.
- Creates maximum separation between light and shadow.
Equipment Used
- 1 × Key Light (Softbox)
- (Optional) Low-power fill light
- Camera positioned in front of the subject.
Setup Notes
- Use little or no fill light for the strongest effect.
- Ask the subject to face the camera or turn slightly toward the light.
- Excellent for creating a dramatic and cinematic portrait.
5. BUTTERFLY LIGHTING (High Front Light)
Glamorous. Elegant. Flattering.
The light is placed high in front of the subject and angled downward, creating a small butterfly-shaped shadow directly beneath the nose. This classic Hollywood lighting produces smooth skin tones and symmetrical facial illumination.
Mood
Elegant, glamorous, beauty-focused.
Best For
- Beauty portraits
- Fashion photography
- Makeup photography
- Glamour portraits
Shadow
A small butterfly-shaped shadow directly beneath the nose with soft shadows under the chin.
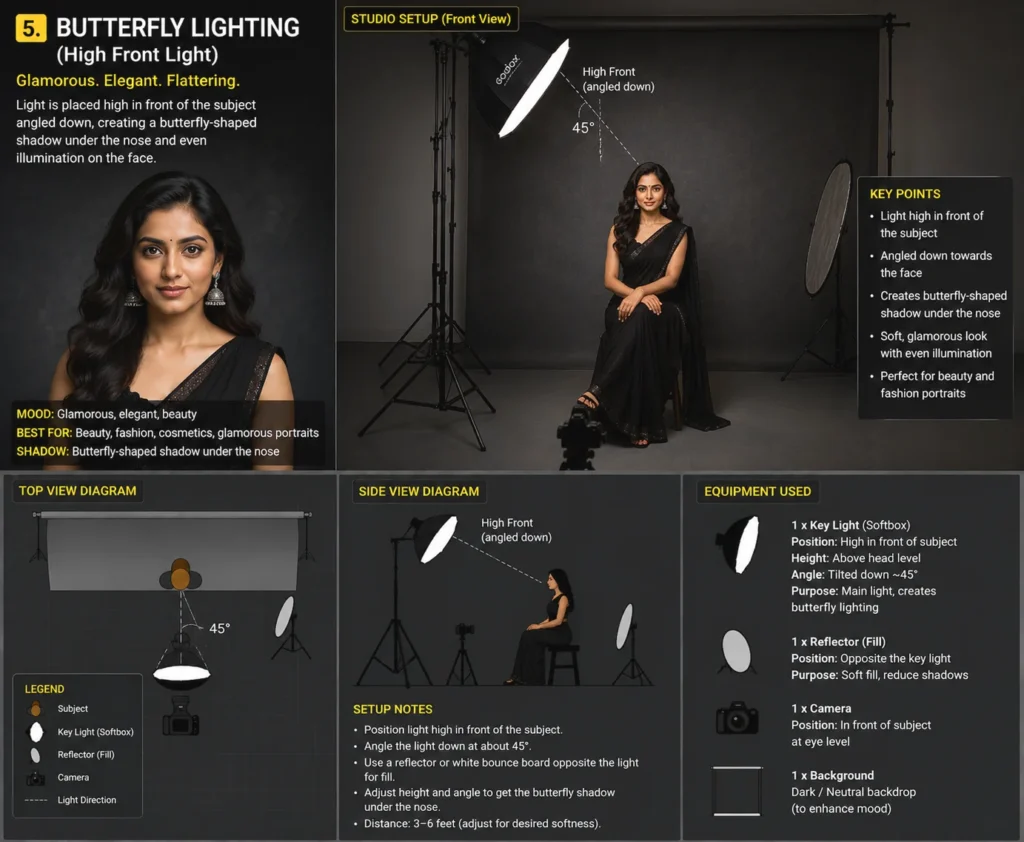
Key Points
- Place the light directly in front of the subject.
- Raise it above head level.
- Angle the light downward at approximately 45°.
- Use a reflector below the face to soften chin shadows.
Equipment Used
- 1 × Key Light (Softbox or Beauty Dish)
- 1 × Reflector or Fill Light (Optional)
- Camera positioned directly in front.
Setup Notes
- Adjust the light height until the butterfly shadow appears beneath the nose.
- Avoid raising the light too high to prevent deep eye sockets.
- Beauty dishes produce a more defined look, while softboxes create softer skin tones.
6. CLAMSHELL LIGHTING
Soft. Flattering. Luxurious.
Clamshell lighting combines a key light placed above the subject with a reflector or second light below the face. The two light sources wrap the face evenly, reducing shadows and creating smooth, glowing skin.
Mood
Soft, elegant, luxurious.
Best For
- Beauty portraits
- Fashion photography
- Makeup photography
- Female portraits
- Headshots
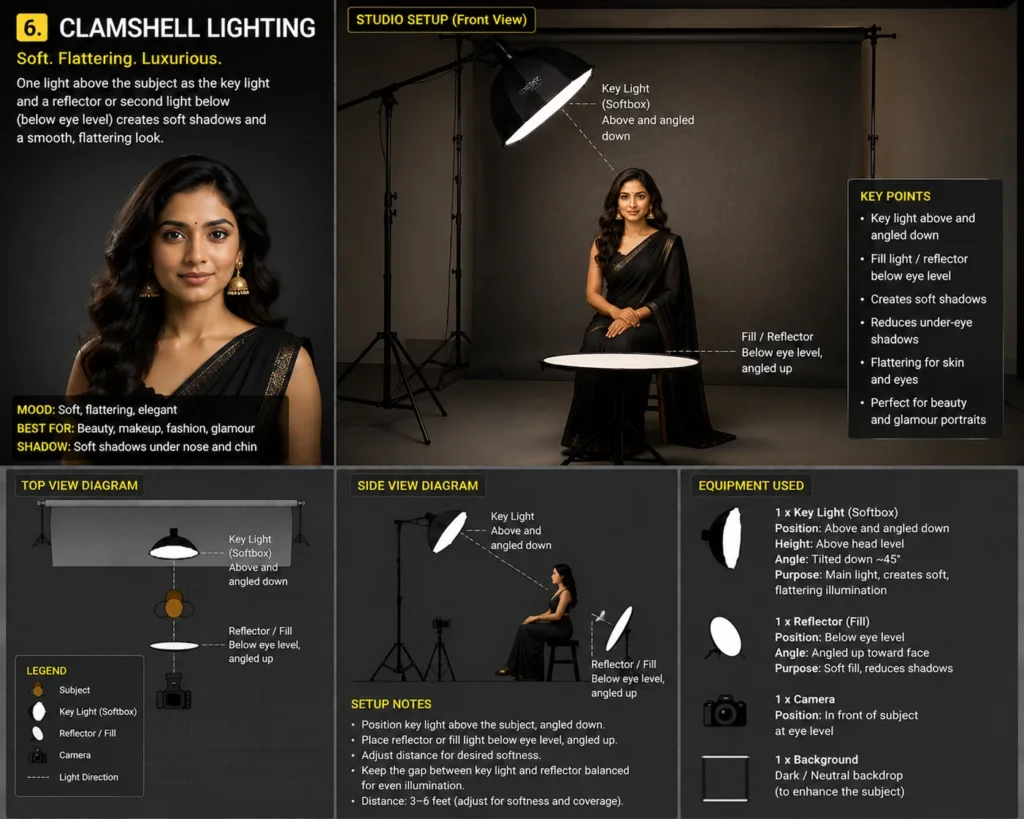
Shadow
Very soft shadows beneath the nose and chin with reduced under-eye shadows.
Key Points
- Position the key light above eye level.
- Angle the light downward toward the face.
- Place a reflector or fill light below eye level.
- Creates smooth, even facial illumination.
Equipment Used
- 1 × Key Light (Softbox or Beauty Dish)
- 1 × Reflector or Fill Light
- Camera positioned directly in front.
Setup Notes
- Balance the brightness of the upper and lower light.
- Keep the reflector close for softer shadows.
- Ideal for highlighting skin texture while minimizing imperfections.
7. BROAD LIGHTING
Bright. Open. Friendly.
Broad lighting illuminates the side of the face turned toward the camera, making the visible side appear wider and brighter. It creates an open and welcoming portrait with gentle facial shadows.
Mood
Friendly, positive, approachable.
Best For
- Corporate portraits
- Lifestyle photography
- Family portraits
- Headshots
Shadow
Soft shadow appears on the far side of the face.
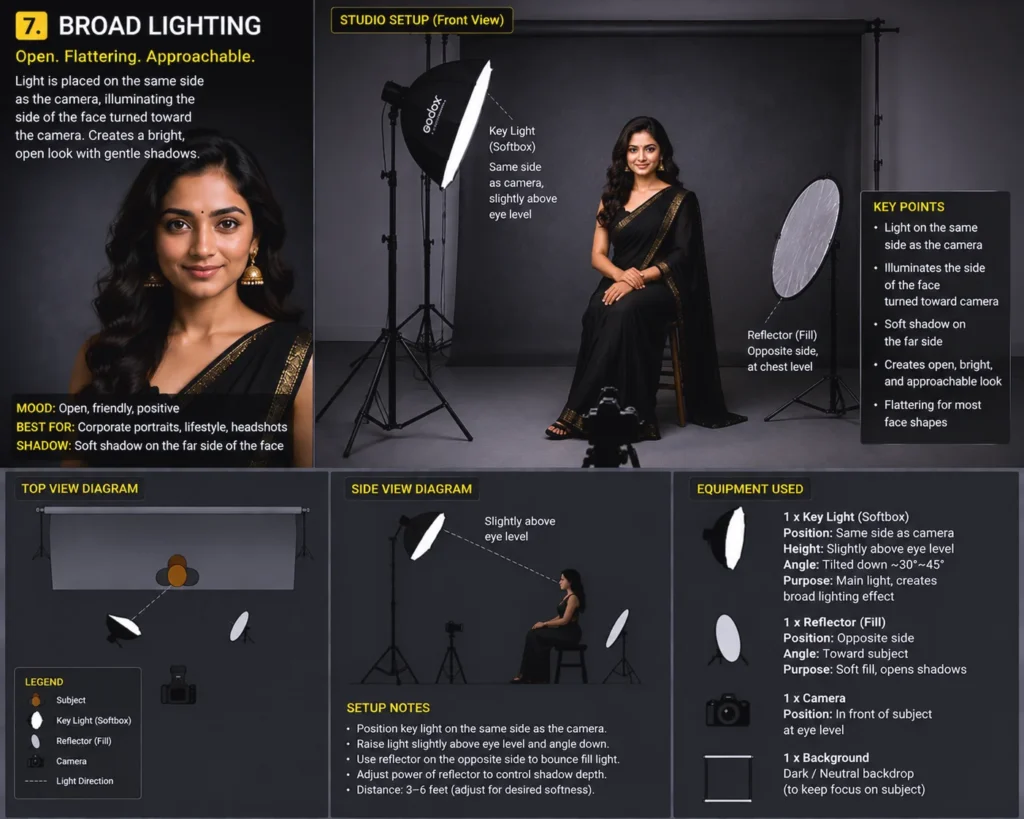
Key Points
- Position the light on the same side as the camera.
- Place it slightly above eye level.
- Turn the subject slightly away from the light.
- Produces a bright and open appearance.
Equipment Used
- 1 × Key Light (Softbox)
- 1 × Reflector or Fill Light (Optional)
- Camera positioned directly in front.
Setup Notes
- Excellent for subjects with narrow or thin faces.
- Use a reflector to soften the far-side shadow.
- Keep the lighting soft for natural-looking portraits.
8. SHORT LIGHTING
Slim. Dramatic. Dimensional.
Short lighting illuminates the side of the face turned away from the camera while leaving the camera-facing side in shadow. This creates depth, strong facial definition, and a slimming effect.
Mood
Dramatic, artistic, sculpted.
Best For
- Round faces
- Character portraits
- Editorial photography
- Fine-art portraits
Shadow
The camera-facing side remains mostly in shadow, creating strong facial contours.
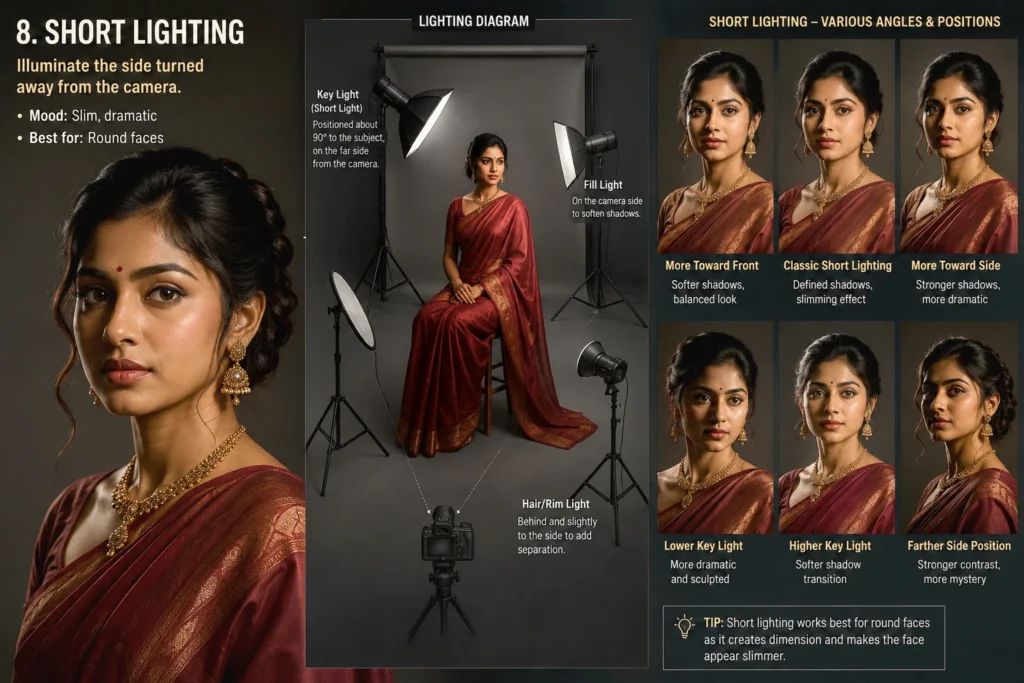
Key Points
- Position the key light about 45°–90° from the subject.
- Light the side of the face turned away from the camera.
- Use a weak fill light if necessary.
- Creates a slimmer facial appearance.
Equipment Used
- 1 × Key Light
- 1 × Fill Light or Reflector (Optional)
- 1 × Hair/Rim Light (Optional)
- Camera positioned in front.
Setup Notes
- Works exceptionally well for fuller or round faces.
- Increase the light angle for a more dramatic look.
- Keep fill light subtle to preserve depth.
9. SIDE LIGHTING (60°–75°)
Textured. Strong. Dimensional.
Side lighting places the key light between Loop and Split Lighting, creating noticeable facial texture while retaining detail in the shadows. It provides excellent depth without becoming overly dramatic.
Mood
Bold, masculine, textured.
Best For
- Fitness portraits
- Editorial photography
- Men’s portraits
- Dramatic headshots
Shadow
Distinct shadows with visible facial texture and strong bone structure.
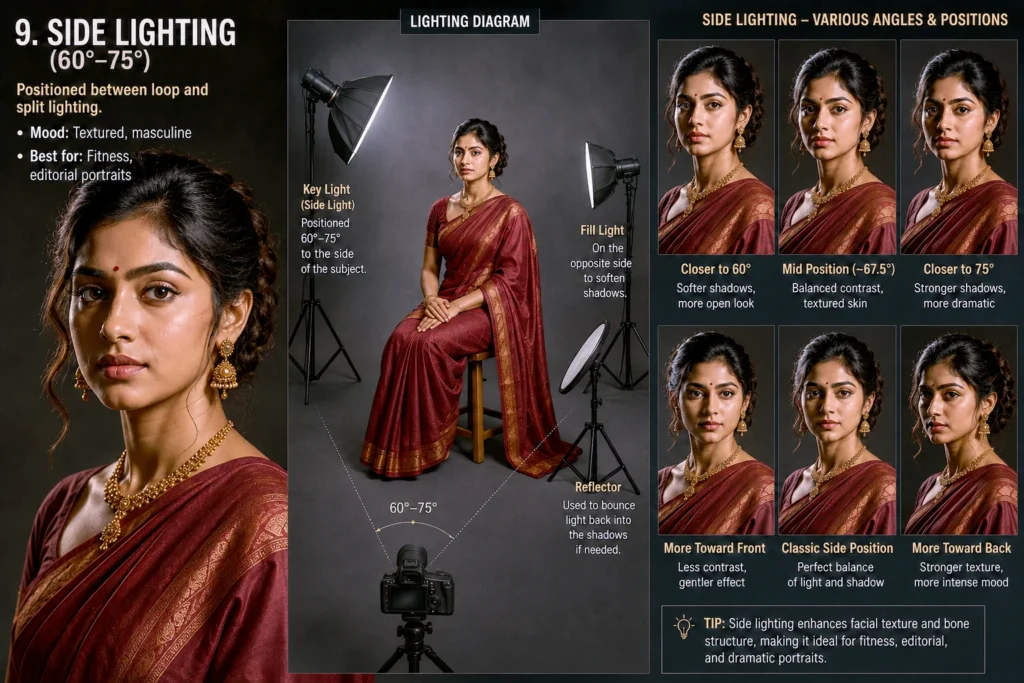
Key Points
- Position the light between 60° and 75°.
- Slightly above eye level.
- Use a reflector if softer shadows are required.
- Produces balanced contrast and depth.
Equipment Used
- 1 × Key Light
- 1 × Reflector or Fill Light (Optional)
- Camera positioned directly in front.
Setup Notes
- Moving toward 60° creates softer contrast.
- Moving toward 75° increases drama.
- Excellent for emphasizing facial features and texture.
10. BACK LIGHTING
Dreamy. Cinematic. Atmospheric.
Back lighting places the light source behind the subject, creating a rim of light around the hair and shoulders. It separates the subject from the background and can also be used to produce dramatic silhouettes.
Mood
Dreamy, cinematic, atmospheric.
Best For
- Outdoor portraits
- Silhouettes
- Bridal photography
- Creative portraits
- Golden hour photography
Shadow
Bright rim around the subject with darker front illumination unless filled.
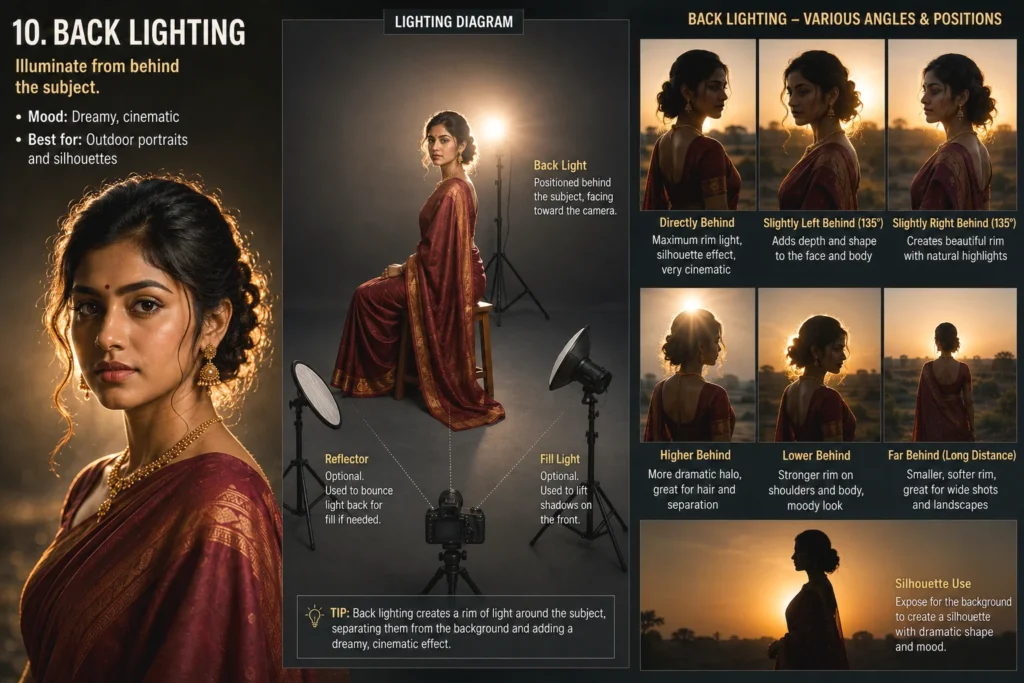
Key Points
- Position the light behind the subject.
- Aim it toward the camera.
- Use a reflector or fill light for facial detail.
- Adjust exposure depending on whether you want a rim-light or silhouette.
Equipment Used
- 1 × Back Light
- 1 × Reflector (Optional)
- 1 × Fill Light (Optional)
- Camera positioned in front.
Setup Notes
- Place the light directly behind for silhouettes.
- Shift it slightly left or right for stronger rim lighting.
- Ideal during sunrise or sunset when the sun acts as the back light.
- Watch for lens flare and use a lens hood if needed.
11. RIM LIGHTING
Powerful. Three-Dimensional. Cinematic.
Rim lighting places the light behind the subject and slightly to one side (typically 120°–150° from the camera). Instead of lighting the face directly, it creates a bright outline around the hair, shoulders, and body, separating the subject from the background and adding depth.
Mood
Powerful, dramatic, cinematic.
Best For
- Sports portraits
- Fitness photography
- Fashion photography
- Editorial portraits
- Creative portraits
Shadow
The front of the face remains in shadow or is softly illuminated, while a bright rim of light outlines the subject’s edges.
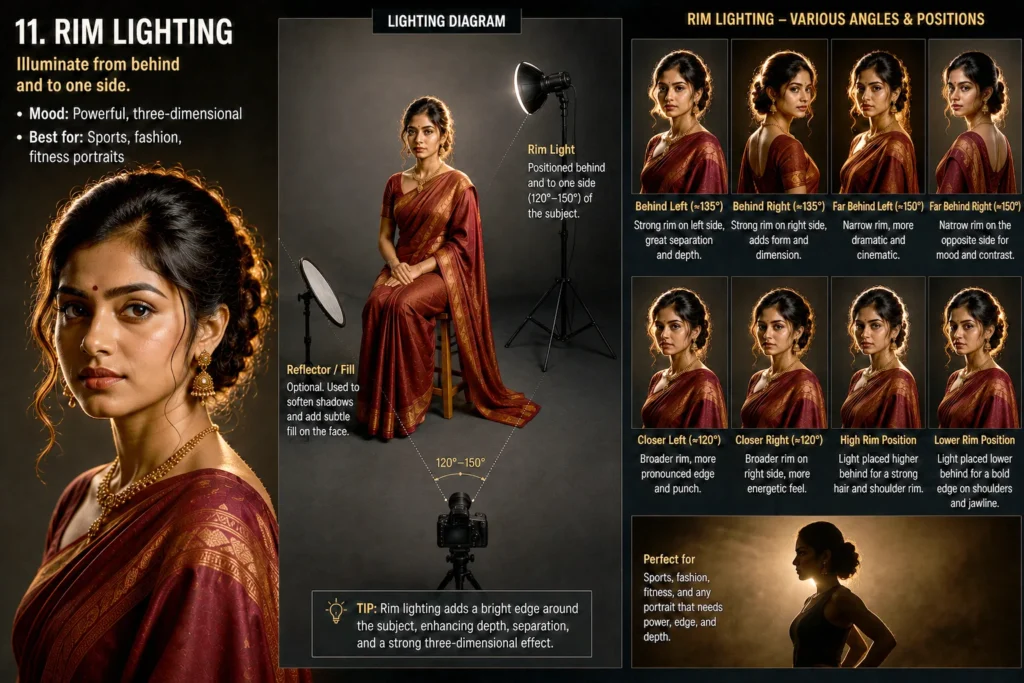
Key Points
- Position the light 120°–150° behind the subject.
- Place it slightly above head level.
- Use a reflector or weak fill light to reveal facial details if needed.
- Creates strong separation between the subject and the background.
Equipment Used
- 1 × Rim Light (Softbox, Strip Box, or Bare Flash)
- 1 × Reflector or Fill Light (Optional)
- Camera positioned directly in front.
Setup Notes
- Position the light farther behind for a thinner, more dramatic rim.
- Move it closer to the side for a wider and brighter edge light.
- Raise the light to emphasize the hair and shoulders, or lower it to highlight the jawline and body contours.
- Keep the rim light out of the camera frame to avoid unwanted lens flare.
- For a stronger three-dimensional effect, add a subtle fill light or reflector on the front of the subject without overpowering the rim light.
Variations
- Behind Left (≈135°): Bright rim along the left side with excellent subject separation.
- Behind Right (≈135°): Highlights the right edge of the face and body for balanced depth.
- Far Behind (≈150°): Creates a thinner, more dramatic rim with a cinematic feel.
- Closer Side (≈120°): Produces a broader rim and reveals more facial detail.
- High Rim Position: Enhances hair light and shoulder highlights.
- Low Rim Position: Accentuates the jawline, arms, and body shape.
Pro Tip
Rim lighting works best when the subject wears darker clothing or stands against a dark background. The bright outline creates a striking three-dimensional effect that makes the subject stand out without heavily lighting the front of the face.
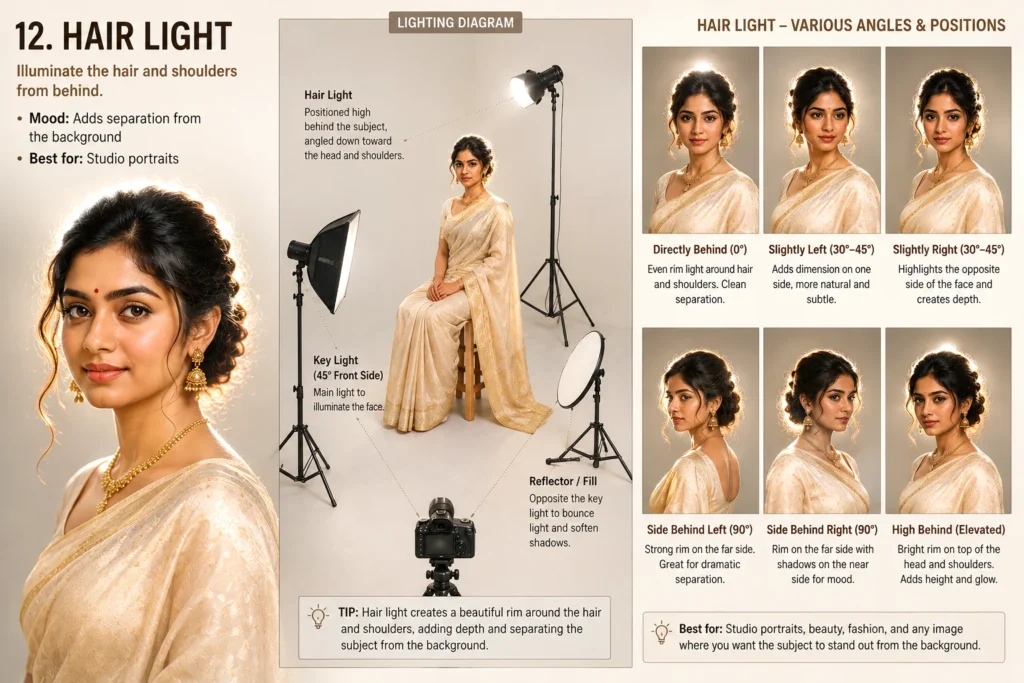
12. Hair Light
A Hair Light is a light placed behind and above the subject to illuminate the hair and the upper part of the shoulders. It creates separation between the subject and the background, making the subject appear more three-dimensional.
Hair light is not intended to brighten the face. Instead, it adds a subtle glow around the head and shoulders.
Position
- Placed behind the subject
- Slightly above head level
- Usually angled downward at about 45°
- Hidden from the camera’s view
Characteristics
- Highlights hair
- Creates depth
- Separates subject from dark backgrounds
- Adds professionalism
- Produces a natural shine
Advantages
- Makes hairstyles more attractive
- Gives portraits a cinematic appearance
- Improves subject-background separation
- Adds depth without affecting facial lighting
Disadvantages
- Too much power creates blown-out highlights.
- Can produce lens flare if aimed at the camera.
- Difficult to control with reflective hair.
Applications
- Portrait photography
- Fashion photography
- Television interviews
- Film production
- Beauty photography
Example
A news anchor standing in front of a dark studio background appears separated because a hair light creates a bright outline around the hair.
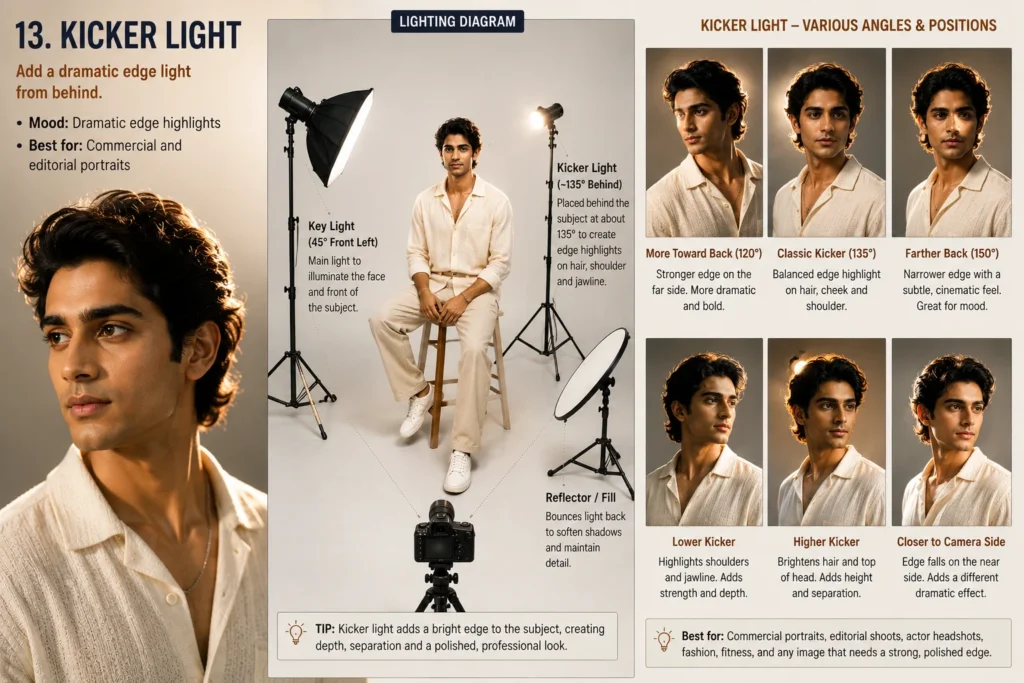
13. Kicker Light
Introduction
A Kicker Light is placed behind the subject at an angle, usually about 45° from the rear. Unlike hair light, it illuminates the side of the face, cheek, shoulder, or body.
It creates a dramatic edge of light.
Characteristics
- Produces rim lighting
- Highlights facial edges
- Creates dramatic contrast
- Adds depth
Advantages
- Makes the subject stand out
- Gives a cinematic look
- Excellent for dramatic portraits
Disadvantages
- Easy to overexpose
- Can create unwanted flare
- Requires careful positioning
Applications
- Movie scenes
- Sports portraits
- Fashion photography
- Commercial advertising
- Music videos
Example
A boxer photographed in a dark gym with a bright edge on one side of the face uses a kicker light.
Difference Between Hair Light and Kicker Light
| Hair Light | Kicker Light |
|---|---|
| Lights the hair | Lights the side of the face |
| Placed directly behind | Placed behind at an angle |
| Produces hair highlights | Produces rim highlights |
| Soft separation | Dramatic separation |
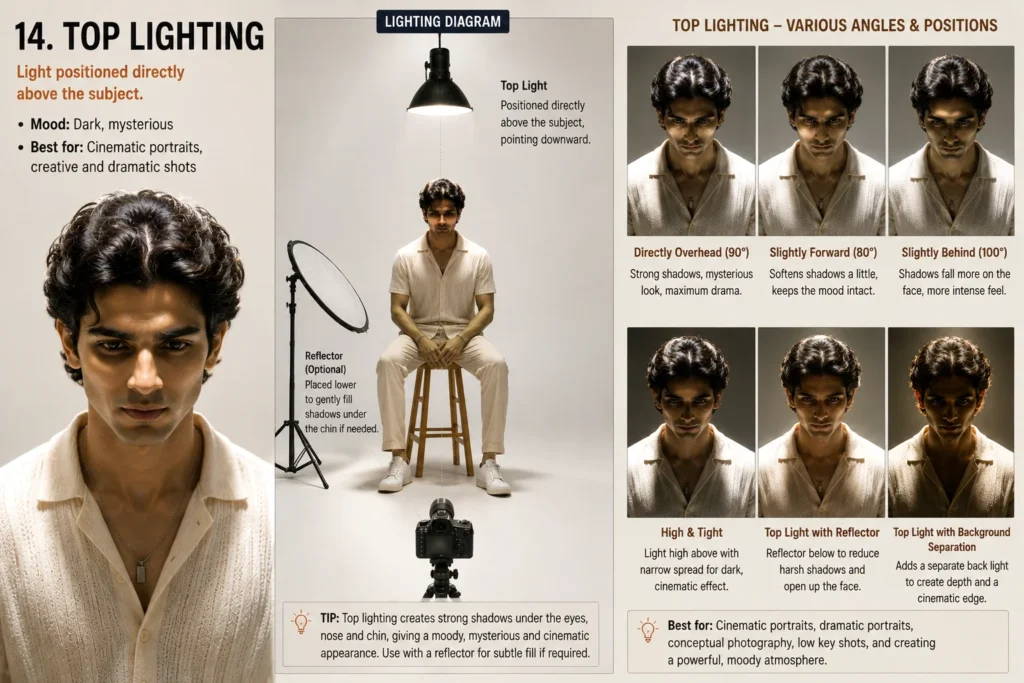
14. Top Lighting
Top lighting places the light source directly above the subject. It resembles sunlight at noon or an overhead ceiling light.
Characteristics
- Strong shadows below nose and chin
- Emphasizes facial structure
- Creates dramatic mood
Advantages
- Powerful dramatic effect
- Good for action scenes
- Natural outdoor appearance
Disadvantages
- Deep eye shadows
- Unflattering for portraits
- Can hide facial expressions
Applications
- Theatre
- Fashion
- Wildlife
- Outdoor photography
- Sports
Example
A person standing under bright midday sunlight demonstrates top lighting.
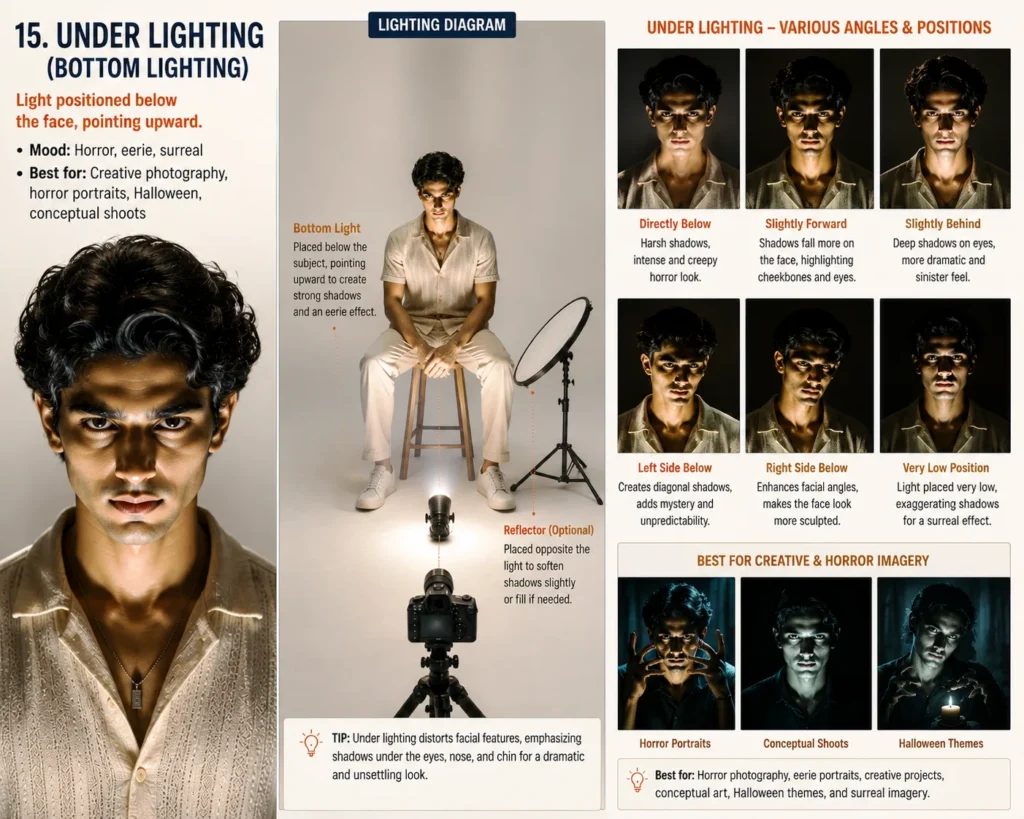
15. Under Lighting (Bottom Lighting)
Introduction
Under lighting places the light below the subject, shining upward.
It is uncommon in normal photography because it produces unnatural shadows.
Characteristics
- Shadows move upward
- Creates a frightening appearance
- Produces dramatic effects
Advantages
- Excellent for horror scenes
- Creates mystery
- Highly dramatic
Disadvantages
- Looks unnatural
- Not suitable for business portraits
- Can distort facial features
Applications
- Horror films
- Halloween photography
- Stage performances
- Fantasy photography
Example
Someone holding a flashlight below their face while telling ghost stories is using under lighting.
Difference Between Top and Under Lighting
| Top Lighting | Under Lighting |
|---|---|
| Light comes from above | Light comes from below |
| Natural | Unnatural |
| Used outdoors | Used mainly for horror |
| Creates downward shadows | Creates upward shadows |
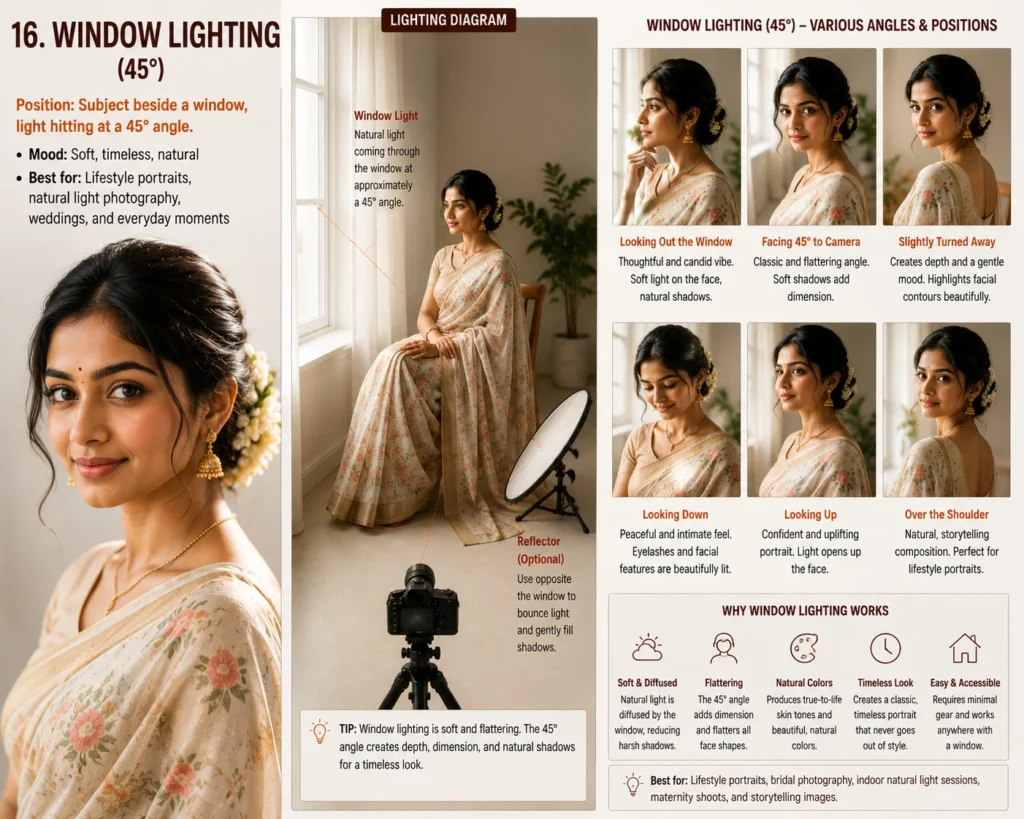
16. Window Lighting (45°)
Window lighting is one of the most beautiful forms of natural lighting.
The subject sits approximately 45 degrees to the window.
Characteristics
- Soft illumination
- Gentle facial shadows
- Natural appearance
Advantages
- Free light source
- Soft skin tones
- Easy setup
- Pleasant portraits
Disadvantages
- Depends on weather
- Changes throughout the day
- Limited control
Applications
- Portraits
- Food photography
- Product photography
- Lifestyle photography
Example
A person reading beside a large window on a cloudy day.
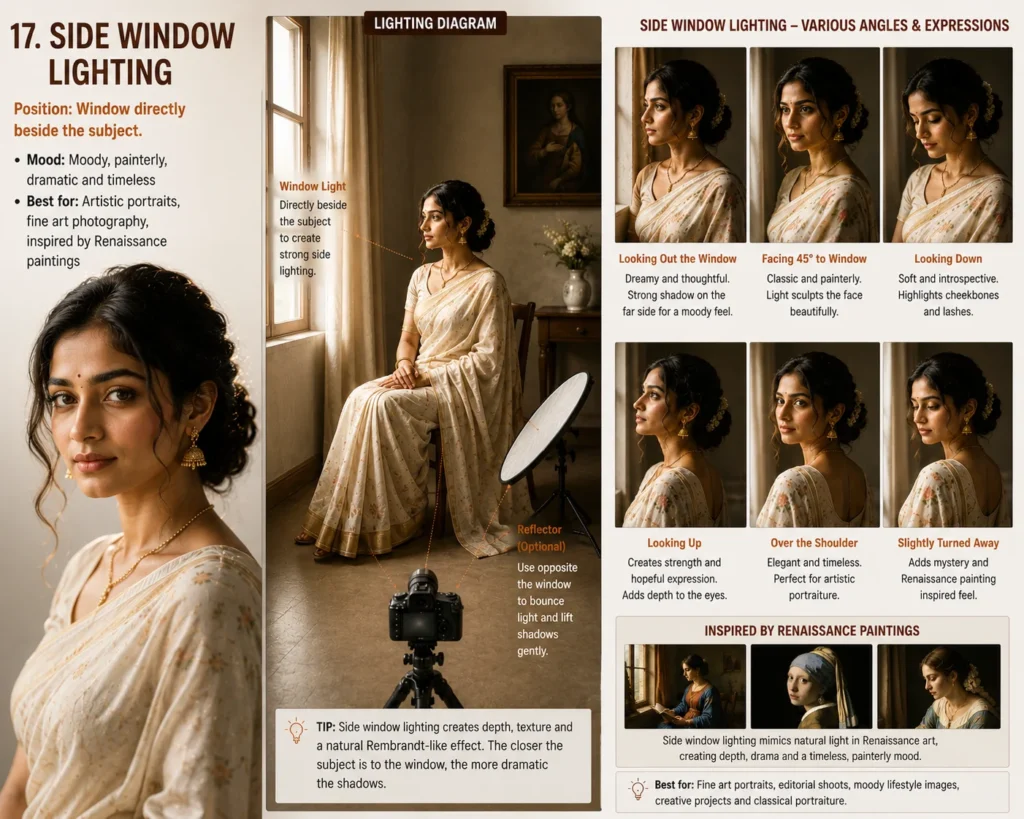
17. Side Window Lighting
The window is positioned directly beside the subject, creating stronger shadows than the 45° arrangement.
Characteristics
- Strong side shadows
- Good texture
- Increased contrast
Advantages
- Emphasizes facial shape
- Highlights texture
- Dramatic appearance
Disadvantages
- High contrast
- May require a reflector
Applications
- Artistic portraits
- Black and white photography
- Fine art
- Character studies
Example
An elderly person’s wrinkles become beautifully visible using side window light.
Difference Between 45° Window Light and Side Window Light
| 45° Window | Side Window |
|---|---|
| Softer shadows | Stronger shadows |
| Balanced lighting | High contrast |
| General portraits | Dramatic portraits |
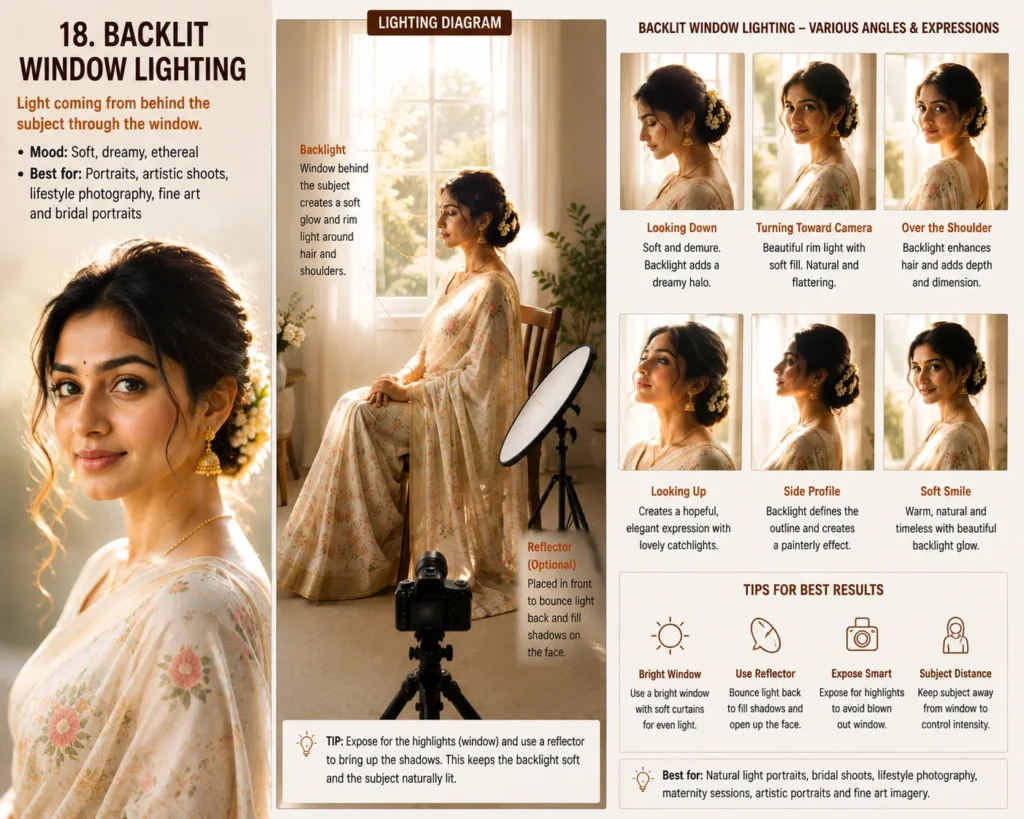
18. Backlit Window Lighting
In backlit window lighting, the subject stands in front of the window while the window acts as the background.
Characteristics
- Bright background
- Subject may appear dark
- Creates silhouette or rim light
Advantages
- Beautiful glow
- Romantic atmosphere
- Excellent for silhouettes
Disadvantages
- Difficult exposure
- Subject may lose details
Applications
- Wedding photography
- Maternity portraits
- Family photography
- Artistic portraits
Example
A bride standing in front of a large window with sunlight behind her.
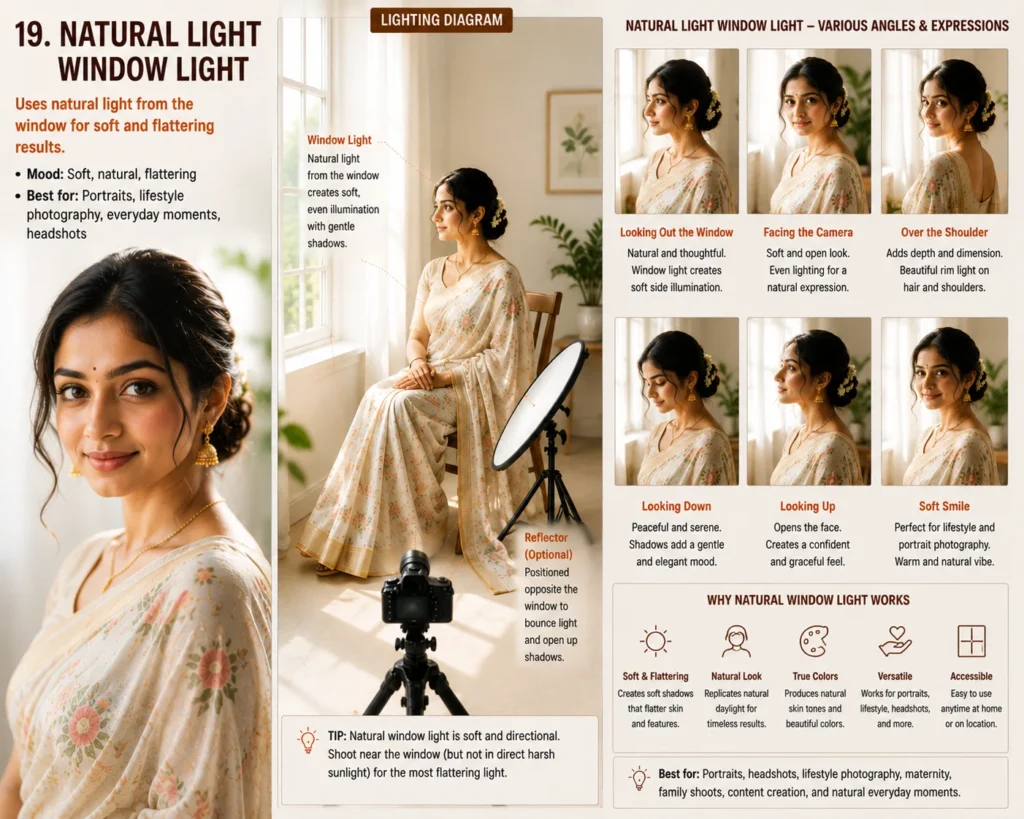
19. Natural Light Window Lighting
Natural window lighting uses only sunlight entering through a window without flash or artificial lighting.
It is one of the most widely used lighting methods in portrait photography.
Characteristics
- Soft
- Natural
- Pleasant skin tones
- Comfortable for subjects
Advantages
- Free
- Easy to use
- Excellent color reproduction
- Comfortable environment
Disadvantages
- Weather dependent
- Limited shooting hours
- Constantly changing intensity
Applications
- Portraits
- Newborn photography
- Food photography
- Lifestyle photography
- Product photography
Best Time
- Morning
- Late afternoon
- Cloudy days
Example
A photographer capturing a baby near a large window using only natural daylight.
20. Three-Light Studio Setup
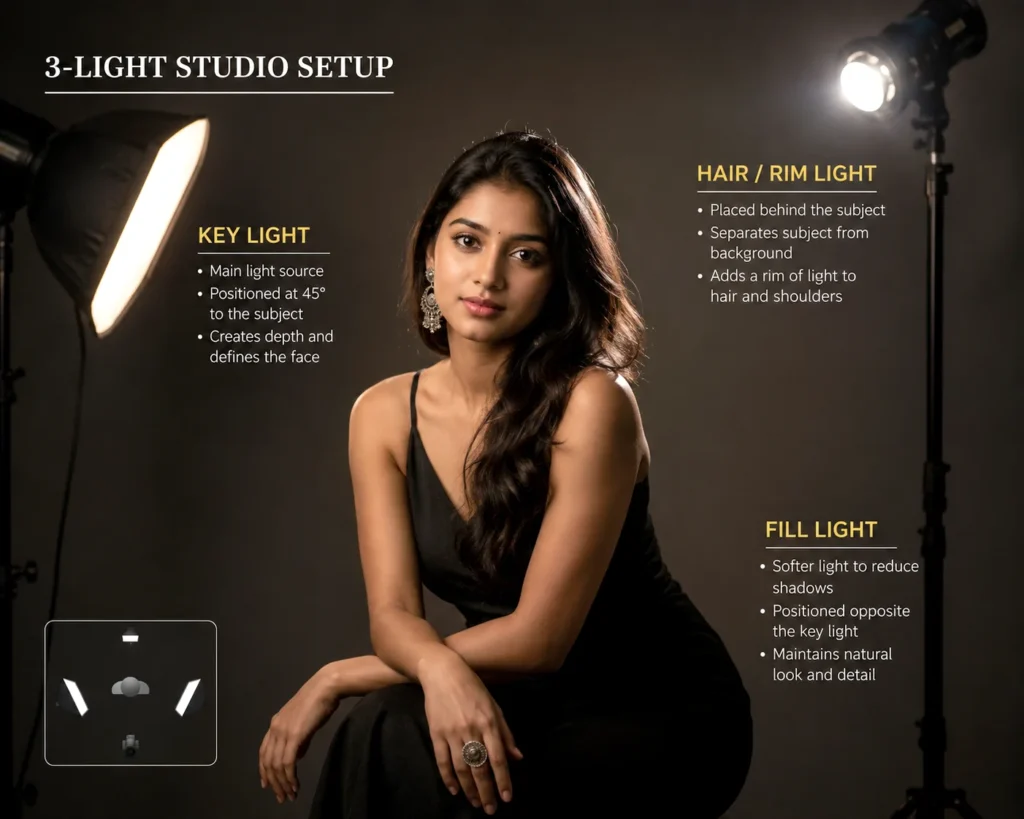
The Three-Light Studio Setup is the standard lighting arrangement used in professional photography, television, filmmaking, and advertising. It provides balanced illumination, depth, and control over shadows.
The setup includes:
- Key Light
- Fill Light
- Back Light (Hair/Rim Light)
1. Key Light
- Main source of illumination
- Usually strongest light
- Positioned about 45° from the camera
- Defines the subject’s shape
2. Fill Light
- Softens shadows created by the key light
- Lower intensity than the key light
- Usually placed opposite the key light
- Maintains detail in darker areas
3. Back Light
- Positioned behind the subject
- Creates separation from the background
- Adds depth
- Produces rim or hair highlights
Lighting Ratio
A common lighting ratio is:
- Key Light = 100%
- Fill Light = 50%
- Back Light = 60–80%
The exact ratio depends on the desired mood and style.
Advantages
- Professional-quality portraits
- Full control over shadows
- Creates depth and dimension
- Suitable for almost every subject
- Highly versatile
Disadvantages
- Requires multiple lights
- Needs more setup time
- Requires studio space and experience
Applications
- Portrait photography
- Television studios
- Film production
- Advertising
- Fashion photography
- YouTube studios
- Corporate interviews
Example
A television news studio uses a three-light setup: the key light illuminates the anchor’s face, the fill light reduces harsh shadows, and the back light separates the anchor from the studio background, creating a polished and professional appearance.
| Lighting Type | Light Position | Main Purpose | Best Used For |
|---|---|---|---|
| Hair Light | Behind and above | Highlight hair, separate subject | Portraits, fashion, TV |
| Kicker Light | Behind at 45° | Edge/rim lighting | Cinematic portraits, sports |
| Top Lighting | Directly above | Dramatic overhead illumination | Theatre, outdoor, fashion |
| Under Lighting | Below subject | Horror and mystery effects | Horror films, stage shows |
| Window Light (45°) | Window at 45° | Soft natural portraits | Portraits, food, products |
| Side Window Light | Window beside subject | Strong texture and contrast | Artistic portraits, B&W |
| Backlit Window | Window behind subject | Silhouettes and glowing outlines | Weddings, maternity, creative portraits |
| Natural Window Light | Daylight through window | Soft, realistic illumination | Lifestyle, newborn, product photography |
| Three-Light Studio Setup | Key + Fill + Back lights | Balanced professional lighting | Studios, TV, advertising, portraits |
You may like to read about photography guide, camera angles, compositions, lighting techniques and portrait photography for beginner’s guide complete tutorial.
A must read article: “Exposure to Expression.”
