

Your Camera’s Sensor Isn’t Doing Everything
When photographers compare cameras, they often focus on the sensor: resolution, dynamic range, ISO performance and sensor size.
But there is another component working on almost every photograph you take: the camera’s processor.
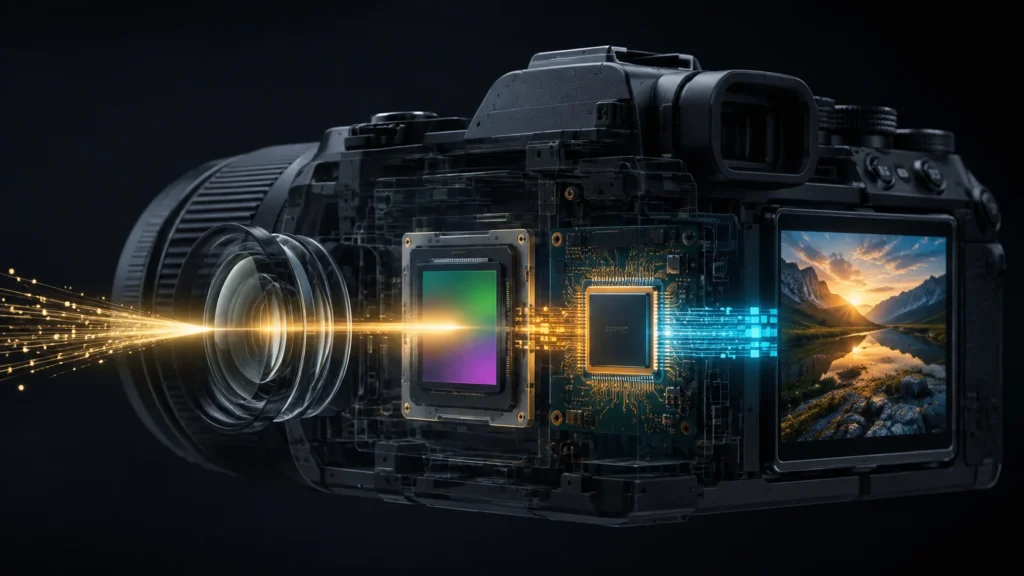
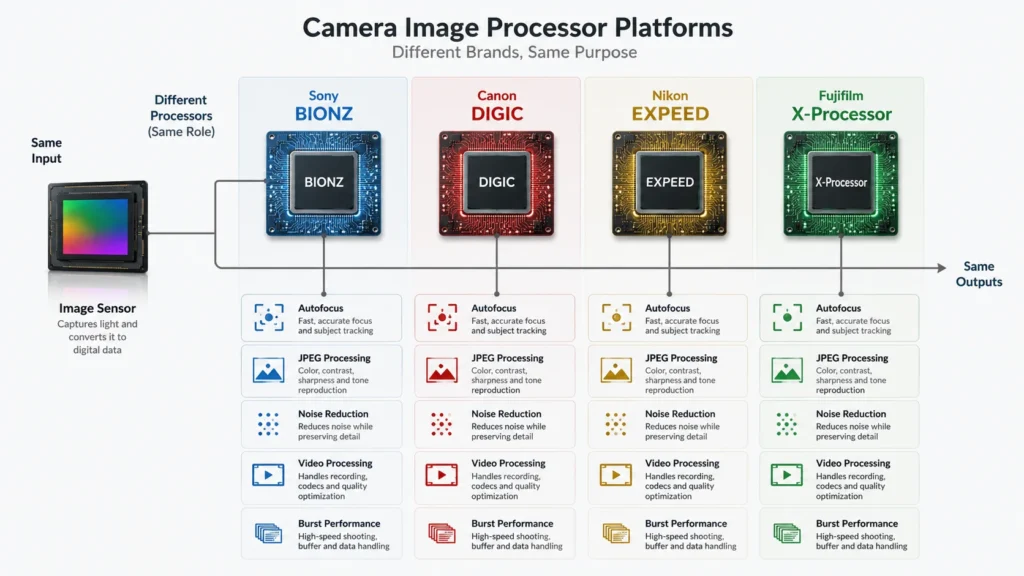
Depending on the manufacturer, you may see names such as Sony BIONZ, Canon DIGIC, Nikon EXPEED, Fujifilm X-Processor, Panasonic Venus Engine, or OM System TruePic. These names can make the processor sound like a mysterious piece of hardware that somehow determines image quality.
It doesn’t work quite that way.
The easiest way to understand a camera processor is this:
The sensor captures raw electrical information from light. The processor turns that information into usable photographic data and controls many of the camera’s real-time operations.
That includes things such as:
- Processing JPEG and HEIF images
- Applying noise reduction and sharpening
- Calculating white balance
- Supporting autofocus calculations
- Recognizing subjects
- Correcting certain lens-related characteristics
- Processing video
- Managing high-speed bursts
- Applying picture styles or film simulations
- Handling metering and exposure-related calculations
- Preparing images for display, storage and sometimes wireless transmission
So, does a newer processor automatically make a camera produce better photographs?
The answer is -> NO.
A processor works together with the sensor, lens, autofocus system, firmware and camera algorithms. A better processor can enable a camera to perform more sophisticated tasks, but it doesn’t magically turn poor exposure or poor composition into a great photograph.
This tutorial will show you what actually happens inside your camera, what BIONZ, DIGIC, EXPEED and X-Processor mean, and—most importantly—what you should do with this knowledge when you’re actually taking photographs.
1. What Is a Camera Processor?
A camera processor, often called an image processor or image-processing engine, is a specialized computer chip that processes the information coming from the camera’s image sensor and handles many other calculations required for photography and video.
Think of the process like this:
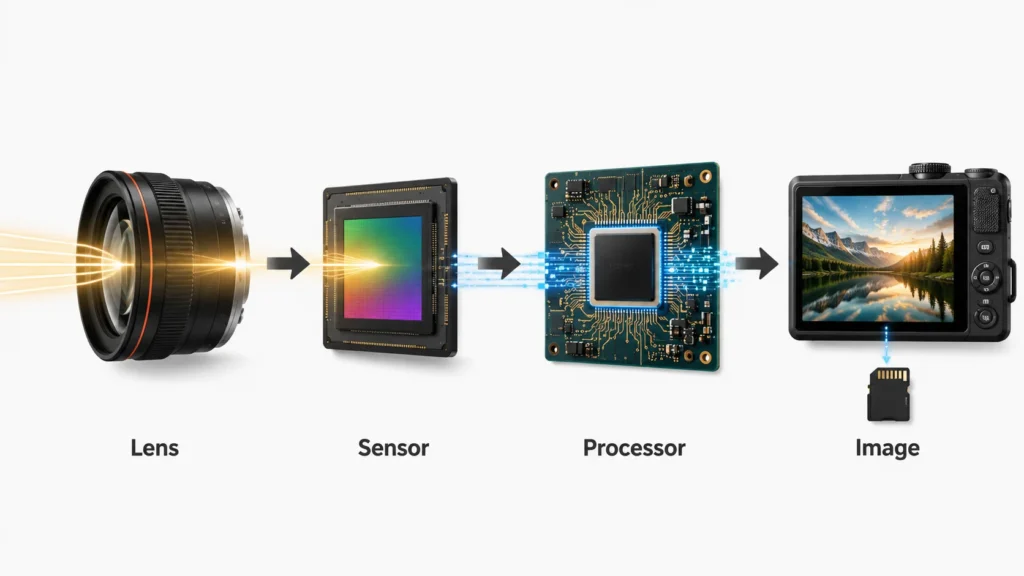
Light → Lens → Sensor → Processor → Image file/display
The lens controls how light reaches the sensor.
The sensor converts that light into electrical information.
The processor then performs a large amount of computation on that information.
For example, if you photograph a person in JPEG mode, the processor may be involved in determining:
- How the raw sensor data should be interpreted
- White balance
- Color rendering
- Noise reduction
- Sharpening
- Contrast
- Highlight and shadow treatment
- Face/eye detection
- Subject recognition
- Lens corrections
- JPEG compression
The result is the photograph you see on the camera’s screen or receive as a JPEG file.
What are BIONZ, DIGIC, EXPEED and X-Processor?
These are primarily manufacturer names for generations of processing technology.
| Manufacturer | Processor family |
|---|---|
| Sony | BIONZ / BIONZ XR |
| Canon | DIGIC |
| Nikon | EXPEED |
| Fujifilm | X-Processor |
| Panasonic | Venus Engine |
| OM System | TruePic |
The important point is that you shouldn’t treat these names as if they were equivalent to megapixels.
“DIGIC 10” or “BIONZ XR” doesn’t directly tell you how good a photograph will look.
The implementation matters: the processor, sensor, firmware, algorithms and camera design all work together.
Suggested visual
Suggested visual: A simple diagram showing:
Lens → Image Sensor → Processor → JPEG/RAW → Memory Card
Label the processor with examples such as BIONZ, DIGIC, EXPEED and X-Processor.
2. Why Is the Camera Processor Important?
You might reasonably ask: If the sensor captures the image, why should I care about the processor?
Because modern cameras aren’t simply recording sensor data. They are performing enormous amounts of calculation while you shoot.
It affects JPEG rendering
If you shoot JPEG, the processor has a major influence on the final appearance of the photograph.
The camera decides how to interpret the sensor information and applies processing such as:
- Color
- Contrast
- Sharpening
- Noise reduction
- Highlight/shadow adjustments
- Picture styles or film simulations
This is one reason two cameras can produce noticeably different JPEG files even when their basic specifications appear similar.
It helps determine autofocus performance
Modern autofocus systems constantly analyze image information.
The processor can help determine:
- Where the subject is
- Whether it is a person, animal, vehicle or another recognized subject
- Where an eye is located
- Whether the subject is moving
- How focus should be adjusted
This is particularly important for wildlife, sports and action photography.
A camera that can process autofocus information rapidly can potentially track a moving subject more effectively.
It affects shooting speed
Suppose you photograph a runner at 20 frames per second.
The camera isn’t simply taking 20 independent photographs and relaxing afterward.
It has to:
- Capture the frames.
- Process information.
- Continue autofocus calculations.
- Write data into memory.
- Maintain the viewfinder/display.
- Manage the camera’s buffer.
Processing power is therefore an important part of high-speed shooting.
It matters for video
Video creates a continuous stream of image data.
The processor can be involved in:
- Image processing
- Noise reduction
- Autofocus
- Color processing
- Image stabilization calculations
- Video encoding
- Resolution/frame-rate handling
That’s why processor improvements often become particularly obvious when comparing cameras designed for demanding video work.
3. The Core Principles: What Does a Camera Processor Actually Do?
Let’s break the processor’s job into practical pieces.
3.1 Converting Sensor Data Into an Image
A camera sensor doesn’t initially record a finished JPEG photograph.
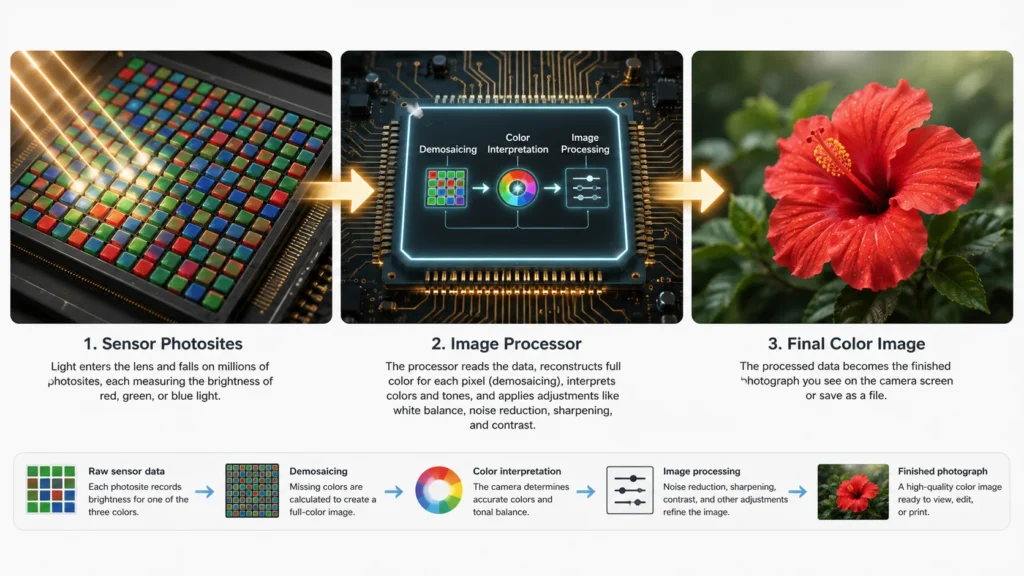
It records measurements of light.
Those measurements have to be interpreted and processed.
One important step involves demosaicing when using a conventional Bayer-type color filter array. Individual photosites primarily measure one color component, so computational processing is required to reconstruct a full-color image.
What the photographer sees
You don’t see a grid of red, green and blue measurements.
You see a photograph with continuous colors, edges and detail.
Practical example
Photograph a red flower against green leaves.
The processor has to interpret the sensor data so that:
- The flower appears red.
- The leaves appear green.
- Fine edges remain reasonably detailed.
- Color transitions don’t produce obvious artifacts.
This processing is especially important in JPEG output.
Suggested visual: A three-stage illustration showing sensor photosites → processed color information → finished photograph.
3.2 Noise Reduction
At higher ISO settings, sensor data becomes noisier.
The processor can apply algorithms designed to reduce that noise.
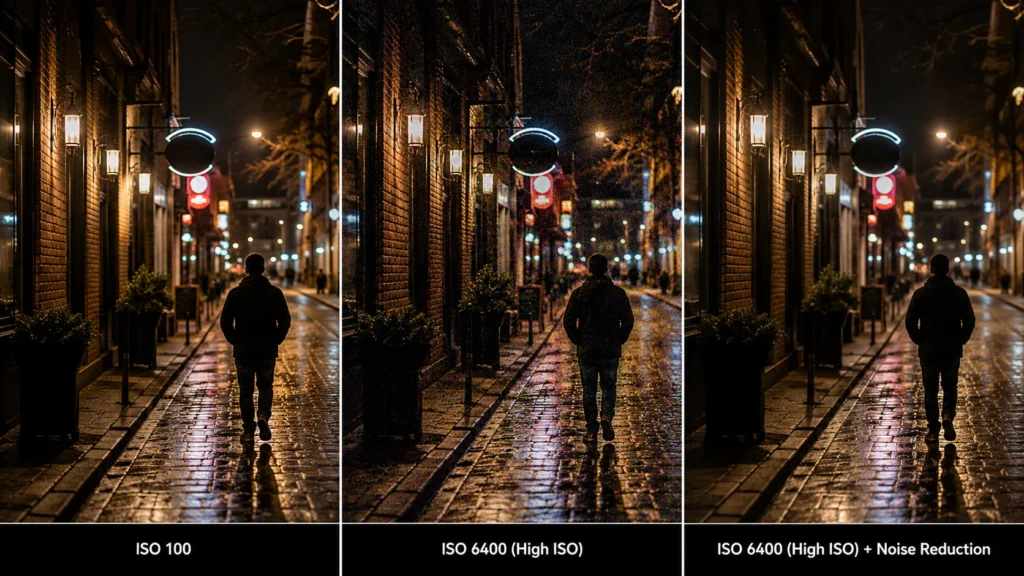
Consider:
ISO 100 vs ISO 1600
At ISO 100, you may have a clean image with fine texture.
At ISO 1600, you may see:
- Grain-like luminance noise
- Color noise
- Reduced fine detail
The processor can suppress some of this.
But noise reduction involves a trade-off.
Too little noise reduction
You retain more visible noise.
Too much noise reduction
Fine details can become smeared or artificially smooth.
For example, an animal’s fur may lose texture if aggressive processing mistakes fine detail for noise.
Practical shooting lesson
Don’t assume that a camera’s processor makes high ISO irrelevant.
Instead:
Use the lowest ISO that gives you the shutter speed and aperture you actually need.
If you’re photographing a bird at dusk, ISO 3200 may be the correct choice because freezing the bird matters more than achieving the lowest possible noise.
3.3 Sharpening and Detail Rendering
Digital photographs often receive sharpening during processing.
Sharpening increases the apparent definition of edges.
For example:
f/2.8 → subject photographed → processing → sharpened edges
This can make a photograph appear crisper.
But excessive sharpening can produce halos and unnatural edges.
This is another reason that “more processing” doesn’t necessarily mean “better.”
3.4 White Balance
The processor also helps determine how the camera should interpret color under different lighting.
A white shirt photographed under:
- Daylight
- Tungsten lighting
- Fluorescent lighting
can appear very different if the color temperature isn’t handled correctly.
Auto White Balance uses the camera’s processing system to estimate the appropriate correction.
Practical example
You’re photographing food in a restaurant illuminated by warm lamps.
With Auto White Balance, the camera may attempt to neutralize some of that warmth.
If you want to preserve the atmosphere, however, you might deliberately use a warmer white-balance setting.
This leads to an important creative principle:
The processor makes an interpretation. You can decide whether you agree with it.
3.5 Subject Detection and Recognition
This is one of the most visible modern uses of processing power.
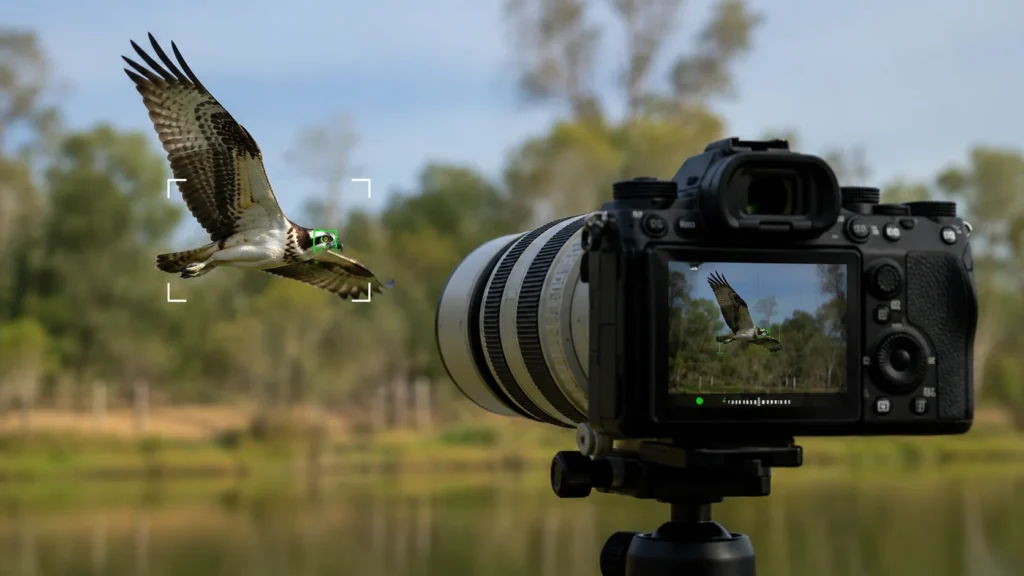
A camera may analyze the scene and identify:
- Human faces
- Eyes
- Birds
- Dogs and cats
- Cars
- Aircraft
- Trains
- Other subjects
The exact capabilities vary considerably by camera.
The processor isn’t simply “seeing” the scene like a human.
It’s running algorithms that analyze image information and attempt to classify and track subjects.
Practical example: bird photography
You point the camera toward a bird flying across a busy background.
The processor may help the autofocus system distinguish the bird from:
- Branches
- Leaves
- Sky
- Buildings
The benefit isn’t that the processor improves your composition.
It gives the autofocus system more information to work with.
4. Camera Settings and Technical Considerations
A processor works automatically in most situations, but your camera settings determine what information it has to work with and what result you get.
Aperture
Aperture controls:
- Amount of light
- Depth of field
- Optical rendering
Compare:
f/2.8 vs f/8
At f/2.8:
- More light reaches the sensor.
- Depth of field is shallower.
- You can often use a faster shutter speed.
At f/8:
- Less light reaches the sensor.
- More of the scene may appear sharp.
- You may need a slower shutter speed or higher ISO.
The processor cannot compensate perfectly for choosing the wrong aperture for your creative goal.
Shutter Speed
Shutter speed determines how long the sensor receives light.
Compare:
1/30 sec vs 1/500 sec
At 1/30 sec:
- More light is collected.
- Camera shake or subject movement may appear.
At 1/500 sec:
- Less light reaches the sensor.
- Movement is easier to freeze.
A processor can help with autofocus and image processing, but it cannot reverse every instance of motion blur.
ISO
ISO affects the amplification/processing pipeline used to produce a usable image from the sensor signal.
Compare:
ISO 100 vs ISO 1600
ISO 100 generally gives you more flexibility for clean, low-noise images under suitable lighting.
ISO 1600 lets you use faster shutter speeds or smaller apertures when light is limited, but noise may become more visible.
Don’t avoid high ISO simply because processors can reduce noise.
Use the ISO you need to achieve the photograph.
Focal Length
Focal length doesn’t directly change what the processor does, but it changes the image the processor receives.
Compare:
24mm vs 200mm
At 24mm:
- You capture a broad field of view.
- Foreground/background relationships can appear exaggerated.
- You can include environmental context.
At 200mm:
- You capture a narrow field of view.
- Distant subjects appear larger.
- Backgrounds can appear more compressed.
The processor can analyze either image, but the photographic result depends heavily on your lens choice and position.
Focus Mode
For static subjects:
AF-S / One-Shot-style focusing can be appropriate.
For moving subjects:
AF-C / Servo-style continuous focusing is usually more appropriate.
Subject detection can then work alongside continuous autofocus to track movement.
Practical rule
If your subject moves unpredictably, don’t rely on a sophisticated processor to rescue an inappropriate autofocus mode.
Set the camera up for the movement first.
Metering
Metering helps the camera estimate exposure.
The processor interprets brightness information and uses your selected metering mode.
For example, a backlit person can confuse the camera into exposing for the bright sky.
In that situation, you might use:
Exposure compensation: +1 EV
to brighten the subject.
The processor is doing its job—it is making an exposure calculation based on the scene.
You still have to tell it when its interpretation isn’t what you want.
White Balance
Use Auto White Balance when:
- Lighting changes quickly.
- You’re shooting casually.
- You want flexibility.
Use a fixed white-balance setting when:
- Lighting is consistent.
- You want consistent color across a sequence.
- You’re deliberately controlling color.
Shooting Mode
A practical starting point is:
- Aperture Priority for portraits, landscapes and everyday photography.
- Shutter Priority for motion.
- Manual when you need consistent control.
- Program/Auto when you want the camera to make most exposure decisions.
The processor operates regardless of which mode you select.
Your shooting mode simply determines how much control you give the camera.
5. Step-by-Step Shooting Tutorial
Let’s turn the theory into a real workflow.
Imagine you’re photographing a cyclist moving through an urban street.
Step 1: Choose the subject
Find a cyclist who will pass through an area with an interesting background.
Step 2: Choose the lens
Try approximately 70–200mm if you want to isolate the cyclist.
Step 3: Observe the light
Look for side light rather than completely flat front lighting.
Side light gives the subject more shape.
Step 4: Choose your shooting mode
Use Shutter Priority or Manual.
Start around:
- Shutter: 1/1000 sec
- Aperture: whatever the camera/lens combination produces or approximately f/4–f/5.6
- ISO: Auto ISO
Step 5: Choose continuous autofocus
Use AF-C/Servo-style continuous AF.
Select an appropriate tracking/subject-detection mode if your camera supports one.
Step 6: Compose before the cyclist arrives
Don’t wait until the subject is already in front of you.
Decide where you want the cyclist in the frame.
Step 7: Take the first sequence
Track the cyclist and shoot a short burst.
Step 8: Review the photograph
Check:
- Is the cyclist sharp?
- Is the face/eye sharp?
- Is the shutter speed fast enough?
- Is the background distracting?
- Is exposure correct?
Step 9: Adjust
If the cyclist is blurry, increase shutter speed.
Try:
1/1000 → 1/1600 sec
If the image becomes too dark, allow Auto ISO to increase.
Step 10: Try a creative alternative
Instead of freezing motion, deliberately slow the shutter.
Try:
1/30 sec
Track the cyclist during exposure.
Now the cyclist may remain relatively recognizable while the background becomes blurred.
That’s a completely different photograph.
Suggested visual
Suggested visual: Three versions of the same cyclist:
- 1/30 sec panning
- 1/500 sec
- 1/1600 sec
This demonstrates that processing power doesn’t replace deliberate camera settings.
6. Five Practical Shooting Examples
Example 1: Portrait in Window Light
Situation: Indoor portrait near a large window.
Subject: Person sitting approximately 1 metre from the window.
Lighting: Soft side light.
Composition: 85mm-equivalent framing with the subject off-center.

Suggested settings:
- Aperture: f/2.8
- Shutter: 1/250 sec
- ISO: 400
- Focus: Eye AF/face detection if available
Look for
Make sure the eye closest to the camera is sharp.
The processor can help identify the eye, but you still need to position the subject and compose carefully.
Expected result
Sharp facial detail with a softer background.
Creative variation
Move the subject farther from the background to increase separation.
Example 2: Bird in Flight
Situation: Bird flying against an open sky.
Subject: Medium-sized bird.
Lighting: Bright morning light.
Composition: Leave space in front of the bird.
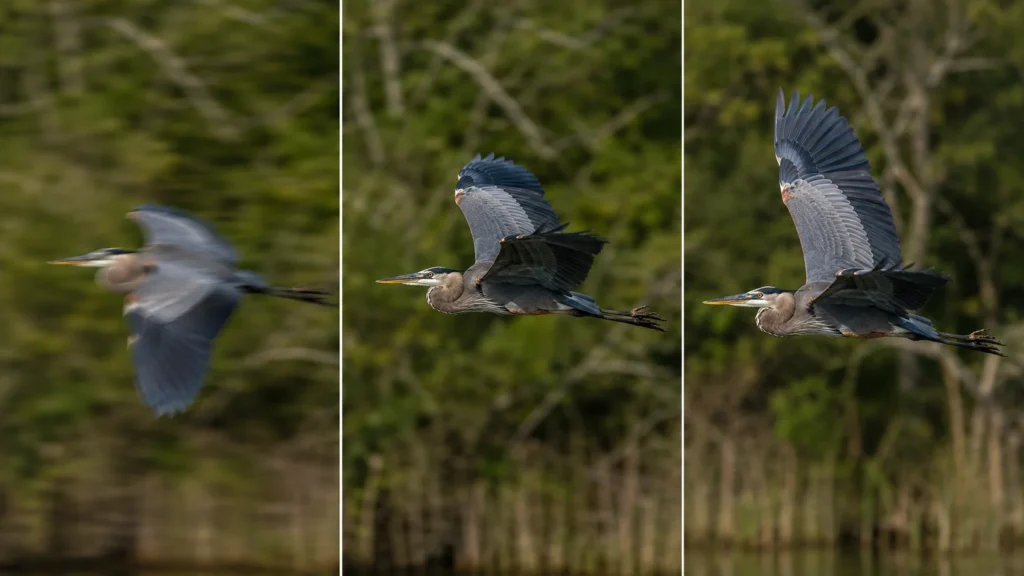
Suggested settings:
- Shutter: 1/2000 sec
- Aperture: f/5.6
- ISO: Auto
- Focus: Continuous AF + bird/animal detection if available
- Drive: High-speed continuous
Look for
Watch the bird’s eye and wing position.
Expected result
A sharp bird with enough shutter speed to freeze wing movement.
Creative variation
Drop to approximately 1/1000 sec to allow some wing movement.
Example 3: Night Street Scene
Situation: Pedestrian walking under shop lights.
Lighting: Mixed artificial light.
Composition: Use reflections from wet pavement.
Suggested settings:
- Aperture: f/2
- Shutter: 1/250 sec
- ISO: 1600–3200
- White balance: Auto or manually chosen
- Focus: Continuous AF if the person is moving
Look for
Check highlights from signs and lamps.
Expected result
A relatively clean subject with atmospheric background lights.
Creative variation
Try ISO 6400 and underexpose slightly if necessary to protect bright signs, then compare the result with a brighter exposure.
Example 4: Landscape at Sunset
Situation: Mountain landscape shortly before sunset.
Lighting: Warm directional light.
Composition: Foreground rocks, middle-distance trees and distant mountains.
Suggested settings:
- Aperture: f/8
- Shutter: Adjust as necessary
- ISO: 100
- Focus: Single AF or manual focus
- White balance: Daylight or Auto
Look for
Check the histogram and highlight warnings.
Expected result
Good depth of field and relatively low noise.
Creative variation
Try f/16 for a different depth-of-field and sun-star effect, provided diffraction and shutter-speed requirements remain acceptable.
Example 5: Fast Indoor Sports
Situation: Basketball game in a poorly lit gym.
Lighting: Artificial and relatively dim.
Composition: Tight framing from the sideline.
Suggested settings:
- Shutter: 1/1000 sec
- Aperture: f/2.8
- ISO: 3200–6400
- Focus: Continuous AF
- Drive: High-speed burst
Why these settings?
You need the shutter speed to freeze movement and the wide aperture to gather light.
That leaves ISO as the variable that must rise to compensate.
This is exactly the sort of situation where a modern processor’s autofocus, noise-processing and burst-management capabilities can become useful.
Creative variation
Use 1/60–1/125 sec and deliberately pan with a player.
7. Common Mistakes
Mistake 1: Assuming the Processor Determines Image Quality
What goes wrong: You choose a camera based primarily on the processor’s name.
Why: Processor branding sounds like a simple quality ranking.
Recognize it: You’re comparing “DIGIC vs BIONZ vs EXPEED” without considering sensor, lens and autofocus implementation.
Fix: Evaluate the complete camera system.
Mistake 2: Expecting Processing to Fix Motion Blur
What goes wrong: Your subject is blurry.
Why: The shutter speed was too slow.
Fix: Increase shutter speed. A processor cannot reliably reconstruct detail that was never captured sharply.
Mistake 3: Using Excessive Noise Reduction
What goes wrong: Skin, feathers or foliage look unnaturally smooth.
Why: Noise reduction has removed fine texture.
Fix: Compare RAW and JPEG files when possible, or reduce in-camera noise reduction if your camera provides that option.
Mistake 4: Letting Auto White Balance Remove Atmosphere
What goes wrong: Warm evening light looks unnaturally neutral.
Why: Auto White Balance has attempted to correct the color cast.
Fix: Try Daylight or another fixed setting when you want to preserve the warmth.
Mistake 5: Using Subject Detection Without Understanding Its Limits
What goes wrong: Autofocus occasionally jumps to the wrong object.
Why: Subject recognition is an aid, not a guarantee.
Fix: Combine subject detection with appropriate AF areas and understand when to reduce automation.
Mistake 6: Shooting Bursts Indiscriminately
What goes wrong: Your memory card fills quickly and finding the best frame becomes difficult.
Why: High-speed shooting is being used continuously rather than at decisive moments.
Fix: Anticipate the action and use short, purposeful bursts.
Mistake 7: Blaming the Processor for Poor Exposure
What goes wrong: The image is too dark or too bright.
Why: Metering is an estimate, and difficult scenes can fool it.
Fix: Use exposure compensation or manual exposure.
Mistake 8: Assuming RAW Means “No Processing”
What goes wrong: You believe the camera hasn’t processed a RAW file at all.
Why: RAW files are often described as “unprocessed.”
Fix: Think of RAW as sensor data saved with relatively limited rendering decisions baked into the file, rather than a completely untouched signal. The camera still has to perform substantial processing to generate the preview and metadata, and your RAW software will perform its own interpretation when you open the file.
8. Creative Techniques: Use Processing to Support Your Intent
The processor isn’t just something happening invisibly inside the camera. Understanding its capabilities can change how you shoot.
1. Use Subject Recognition to Concentrate on Composition
If your camera reliably tracks eyes, you can spend more attention on:
- Subject placement
- Background
- Timing
- Light
Instead of constantly moving the autofocus point.
But don’t become dependent on it. Know how to take control when it fails.
2. Combine High ISO With Deliberate Motion
Don’t automatically fear high ISO.
At a concert, try:
1/500 sec + ISO 3200
instead of dropping the shutter to 1/60 sec simply to maintain ISO 400.
A slightly noisy sharp photograph is often much more useful than a clean but motion-blurred photograph.
3. Change Focal Length Before Blaming Processing
Try the same subject at:
24mm → 50mm → 135mm
You will change:
- Perspective
- Subject size
- Background appearance
- Compression
- Composition
No processor upgrade can create the same visual change as physically changing your position and lens.
4. Deliberately Underexpose Difficult Scenes
If you’re photographing a person against bright lights, consider protecting the highlights.
Try:
Exposure compensation: -1 EV
Then compare it with the camera’s normal exposure.
This can create a darker, moodier image while preserving important highlights.
5. Shoot JPEG for Immediate Creative Rendering
If you enjoy seeing a finished look immediately, experiment with your camera’s:
- Picture Styles
- Film Simulations
- Creative Looks
- Monochrome modes
- Contrast settings
These depend heavily on image processing.
RAW gives you greater flexibility later, but JPEG/HEIF lets you experience the camera’s rendering choices immediately.
9. Beginner vs Advanced Approach
Beginner approach
A beginner should focus on:
- Understanding what the processor does.
- Using appropriate autofocus modes.
- Choosing sensible shutter speeds.
- Learning how Auto ISO behaves.
- Reviewing JPEG output critically.
- Understanding that processor ≠ sensor.
Don’t worry about memorizing processor generations.
Advanced approach
An experienced photographer can start asking more interesting questions:
- How does this camera’s subject recognition behave against cluttered backgrounds?
- How aggressively does its JPEG engine reduce noise?
- How does it preserve fine texture at high ISO?
- Does high-speed shooting maintain autofocus performance?
- How does processing change between RAW and JPEG?
- Which in-camera rendering options support my visual style?
- When should I turn automation off?
That’s where processor knowledge becomes practically useful.
10. Troubleshooting Guide
| Problem | Possible reason | Solution |
|---|---|---|
| Subject is blurry | Shutter speed too slow | Increase shutter speed |
| Eye AF keeps missing | Subject detection is struggling | Change AF area, distance or tracking settings |
| JPEG looks too artificial | Excessive sharpening/noise reduction | Adjust picture settings or shoot RAW |
| High ISO image looks smeared | Strong noise reduction | Reduce noise reduction if possible; expose correctly |
| Skin looks too orange | White balance/color processing | Try Auto WB or a different WB setting |
| Camera stops during burst | Buffer is full | Use shorter bursts or a faster card where supported |
| Background is distracting | Subject too close to background | Increase separation or change focal length |
| Bright sky is blown out | Exposure favors darker subject | Use exposure compensation or shoot HDR/bracketed exposures |
| Camera feels slow | Processing/buffer/card limitations | Reduce burst length, resolution or use a suitable high-speed card |
| Autofocus chooses the wrong subject | Recognition ambiguity | Use a smaller AF area or manually specify the subject |
11. Photography Assignment: The Processor Stress Test
Objective
Learn to distinguish between what your camera processor can help with and what must be solved through photography technique.
Task
Photograph one moving subject in three different ways.
A cyclist, runner, dog, bird, skateboarder or passing vehicle works well.
Requirements
Take 18 photographs minimum:
Set A — Freeze movement
Take 6 photographs at approximately:
- 1/1000 sec or faster
- Continuous AF
- Burst mode
Your goal is maximum subject sharpness.
Set B — Moderate motion
Take 6 photographs at approximately:
- 1/250 sec
- Continuous AF
Look for slight motion in hands, feet, wheels or background.
Set C — Intentional motion
Take 6 photographs at approximately:
- 1/30–1/60 sec
- Panning technique
Track the subject as you release the shutter.
Additional requirements
Keep the following as consistent as practical:
- Same location
- Same subject
- Similar composition
- Similar focal length
Change the shutter speed deliberately rather than allowing the camera to make the decision for you.
Challenge
For the final six photographs, do not use the highest available burst speed.
Instead, predict when the most interesting moment will occur and take a short burst around that moment.
This teaches you that more processing power and more frames don’t necessarily produce better photography.
Submission/review checklist
For each set, ask:
- Is the subject actually sharp?
- Is the subject’s eye sharp where appropriate?
- Did the shutter speed match the intended visual effect?
- Did the camera’s autofocus stay on the subject?
- Did high ISO introduce distracting noise?
- Did noise reduction remove important texture?
- Is the background helping the photograph?
- Did the processor’s JPEG rendering improve or hurt the image?
- Which photograph has the strongest timing?
- Could you have achieved the same result with a less sophisticated camera through better technique?
That last question is particularly important.
12. Advanced Challenge: RAW vs JPEG Processing Test
Now investigate the processor more directly.
Choose a scene containing:
- Fine texture
- Shadows
- Bright highlights
- Several colors
- A moving subject if possible
Shoot the scene as RAW + JPEG.
Then make three comparisons:
Comparison 1: Detail
Zoom into fine textures.
Look at:
- Hair
- Feathers
- Leaves
- Fabric
- Fine architecture
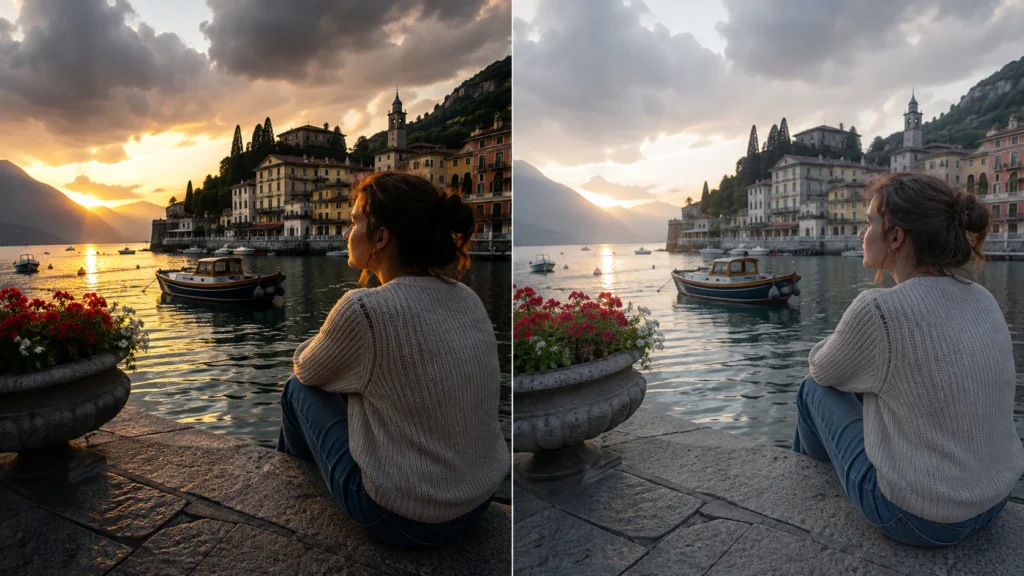
Comparison 2: High ISO
Repeat the scene at:
ISO 100, 800, 3200 and 6400 where practical.
Compare noise and detail.
Comparison 3: Color rendering
Photograph the same scene using:
- Auto White Balance
- A fixed white-balance setting
- One of your camera’s creative color profiles/film simulations
Write down what changed.
Your goal isn’t to decide which file is “best.”
Your goal is to understand what your camera’s processing system is actually doing to your photographs.
13. Final Takeaways
- BIONZ, DIGIC, EXPEED and X-Processor are processor families used by camera manufacturers.
- The processor is essentially a specialized computer responsible for a large amount of image and camera-system computation.
- It helps turn sensor data into JPEG/HEIF images and supports many real-time camera functions.
- It can contribute to autofocus, subject recognition, noise reduction, sharpening, white balance, video processing and burst performance.
- A newer or more powerful processor does not automatically mean better photographs.
- The sensor, lens, firmware, algorithms and processor work as a system.
- Processing cannot reliably fix an incorrectly chosen shutter speed, poor composition or missed focus.
- JPEG shooters are particularly affected by the camera’s processing and rendering choices.
- RAW gives you more control over many rendering decisions later.
- High ISO noise reduction involves a trade-off between cleaner images and retained detail.
- Modern processors are particularly valuable for tracking, subject recognition, high-speed shooting and demanding video.
- Use the processor as an assistant—not as a replacement for photographic technique.
- The best way to understand your camera’s processor is to test it under controlled shooting conditions.
