Kelvin temperature scale is essential for photographers looking to achieve accurate colors and create the desired mood in their images. The Kelvin scale measures the warmth or coolness of light, impacting how colors appear in your photos. In this comprehensive guide, we’ll explore the Kelvin scale, its importance in photography, and practical tips for using it effectively.

What is the Kelvin Temperature Scale?
The Kelvin scale (K) is an absolute temperature scale that measures the color temperature of light sources. Unlike the Celsius or Fahrenheit scales, which are based on specific reference points, the Kelvin scale defines temperature starting from absolute zero (0 K), where molecular motion stops.
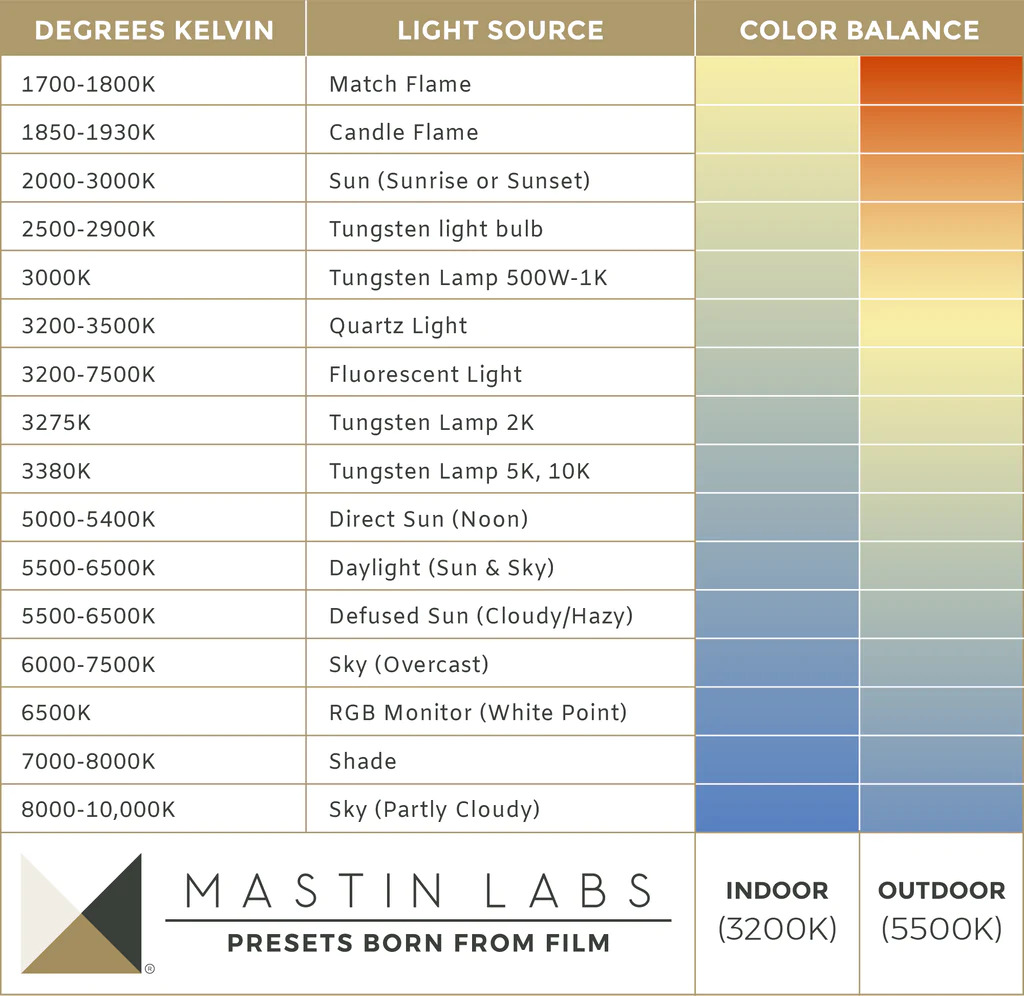
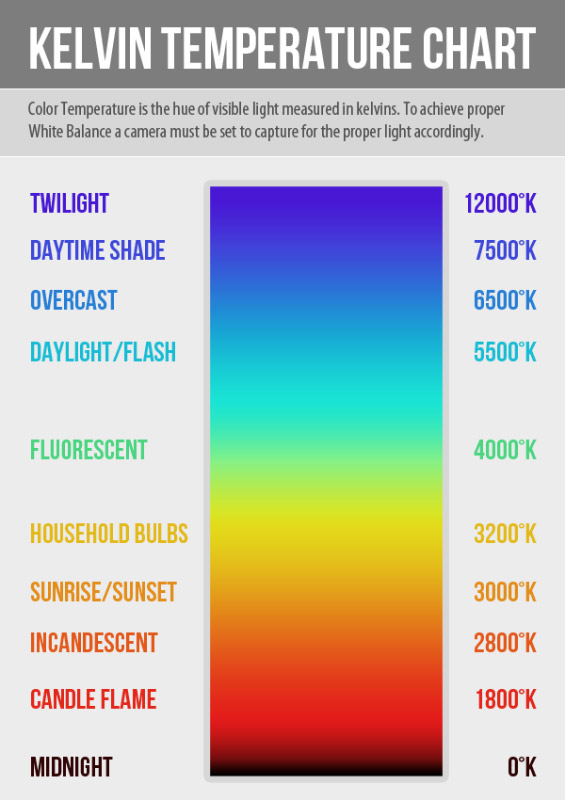
In photography, the Kelvin scale ranges typically from about 1000 K (warm light, like candlelight) to over 10000 K (cool light, like a clear blue sky). Understanding where different light sources fall on this scale is essential for achieving accurate colors in your photographs.
Importance of Color Temperature in Photography
Color temperature affects the mood, tone, and accuracy of your images. Here’s why it matters:
Mood and Emotion: Warm light (low Kelvin values) tends to create a cozy, inviting atmosphere, while cool light (high Kelvin values) evokes a sense of calm and detachment. Understanding this allows photographers to evoke specific emotions in their work.
Color Accuracy: Different light sources emit varying color temperatures, which can distort colors if not corrected. Accurately setting the white balance based on the Kelvin scale helps achieve true-to-life colors in your photographs.
Post-Processing Ease: Capturing images with the correct color temperature reduces the need for extensive post-processing, saving time and maintaining image quality.
Using the Kelvin Scale in Photography

Setting White Balance:
Most cameras allow you to set the white balance manually using the Kelvin scale. This feature is especially useful in mixed lighting conditions or when shooting in environments with unusual light sources.
Here’s a quick reference for common light sources and their corresponding Kelvin values:
Candlelight: ~1000 K
Tungsten Bulbs: ~3200 K
Fluorescent Lights: ~4000 K
Daylight (Sunny): ~5600 K
Cloudy Day: ~6000-6500 K
Shade: ~7000 K
Overcast Sky: ~8000 K
Clear Blue Sky: ~10000 K
Evaluating Light Sources:
Knowing the color temperature of various light sources helps you decide on settings before you start shooting. For instance, if you’re shooting indoors under tungsten lighting, adjusting your camera to around 3200 K will yield more accurate colors.
Creative Use of Color Temperature:
Experiment with different Kelvin settings to create artistic effects. For example, intentionally setting your camera to a lower Kelvin value (like 3000 K) can enhance warm tones, creating a dreamy, nostalgic effect.
Practical Tips for Working with the Kelvin Scale
Use a Gray Card:
For precise white balance, use a gray card. Place it in the light you’re shooting under and take a photo. Set your camera’s white balance to match the Kelvin temperature reading for accurate color reproduction.
Experiment in Manual Mode:
Don’t hesitate to experiment with manual settings. Take several shots at different Kelvin temperatures to see how it affects your images. Review them on your camera to find what works best for your style.
Post-Processing Adjustments:
Even with careful adjustments in-camera, some post-processing may be necessary. Programs like Adobe Lightroom and Photoshop allow you to fine-tune the color temperature, ensuring your final image meets your creative vision.
Practical Examples and Assignments
- Setting White Balance in Different Light Conditions
Assignment: Choose a location with mixed lighting (e.g., indoors with both natural and artificial light). Set your camera to manual white balance and adjust it to different Kelvin settings: 3200 K, 4500 K, 5600 K, and 7000 K. Take a series of photos at each setting.
Goal: Analyze how each Kelvin setting affects the colors in your images. Note how skin tones, shadows, and highlights change with each adjustment.
- Creative Use of Color Temperature
Assignment: Go outside during golden hour (the hour after sunrise or before sunset). Set your camera to a low Kelvin setting (e.g., 2500 K) and take a series of shots of the landscape.
Goal: Notice how the warm tones affect the overall feel of the image. Experiment with adjusting the Kelvin setting in-camera to see how it transforms the scene. Consider creating a diptych showing the contrast between the original and altered images.
- Working with a Gray Card
Assignment: Acquire a gray card and place it in the scene you’re shooting (ensure it’s in the same light). Take a photo of the gray card, then set your camera’s white balance to match the Kelvin temperature reading you get from that scene.
Goal: Compare the resulting images with and without the gray card adjustment. This practice will help you understand how to accurately set your white balance for different lighting conditions.
- Post-Processing Practice
Assignment: Select a few of your favorite images taken in various lighting conditions.
Use a photo editing software (like Adobe Lightroom or Photoshop) to adjust the color temperature and tint settings based on your initial Kelvin settings.
Goal: Experiment with making minor adjustments to see how they impact your images. Try shifting the temperature warmer and cooler and note the visual differences. Create a final edit that you believe best represents the scene.
- Comparative Study of Lighting Conditions
Assignment: Choose a subject (like a fruit bowl or a model) and photograph it under three different lighting conditions: tungsten (3200 K), daylight (5600 K), and shade (7000 K).
Use the same camera settings (aperture, shutter speed, and ISO) to ensure consistent exposure across all images.
Goal: Compare the resulting images to see how different light sources impact color and texture. Write a brief reflection on which lighting condition you prefer and why.
Conclusion
By engaging in these practical assignments, you’ll gain a comprehensive understanding of how the Kelvin temperature scale affects photography. This knowledge will empower you to make informed decisions regarding color temperature, ultimately enhancing your skills and the quality of your images.
