

Pixel binning is a technique in which the signals from neighboring sensor pixels are combined to produce a single image pixel. Instead of treating every tiny photosite1 as a separate output, the camera effectively groups several photosites together.
The goal is usually to trade some resolution for benefits such as better signal-to-noise performance, improved low-light output, faster data handling, or more practical file sizes.
This is particularly important in smartphones, compact cameras, surveillance cameras, scientific imaging systems, and some high-resolution camera sensors.
But pixel binning is easy to misunderstand.
It does not simply mean that a 50 MP sensor magically becomes a sensor with four times larger physical pixels. The photosites are still physically the same size. What changes is how their signals are read and processed.
The important question throughout this lesson is:
What should the photographer actually do with the camera?
1. What Is Pixel Binning?
Pixel binning is the process of combining the signals from multiple neighboring sensor photosites into a single image pixel.
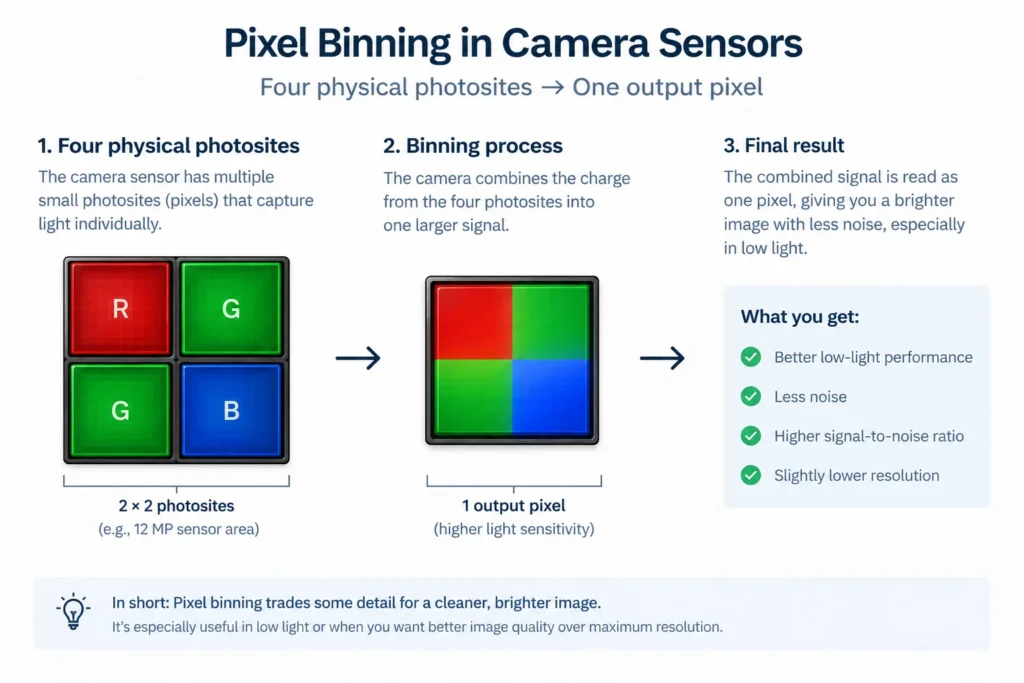
A common example is 2×2 binning.
Imagine four photosites arranged like this:
[ A ][ B ]
[ C ][ D ]
With normal full-resolution readout, the camera can treat A, B, C, and D as four separate sampling points.
With 2×2 binning, their information is combined:
[ A + B ]
[ C + D ]  → one combined output
Conceptually, four sensor samples become one output sample.
A 48 MP sensor using a 2×2 binning pattern may therefore produce approximately a 12 MP output image.
A 108 MP sensor using 2×2 binning can produce approximately 27 MP output.
The exact behavior depends on the sensor and camera’s readout and image-processing architecture.
Photosites vs pixels
One terminology distinction is important.
A photosite is the light-sensitive element on the physical sensor.
A pixel generally refers to a picture element in the resulting digital image.
People often use the two terms interchangeably, but they aren’t exactly the same thing.
Pixel binning takes measurements from multiple physical photosites and combines them into fewer image pixels.
Suggested visual:
“Diagram comparing a 4×4 group of individual sensor photosites with the same area represented as a 2×2 binned output.”
2. Why Is Pixel Binning Important?
Pixel binning exists because higher resolution isn’t always the most useful goal.
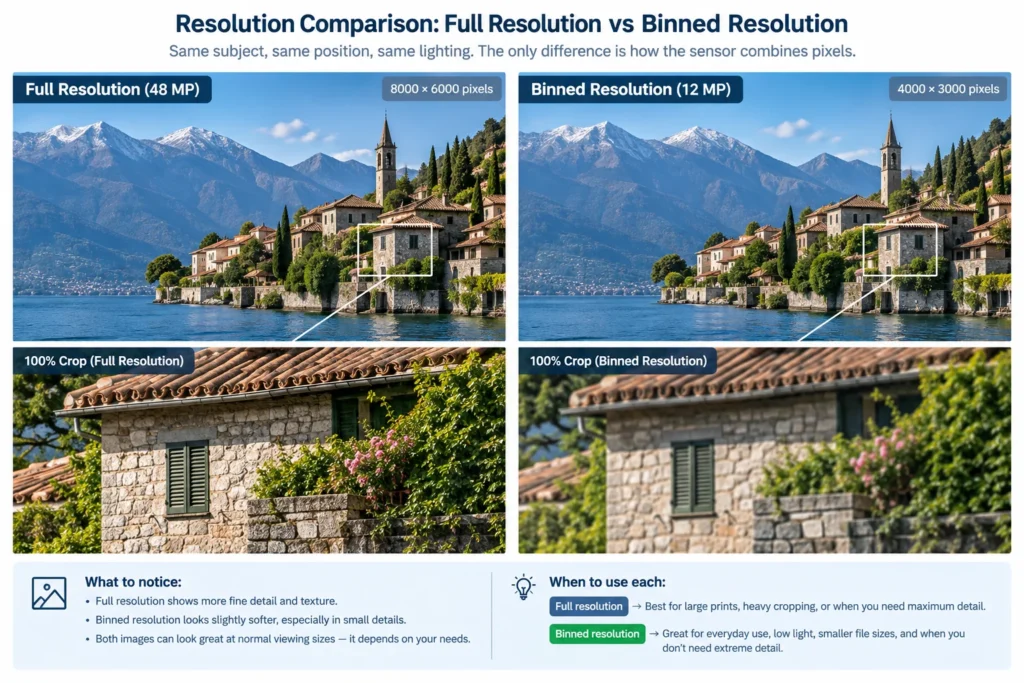
A camera sensor receives light, but the light signal is accompanied by unwanted variation called noise.
In very dark conditions, the useful signal can be relatively weak compared with noise.
Combining neighboring measurements can improve the usable signal-to-noise characteristics of the resulting image.
This creates a practical trade-off:
| Full-resolution output | Binned output |
|---|---|
| More image pixels | Fewer image pixels |
| More fine spatial detail | Less spatial resolution |
| Larger files | Smaller files |
| Potentially more demanding processing | Lower data burden |
| Useful for cropping and large prints | Useful when resolution isn’t the priority |
| Can reveal fine sensor-level noise | Can provide cleaner-looking output |
The important point is that pixel binning isn’t automatically better or worse.
It is a compromise.
If you need maximum detail in bright light, full resolution may be preferable.
If you’re photographing a dimly lit scene and don’t need a huge file, a binned mode may produce a more useful photograph.
Suggested visual:
“Same low-light subject photographed at full sensor resolution and at the camera’s binned resolution, displayed at the same final output size.”
3. The Core Principles of Pixel Binning
Principle 1: Multiple sensor measurements become one output pixel
The fundamental idea is straightforward.
Suppose four neighboring photosites collect light:
1    2
3    4
Instead of processing them independently, the camera can combine their measurements into one result.
The camera may effectively calculate a combined signal from those measurements before or during image processing.
What the photographer sees
The final photograph has fewer pixels than the sensor’s maximum resolution.
Practical example
A 48 MP camera might offer:
- 48 MP full-resolution mode
- approximately 12 MP binned mode
If you don’t need the 48 MP file, the 12 MP mode can be a sensible everyday option.
Principle 2: Binning trades spatial resolution for signal quality
The biggest practical trade-off is resolution versus signal quality.
When four photosites are combined, the resulting image no longer contains four independent spatial samples in that area.
You gain useful signal-processing advantages but sacrifice some ability to resolve extremely fine detail.
This is why binning should not be described simply as “making the camera better.”
It changes the balance between competing characteristics.
Think of it like this
If you’re photographing:
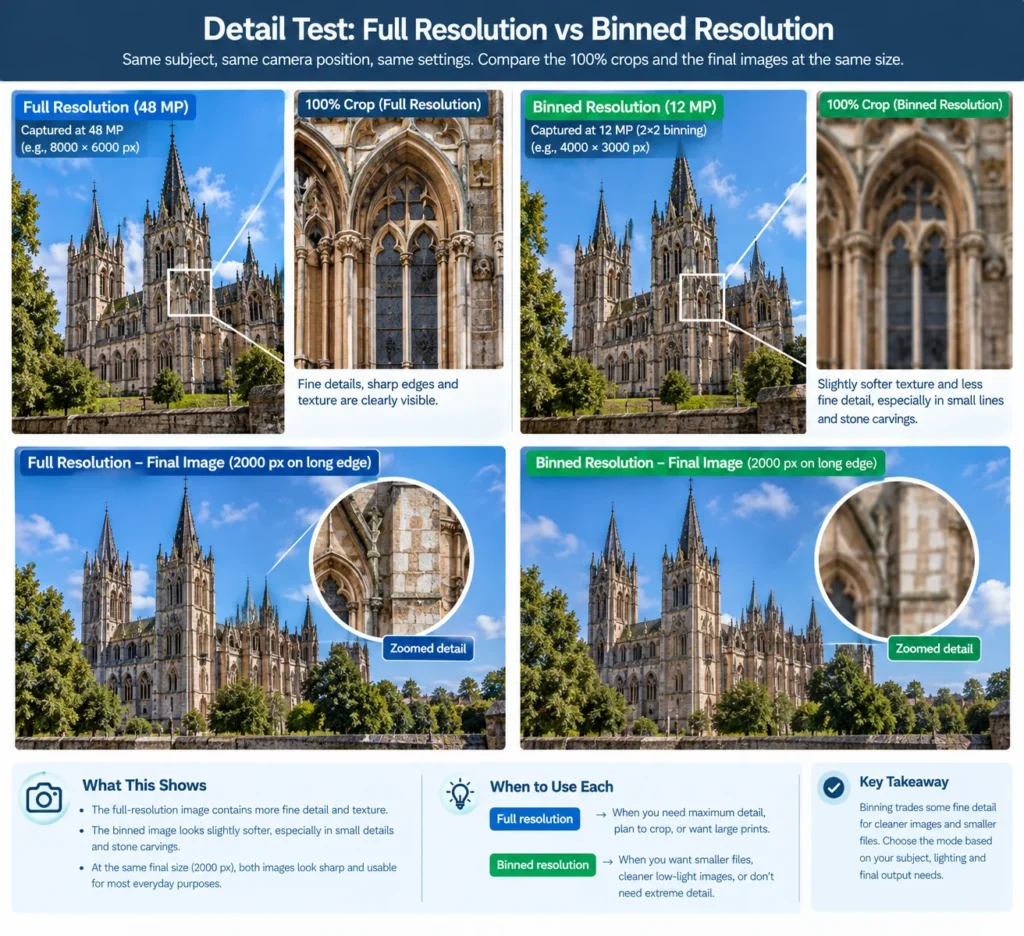
- a detailed architectural facade → resolution matters
- a dark street scene → noise performance may matter more
- a social-media portrait → enormous resolution may be unnecessary
- a large landscape print → maximum detail may be valuable
The appropriate choice changes with the assignment.
Suggested visual:
“Detailed landscape photographed at full resolution versus binned resolution, with 100% crops showing fine textures.”
Principle 3: Binning does not physically enlarge the sensor’s pixels
This is one of the most important misconceptions to eliminate.
Suppose a sensor contains tiny 0.7-micrometer photosites.
Switching to a binned mode does not physically turn them into 1.4-micrometer photosites.
The hardware hasn’t changed.
Instead, the camera is combining the measurements from multiple photosites.
So:
Physical photosite size ≠ binned output pixel size.
The distinction matters because larger physical photosites can have different optical and electronic characteristics from combining several smaller photosites.
What should you remember?
When a specification says a smartphone uses “pixel binning,” don’t automatically assume it has physically large pixels.
It means the sensor is using a method of combining information.
4. How Does 2×2 Pixel Binning Work?
The most familiar arrangement is 2×2 binning.
Imagine four neighboring sensor positions:
┌─────┬─────┐
│  A  │  B  │
├─────┼─────┤
│  C  │  D  │
└─────┴─────┘
Instead of generating four independent output samples, the camera combines their measurements.
The result is approximately:
┌───────────┐
│ A+B+C+D   │
└───────────┘
Repeated across the sensor, this reduces the number of output pixels by roughly four.
A 4000 × 3000 image, for example, contains 12 million pixels.
A 2×2 reduction produces roughly:
2000 × 1500or 3 million output pixels.
The actual implementation can be considerably more sophisticated because the sensor has a color filter array, the camera may perform analog or digital combination, and computational processing can occur afterward.
So don’t think of binning as merely “adding four JPEG pixels together.”
It happens as part of the sensor’s readout and/or image-processing pipeline.
5. Analog Binning vs Digital Binning
There are different ways of combining sensor information.
Analog binning
In some sensor architectures, signals can be combined during the sensor’s readout process before final digital conversion.
This can provide advantages because the combination happens relatively early in the signal chain.
One potential benefit is improved efficiency in situations where read noise is significant.
Digital binning
A camera can also combine measurements after they have been digitized.
This is more like computationally combining separately measured data.
The exact benefits depend heavily on the sensor architecture and implementation.
Why does this matter to photographers?
Usually, you don’t need to know the electronics in order to take the photograph.
But it explains why two cameras with apparently similar “2×2 binning” specifications can produce different results.
Pixel binning is not a universal image-quality formula.
Sensor design, readout circuitry, color-filter arrangement, processing algorithms, lens quality, exposure, and noise characteristics all matter.
6. What Happens to Noise?
Noise is one of the main reasons binning is useful.
Consider four neighboring photosites photographing a dark area.
Each one receives some useful light signal but also contains noise.
When measurements are combined appropriately, the useful signal can become stronger relative to some sources of noise.
This can result in a cleaner-looking image at the reduced output resolution.
However, don’t interpret this as “binning removes noise.”
It doesn’t magically eliminate every type of noise.
There are several forms of image noise, including:
- Shot noise
- Read noise
- Dark-current-related noise
- Pattern noise
- Processing artifacts
Different noise sources behave differently.
An important practical point
More light is still the most fundamental way to improve signal quality.
If you can photograph the same scene at:
- ISO 1600 with a properly exposed sensor
- ISO 1600 with a badly underexposed sensor and brightened later
the first approach will generally produce a better result.
Pixel binning cannot rescue fundamentally poor exposure.
7. Does Pixel Binning Make a Camera Better in Low Light?
It can help produce more useful low-resolution images in low-light conditions, but there is an important distinction.
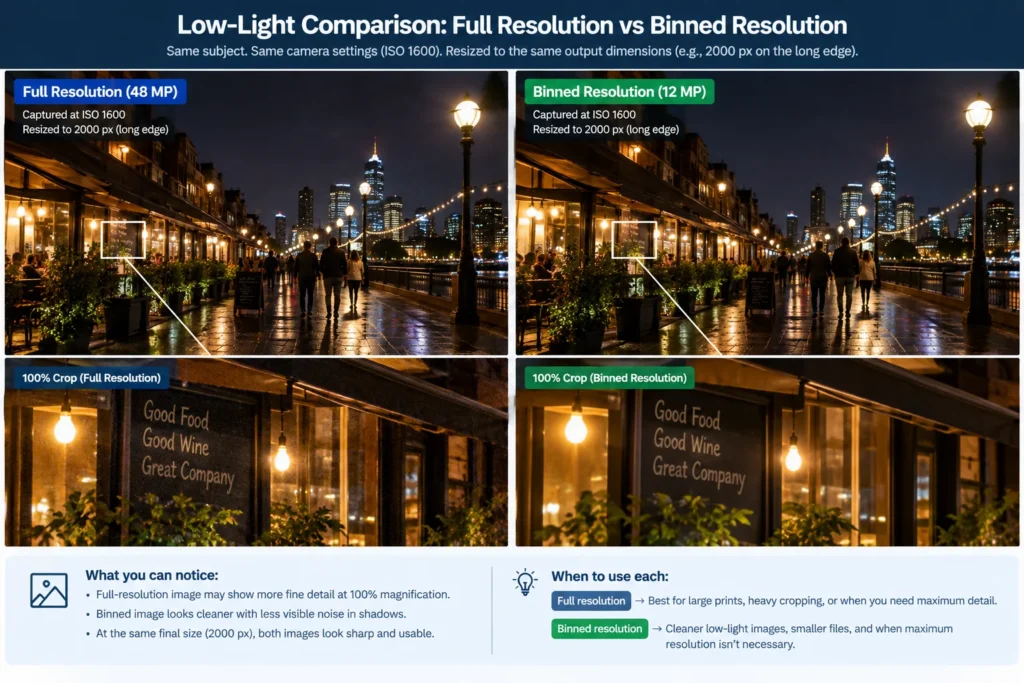
Binning does not create additional photons.
The scene still provides the same amount of light.
Instead, the camera combines measurements from neighboring photosites.
This can improve the resulting signal-to-noise behavior and make the lower-resolution image appear cleaner.
That makes binning particularly useful when:
- The scene is dark
- You don’t need maximum resolution
- You want a manageable file size
- The camera is designed around a high-resolution sensor
- You want a good-quality image for screens or moderate prints
But if your subject is moving, you still need a sufficiently fast shutter speed.
For example:
1/15 sec + binning does not automatically become a good solution for a moving person.
You may still need:
1/250 sec + appropriate ISO + binned output.
The shutter speed controls motion blur. Binning does not.
8. How Pixel Binning Relates to Aperture, Shutter Speed and ISO
Pixel binning is a sensor/readout technique, not an exposure control.
That means your normal exposure triangle still matters.
Aperture
A wider aperture such as f/2.8 allows more light to reach the sensor than f/8.
This can be useful in low light regardless of whether you’re using binning.
Example
For a dim portrait:
- f/2.8 → more light, shallower depth of field
- f/8 → less light, greater depth of field
Binning doesn’t replace aperture control.
Shutter speed
Shutter speed determines how long the sensor collects light and strongly affects motion blur.
Compare:
| Setting | Effect |
|---|---|
| 1/30 sec | More light, but movement can blur |
| 1/500 sec | Freezes much more movement, but needs more light/ISO |
If you’re photographing a person walking at night, don’t slow the shutter excessively just because you’re using a binned mode.
ISO
ISO changes how strongly the camera amplifies the recorded signal.
Compare:
ISO 100 → ISO 1600
ISO 1600 may make a dark scene easier to expose at a fast shutter speed, but it can also reveal more visible noise.
Binning may improve the resulting low-resolution image, but it doesn’t eliminate the fundamental exposure trade-off.
9. Focal Length and Pixel Binning
Focal length doesn’t directly control binning.
However, it affects how much detail your subject occupies in the frame.
Consider photographing a bird.
With a:
400mm lens
the bird may occupy many pixels.
With a:
24mm lens
the bird may occupy very few pixels.
If you use a binned mode and then heavily crop the 24mm photograph, you may lose useful subject detail.
Therefore:
Binning is more practical when the subject already occupies enough of the frame for the intended output.
For distant wildlife, full resolution can be valuable because you may need to crop.
10. Focus and Metering
Pixel binning doesn’t fundamentally change how autofocus or metering works on every camera, but the implementation varies.
For practical shooting, the main lesson is simple:
Don’t confuse image-output resolution with autofocus performance.
A camera can produce a 12 MP binned image while still using sophisticated sensor data for autofocus.
Similarly, your metering system still needs to determine the appropriate exposure.
For ordinary photography:
- Use your normal autofocus mode appropriate to the subject.
- Meter the scene normally.
- Check highlights and shadows.
- Treat the binned mode primarily as an image-output/readout decision.
11. Camera Settings: What Should You Actually Change?
There is no universal “pixel-binning exposure setting.”
Instead, choose settings based on the subject and lighting first.
Example: Low-light street photography
Aperture: f/2.8
Shutter speed: 1/125 sec
ISO: 1600
Focal length: 35mm
Focus: AF-S/Single AF for stationary subjects
White balance: Auto or a fixed value if you want consistency
Output: Binned/reduced-resolution mode, if available
Why?
f/2.8 allows substantial light into the camera.
1/125 sec gives reasonable protection against ordinary handheld movement and some subject movement.
ISO 1600 provides additional exposure when the environment is dark.
The reduced-resolution mode can be useful because you don’t need a huge file for a photograph intended for a phone or web display.
12. Full Resolution vs Binned Output
This is one of the most useful practical comparisons.
| Situation | Full resolution | Binned output |
|---|---|---|
| Large landscape print | Advantage | Usually unnecessary |
| Heavy cropping | Advantage | Disadvantage |
| Social-media image | Often excessive | Very practical |
| Low-light casual photography | Useful | Often useful |
| Detailed architecture | Advantage | May lose fine detail |
| Fast workflow | Larger files | Smaller files |
| Maximum editing latitude | Often preferable | Depends on camera |
| Everyday snapshots | Often unnecessary | Convenient |
Don’t automatically select the largest number because it sounds better.
Ask:
How much resolution does the final photograph actually require?
13. Step-by-Step Shooting Tutorial
Let’s turn the theory into a field workflow.
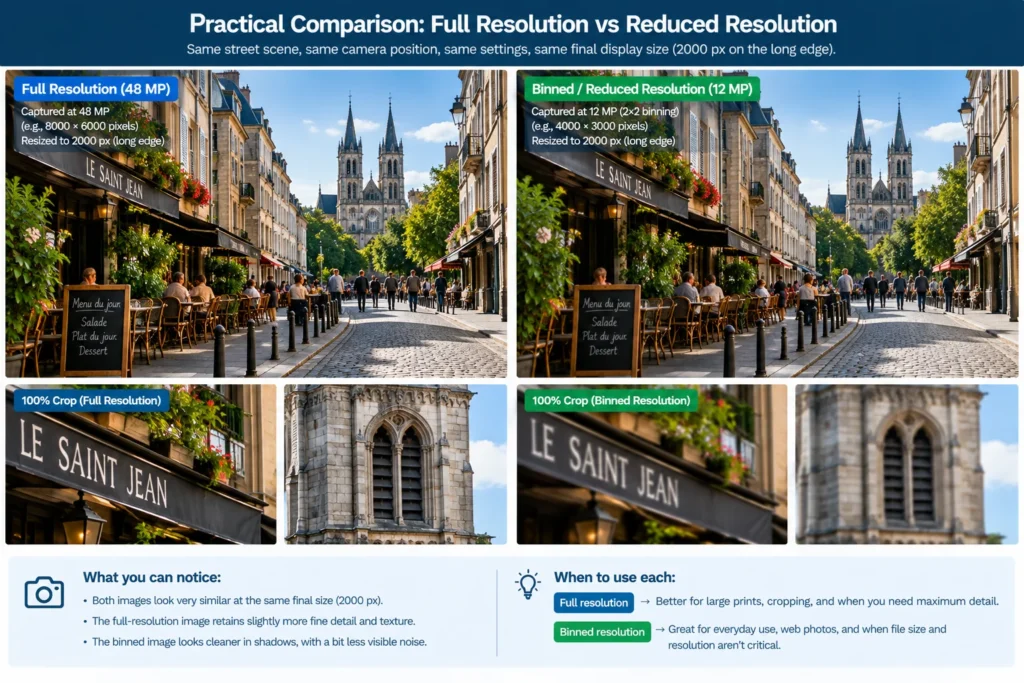
Step 1: Choose a subject
Start with a subject containing both detail and relatively plain areas.
Good choices include:
- A brick building
- A person’s face
- A street scene
- Leaves and branches
- A textured wall
- A still-life arrangement
Avoid beginning with a completely plain subject because it makes differences difficult to see.
Step 2: Choose consistent lighting
For your first test, use steady lighting.
A cloudy outdoor scene or controlled indoor setup works well.
Avoid rapidly changing sunlight.
Step 3: Put the camera in a stable position
Use a tripod if possible.
This is especially important when comparing different resolution modes.
If the camera moves between exposures, you won’t know whether differences came from binning or camera movement.
Step 4: Compose carefully
Choose a composition containing:
- Fine texture
- Edges
- Small details
- Shadow areas
- Highlight areas
This gives you more information to compare later.
Step 5: Select a suitable focal length
Use a normal or moderate focal length such as 35–50mm full-frame equivalent for a general test.
The exact focal length isn’t important.
Consistency is.
Step 6: Establish the exposure
Start with something like:
f/5.6
1/125 sec
ISO 400
Adjust these values for your actual lighting.
The goal isn’t to use these exact numbers.
The goal is to create a correctly exposed photograph.
Step 7: Photograph at full resolution
Record the scene at the sensor’s maximum available resolution.
Do not change your composition.
Step 8: Photograph using the binned/reduced-resolution mode
If your camera offers an explicit binned mode, use it.
Keep:
- Position
- Lens
- Aperture
- Shutter speed
- ISO
- Focus
- Lighting
as consistent as possible.
Step 9: Repeat the test in low light
Move indoors or wait until evening.
Repeat the comparison at a higher ISO.
For example:
ISO 100 vs ISO 1600
Now compare the images at the same final display size, not only at 100% magnification.
Step 10: Examine the results
Look at:
- Fine detail
- Shadow noise
- Color
- Texture
- Edge definition
- Highlight behavior
- File size
- Cropping flexibility
Step 11: Make a practical decision
Ask:
“Which file would I actually prefer to use for the final photograph?”
That is more useful than simply asking which file contains more pixels.
14. Five Practical Shooting Examples
Example 1: Night Street Photography
Situation
You are photographing a busy street after sunset.
Subject
Pedestrians, shop fronts, cars and illuminated signs.
Lighting
Mixed artificial light with dark shadows.
Composition
Use a 35mm-equivalent lens and place a brightly lit shop or streetlight toward one side of the frame.
Suggested settings
- Aperture: f/2.8
- Shutter speed: 1/125 sec
- ISO: 1600–3200
- Focal length: 35mm equivalent
- Output: Binned/reduced resolution if available
What to look for
Watch for:
- Shadow noise
- Motion blur
- Color shifts
- Highlight clipping
Expected result
The binned image may provide a cleaner-looking result at a practical output size, while the faster shutter speed helps prevent pedestrian movement from becoming excessive blur.
Creative variation
Photograph reflections in wet pavement and deliberately place bright signs near the edges of the frame.
Example 2: Indoor Portrait
Situation
You are photographing a person near a large window.
Subject
One person.
Lighting
Soft side light from the window.
Composition
Use an 85mm-equivalent focal length and frame from approximately the chest upward.
Suggested settings
- Aperture: f/2.8
- Shutter speed: 1/250 sec
- ISO: 400–800
- Focal length: 85mm equivalent
- Focus: Eye/face detection if available
What to look for
Compare:
- Skin texture
- Fine hair
- Shadow noise
- Background rendering
Expected result
At normal viewing sizes, the binned image may contain more than enough resolution for web delivery or moderate prints.
Creative variation
Move the subject farther from the background and use the same lens and aperture to create stronger separation.
Example 3: Detailed Architecture
Situation
You are photographing an old building with intricate stonework.
Subject
Windows, brickwork, carvings and architectural lines.
Lighting
Bright directional morning light.
Composition
Use a tripod and carefully align vertical lines.
Suggested settings
- Aperture: f/8
- Shutter speed: approximately 1/125 sec
- ISO: 100
- Focal length: 35–50mm equivalent
What to look for
Pay particular attention to:
- Fine textures
- Brick edges
- Small architectural details
- Crop flexibility
Expected result
This is a situation where full resolution may provide a meaningful advantage.
Creative variation
Make a second composition using a telephoto lens to isolate a small architectural detail.
Example 4: Food Photography for Online Publishing
Situation
You are photographing a plate of food for a restaurant’s social-media account.
Subject
A plated dish.
Lighting
Large soft window light from one side.
Composition
Shoot from approximately 45 degrees above the table.
Suggested settings
- Aperture: f/4
- Shutter speed: 1/125 sec
- ISO: 200–400
- Focal length: 50mm equivalent
What to look for
Look at:
- Texture
- Color
- Fine food detail
- Shadow quality
Expected result
If the final image is going online at relatively modest dimensions, a high-resolution sensor’s binned output may already provide considerably more resolution than necessary.
Creative variation
Move the light behind the food to create translucent highlights in ingredients such as herbs, fruit or sauces.
Example 5: Evening Landscape
Situation
You are photographing a city skyline shortly after sunset.
Subject
Buildings, sky and city lights.
Lighting
Low ambient light with bright artificial highlights.
Composition
Use a tripod and include both the skyline and some foreground.
Suggested settings
- Aperture: f/5.6–f/8
- Shutter speed: Adjust according to exposure
- ISO: 100–400 where practical
- Focal length: 24–35mm equivalent
- Focus: Manual or single-point AF after confirming focus
What to look for
Compare:
- Fine building detail
- Shadow noise
- Bright-light transitions
- Cropping flexibility
Expected result
Because you have a tripod and can use a relatively low ISO, full resolution may be preferable if maximum detail is the goal.
Creative variation
Take a second frame during blue hour when the sky still contains color while the buildings are illuminated.
15. Common Pixel-Binning Mistakes
Mistake 1: Assuming binning physically creates larger pixels
What goes wrong
You think a 50 MP sensor becomes physically equivalent to a 12.5 MP sensor with four-times-larger photosites.
Why it happens
Marketing descriptions sometimes use phrases such as “larger effective pixels.”
How to recognize it
You begin comparing physical sensor designs as if the photosites had changed size.
Fix
Remember:
The physical photosites stay the same. Their signals are being combined.
Mistake 2: Assuming binning always produces a sharper photograph
What goes wrong
You expect lower resolution to automatically mean higher image quality.
Why
You confuse cleaner output with greater spatial detail.
Fix
Compare both images at the same final viewing size.
Mistake 3: Using binning when heavy cropping is required
What goes wrong
You capture a distant subject at reduced resolution and later crop aggressively.
Why
You discarded spatial information before cropping.
Fix
Use full resolution when you anticipate substantial cropping.
Mistake 4: Slowing the shutter because you’re using binning
What goes wrong
Your subject becomes blurry.
Why
You assume improved signal quality makes motion irrelevant.
Fix
Choose shutter speed according to subject movement first.
Mistake 5: Believing binning eliminates high-ISO noise
What goes wrong
You expect perfectly clean night photographs.
Why
Binning can improve signal-to-noise behavior, but it cannot remove every noise source.
Fix
Use more light, an appropriate aperture, a sensible shutter speed, and proper exposure.
Mistake 6: Comparing images only at 100%
What goes wrong
The high-resolution image looks noisier at 100%, so you automatically declare the binned image superior.
Why
The images may be displayed at different physical sizes.
Fix
Compare them at the same output dimensions.
Mistake 7: Ignoring lens quality
What goes wrong
You blame binning for a lack of detail.
Why
The lens may not resolve enough detail to exploit the sensor’s full resolution.
Fix
Use a good-quality lens and appropriate aperture when testing sensor resolution.
Mistake 8: Changing exposure between comparisons
What goes wrong
You cannot determine whether the difference came from binning or exposure.
Fix
Keep the test conditions consistent.
16. Troubleshooting Guide
| Problem | Possible reason | Solution |
|---|---|---|
| Binned image looks soft | Reduced spatial resolution or poor focus | Compare at normal output size and verify focus |
| Full-resolution image looks noisier | You’re viewing it at 100% | Resize both images to the same final dimensions |
| Night subject is blurry | Shutter speed is too slow | Increase shutter speed and adjust aperture/ISO |
| Cropped image lacks detail | Too few output pixels | Use full-resolution mode |
| Image still has lots of noise | Scene is severely underexposed | Add light, open aperture, slow shutter if possible, or raise ISO appropriately |
| Colors differ between modes | Different processing pipelines | Compare RAW/output settings where supported |
| Fine texture disappears | Binning reduced spatial sampling | Use full resolution for highly detailed subjects |
| Files are still very large | Camera may not be using a simple low-resolution output path | Check actual output dimensions and file format |
| Results look different between cameras | Sensor and processing implementations differ | Test each camera independently rather than assuming equivalent behavior |
17. Creative Ways to Use Pixel Binning
Pixel binning isn’t only about technical image quality. It can influence how you approach a photographic project.
1. Prioritize the final viewing format
If your photograph is going to appear primarily on:
- A website
- A presentation
- A smartphone
- A small print
you may not need the sensor’s maximum resolution.
A binned image can provide a more practical working file.
Creative idea
Instead of obsessing over maximum megapixels, spend your time improving:
- Composition
- Timing
- Light
- Subject placement
The final image may benefit more from those decisions than from additional pixels.
2. Use binning for low-light documentary work
When photographing events, streets or interiors, you may value a clean, manageable file over maximum resolution.
Try a reduced-resolution mode while maintaining a shutter speed fast enough to preserve subject movement.
3. Use full resolution selectively for important details
You don’t have to choose one mode for everything.
Shoot binned output for ordinary frames and switch to full resolution when you encounter a scene where cropping or fine detail matters.
For example:
Street walk: binned mode
Important architectural detail: full resolution
4. Change your distance rather than relying on resolution
Resolution isn’t a substitute for composition.
Instead of photographing a subject from far away and planning to crop later, physically move closer when practical.
A closer subject can occupy more of the frame, making better use of the available output resolution.
This is especially important when working in a binned mode.
5. Use perspective deliberately
Suppose you’re photographing a portrait.
From close range with a wide lens, facial features can appear exaggerated.
From farther away with a longer lens, perspective can appear more compressed.
Pixel binning doesn’t change perspective, but its reduced output resolution may encourage you to think more carefully about filling the frame rather than depending on heavy cropping.
18. Binning vs Cropping: An Important Difference
These two ideas are often confused.
Pixel binning
Combines neighboring sensor information during readout/processing.
Cropping
Removes part of the image after capture.
Imagine you have a 48 MP image and crop it heavily.
You may end up with only 8 MP of useful image area.
If the camera instead captures a 12 MP binned image from the entire sensor, you still have a 12 MP image covering the whole frame.
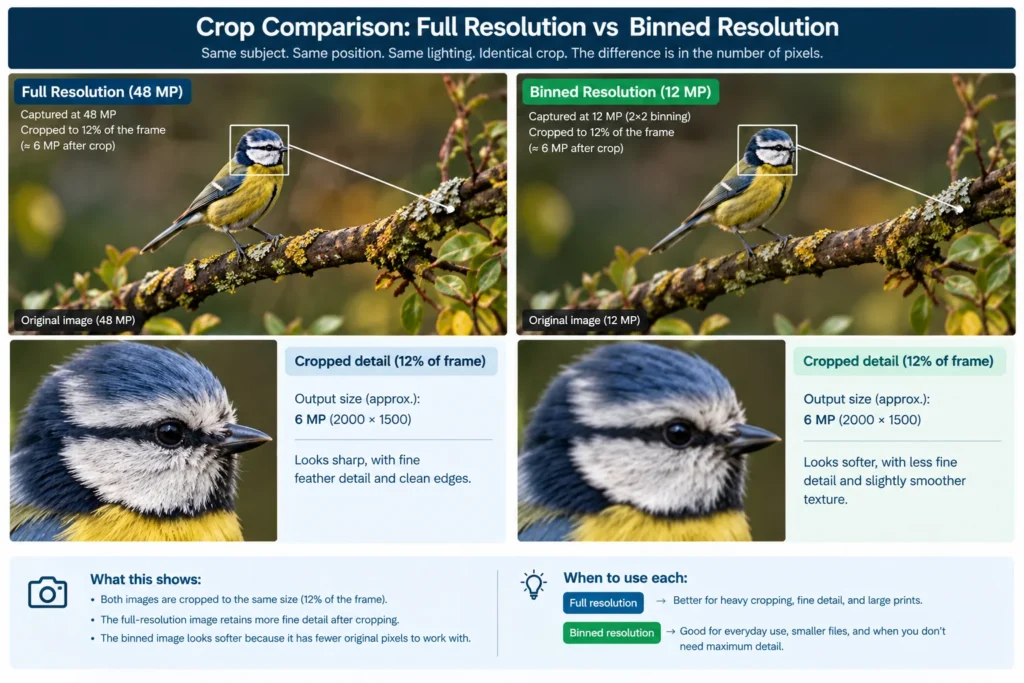
The practical results are different.
This leads to a useful rule:
If you know you need to crop, capture more spatial information before you crop it.
19. Does a 50 MP Camera Really Shoot 50 MP Photos?
Not necessarily.
A sensor may physically contain enough photosites to support a 50 MP output, but the camera may offer different operating modes.
For example:
50 MP mode:
Individual sensor information is used to produce a high-resolution image.
12.5 MP mode:
The sensor uses 2×2-style binning or another reduction method to create a lower-resolution output.
Modern computational cameras may also use techniques such as remosaicing, multi-frame processing, sharpening, noise reduction and HDR processing.
Therefore, simply reading the megapixel number on the sensor doesn’t tell you exactly how every photograph is being produced.
The camera’s specifications and image-processing pipeline matter.
20. Pixel Binning and Color
A conventional Bayer color filter array uses different color filters over different photosites.

A simplified Bayer pattern looks like:
G R
B G
This means the sensor doesn’t normally have a full RGB measurement at every physical photosite.
That makes real-world binning more complicated than simply adding four identical color measurements together.
Modern sensors may use specialized filter arrangements, such as Quad Bayer-type designs, and sophisticated processing to reconstruct a color image.
This is another reason not to assume that:
“Four pixels in = one perfect pixel out.”
The actual imaging pipeline is more complex.
For photographers, the practical consequence is simple:
Evaluate the camera’s actual output rather than relying only on the theoretical megapixel calculation.
21. Beginner vs Advanced Approach
Beginner approach
Keep it simple.
- Find out whether your camera offers a reduced-resolution or binned shooting mode.
- Photograph the same scene in full and reduced resolution.
- Compare both at the same final size.
- Test them in daylight and low light.
- Decide which mode is appropriate for your normal use.
Don’t worry about the electronics initially.
Your goal is to understand the practical trade-off.
Advanced approach
An experienced photographer can investigate:
- RAW versus JPEG/HEIF output
- Sensor readout modes
- Different ISO settings
- Dynamic range
- Shadow recovery
- Highlight retention
- Fine-detail resolution
- Color artifacts
- Lens resolving power
- Cropping tolerance
- File size and workflow speed
You can even create controlled test charts and examine the output at identical dimensions.
The advanced goal is not merely to determine which file “looks better.”
It is to determine:
Which sensor mode produces the best result for a specific photographic job?
22. Photography Assignment: The Binning Field Test

Assignment title:
Four Pixels, One Decision
Objective
Learn to recognize when reduced-resolution/binned output is advantageous and when maximum sensor resolution is more useful.
Task
Photograph the same subject using both:
- Your camera’s maximum-resolution mode
- Its reduced-resolution/binning mode, if available
If your camera does not provide an explicit binned mode, use its normal high-resolution and lower-resolution output modes and document the difference.
Requirements
Take 12 photographs:
- 3 full-resolution photographs in good light
- 3 binned/reduced-resolution photographs in good light
- 3 full-resolution photographs in low light
- 3 binned/reduced-resolution photographs in low light
Keep the following as consistent as possible:
- Camera position
- Lens
- Composition
- Focus
- Subject
- Lighting
For the low-light set, use an ISO high enough to make noise visible.
Required variations
Include:
- One detailed subject
- One portrait or human subject
- One scene containing deep shadows
- One scene where you could realistically need to crop
Challenge
You are not allowed to judge the photographs only at 100% magnification.
Instead, create a final output version at a fixed size—for example, 2000 pixels on the long edge—and compare the images at that same size.
Then make one aggressive crop from the detailed subject.
Submission/review checklist
Ask yourself:
- Which mode produced more useful detail?
- Which mode looked cleaner in the shadows?
- Did the difference remain visible at normal viewing size?
- Did the binned image give you enough resolution for the intended output?
- Which mode survived cropping better?
- Did shutter speed affect the result more than binning?
- Did the lens limit the amount of detail you could capture?
- Did the camera use different processing in each mode?
- Which mode would you choose for an online photograph?
- Which mode would you choose for a large print?
The final step is to write one sentence:
“I would use binned output when ______, but I would use full resolution when ______.”
That sentence demonstrates whether you actually understand the practical value of pixel binning.
23. Advanced Challenge: Build Your Own Sensor Test
If you want to take the experiment further, create a controlled resolution and noise test.
Setup
Photograph a textured subject such as:
- A newspaper page
- A detailed book cover
- Brickwork
- Fabric
- A printed resolution chart
Put the camera on a tripod.
Use the same:
- Lens
- Aperture
- Focus
- Composition
- Lighting
Now create several exposures at different ISO settings.
For example:
ISO 100
ISO 400
ISO 800
ISO 1600
ISO 3200
Capture each at both full resolution and binned/reduced resolution where available.
Compare
For each ISO, examine:
- Shadow noise
- Fine lines
- Color accuracy
- Texture
- Edge definition
- Dynamic range
- File size
Then resize all photographs to the same output dimensions.
Advanced question
At what ISO does the binned image become more useful for your intended final output?
And at what point does full resolution become more valuable because you need additional detail?
There may not be one universal answer.
That’s the point of the exercise.
You are learning to make a camera-specific, situation-specific decision rather than relying on a generic specification.
24. Final Thoughts
- Pixel binning combines information from multiple neighboring sensor photosites into fewer output pixels.
- A common arrangement is 2×2 binning, where four photosite measurements contribute to one output sample.
- Binning can improve the practical signal-to-noise characteristics of reduced-resolution images.
- It does not physically make the sensor’s photosites larger.
- Binning trades some spatial resolution for other benefits.
- It can be particularly useful for low-light photography, everyday shooting, web delivery and situations where enormous files aren’t necessary.
- Full resolution is generally more valuable when you need fine detail, heavy cropping or large prints.
- Binning does not replace good exposure technique.
- Shutter speed still controls motion blur.
- Aperture still controls light and depth of field.
- ISO still affects amplification and noise.
- Focal length and camera position still determine how large your subject appears in the frame.
- Always compare images at the same final viewing size.
- Don’t assume that two cameras using “pixel binning” will produce identical results.
- The best mode depends on the subject, lighting, intended output and amount of cropping you expect to do.
The most useful lesson is this:
More megapixels are not automatically more useful megapixels.
A high-resolution sensor gives you more information to work with, but you don’t always need to use all of it. Pixel binning gives the camera another way to balance resolution, noise, processing requirements and final-image needs.
Once you understand that trade-off, the megapixel number on a camera specification sheet becomes much less important than the question that actually matters:
What kind of photograph are you trying to make, and how much sensor information do you really need to make it?
Frequently Asked Questions
1. What is pixel binning in a camera?
Pixel binning is a sensor technique that combines the signals from multiple neighboring photosites to create fewer output pixels. A common example is 2×2 binning, where four photosite measurements contribute to one output sample.
2. Does pixel binning make camera pixels physically larger?
No. The physical photosites on the sensor do not change size. Binning changes how their captured signals are combined and used to create the final image.
3. Does pixel binning improve low-light photography?
It can improve the signal-to-noise characteristics of a lower-resolution output, particularly when several neighboring measurements are combined. However, it does not create additional light, so proper exposure remains critical.
4. Is pixel binning better than full resolution?
Neither is universally better. Binned output can be useful when you want manageable files or cleaner-looking lower-resolution images. Full resolution is generally preferable when you need maximum detail or significant cropping flexibility.
5. Why does a 48 MP camera sometimes produce 12 MP photographs?
One common explanation is 2×2 pixel binning. Four neighboring photosite measurements are combined to produce approximately one output pixel, reducing a 48 MP sensor’s output to around 12 MP.
6. Should I use pixel binning for night photography?
It can be useful, especially when you don’t need maximum resolution. But choose your shutter speed based on subject movement and camera shake, and use an aperture and ISO that provide a suitable exposure.
7. Does pixel binning reduce image sharpness?
Reducing the number of independent spatial samples can reduce fine-detail resolution. However, at a normal final viewing size, a binned photograph can still look very sharp—particularly when the output resolution is more than sufficient for the intended display.
8. Should I always use my camera’s highest megapixel setting?
No. Maximum resolution is useful when you need maximum detail or cropping flexibility, but it isn’t necessary for every photograph. Choose the output mode according to the subject, lighting, editing requirements and final destination of the image.
- Photosites are light collectors. They are at the heart of every digital camera, and the only light-sensitive element utilized in digital imaging. They hold light, just for a moment, before converting it into a signal that is legible to our various electronic devices. ↩︎
