One light- source product photography @ home
One light source product photography at home is possible when you are stuck at home or your room on a weekend, you can indulge many things. First open the camera gear bag pull out everything, check the batteries, clean the lenses with blower and lens pens and organize everything in order. What if there is some more time left?
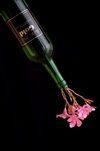
You can probably do a lot of internet research and try splash photography, water curtains, miniature and so on and so forth. The following is one such item; and do not need to have a TTL/ high- speed sync flash for this. I used a slave flash, which is available from any of the camera shop for about 2000 INR. However, lighting for a product, especially a bottle (which is my subject in this experiment) has a few components. It should look like real and appealing by creating a 3D effect by way of shadows. With one more set of flashes or hand-made continuous lighting, (you can use the table lamps) I could have created a more dramatic effect. While describing the experiment, I will explain about why that particular item is required.
The diagram (excuse for the poor drawing) gives roughly the layout.
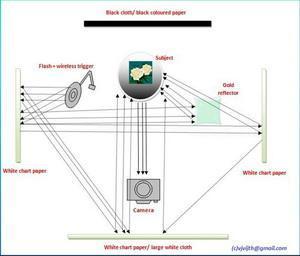
The subject is in a black cloth on top of the table. There is a black cloth behind the subject clipped to a window behind the subject to block the light as well as I wanted a dark background. I like the way the dark green bottle almost merging into the dark. I kept a gold reflector, because there are lot of printing in gold on the bottle label and wanted to highlight it. Just to highlight the front label, kept it almost 35-45 degrees to the horizontal (from camera to subject). On the three sides, paste white chart paper as shown in the above diagram. Make sure that the subject, flash and the camera are in the same elevation and this elevation should be falling in the centre of each chart paper.
Gear used for one light source:
Camera: Nikon D300; It is the only digital camera body I have right now and I have two more film SLR bodies. Even though replaced by D300s, it is still an expensive and chunky pro-camera, whatever camera body you have is more than enough for this set up.
Lens: Nikkor 70-300 f/4-5.6 D. You can try with your kit lens or the cheap 50 mm prime
Flash: this is Simpex VT531 which I bought few years back at about 2000 INR plus. Its fully manual, I started at half the power and tried the shots; finally fixing at one stop less than the full power from the power selector.
Receiver: Yongnuo RF 603. There is a belief that flash adds light, it’s true to some extent. However, along with the light it brings shadows as well. If you keep the flash mounted on the camera and shoot, it brings everything in the line of view clear. But if you move the flash and angle it from various angles like 45 degrees to 90 degrees, it creates a lot of contrast by way of adding shadows. This is because unlike human eye, the camera sensor + processor OR a film do not have the capability of human eye and brain.
Check the images shot in dim light but the flash angle made the background dark.
I highly recommend wireless receiver as the cables are not long enough. Further, if you use the slave mode, you need to have one more flash. If you use the on board flash on the camera, it will create an ugly reflection from the bottle and even flare. There are many choices available in the market of various brands for wireless receivers, you can buy the best suited for your flash. Because some flashes will not work on this. If your flash is having TTL and High Speed Sync, buy the suitable one. The one I am using is for manual flash units without TTL or hi-speed sync.
How it works in one light source:
The light emitted from the flash (flash is not facing the subject but to the wall on the left side) bounces of the wall on the left and then undergo a series of reflections and finally illuminating the subject. Please follow the dotted lines path in the diagram.
Settings:
ISO 200 ( I love to use the native ISO of my camera which is 200 to get good images, it’s too technical to explain now but will follow in my next series about understanding the photography for beginners).
Image format RAW.
Aperture: f/4 onwards varied based on the zoom and in incremented half stops and finally picked the better ones.
Focal length: 70 mm onwards depending on the composition, but the aperture also varies when I zoom in this particular lens.
In the examples given below, I used the walls of the room as its white in colour. You can vary the angle of the flash and the angle of the reflector; and see the results yourselves. Experimentation is the key to learning.
You can also make a DIY continuous lighting system using bowls and utensils before given away as scrap. I made one with an old microwave bowl (as it can withstand the 200 W incandescent bulb heat) as shown below. Used foils pasted for reflection and used some torn cloth bags for the soft light effect. But please be careful in doing this as electricity is dangerous. Also please don’t keep it switched On for more than few minutes, these things may catch fire. I made this as I was at home and did not take when I started from Bangalore. I had to do a product photo for a magazine article urgently for a friend, so there was no alternative.
About the author:
Hi, I’m Vijithvj who have been into photography since my college days. From a family with many of my relatives working in photography including movie and television as cameramen and technicians, I could not even touch the cameras at home. When I joined college in 1994, first time I had a chance to use film cameras of my hostel mates. Those where point and shoot film camera but it taught me to compose. I have a flair for drawing which helped me to improvise my composition. The first SLR that used was a Minolta SRT, bought from Mumbai in 1998 at about 1000 INR. This camera taught me how to focus on the subject and related to my field of study I used microscope every day and it made focusing on a manual camera quite easy.
Then I switched to digital starting from Sony point and shoot, then Nikon entry level SLRs and finally settling on D300 because of my obsession for birding and action. I use a Cosina CT1 and Nikon F75 film SLRs for street and landscapes. I own a 30 mm f/1.4 prime and 50 mm f/1.8 prime which are more than enough for my daily use. I hire telephotos primes as found out to be very expensive to invest some costs as much as a luxury sedan or more.
I have tried various gears extensively and owned many of them of various companies and makes and found that within the same price range almost all of them are similarly performing in the entry and middle level group. I plan to pursue full time into teaching photography and also do some commercial photography for earning my bread in near future.
Please follow www.clickstory.in for my series on photography on a budget, where in I will write in detail with examples for choosing a camera ( not brand specific) , know your camera, how to overcome the short comings and make you attempt to take few pictures.
Cheers !!!
https://www.flickr.com/photos/diyasheenavijith/
https://www.facebook.com/opticalbug

