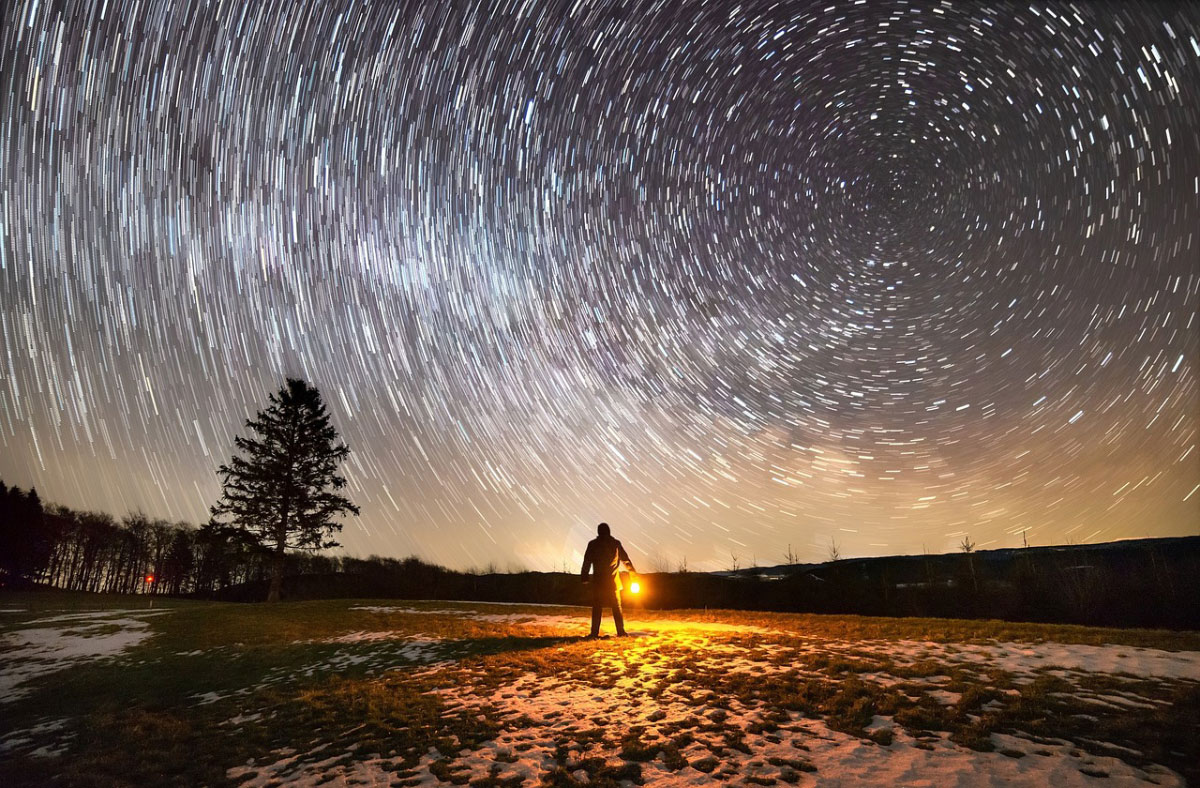
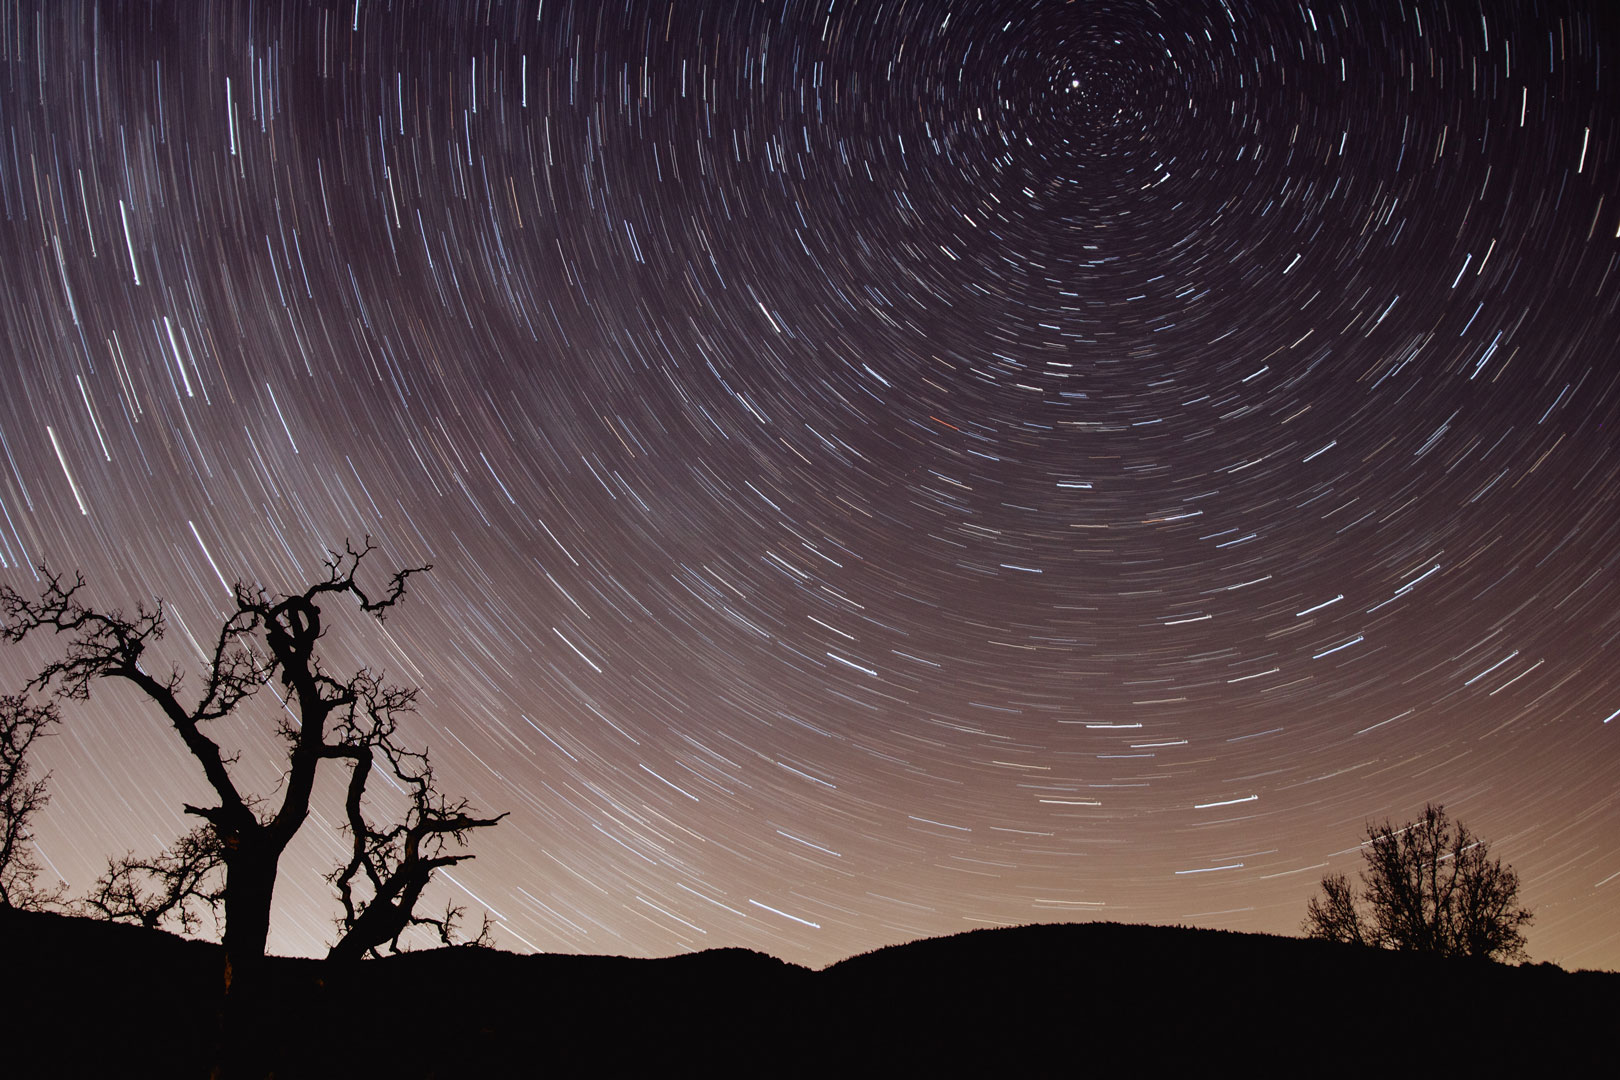
Star trail photography, a breathtaking technique that captures the movement of stars over time, allows us to witness the mesmerizing symphony of the cosmos. In the vast expanse of the night sky, stars twinkle and dance, painting a celestial canvas that has captivated humans for centuries. In this article, I delve into the world of star trail photography, exploring its techniques, equipment requirements, and the artistic possibilities it offers.
The Fascination with Star Trails
Star trail photography holds a unique attraction for both photographers and stargazers alike. By capturing the apparent movement of stars as the Earth rotates, these images unveil the unseen motion and cosmic rhythms that unfold above us. They provide a visual testament to the vastness of the universe and our fleeting place within it.
Equipment for star trail photography
To embark on your star trail photography journey, you’ll need a few essential tools:
- Choose the right gear: Use a camera with manual mode capabilities, preferably a DSLR or mirrorless camera. A wide-angle lens with a fast aperture (e.g., f/2.8 or wider) is ideal for capturing more stars and maximizing light gathering. A camera with low noise at high ISO settings is ideal for capturing the faint details of the night sky.
- Sturdy Tripod: A stable tripod is essential to prevent camera shake during long exposures. Ensure it is secure and can withstand outdoor conditions.
- Wide-angle Lens: opt for a wide-angle lens with a low focal length to capture a larger portion of the sky. A lens with a wide aperture (low f-stop) will allow more light to enter the camera sensor.
- Remote Shutter Release: A remote shutter release or an intervalometer is useful to prevent camera shake when triggering the shutter.
- Fully Charged Batteries and Spare Memory Cards: Nighttime photography often requires longer exposures, so ensure your batteries are fully charged, and you have sufficient memory card space.
- Manual Settings: Set your camera to manual mode and adjust the settings as follows:
- Aperture: Open the aperture to its widest setting (e.g., f/2.8).
- Shutter Speed: Start with a shutter speed of 20-30 seconds. Longer exposures create longer star trails, but be mindful of overexposing the sky.
- ISO: Begin with a moderate ISO setting (e.g., ISO 800 or 1600) and adjust based on the brightness of the stars and ambient light.
Settings for star trail photography
Here’s a step-by-step guide to creating stunning star trail photographs:
- Location: Choose a location away from light pollution to minimize unwanted ambient light. National parks, remote areas, or high-altitude regions often provide ideal dark skies.
- Composition: Consider foreground elements, such as landscapes, trees, or architectural structures, to add interest and depth to your image.
- Manual Mode: Set your camera to manual mode to have full control over the exposure settings.
- Focus: Use manual focus to set the lens to infinity or focus on a distant object. It’s crucial to achieve sharp focus on the stars.
- ISO: Start with a moderate ISO setting (e.g., ISO 800) to capture enough light without excessive noise.
- Shutter Speed: Experiment with long exposure times, typically ranging from a few minutes to several hours. Longer exposures create longer star trails.
- Aperture: Choose a wide aperture (low f-stop) to maximize the amount of light reaching the camera sensor.
- Noise Reduction: Enable long exposure noise reduction in your camera settings to minimize noise during longer exposures. This feature will take an additional dark frame to subtract noise from the final image.
- Bulb Mode: Use either the bulb mode or an intervalometer to control the duration of the exposure. This allows you to capture multiple frames to be later combined into a star trail image.
- Patience is Key: Star trail photography requires time and patience. Plan for long exposure times, ranging from minutes to hours, to capture extensive star trails. Use a remote shutter release or intervalometer to minimize camera shake when pressing the shutter button.

Post-Processing and Creative Options
After capturing your star trail images, you can enhance them further during post-processing:
- Star Stacking: Use dedicated software like Adobe Photoshop or specialized star stacking software to align and blend multiple images, emphasizing the star trails.
- Noise Reduction and Adjustment: Apply noise reduction techniques and adjust brightness, contrast, and color balance to achieve the desired aesthetic.
- Composite Images: Combine star trails with foreground elements captured separately to create visually captivating compositions.
- Experimentation: Explore different artistic possibilities, such as circular star trails, zoom burst effects, or incorporating light painting techniques for added creativity.
You can find step by step post processing techniques in Adobe Photoshop for star trail photography.
Conclusion
Star trail photography allows us to witness the beauty and grandeur of the cosmos. By capturing the movement of stars over time, we can create mesmerizing images that reveal the celestial rhythms hidden in the night sky.
Armed with the right equipment, techniques, and artistic vision, you can embark on a captivating journey into the realm of star trail photography and unlock a world of infinite wonders above us.