

The secret to backlit photography is not making every part of the image equally bright. It is deciding which parts of the scene deserve to be seen, which can remain in shadow, and how the light should shape the photograph.
When the Light Is Behind Your Subject
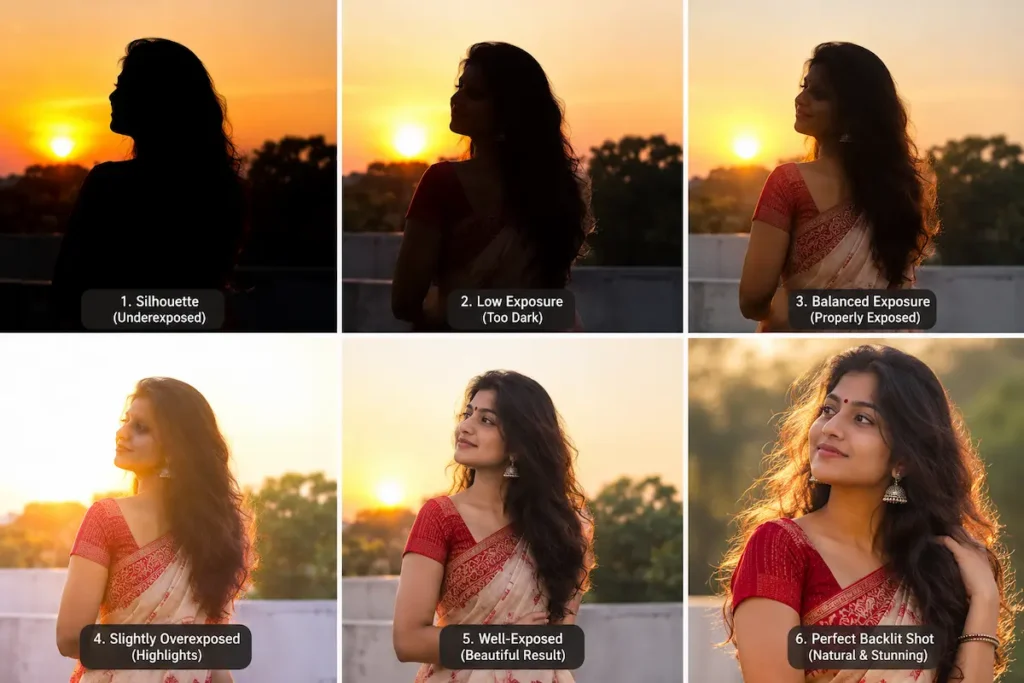
Imagine photographing a person standing in a field just before sunset. The sun is low behind them, catching the edges of their hair and creating a warm glow around their shoulders. The background looks beautiful, but the person’s face is almost completely dark. If you increase the exposure, the sky becomes pale and loses its colour. If you reduce it, the person becomes an even darker silhouette.
You try moving slightly to one side, but the light changes direction. You open the aperture, yet the face still looks darker than you expected. The moment is beautiful, but the photograph does not quite match what you see.
This is when the question appears: “What camera settings should I use?”
Backlit photography can be challenging because the camera must deal with a bright background and a comparatively dark subject. However, this difference in brightness is also what makes backlighting attractive. It can create glowing hair, translucent leaves, dramatic silhouettes, atmospheric portraits, and a sense of depth that is difficult to achieve with front lighting.
The challenge is not necessarily to eliminate the difference between light and shadow. It is to decide how much of that difference belongs in the final photograph.
The best camera settings for backlit photography depend on whether you want to reveal the subject, preserve the bright background, create a silhouette, or use the light itself as the main visual feature.
The Question Photographers Keep Asking
“What are the best camera settings for backlit photography?”
It is a reasonable question, especially when you are learning to photograph against the sun. You want a dependable starting point that will prevent dark faces, washed-out skies, and disappointing images.
But backlighting does not describe just one photographic situation.
A portrait with sunlight shining through someone’s hair requires a different approach from a photograph of a cyclist passing in front of the setting sun. A backlit flower may benefit from delicate highlights and visible petal detail, while a landscape photographer might deliberately allow the foreground to become nearly black.
What does this particular photograph need my camera to preserve?
If the face is the priority, you may need to expose for the face. If the shape of the subject is more important than its details, a darker exposure might be exactly right. If the glow around the subject matters most, you need to protect the highlights while deciding how much shadow detail to retain.
Once you know what matters most, choosing your settings becomes easier.
The First Decision Is Not on Your Camera
Before changing the aperture or shutter speed, spend a few seconds looking at the light.
First, notice where the light source is positioned. Is the sun directly behind the subject, just outside the frame, or coming from behind at an angle? Direct backlighting can produce strong contrast, while slightly off-axis backlighting can illuminate one side of a face and create a more balanced portrait.
Next, look at the background. Is the sky bright and clear, or is the subject standing in front of a darker background? A bright sky can easily become the dominant part of the image. A darker background may make the rim of light around the subject more noticeable.
Then consider what needs to be visible. In a portrait, you might want the eyes and facial expression to remain clear. In a silhouette, you may want the subject’s outline to be unmistakable while allowing interior details to disappear.
Movement matters too. A person standing still gives you more freedom to use a slower shutter speed than a child running through a sunlit field. And if you are photographing leaves or flowers, even a gentle breeze can affect sharpness.

Finally, decide how much control you have. You may be able to reposition a portrait subject, but you cannot move the sun. You may be able to wait for softer light, but you might have only a few seconds to capture a fleeting expression.
The order of decisions is simple: observe the light, identify the subject’s role, decide what you want the photograph to communicate, and then choose settings that support that intention.
When You Find Yourself Photographing a Portrait Against the Sun
Consider a common situation: a friend is standing outdoors during the last hour of sunlight. The sun is behind them, creating a golden outline around their hair, while their face is several stops darker than the bright background.
If you use an automatic exposure mode, the camera may produce a reasonable result, but the outcome depends on its metering system and how much of the frame is occupied by the bright background. The face might remain dark, or the sky might lose some detail when you increase exposure.
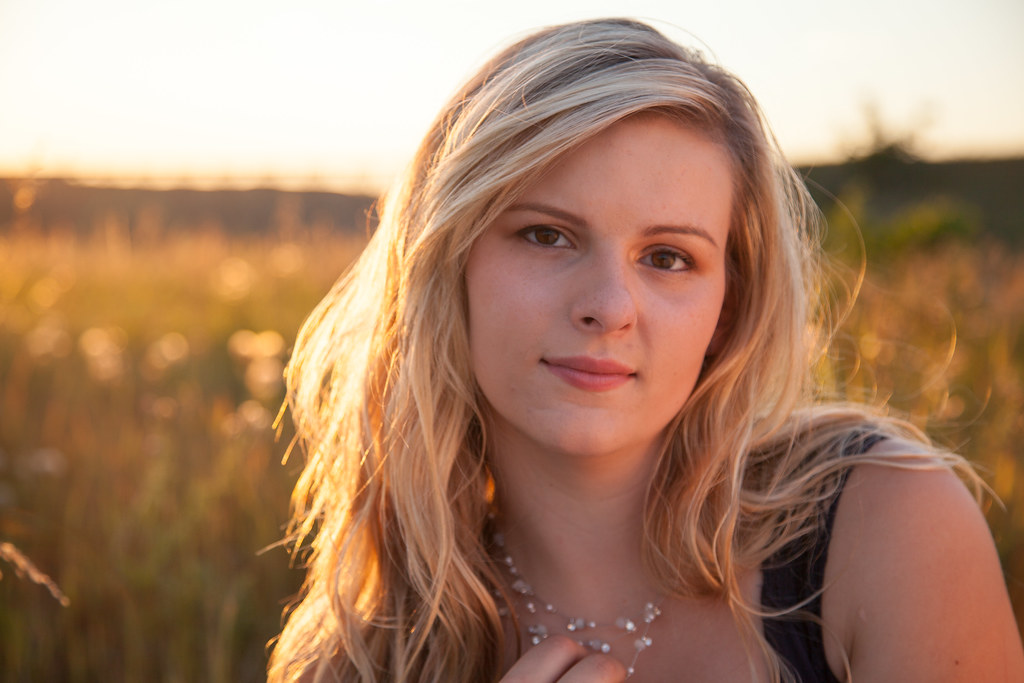
Start by choosing a shutter speed that keeps the person sharp. For a relatively still portrait, around 1/250 second is a useful starting point, although a moving subject may need 1/500 second or faster. If the person is holding a pose and you have good support, a slower shutter speed might work.
Next, choose an aperture according to the appearance you want. Around f/2.8 to f/4 can help separate the subject from the background, provided your lens supports those apertures and the depth of field is sufficient. With a typical kit zoom, you might need to work at f/4 to f/5.6 instead.
Now consider exposure. If the face is too dark, try positive exposure compensation when using an automatic exposure mode. A starting adjustment of +2/3 to +1 1/3 EV may help but check the highlights after each change. If the sky or the bright outline around the hair begins losing important detail, you may need a different solution.
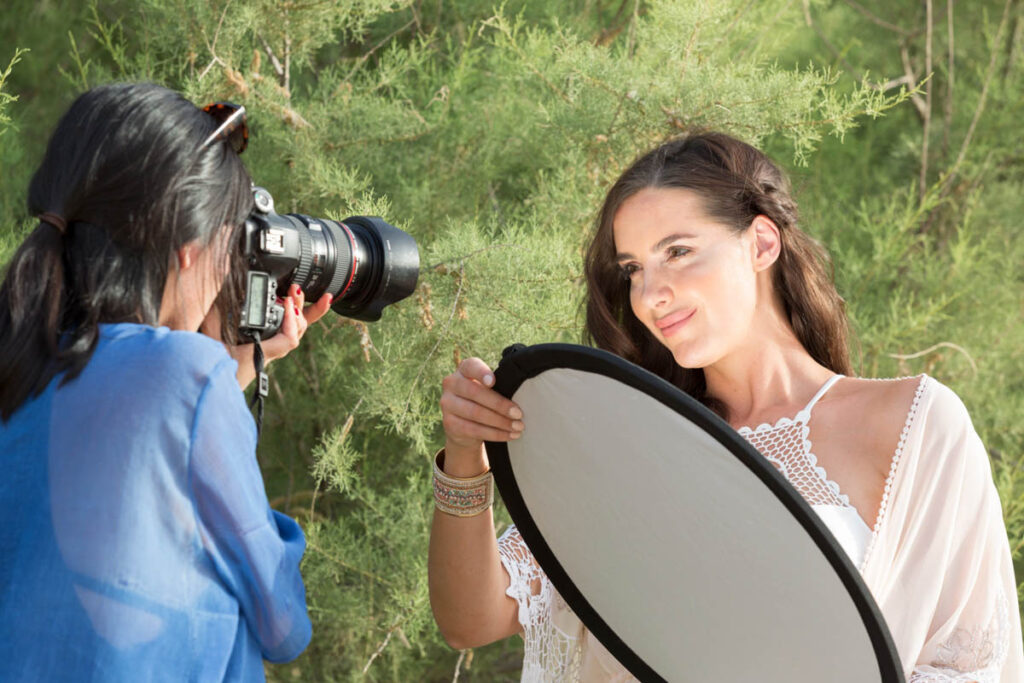
One alternative is to use a reflector or gentle fill flash to brighten the face without raising the overall exposure as much. Another is to move the person into open shade while keeping the brighter background behind them.
The important lesson is that increasing exposure is not always the complete solution. Sometimes you need to change the balance of light in the scene rather than asking the camera to brighten everything.
Understanding the Settings That Matter Most
Shutter Speed: Keep the Subject Sharp
Shutter speed controls how long the sensor receives light. It also determines how movement appears in the photograph.
Backlighting itself does not require a particular shutter speed. The subject’s movement does.
For a stationary portrait, 1/60 to 1/125 second may be sufficient if your technique is steady and the subject is not moving much. For a person walking, 1/160 to 1/250 second is a more useful starting range. For children running, jumping, or playing, 1/250 to 1/500 second or faster may be necessary.
These are starting points rather than guarantees. A fast-moving subject, a long focal length, or a sudden gesture can require a faster shutter speed.

A slower shutter speed can be useful when photographing a still landscape with sunlight. If you want the foreground to remain sharp, however, use a tripod or another stable support when necessary.
Do not sacrifice a sharp face simply to keep ISO low. A slightly noisy photograph is often more useful than one in which the important subject is blurred.
ISO: Accept Noise When It Protects the Photograph
ISO determines how strongly the camera’s signal is amplified or processed to produce the final image. Higher ISO settings generally make it easier to use faster shutter speeds in low light, but they can also increase visible noise and reduce image quality, depending on the camera and exposure.
For bright outdoor backlighting, ISO 100 or 200 is a reasonable starting point. As the sun drops, you may need ISO 400, 800, or higher, especially when photographing movement.
Do not assume that ISO 100 is always the best choice. If a child is moving and your shutter speed falls too low, raising ISO may preserve the moment.
Auto ISO can be particularly useful for backlit portraits because the light changes as you turn, recompose, or move between open sunlight and shade. You can select the aperture and minimum shutter speed you need, then allow the camera to adjust ISO.
If your camera allows an ISO limit, set a maximum that you find acceptable for your camera and intended output. The right limit depends on how the images will be used, not just on a number in a specification sheet.
You Don’t Need the Ideal Equipment
Backlit photography is often associated with expensive portrait lenses, full-frame cameras, and specialist lighting equipment. These can be useful, but they are not requirements.
A basic kit lens can produce beautiful backlit portraits, particularly when the subject is positioned carefully and the background is not excessively cluttered. A lens that opens only to f/5.6 at the long end may not produce the same background blur as an f/1.8 prime, but it can still capture attractive light and colour.
An older camera may have less flexibility in recovering shadow detail or handling high ISO than a newer model. You can work around some of these limitations by exposing carefully, keeping ISO as low as practical, and avoiding unnecessarily bright backgrounds when the subject must remain detailed.
A prime lens can offer a wider maximum aperture, but a zoom lens gives you flexibility when you cannot move freely. Neither is universally better.
The more important skill is learning how your particular camera responds when the frame contains both bright highlights and deep shadows.
Good photography does not depend on owning the most expensive equipment. It depends on understanding what your equipment can do and adapting your decisions to its limitations.
When the Equipment Becomes a Limitation
When Your Lens Cannot Open Wide Enough
Suppose you are photographing a person in late-evening light with an 18–105mm f/3.5–5.6 kit lens. At the long end, the maximum aperture may be f/5.6, which lets in less light than an f/2.8 lens.
You could raise ISO, but another solution may be to move to a shorter focal length if the composition allows it. You might also move closer to the subject, change the background distance, or wait until the light is slightly brighter.
If your main goal is a shallow depth of field, remember that background separation depends on several factors, including aperture, focal length, focus distance, and the distance between the subject and background.
When the Sky Is Too Bright
Some cameras struggle to record fine detail simultaneously in a very bright sky and deep shadows.
Instead of increasing exposure until the face looks perfect, consider changing the composition. Place the subject against a darker section of the background, move the sun behind an object, or frame the photograph so that less bright sky appears.
If the face is essential, use a reflector or fill flash if available. If you want a silhouette, allow the subject to remain dark and concentrate on a clean outline.
You can also capture a RAW file, which may give you more flexibility when processing highlights and shadows. However, RAW does not recover detail that the sensor never recorded because of severe clipping.
When You Do Not Have a Reflector or Flash
You can often use the environment to your advantage. A light-coloured wall, pavement, or nearby open surface may reflect light onto the subject. A shaded area facing a bright open sky can provide softer illumination than direct sunlight.
The solution does not always require more equipment. Sometimes moving the subject by a few steps changes the quality of the light more effectively than changing a camera setting.
When Flare Reduces Contrast
Strong light entering the lens can create flare, hazy contrast, or coloured artefacts. Sometimes these effects contribute to the atmosphere, but they can also make the subject look flat.
Try shading the lens with a lens hood or your hand, making sure your hand does not enter the frame. A slight change in camera angle can reduce flare while preserving the backlit effect.
If the sun itself is visible, a small change in framing can make a substantial difference.
The Light Changes Everything
Backlighting can look dramatically different as the sun moves, clouds pass, or the subject changes position. Learning to recognise these changes is often more valuable than memorising a particular exposure.
Golden-Hour Backlighting
When the sun is low, the light often appears warm and creates a visible outline around hair, clothing, leaves, and other edges.

A useful portrait starting point is f/2.8–f/4, 1/250 second, and ISO 100–400, depending on the available light. If the subject is moving, prioritise a faster shutter speed.
The main decision is whether you want the subject’s face to be bright or the golden outline to dominate. Positive exposure compensation or fill light may help with the first goal. A darker exposure may suit the second.
Midday Sun Behind the Subject
Midday sunlight can produce a very bright background and strong contrast. The sky may lose detail before the subject becomes sufficiently bright.
Try placing the sun behind a tree, building, or another object. You can also move the subject into open shade while keeping the bright scene behind them.
A starting point might be f/4–f/8, 1/500 second for a moving person, and ISO 100. The exact exposure will depend on the scene and your camera.
Overcast Backlighting
On an overcast day, the sun may not be visible, but the sky can still provide strong light from behind the subject. The light is often softer, although the background may remain brighter than the subject.
Try f/2.8–f/5.6, 1/250 second, and ISO 200–800 depending on movement and available light. Watch the subject’s eyes and face carefully, because soft light does not automatically mean the exposure will be balanced.
Backlighting in Shade
A subject standing in shade with a bright opening behind them can produce a similar problem to photographing against the sun.
You may have more control over the subject’s illumination, especially if they are facing open sky. Start with an aperture suited to your depth-of-field preference, then choose a shutter speed that keeps the subject sharp.
If the background is too bright, alter the angle or composition before trying to force the camera to capture every detail.
Backlighting Indoors
A person standing near a bright window can create an indoor version of the same challenge. The window may become white while the person’s face remains dark.
If the face is the priority, move the person slightly toward the room’s ambient light or use a reflector to bounce light back onto them. If the window is important to the story, expose carefully for the window and accept some shadow, or use fill light to reduce the contrast.
The key question is not whether the light is natural or artificial. It is how much brighter the background is than the subject, and what you want to preserve.
One Subject Can Give You Four Completely Different Photographs
Imagine photographing a person standing beneath a tree while the evening sun shines through the leaves behind them.
Photograph 1 — A Clean, Natural Portrait
Approach: Expose for the face, keep the eyes sharp, and use the sunlight to create a subtle outline around the hair.
Possible settings: f/2.8–f/4, 1/250 second, ISO 100–800.
Reason: A wide aperture helps separate the subject from the background, while the shutter speed protects against small movements. If the face remains too dark, use exposure compensation or fill light.
Photograph 2 — A Strong Silhouette
Approach: Position the subject against a bright opening in the foliage and let the face become dark.

Possible settings: f/5.6–f/8, 1/500 second, ISO 100, with exposure chosen to retain the desired background brightness.
Reason: The photograph depends on the outline rather than facial detail. A clean shape and good placement are more important than brightening the subject.
Photograph 3 — A Dreamy, Soft Portrait
Approach: Use a wider aperture and allow some backlight to enter near the edge of the frame.
Possible settings: f/1.8–f/2.8 if the lens permits, 1/250 second, ISO 100–400.
Reason: The wide aperture and background separation can produce soft highlights and a gentle atmosphere. Watch for excessive flare and ensure the eyes remain sharp.
Photograph 4 — A Detailed Environmental Portrait
Approach: Include the tree, the surrounding field, and the warm light to show the person in their environment.
Possible settings: f/5.6–f/8, 1/250 second, ISO 100–800.
Reason: A narrower aperture gives you more depth of field, helping the surroundings remain recognisable. If the subject is moving or the light is fading, a wider aperture or higher ISO may be necessary.
The subject is the same, but the photograph changes because the photographer changes the intention.
The Mistake Photographers Often Notice Too Late
One common mistake is allowing the brightest part of the scene to dictate the entire composition.
A backlit portrait may have technically acceptable exposure and a beautiful glow around the hair, yet the photograph can still feel weak because a bright patch of sky competes with the face. A branch may cross the subject’s head, or the sun may create a distracting flare in an awkward part of the frame.
Photographers often notice these problems only after taking the picture because they concentrate on exposure and autofocus while shooting. The camera may confirm that the subject is sharp, but it cannot decide which visual elements should attract the viewer’s attention.
Before pressing the shutter, examine the whole frame.
Ask yourself:
- What will the viewer notice first?
- Is the brightest area helping the composition or distracting from the subject?
- Are the edges of the frame clean?
- Does the subject’s outline separate clearly from the background?
- Is the flare attractive, or is it covering an important detail?
- Does the photograph communicate the mood I intended?
A small movement to the left or right can separate a person’s head from a bright background. Lowering the camera slightly may remove a distracting object. Waiting for a gesture can make the silhouette more expressive.
In backlit photography, composition often solves problems that exposure settings cannot.
Practical Camera Settings for Backlit Photography
The following table offers starting points for common backlit situations. These ranges assume a typical interchangeable-lens camera and ordinary photographic conditions, rather than extremely bright or dark scenes.
| Situation | Aperture | Shutter Speed | ISO | Focus | Other Setting | Main Purpose |
|---|---|---|---|---|---|---|
| Backlit portrait | f/2.8–f/4 | 1/250 sec | 100–800 | Eye AF or AF-S | Positive compensation if needed | Reveal the face and preserve glow |
| Moving person | f/2.8–f/5.6 | 1/500–1/1000 sec | Auto ISO | AF-C | Subject tracking | Keep the subject sharp |
| Silhouette | f/5.6–f/8 | 1/250–1/1000 sec | 100–400 | AF-S or AF-C | Expose for background | Preserve the subject’s outline |
| Backlit flowers | f/4–f/8 | 1/250 sec or faster in wind | 100–800 | AF-S | Check highlights | Reveal translucent petals |
| Backlit landscape | f/8–f/11 | According to support and movement | 100–400 | Single-point AF or manual | RAW capture | Balance depth of field and highlights |
| Indoor window portrait | f/2.8–f/5.6 | 1/125–1/250 sec | 400–1600 or Auto | Eye AF or AF-S | Reflector or fill flash if available | Control window-to-subject contrast |
These are starting points, not fixed rules.
A moving subject may require a faster shutter speed. A kit lens may not open to f/2.8. A camera with limited high-ISO performance may benefit from added light or a change in composition. And when you intentionally want a silhouette, preserving the bright background may be more important than revealing every detail.
If you remember only one practical rule, let the subject’s movement determine the minimum useful shutter speed, let the desired depth of field guide aperture, and use ISO and exposure adjustments to make the rest of the photograph work.
If You Have Only One Lens
An 18–105mm zoom lens with a variable maximum aperture around f/3.5–f/5.6 is enough to explore many forms of backlit photography.
At the wider end, the lens lets you include the environment. You can photograph a person in a field, show sunlight filtering through trees, or create a portrait in which the location contributes to the story.
At the longer end, you can frame more tightly and make the background appear larger relative to the subject. Longer focal lengths can also make it easier to isolate the subject, especially when you can position the subject well away from the background.
The limitation is the maximum aperture. At 105mm, an f/5.6 maximum aperture gives you less light than an f/2.8 lens. You may need to raise ISO, slow the shutter speed when the subject is still, or choose a brighter part of the scene.
If you want a soft background, increase the distance between the subject and the background when possible. Move closer to the subject if the composition allows it, and use the longer end of the zoom when you want tighter framing.
If you want a silhouette, the lens’s maximum aperture is less important because you can choose a narrower aperture to suit your depth of field and exposure requirements.
A lens hood can help reduce unwanted flare, although it will not eliminate every reflection or haze effect. Pay attention to the direction of the light and make small adjustments to your camera position.
You do not need to make the same photograph as someone using specialist equipment. Find the photographs that your equipment allows you to make well.
What About the Photographer Who Is Just Starting?
If you are new to backlit photography, begin with two decisions: how fast the shutter needs to be and whether you want the subject bright or dark.
Try aperture-priority mode (A or Av). Select an aperture around f/4 or the widest aperture your lens can provide, then use Auto ISO if your camera supports it. If your camera offers a minimum shutter-speed setting for Auto ISO, choose one appropriate for the subject’s movement.
For a still portrait, start around 1/250 second if the light allows it. Focus on the nearer eye and take a test photograph.
Next, examine the face and the background. If the face is too dark, try positive exposure compensation. If you want a silhouette, reduce exposure instead and check whether the outline remains clear.
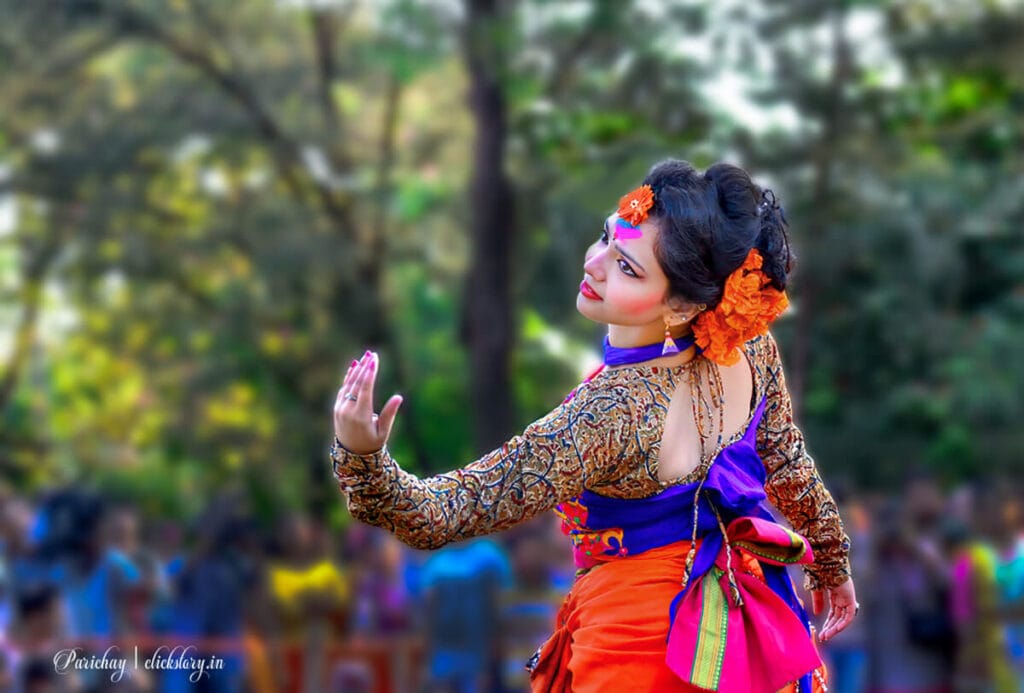
Do not change five settings at once. Make one adjustment, take another photograph, and compare the results.
Once you understand this basic relationship, experiment with aperture and shutter speed separately. Manual mode will become easier to learn when you already understand what each setting is trying to achieve.
A Simple Exercise to Understand Backlit Photography
You can complete this exercise with a phone that offers exposure control or with any camera that lets you adjust exposure.
Exercise: Photograph the Same Subject at Four Exposure Levels
- Find a person, tree, flower, or other subject with a bright sky or window behind it.
- Place the subject between the camera and the light source, taking care not to look directly at the sun.
- Choose a suitable shutter speed and aperture. Keep them fixed if possible.
- Take a photograph at 0 EV exposure compensation.
- Take another at -1 EV.
- Take a third at +1 EV.
- If you have time, repeat at -2 EV and +2 EV, checking the highlights and shadows each time.
- Compare the photographs on your camera or computer.
Look for changes in facial detail, background colour, silhouette strength, highlight clipping, and the overall mood of the image.
If you want to explore the effect of aperture, repeat the exercise with different aperture values while keeping the exposure consistent through shutter speed or ISO adjustments. Observe how the background and depth of field change.
If you want to study flare, make a second series in which you move the sun slightly inside and outside the frame. Keep an eye on contrast and focus as you do so.
The goal is not to discover one perfect setting. The goal is to understand how your decisions change the photograph.
If You Remember Only Five Things
1. Decide what deserves the correct exposure.
A face, a silhouette, and a glowing background require different exposure choices. Decide what matters before changing settings.
2. Protect the shutter speed when the subject moves.
A dark but sharp photograph can often be improved during processing. Motion blur caused by an unnecessarily slow shutter speed may be much harder to fix.
3. Use aperture for depth of field, not just brightness.
A wide aperture can separate a subject from the background, while a narrower aperture can preserve more detail. Choose according to the photograph you want.
4. Treat exposure compensation as a creative tool.
Positive compensation can help reveal a face; negative compensation can strengthen a silhouette. Neither direction is automatically correct.
5. Change your position before blaming your equipment.
Moving a few steps can improve the background, reduce flare, alter the direction of light, or make the subject’s outline clearer. Good positioning often matters more than an expensive lens.
The Best Backlit Photograph Begins Before You Press the Shutter
Return to the person standing in the field as the sun approaches the horizon. The golden outline around their hair is still beautiful, and their face is still darker than the background. But now, instead of treating that difference as a problem to correct automatically, you recognise it as a choice.
If the photograph is about expression, you can expose for the face and use a reflector or fill flash if necessary. If it is about shape and atmosphere, you can allow the person to become a silhouette. If it is about the feeling of the evening, you can preserve the warm glow and accept a little shadow.
The camera settings follow that decision. Aperture helps control depth of field and background appearance. Shutter speed keeps the subject sharp. ISO helps you work within the available light. Exposure compensation helps you adjust the balance when automatic metering does not match your intention.
The equipment still matters, but it does not make the creative decision for you. A basic lens can produce a beautiful photograph when the composition, timing, and light work together. A specialist lens cannot rescue a photograph if the subject is poorly positioned or the background is distracting.
Backlighting becomes easier when you stop expecting the camera to make every part of the scene equally bright. Instead, learn to recognise where the light is strongest, what the subject needs, and which details are worth preserving.
Observation → Intention → Camera Decision → Photograph.
The best camera setting is not the one you memorised. It is the one that makes sense for the photograph in front of you.
