

Why Do Some Lenses Produce Better-Looking Bokeh?
You have probably noticed that two photographs taken at the same aperture can have very different-looking backgrounds.
In one image, out-of-focus lights may appear as smooth, nearly circular discs. In another, those same lights may look like obvious polygons. Some lenses produce soft, creamy transitions between sharp and blurred areas, while others can produce distracting shapes, bright edges, or uneven highlights.
Part of the explanation is hidden inside the lens: the aperture diaphragm and its blades.
The aperture is the opening through which light passes into your camera. That opening is controlled by a group of overlapping metal or engineered-material blades. When you change from something like f/2.8 to f/8, those blades move to make the opening smaller.
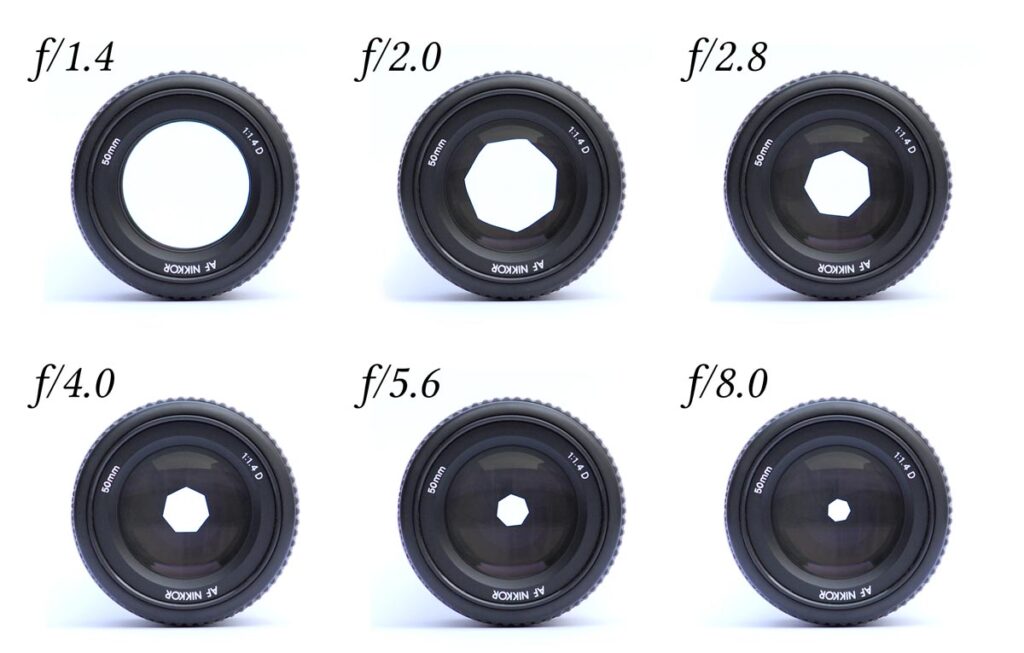
The shape of that opening influences the appearance of out-of-focus highlights, while the lens’s optical design, aperture setting, subject distance, background distance, and focal length all contribute to the overall character photographers call bokeh.
This distinction matters.
Bokeh is not simply “how blurry the background is.” It describes the quality and appearance of out-of-focus areas.
1. What Are Aperture Blades?
Aperture blades are the overlapping pieces inside a lens that form the adjustable opening through which light passes.
When you select an aperture on your camera, the aperture diaphragm moves these blades.
For example:
- At f/2.8, the opening is relatively large.
- At f/5.6, the opening becomes smaller.
- At f/11, the opening becomes smaller still.
The blades overlap to create the opening. Because the blades have particular shapes and because there are a particular number of them, the opening isn’t always a perfect circle.
Imagine a camera aperture like an iris
Think of the aperture diaphragm as the iris of an eye.
When the opening is large, more light enters. When it becomes smaller, less light enters.
But unlike a perfectly circular hole, a real mechanical aperture is constructed from individual blades.
For example, an aperture with six relatively straight blades can create a shape that becomes noticeably hexagonal when stopped down.
A lens with nine rounded blades may maintain a much more circular-looking opening.
Why does this matter for photographs?
The shape of the aperture opening influences the shape of defocused point sources of light.
Imagine photographing a string of small Christmas lights with the lights deliberately out of focus.
Each tiny light can become a blurred disc.
If the aperture opening is approximately circular, the blurred highlight can also appear approximately circular.
If the aperture opening becomes polygonal, the blurred highlight can become polygonal too.
Suggested visual:
“Close-up comparison of the same string of lights photographed at f/2.8, f/5.6 and f/11, showing how the shape of out-of-focus highlights changes.”
2. Why Are Aperture Blades Important for Bokeh?
Aperture blades matter because they can influence the shape and character of out-of-focus highlights, particularly when the aperture is stopped down.
But they are only one part of the bokeh equation.
A useful way to think about it is:
Bokeh = aperture shape + lens optics + focus + distance + background + aperture setting
The aperture blades determine the geometry of the opening, but the lens’s optical design determines how light behaves when objects are rendered out of focus.

This is why you shouldn’t assume:
“More aperture blades automatically means better bokeh.”
That’s too simplistic.
A lens with six blades can produce attractive images, while a lens with nine or eleven blades can still produce distracting bokeh under certain conditions.
Aperture blade count
Lens manufacturers may use different numbers of blades, such as:
- 5 blades
- 6 blades
- 7 blades
- 8 blades
- 9 blades
- 11 blades
The number alone doesn’t tell you everything.
The shape and curvature of the blades are also important.
Straight blades vs rounded blades
A diaphragm with relatively straight blades tends to create a more polygonal opening when stopped down.
Rounded blades tend to keep the opening closer to a circular shape.
For photographers interested in smooth, circular-looking defocused highlights, rounded aperture blades can therefore be desirable.
Suggested visual:
“Same lens or two lenses photographed at f/8 with distant point lights rendered out of focus, comparing a more polygonal aperture shape with a rounded aperture shape.”
3. The Core Principles
Principle 1: The Aperture Opening Changes Shape as You Stop Down
The first thing to understand is that changing aperture doesn’t just change exposure and depth of field.
It also changes the physical shape of the opening.
At a wide aperture such as f/1.4 or f/2, the opening may appear relatively circular even if the lens has several blades.
As you stop down, the blades move inward and their geometry becomes more obvious.
For example:
f/2.8 → large opening
f/5.6 → smaller opening
f/8 → smaller opening with blade geometry increasingly visible
f/16 → very small opening
If you’re photographing a distant light that is completely out of focus, that shape can be visible in the resulting highlight.
What you’ll see
At a wide aperture, highlights may look relatively round.
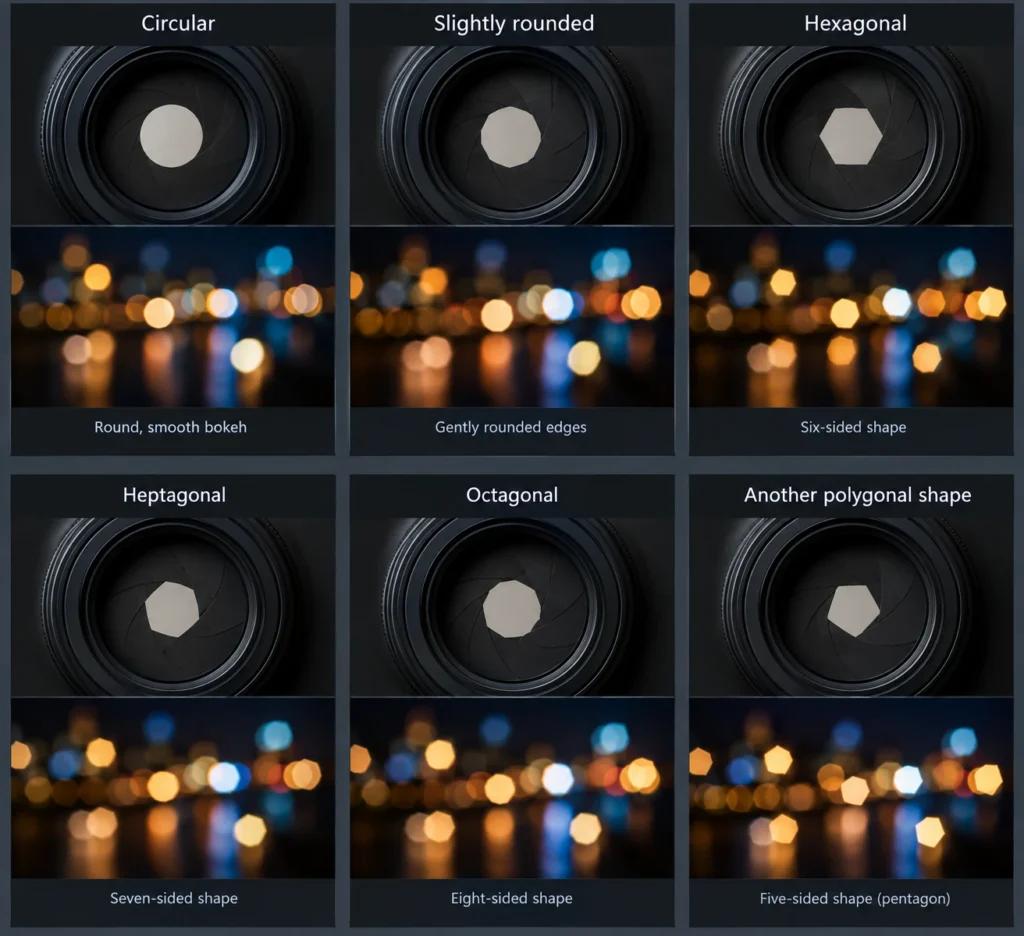
At smaller apertures, they may become:
- Circular
- Slightly rounded
- Hexagonal
- Heptagonal
- Octagonal
- Another polygonal shape
depending on the lens.
Principle 2: Rounded Blades Tend to Produce More Circular Highlights
A lens with rounded aperture blades is designed so that the aperture opening remains more circular as it closes.
This can be particularly useful for:
- Portraits
- Night photography
- Wedding photography
- Event photography
- Environmental portraits
- Close-up photography
- Product photography
Suppose you photograph a person against a background containing hundreds of small distant lights.
At f/2.8, those lights might become soft circular highlights.
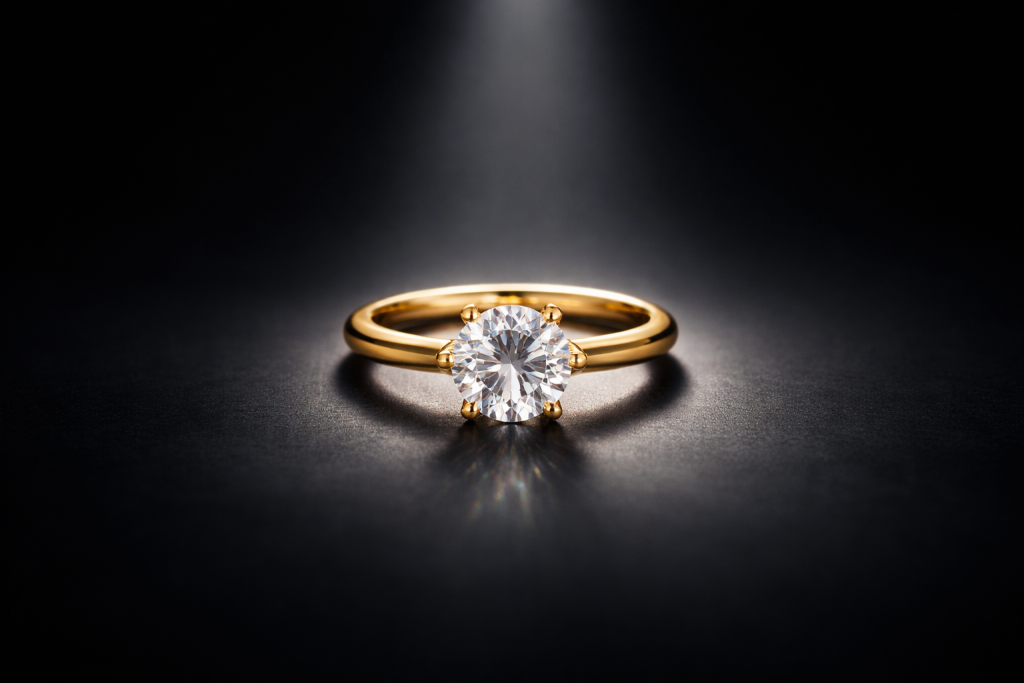
At f/8, the aperture closes substantially. If the lens’s diaphragm creates a polygonal opening, those lights may become visibly polygonal.
With a well-rounded diaphragm, they may remain more circular.
Practical example
Photograph a person at night with distant streetlights behind them.
Try:
Version A
- 85mm
- f/2.8
- 1/250 sec
- ISO 800
Version B
- 85mm
- f/8
- 1/30 sec
- ISO 800
The exposure will need adjustment depending on the scene, but the important comparison is the aperture.
At f/2.8, you’ll likely get stronger background blur and larger defocused highlights.
At f/8, more of the background may become recognizable, and the highlights may reveal the aperture’s shape.
Principle 3: More Blades Can Help, But Blade Shape Matters More Than a Simple Blade Count
You may hear advice such as:
“A nine-blade aperture gives better bokeh than a six-blade aperture.”
This is not a reliable universal rule.
More blades can help create a more circular opening, particularly when the blades are curved, but the design of the diaphragm matters.
Consider two lenses:
Lens A
- 6 blades
- Relatively straight blades
Lens B
- 7 blades
- Strongly rounded blades
Lens B may maintain a more circular opening even though it has only one more blade.
And even this doesn’t determine the entire bokeh character because optical design also matters.
What should you do as a photographer?
Don’t buy a lens solely because it has a certain blade count.
If bokeh is important to your work, examine real photographs of out-of-focus highlights made with the lens.
Principle 4: Bokeh Is Different From Background Blur
This is one of the most important distinctions in this tutorial.
Background blur refers broadly to how much of the background is out of focus.
Bokeh refers to the visual quality and character of that out-of-focus rendering.
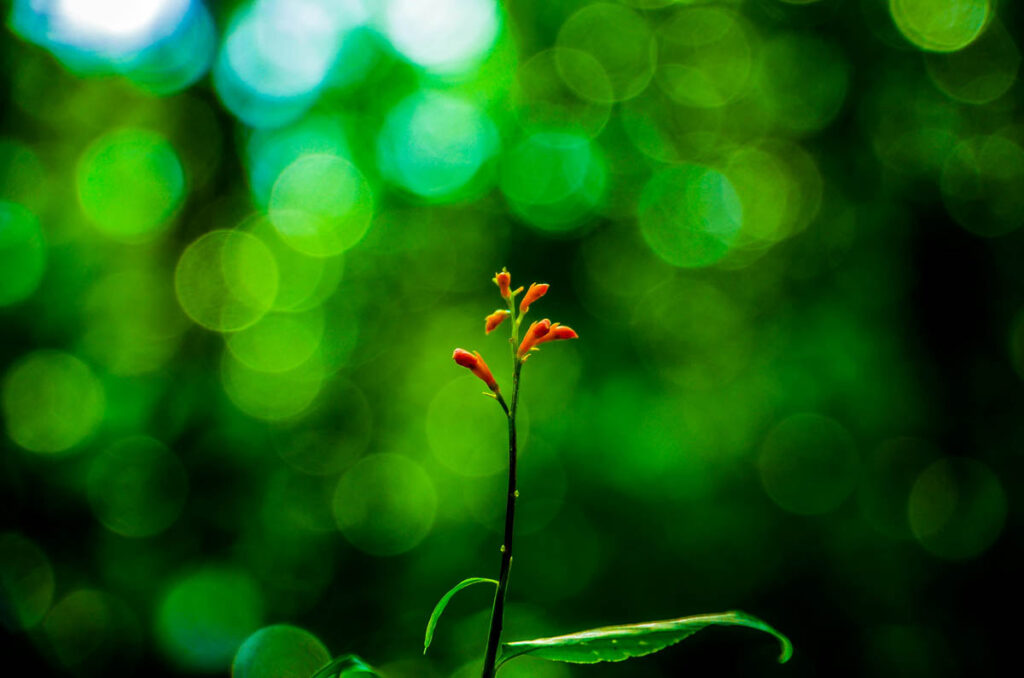
A photograph can have a heavily blurred background but unattractive bokeh.
For example, you might shoot at f/1.4 and produce a very shallow depth of field, but bright background highlights could have:
- Hard edges
- Strange shapes
- Uneven brightness
- Distracting rings
Another photograph may have slightly less blur but smoother transitions and more pleasant highlights.
Practical comparison
f/2.8
- More background blur
- Larger defocused highlights
- Shallower depth of field
- Stronger subject separation
f/8
- Less background blur
- Smaller defocused highlights
- Greater depth of field
- More recognizable background detail
- Aperture shape may become more obvious
Suggested visual:
“Portrait photographed from the same camera position at f/2.8 and f/8, with identical subject-background distance.”
Principle 5: The Shape of Bokeh Also Depends on Where the Highlight Appears in the Frame
Not every out-of-focus highlight has to appear perfectly circular, even with rounded aperture blades.
Highlights toward the edges of the frame can become stretched or shaped differently because of optical effects and mechanical vignetting.
This can produce the familiar “cat-eye” bokeh effect, where circular highlights near the center become more elliptical toward the edges.
This isn’t necessarily a defect.
Some photographers like it because it gives the background a distinctive character.
Practical example
Photograph a portrait with small distant lights behind the subject.
Keep the focus on the eyes.
Then move the subject so the lights appear:
- Near the center of the frame
- Near the left edge
- Near the right edge
Compare the shape of the highlights.
You may find that the edge highlights look more stretched.
4. Camera Settings and Technical Considerations
Aperture blades are physically part of the lens, but your camera settings determine how prominently their effect appears.
Aperture
This is the most important setting.
If your goal is strong background blur and large bokeh highlights, start with a relatively wide aperture.
Typical starting points:
- f/1.4
- f/1.8
- f/2
- f/2.8
- f/4
If you want to deliberately test aperture shape, stop down:
- f/5.6
- f/8
- f/11
Remember
A wider aperture doesn’t automatically mean better bokeh.
You still need an appropriate background and subject distance.
Shutter Speed
Shutter speed doesn’t directly change the shape of the aperture.
However, it affects exposure.
For a portrait in daylight:
Example:
- Aperture: f/2.8
- Shutter speed: 1/500 sec
- ISO: 100
- Focal length: 85mm
The fast shutter speed helps prevent subject movement from becoming blurred while allowing you to use f/2.8.
At night:
Example:
- Aperture: f/2.8
- Shutter speed: 1/125 sec
- ISO: 800
You may need a higher ISO because you’re working with less available light.
ISO
ISO also doesn’t change the physical aperture shape.
It controls how much amplification is applied to the captured signal and therefore affects exposure.
For a clean bokeh test, use the lowest practical ISO.
For example:
- ISO 100 outdoors
- ISO 400–800 in moderate light
- ISO 800–3200 or higher for nighttime scenes, depending on your camera
Don’t raise ISO simply to create bokeh. Adjust it only when necessary to obtain a suitable exposure.
Focal Length
Focal length has a major influence on the appearance of background blur.
An 85mm lens and a 24mm lens can produce very different results even when both are set to f/2.8.
Longer focal lengths are often useful for creating strong subject separation because they make it easier to frame a subject tightly while maintaining a distant background.
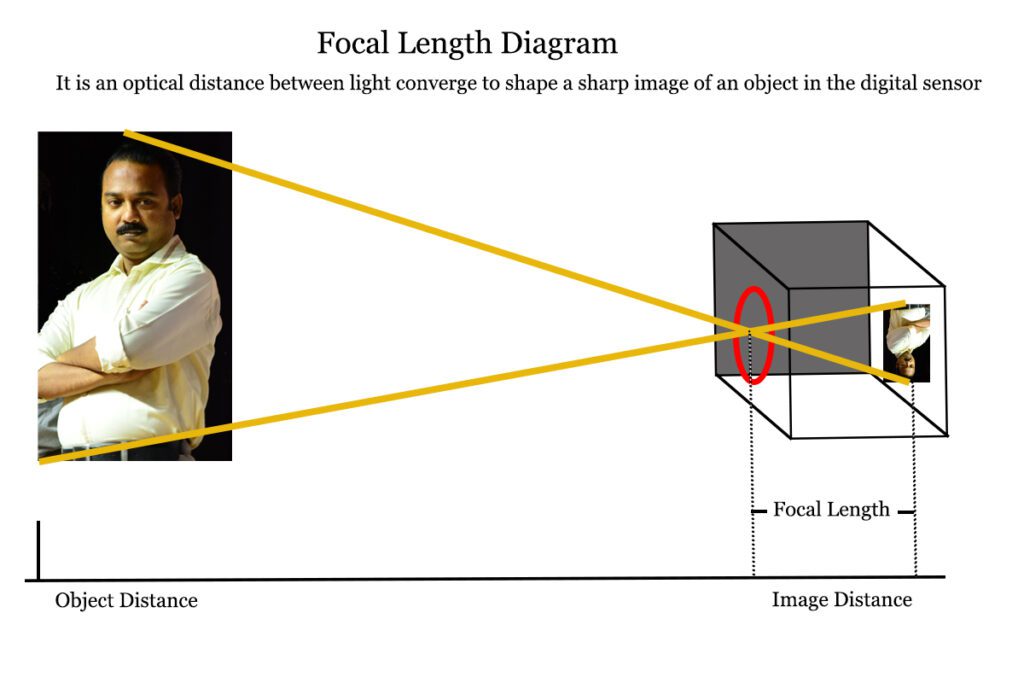
Comparison
24mm at f/2.8
- Wide field of view
- More environment visible
- Background often remains relatively recognizable
- Useful for environmental portraits
85mm at f/2.8
- Narrower field of view
- Easier to isolate a subject
- Background can become substantially softer
- Excellent for portraits
Suggested visual:
“Same subject photographed at 24mm f/2.8 and 85mm f/2.8, maintaining a similar subject size in the frame.”
Subject-to-Background Distance
This is one of your most powerful controls.
If your subject is very close to the background, the background may remain relatively recognizable.
Move the subject farther away from the background and it can become much more blurred.
Try this
Place a person 1 metre in front of a wall.
Take a photograph.
Then move the person 4 metres away from the wall while keeping approximately the same framing.
The wall should become significantly less distracting.
This is often more useful than simply opening the aperture further.
Camera-to-Subject Distance
Moving closer to the subject can also increase background blur, although your framing and perspective change.
For example, photographing a flower from close range at f/2.8 can produce extremely shallow depth of field.
But moving very close can also make focusing more demanding.
Focus Mode
For portraits:
- Use single-point AF or eye/subject detection if your camera handles it reliably.
- Make sure the eye is actually sharp.
- Don’t sacrifice focus accuracy simply to obtain stronger bokeh.
A perfectly blurred background cannot rescue an incorrectly focused face.
Shooting Mode
Aperture Priority (A/Av) is particularly convenient for experimenting with aperture blades.
You select:
f/2.8, f/4, f/5.6, f/8…
and allow the camera to adjust shutter speed.
This makes it easy to compare different aperture settings.
Manual exposure is useful when you want complete consistency between frames.
Exposure Compensation
In Aperture Priority, exposure compensation can be useful if the camera’s meter produces an exposure that is too bright or too dark.
For example:
- Start at 0 EV.
- Review the image.
- Try -1/3 EV if highlights are too bright.
- Try +1/3 EV if the subject is too dark.
This is particularly useful when photographing bright lights against dark backgrounds.
5. Step-by-Step Shooting Tutorial: Photographing and Testing Bokeh
Here’s a practical field workflow.
Step 1: Choose a subject
Start with something stationary.

Good choices include:
- A flower
- A person
- A toy
- A cup
- A small product
- A tree branch
A person is particularly useful because you’ll also learn how bokeh affects portrait separation.
Step 2: Find a suitable background
Look for distant sources of texture or light.
Examples:
- Fairy lights
- Streetlights
- Sunlit leaves
- Reflections
- Cars in the distance
- Buildings
- Water reflections
The farther the background is from your subject, the easier it is to make it strongly defocused.
Step 3: Put distance between subject and background
Start with at least several metres if possible.
Don’t stand your subject directly against a wall.
Step 4: Select your lens
For a portrait, try:
- 50mm
- 85mm
- 105mm
- 135mm
For close-up work, use the lens appropriate to your subject and focusing distance.
Step 5: Start wide open
Use something like:
f/2.8
If your lens opens wider, you can also test:
f/1.8 or f/1.4
Step 6: Set your exposure
A starting portrait setup might be:
- Aperture: f/2.8
- Shutter speed: 1/500 sec
- ISO: 100–400
- Focal length: 85mm
Adjust shutter speed and ISO for your actual light.
Step 7: Focus carefully
For a person, focus on the nearest eye.
For a flower or object, select the most important detail.
Step 8: Take the first photograph
Don’t immediately change everything.
Record your baseline image.
Step 9: Stop down
Take additional photographs at:
- f/4
- f/5.6
- f/8
Keep your composition and subject position as consistent as possible.
Step 10: Inspect the highlights
Zoom in.
Ask:
- Are the highlights circular?
- Are they polygonal?
- Are they stretched near the edges?
- Are they evenly illuminated?
- Do they have bright rings?
- Are their edges smooth?
Step 11: Change the background distance
Move the subject farther from the background.
Take another photograph.
Step 12: Change focal length
If you have a zoom lens, photograph the same subject at two different focal lengths.
Compare the background.
Step 13: Experiment with composition
Move the brightest background highlights toward the center and then toward the edges.
Look for changes in their shape.
6. Five Practical Bokeh Situations to Recreate
Example 1: Night Portrait With Streetlights
Situation: Portrait at dusk or after dark.
Subject: Person standing on a sidewalk.
Lighting: Ambient street lighting plus a soft LED or available light on the face.
Composition: Medium close-up with distant lights behind the subject.
Suggested settings:
- 85mm
- f/2.8
- 1/250 sec
- ISO 800–1600
What to look for: Large circular or polygonal background highlights.
Expected result: The subject separates from the dark background while distant lights become prominent bokeh.
Creative variation: Move the brightest lights toward the edge of the frame to investigate cat-eye-shaped highlights.
Example 2: Flower With Sunlit Leaves
Situation: Outdoor garden photography.
Subject: One flower.
Lighting: Backlight or side light through leaves.
Composition: Position the flower against a distant patch of bright foliage.
Suggested settings:
- 85–100mm
- f/2.8–f/4
- 1/1000 sec
- ISO 100
What to look for: Small bright circles created by distant sunlit areas.
Expected result: The flower remains sharp while the leaves dissolve into soft highlights.
Creative variation: Shoot toward the light so small gaps between leaves become bokeh.
Example 3: Christmas or Decorative Lights
Situation: Indoor decorative-light photography.
Subject: Person, ornament, or small object.
Lighting: String lights several metres behind the subject.
Composition: Place the subject in front of the lights but far enough away to create defocus.
Suggested settings:
- 50mm or 85mm
- f/2.8
- 1/125 sec
- ISO 400–800
What to look for: The shape of individual defocused lights.
Expected result: Large glowing highlights behind the subject.
Creative variation: Repeat the experiment at f/5.6 and f/8 to reveal how the aperture shape changes.
Example 4: Environmental Portrait at f/8
Situation: A portrait where the surroundings matter.
Subject: Person in a café, market, or street.
Lighting: Soft window light or open shade.
Composition: Include environmental details.
Suggested settings:
- 35–50mm
- f/8
- 1/125 sec
- ISO 400
What to look for: How much recognizable information remains in the background.
Expected result: The background is softer than the subject but still communicates location.
Creative variation: Take the same photograph at f/2.8 and compare storytelling versus isolation.
Example 5: Product Photograph With Reflective Background Lights
Situation: Small product photographed against decorative lights.
Subject: Watch, bottle, camera accessory, or other object.
Lighting: Large soft source from one side.
Composition: Product in the foreground with distant lights behind it.
Suggested settings:
- 85mm
- f/4
- 1/125 sec
- ISO 100–400
What to look for: Whether the highlights complement or compete with the product.
Expected result: Controlled background separation with recognizable circular highlights.
Creative variation: Stop down to f/8 and deliberately introduce polygonal highlights as part of the design.
7. Common Mistakes Beginners Make
Mistake 1: Assuming More Blades Always Means Better Bokeh
What goes wrong: You choose a lens purely because it has nine or eleven blades.
Why: Blade count is an easy specification to compare.
How to recognize it: The real photographs don’t look as good as expected.
Fix: Evaluate actual sample images and consider blade curvature, optical design, highlight rendering, and your intended use.
Mistake 2: Confusing Blur With Bokeh
What goes wrong: You assume maximum background blur automatically means attractive bokeh.
Why: Beginners often use “bokeh” as a synonym for shallow depth of field.
How to recognize it: The background is extremely blurred but contains harsh or distracting highlights.
Fix: Examine the quality of the out-of-focus areas, not just the amount of blur.
Mistake 3: Shooting the Subject Too Close to the Background
What goes wrong: The background remains recognizable.
Why: Distance has a major influence on defocus.
How to recognize it: You are already at f/1.8 but the wall, fence, or foliage remains distracting.
Fix: Increase subject-background distance.
Mistake 4: Opening the Aperture Without Checking Focus
What goes wrong: One eye is sharp but the other eye, nose, or face falls outside the shallow depth of field.
Why: Wide apertures can produce extremely thin focus zones.
How to recognize it: The subject’s most important feature isn’t sharp at 100% magnification.
Fix: Focus carefully. If necessary, stop down to f/2.8, f/4, or beyond.
Mistake 5: Ignoring Edge Bokeh
What goes wrong: Highlights near the frame edges become stretched or cat-eyed.
Why: Optical vignetting and lens design can alter defocused highlight shapes.
How to recognize it: Center highlights are round but edge highlights become elliptical.
Fix: Recompose, move the highlights toward the center, stop down slightly, or deliberately use the effect creatively.
Mistake 6: Using Too Slow a Shutter Speed
What goes wrong: The background looks beautiful but the person is blurry.
Why: You slowed the shutter to compensate for a small aperture or low light.
How to recognize it: Fine details on the subject are smeared.
Fix: Increase shutter speed and compensate with ISO or aperture.
For moving people, 1/250 sec is often a more practical starting point than 1/30 sec.
Mistake 7: Putting Every Light Behind the Subject
What goes wrong: The photograph becomes visually cluttered.
Why: More bokeh isn’t necessarily better composition.
How to recognize it: Bright highlights pull attention away from the subject.
Fix: Reduce the number of competing highlights or position them deliberately around the subject.
Mistake 8: Assuming f/1.4 Is Always the Best Setting
What goes wrong: The image becomes too soft, too shallow, or difficult to focus.
Why: Maximum aperture is being treated as a quality setting rather than a creative choice.
Fix: Compare f/1.4, f/2, f/2.8, and f/4. Choose the aperture that gives the best balance of subject sharpness and background rendering.
8. Creative Techniques for Using Aperture Blades and Bokeh
1. Deliberately Reveal Polygonal Bokeh
You don’t always have to hide the aperture shape.
If your lens produces distinctive polygonal highlights, use them.
Stop down to f/5.6 or f/8 and place distant lights behind the subject.
The resulting shapes can become a graphic element.
This works particularly well for:
2. Use Circular Bokeh as a Framing Device
Place large blurred highlights around the subject rather than directly behind their face.
For example, position a person between two clusters of distant lights.
The blurred circles can act like visual brackets around the subject.
3. Change Perspective Instead of Only Changing Aperture
Suppose your background isn’t becoming sufficiently blurred.
Don’t immediately switch from f/4 to f/1.4.
First try changing your position.
Move closer to the subject.
Then adjust your framing.
This can create a stronger separation while giving you greater control over composition.
4. Combine Long Focal Length With Background Distance
Try:
- 135mm
- f/2.8
- Subject several metres from the background
This combination can create pronounced background compression and defocus.
The result can be very different from:
- 35mm
- f/2.8
- Subject close to the background
Even though both images use f/2.8.
5. Use Hard and Soft Light Differently
Hard light can produce intense, sharply defined bright areas in the background.
Soft light tends to produce gentler tonal transitions.
For bokeh experiments, compare:
Hard sunlight through leaves
versus
Soft open shade
The resulting background highlights can have very different visual intensity.
6. Move Highlights Toward the Edge
Put small lights near the edges of the frame and observe their shape.
Then place the same lights near the center.
This lets you explore how lens design and optical vignetting affect bokeh.
You may find that the edge highlights become elongated.
Instead of correcting this, you can use it to create a sense of movement toward the subject.
7. Stop Down for Storytelling
Sometimes f/8 is more creative than f/1.4.
Imagine photographing a chef in a restaurant.
At f/1.4, the chef may be isolated from the environment.
At f/8, the kitchen, utensils, customers, and architecture may become recognizable.
If your goal is storytelling rather than isolation, the additional background information can make the photograph stronger.
9. Beginner vs Advanced Approach
Beginner approach
Start with one lens and one subject.
Use:
- Aperture Priority
- f/2.8
- One focal length
- A distant background
- A stationary subject
Then change only one variable at a time.
For example:
f/2.8 → f/4 → f/5.6 → f/8
This makes cause and effect easy to understand.
Advanced approach
An experienced photographer starts treating bokeh as a compositional material.
Instead of asking:
“How can I get more blur?”
they ask:
“What should the out-of-focus area look like?”
They may deliberately control:
- Highlight size
- Highlight placement
- Edge distortion
- Subject-background distance
- Focal length
- Aperture
- Light intensity
- Background color
- Background texture
- Camera position
The objective isn’t maximum blur.
It’s intentional blur.
10. Troubleshooting Guide
| Problem | Possible reason | Solution |
|---|---|---|
| Background is distracting | Subject too close to background | Increase subject-background distance |
| Bokeh highlights look polygonal | Aperture blades create polygonal opening | Use a wider aperture or lens with more rounded blades |
| Highlights are stretched near edges | Optical vignetting/cat-eye effect | Recompose, stop down slightly, or use the effect creatively |
| Subject isn’t sharp | Depth of field is too shallow | Stop down slightly and focus carefully |
| Person is blurry | Shutter speed too slow | Increase shutter speed |
| Background blur is weak | Background too close | Move subject farther from background |
| Bokeh lights are too small | Highlights/background sources are too far away or aperture is too small | Open aperture and/or change background distance |
| Bokeh dominates the subject | Too many bright background highlights | Simplify the background or reposition the subject |
| Image is noisy | ISO too high | Add light, open aperture, or use a slower shutter when the subject is stationary |
| Bokeh looks harsh | Lens optical rendering/background structure | Change background, aperture, focal length, or lens |
| Face is soft at wide aperture | Focus error or extremely shallow depth of field | Use eye AF/single-point AF and consider f/2.8–f/4 |
11. Photography Assignment: The Bokeh Aperture-Blade Test
Assignment title:
The Bokeh Shape Laboratory
Objective
Learn to distinguish between:
- Amount of background blur
- Quality of bokeh
- Shape of defocused highlights
- Effect of aperture blade geometry
- Effect of subject-background distance
Task
Photograph the same subject against a background containing small bright highlights or strongly contrasting points of light.
A string of decorative lights is ideal, but distant reflections, sunlight through leaves, or bright windows can also work.
Requirements
Take 12 photographs.
Set 1: Aperture comparison
Take the same composition at:
- f/2.8
- f/4
- f/5.6
- f/8
Keep the camera position and subject position as consistent as possible.
Set 2: Distance comparison
Keep approximately the same aperture.
Photograph the subject with:
- Background close
- Background moderately distant
- Background very distant
- Subject moved closer to the camera
Set 3: Composition comparison
Take four additional photographs:
- Highlights centered behind subject
- Highlights toward the left edge
- Highlights toward the right edge
- Highlights positioned around the subject as a framing element
Required camera technique
Use:
- Aperture Priority or Manual exposure
- Accurate focus on the subject
- Lowest practical ISO
- A shutter speed fast enough to avoid camera or subject movement
- The same lens for the main comparison
Challenge
You are not allowed to use your lens’s widest aperture for every photograph.
Your goal is to create at least one photograph at f/5.6 or f/8 in which the background contributes positively to the composition.
This forces you to learn that good bokeh isn’t simply a race toward the widest aperture.
Submission/review checklist
For each photograph, ask:
- Is the subject actually sharp where it matters?
- How much background blur is present?
- Are the highlights circular or polygonal?
- Do the highlights become different shapes near the frame edges?
- Is the background helping or distracting?
- Does the aperture setting support the intended composition?
- Is the subject-background distance helping the effect?
- Would a different focal length improve the result?
- Is the brightest highlight competing with the subject?
- Which frame has the most pleasing quality of bokeh rather than simply the most blur?
12. Advanced Challenge: Design Your Own Bokeh
Now stop treating bokeh as something that happens automatically.
Design it.
Choose a portrait subject and create three intentionally different images.
Photograph 1: Soft isolation
Use:
- Long focal length
- Wide aperture
- Large subject-background distance
- Soft background lighting
Your goal is maximum subject separation.
Photograph 2: Graphic bokeh
Stop down enough to make the aperture shape visible.
Place several small lights behind the subject.
Your goal is to make the geometric highlights part of the composition.
Photograph 3: Environmental bokeh
Use a smaller aperture such as f/5.6 or f/8.
Keep enough background detail to communicate the location.
Your goal is to balance subject separation with environmental information.
Advanced question
Compare the three images and ask:
Which photograph communicates the most, and which merely produces the most blur?
That distinction is an important step toward intentional photography.
13. What Aperture Blades Can—and Cannot—Tell You About a Lens
Aperture blade specifications are useful, but don’t treat them as a complete measurement of lens quality.
Two lenses with the same number of blades can render backgrounds differently.
Why?
Because bokeh is also affected by:
- Optical aberrations
- Lens element design
- Aspherical elements
- Spherical aberration
- Mechanical vignetting
- Focus distance
- Background structure
- Aperture setting
For example, some lenses can produce onion-ring patterns in out-of-focus highlights. These may be associated with the optical design and manufacturing of certain aspherical lens elements rather than simply the aperture blade shape.
This is why looking at real-world sample images is valuable when choosing a lens specifically for its bokeh character.
14. A Useful Comparison: f/2.8 vs f/8
If you’re learning aperture blades, perform this comparison yourself.
| Characteristic | f/2.8 | f/8 |
|---|---|---|
| Aperture opening | Large | Small |
| Light entering | More | Less |
| Depth of field | Shallower | Deeper |
| Background detail | Less recognizable | More recognizable |
| Defocused highlights | Larger | Smaller |
| Blade shape visibility | Usually less obvious | Often more obvious |
| Subject isolation | Stronger | Weaker |
| Environmental storytelling | Reduced | Increased |
| Shutter speed required | Usually faster | Usually slower, all else equal |
The important lesson is that aperture is a creative control, not merely an exposure control.
15. How to Choose a Lens if Bokeh Matters to You
If you frequently photograph portraits, weddings, events, or close-up subjects, pay attention to more than maximum aperture.
When evaluating a lens, look for:
- Maximum aperture
- Aperture blade count
- Rounded aperture blades
- Real-world bokeh samples
- Focus distance
- Focal length
- Autofocus performance
- Rendering characteristics
- Edge highlight behavior
A lens that opens to f/1.4 isn’t automatically the right lens for your work.
Ask instead:
“Does this lens produce the type of out-of-focus rendering I want?”
For some photographers, smooth circular highlights are important.
For others, unusual or distinctive bokeh is part of their visual style.
16. Final Thoughts
- Aperture blades form the adjustable opening inside your lens.
- Their shape can influence the shape of out-of-focus highlights.
- Rounded blades generally help maintain a more circular aperture opening when stopped down.
- More blades can help, but blade count alone does not determine bokeh quality.
- Bokeh is about the quality and character of out-of-focus areas, not simply the amount of blur.
- Aperture, focal length, camera-to-subject distance, and subject-to-background distance all affect the result.
- A wide aperture such as f/2.8 usually produces stronger background separation than f/8.
- Stopping down can make the shape of the aperture more visible in defocused highlights.
- Edge highlights can become stretched or “cat-eyed” because of optical and mechanical effects.
- Don’t automatically use the widest aperture. Sometimes f/4, f/5.6, or f/8 produces the better photograph.
- The best way to understand aperture blades is to photograph the same subject at different apertures and inspect the actual highlights.
- Think of bokeh as something you can design, not merely something your lens gives you.
The ultimate goal is not:
“Get the blurriest background possible.”
It is:
“Choose the aperture, lens, distance, light, and composition that make the out-of-focus areas work for the photograph.”
One Important Lesson to Remember
When you’re testing a lens, don’t just look at whether the background is blurry.
Zoom in on the out-of-focus highlights.
Look at their shape, edges, brightness, smoothness, and position in the frame. Then change one variable—usually aperture, subject-background distance, or focal length—and photograph the scene again.
That simple comparison will teach you more about aperture blades and bokeh than memorizing a lens specification sheet.
Frequently Asked Questions About Aperture Blades and Bokeh
1. Do more aperture blades mean better bokeh?
Not necessarily. More blades can help produce a more circular aperture, especially when combined with rounded blades, but bokeh also depends heavily on the lens’s optical design and shooting conditions.
2. Are rounded aperture blades better for bokeh?
They can be advantageous when you want circular-looking out-of-focus highlights, particularly when the lens is stopped down. However, “better” depends on the visual effect you’re trying to create.
3. How many aperture blades are best for bokeh?
There is no universal best number. Lenses with 7, 9, or 11 blades can produce attractive bokeh, but the curvature of the blades and the overall optical design are also important.
4. Why does my bokeh look like hexagons or polygons?
Your lens’s aperture opening is becoming polygonal as the blades close down. Try opening the aperture or using a lens with a more rounded diaphragm if you want more circular highlights.
5. Does f/1.4 always produce better bokeh than f/2.8?
No. f/1.4 produces a wider aperture and often stronger background separation, but the shallow depth of field can make focusing difficult. f/2 or f/2.8 may provide a better balance between subject sharpness and background rendering.
6. Why are my bokeh circles stretched near the edges?
This can happen because of optical vignetting and the way the lens renders out-of-focus light toward the edges of the frame. The result is often called cat-eye bokeh.
7. How can I make my bokeh circles larger?
Use a wider aperture, move closer to the subject, use an appropriate longer focal length, and increase the distance between your subject and the background. Small distant lights also work particularly well.
8. Can I get good bokeh with a kit lens?
Absolutely. You don’t need an expensive prime lens. Use the widest practical aperture, increase subject-background distance, move closer to your subject when appropriate, and look for suitable background highlights.
