Various exposure modes play a vital role in controlling the amount of light that reaches the camera sensor. These modes significantly impact how an image appears, influencing its brightness, contrast, and overall quality. By understanding different exposure modes, photographers can tailor their approach to achieve the desired outcome in their images. This article will delve into four primary exposure modes: Automatic, Manual, Aperture Priority, and Shutter Priority, providing examples to illustrate their practical applications.

1. Automatic Mode
What is Automatic Mode?
Automatic mode is a setting where the camera takes full control of exposure settings, including aperture, shutter speed, and ISO. The photographer simply points the camera at the subject and presses the shutter button.

Advantages of Automatic Mode
- Ease of Use: Ideal for beginners, automatic mode allows photographers to focus on composition without worrying about technical details.
- Speed: Quickly capture images in changing environments, making it perfect for spontaneous moments.
Disadvantages of Automatic Mode
- Limited Creative Control: Photographers have no say over exposure settings, which can lead to missed artistic opportunities.
- Inconsistency: The camera’s algorithms may not always make the best decisions, especially in complex lighting conditions.
Example of Automatic Mode in Action
Imagine attending a family gathering and wanting to capture candid moments. By using automatic mode, you can quickly snap photos of kids playing without needing to adjust settings. The camera evaluates the scene and selects optimal exposure settings, allowing you to focus on capturing memories rather than technical adjustments.
2. Manual Mode
What is Manual Mode?
In manual mode, the photographer has complete control over exposure settings. This includes adjusting the aperture, shutter speed, and ISO independently to achieve the desired exposure.

Advantages of Manual Mode
- Full Creative Control: Photographers can adjust settings to achieve specific artistic effects, like depth of field or motion blur.
- Consistency: Manual mode allows for consistent exposures, especially in challenging lighting situations.
Disadvantages of Manual Mode
- Complexity: It requires a good understanding of exposure principles, which can be daunting for beginners.
- Time-Consuming: Adjusting settings can slow down the shooting process, making it less ideal for fast-moving subjects.
Example of Manual Mode in Action
Consider a landscape photographer during sunset. By using manual mode, they can set a narrow aperture (like f/16) for a greater depth of field, ensuring both the foreground and background are in focus. They can also choose a slower shutter speed to capture the motion of flowing water, creating a soft, dreamy effect.
3. Aperture Priority Mode
What is Aperture Priority Mode?
Aperture priority mode (often denoted as “Av” for Canon or “A” for Nikon) allows the photographer to set the aperture while the camera automatically adjusts the shutter speed to achieve the correct exposure.

Advantages of Aperture Priority Mode
- Depth of Field Control: Photographers can easily control how much of the image is in focus, making it great for portraits or landscapes.
- Quick Adjustments: This mode allows for faster shooting in varying light conditions while still providing creative control over aperture.
Disadvantages of Aperture Priority Mode
- Less Control Over Motion: While the photographer controls depth of field, the camera decides shutter speed, which might result in motion blur if the subject is moving.
- Requires Understanding of Aperture: A basic understanding of how aperture affects exposure and depth of field is necessary.
Example of Aperture Priority Mode in Action
Imagine a portrait session in a park. By setting the aperture to f/2.8, the photographer can create a shallow depth of field, beautifully blurring the background and drawing attention to the subject’s face. As the lighting changes throughout the session, the camera automatically adjusts the shutter speed to maintain proper exposure, allowing the photographer to focus on capturing expressive moments.
4. Shutter Priority Mode
What is Shutter Priority Mode?
Shutter priority mode (denoted as “Tv” for Canon or “S” for Nikon) allows the photographer to set the shutter speed while the camera automatically adjusts the aperture for proper exposure.

Advantages of Shutter Priority Mode
- Motion Control: Photographers can freeze motion with fast shutter speeds or create motion blur with slower speeds, making it ideal for sports or action photography.
- Quick Response to Movement: This mode allows for rapid adjustments to shutter speed in dynamic situations.
Disadvantages of Shutter Priority Mode
- Limited Depth of Field Control: The camera sets the aperture, which may lead to unintended depth of field effects.
- Requires Understanding of Shutter Speed: Photographers need to understand how shutter speed affects exposure and motion to use this mode effectively.
Example of Shutter Priority Mode in Action
Consider a photographer at a local sports event. By setting a fast shutter speed (like 1/1000 of a second), they can capture sharp images of athletes in action, freezing their movements mid-stride. As the light conditions change, the camera automatically adjusts the aperture to ensure the photos remain properly exposed.
Quick Tips for Each Exposure Mode in Photography
Automatic Mode
- Ease of Use: Great for beginners. Just point and shoot!
- Good for Candid Shots: Ideal for capturing spontaneous moments without adjustments.
- Check Exposure: Be aware that the camera might not always choose the best settings in challenging lighting.
Manual Mode
- Full Control: Use when you want to dictate all settings for creative purposes.
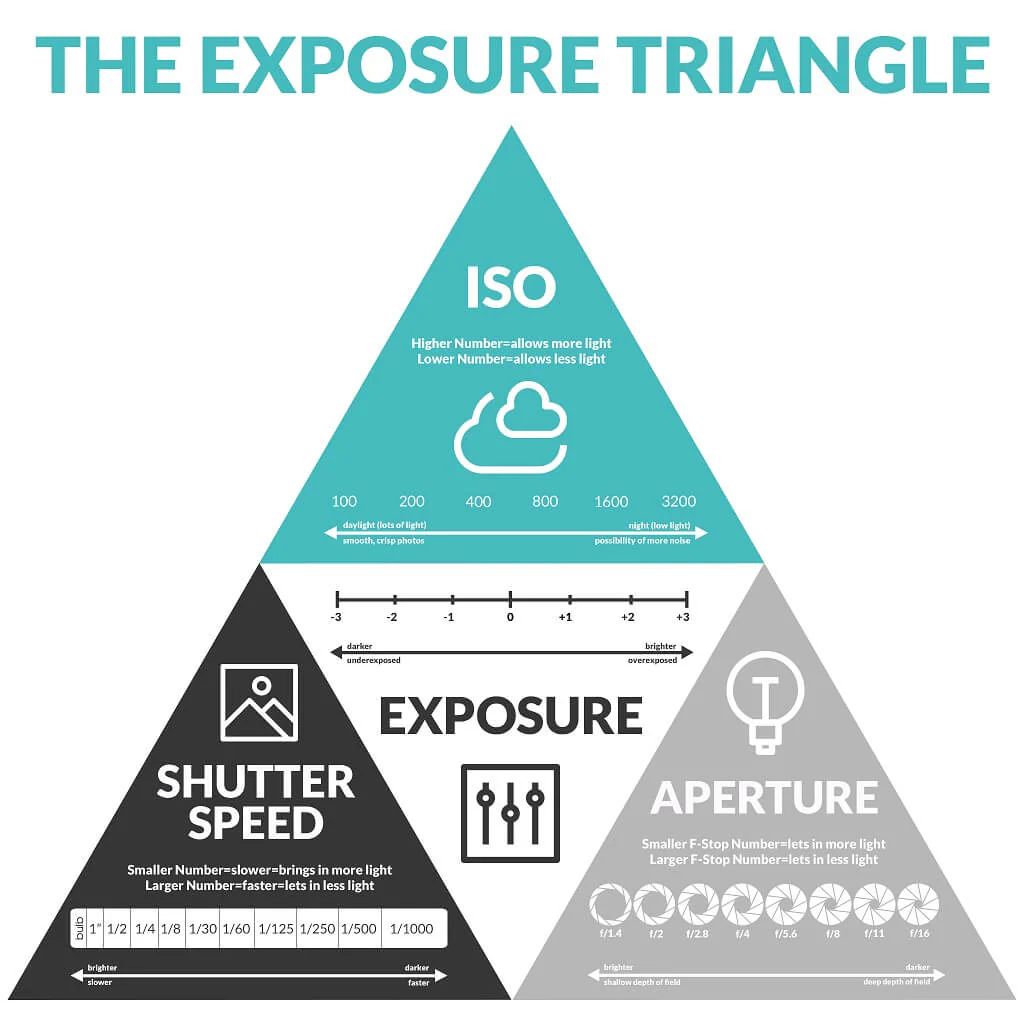
- Practice Exposure Triangle: Understand how aperture, shutter speed, and ISO work together.
- Use a Tripod: Helps stabilize the camera for longer exposures, especially in low light.
Aperture Priority Mode
- Control Depth of Field: Set a wide aperture (e.g., f/2.8) for blurred backgrounds or a narrow one (e.g., f/16) for greater depth of field.
- Ideal for Portraits: Use this mode for portrait photography to isolate the subject.
- Monitor Shutter Speed: Ensure the camera’s chosen shutter speed is fast enough to avoid motion blur.
Shutter Priority Mode
- Freeze Motion: Set a fast shutter speed (e.g., 1/1000 sec) to capture fast-moving subjects clearly.
- Create Motion Blur: Use a slower shutter speed (e.g., 1/30 sec) to intentionally blur motion for artistic effects.
- Check Aperture Settings: Be mindful that the camera will adjust the aperture, which may affect depth of field.
General Tips
- Experiment: Try each mode in different conditions to see how they affect your photos.
- Use Exposure Compensation: Adjust exposure settings in automatic and priority modes if the results aren’t as expected.
- Review Your Shots: Learn from each image by checking if the exposure is correct and making adjustments for next time.
By applying these quick tips, you can make the most of each exposure mode and enhance your photography skills!
Conclusion
Understanding the various exposure modes—Automatic, Manual, Aperture Priority, and Shutter Priority—empowers photographers to make informed decisions based on their shooting scenarios. Each mode offers unique advantages and is suited for different types of photography. By experimenting with these settings, photographers can enhance their skills, express their creativity, and capture stunning images. Whether you’re a beginner looking to simplify your process or an experienced shooter aiming for full control, knowing how to navigate these exposure modes is essential for any photographer. Happy shooting!


Information is really required for the novice to pro.