Adobe Photoshop is the most popular image editing software in the world. Whether you’re improving a selfie, fixing a faded old photo, or editing professional images, understanding image adjustment tools is essential.
The key areas of editing:
- Brightness & Contrast
- Tonal & Color Values
- Levels
- Curves
Brightness and Contrast
What is Brightness?
Brightness affects the overall lightness or darkness of an image. When you increase brightness, everything in the photo becomes lighter, and when you decrease it, everything becomes darker.
What is Contrast?
Contrast changes the difference between light and dark areas. Higher contrast makes images look sharper, while lower contrast makes them look flatter.

How to Adjust in Photoshop:
- Open your image.
- Go to Image > Adjustments > Brightness/Contrast.
- A small box will appear with two sliders:
- Brightness: Move right to lighten, left to darken.
- Contrast: Move right for higher contrast (more pop), left for lower contrast (softer).
Real-World Example:
- You took a photo in the evening, and it looks too dark.
- Increase brightness to make the image clearer.
- If it still looks dull, increase contrast to bring out the details in shadows and highlights.
Tonal and Color Values
What are Tonal Values?
Tonal values control the range of brightness in an image—from pure black to pure white. A balanced image should have tones in shadows (dark areas), midtones (gray), and highlights (bright areas).
What are Color Values?
Color values refer to the amount of red, green, and blue (RGB) in an image. Photoshop lets you fine-tune these colors to fix color casts (for example, if an image looks too yellow or too blue).

Useful Tools:
- Hue/Saturation (Image > Adjustments > Hue/Saturation): Change color intensity.
- Color Balance (Image > Adjustments > Color Balance): Shift between red/cyan, green/magenta, and blue/yellow.
- Shadows/Highlights (Image > Adjustments > Shadows/Highlights): Lighten dark areas or recover bright areas.
Real-World Example:
- An indoor photo under yellow lights makes people’s faces look orange.
- Open Color Balance and reduce the red/yellow tones.
- Use Hue/Saturation to desaturate warm colors slightly.
Levels
What is the Levels Tool?
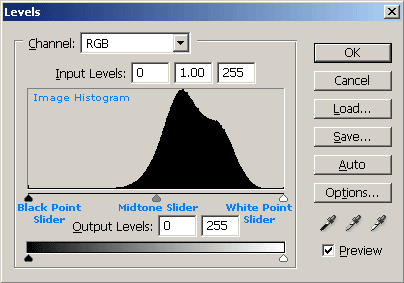
Levels let you control the brightness range in an image by adjusting the shadows, midtones, and highlights using a histogram (a graph that shows brightness levels in the image).
How to Use Levels:
- Open image → Image > Adjustments > Levels.
- You’ll see a histogram with 3 sliders underneath:
- Black (left) = Shadow details
- Gray (middle) = Midtones
- White (right) = Highlights
- Adjust each slider:
- Move black to the right: Deepens shadows
- Move white to the left: Brightens highlights
- Move gray left/right: Brightens or darkens midtones
Real-World Example:
- You scanned an old faded photo. The image looks dull and flat.
- Move the black slider inward until shadows become darker.
- Move the white slider inward to brighten highlights.
- Adjust midtones for better balance.
Tip: Hold down Alt (Windows) or Option (Mac) while moving sliders to preview clipping (areas losing detail).
Curves
What is Curves?
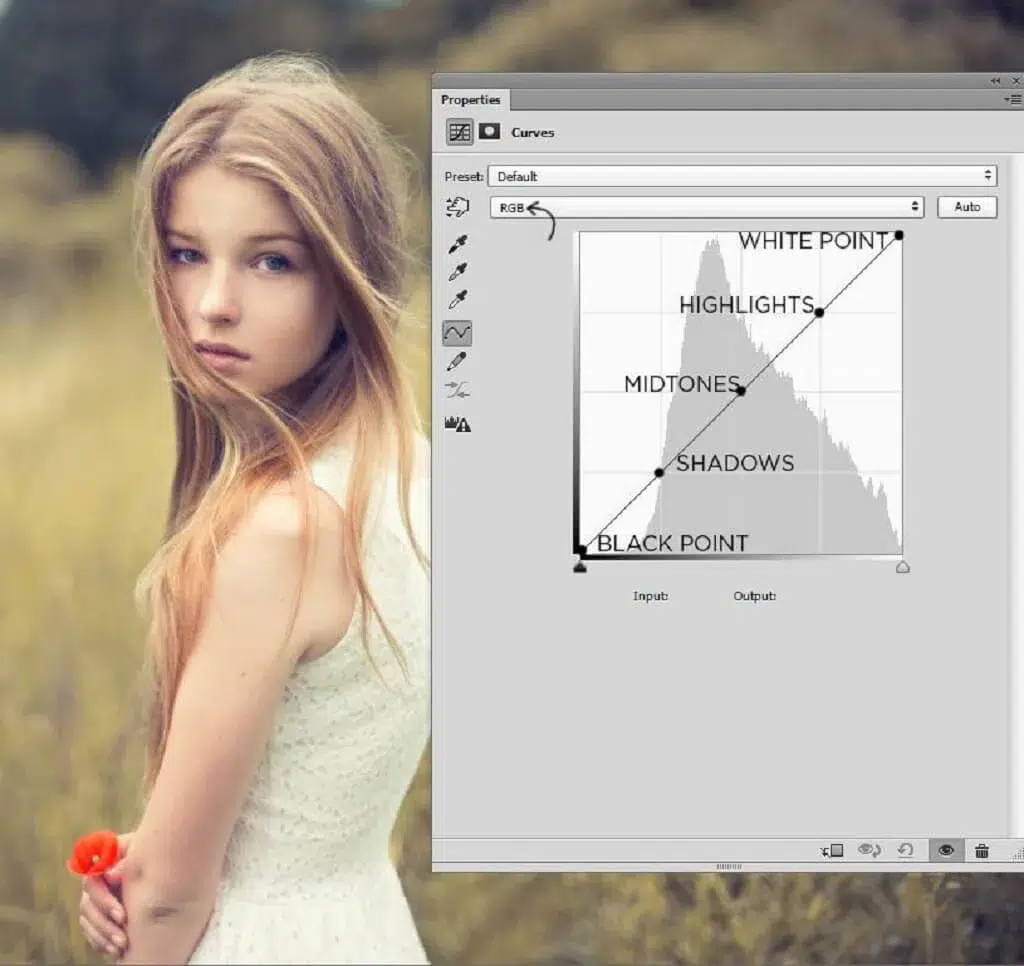
Curves give advanced control over brightness and contrast by letting you adjust points along a tonal curve (input vs. output of brightness).
Instead of just 3 sliders (like Levels), you can control any part of the tonal range with points on the curve.
How to Use Curves:
- Open image → Image > Adjustments > Curves.
- You’ll see a graph with a diagonal line.
- Click on the line to add control points:
- Drag up to lighten
- Drag down to darken
Common Curves:
S-curve: Increases contrast (make lights lighter and darks darker)
Inverted S-curve: Decreases contrast
Real-World Example:
- You photographed someone in front of a bright window. Their face is dark, and the background is overexposed.
- Use Curves to brighten shadows (lift lower-left part of the curve).
- Slightly lower highlights (pull down upper-right part).
Tip: Use the hand icon tool in the Curves window. Click on part of the image (like a face), then drag up/down to adjust that specific tone.
Summary: When to Use What
| Tool | Use When | Skill Level |
| Brightness/Contrast | You need quick fixes or are new to editing | Beginner |
| Color/Tonal Adjustments | The photo has a strong color cast or poor lighting | Beginner–Intermediate |
| Levels | You want to fix exposure problems with good control | Intermediate |
| Curves | You want precise control over tones and contrast | Intermediate–Advanced |
Final Thoughts
Learning these tools will help you fix common image problems like:
- Overexposure (too bright)
- Underexposure (too dark)
- Washed-out or dull colors
- Harsh lighting
- Bad color balance