Light quality in photography is the most powerful yet often overlooked element of visual storytelling. Most beginners focus only on brightness—making sure an image isn’t too dark or too bright. But in truth, brightness is just one aspect of light. What matters even more is the quality of light—its softness or hardness, its direction, and its color.
These qualities shape how your subject appears and how your viewer feels. A photograph taken in soft morning light can evoke warmth and nostalgia, while one captured in harsh midday sun might feel flat, emotionless, or overly contrasty. Learning to see and control the quality of light is one of the most essential steps toward developing a mature photographic eye.
Understanding Light Quality
Light quality refers to how light behaves rather than how much of it there is. It determines the appearance of shadows, the depth of contrast, and the color tone of your photographs. The quality of light has three main aspects:
- Softness or Hardness – How diffused or sharp the shadows appear.
- Direction – The angle at which the light hits the subject.
- Color Temperature – The color tone of light, ranging from warm to cool.
Each of these qualities interacts with your subject in unique ways. For example, the same portrait can look soft and romantic in diffused window light, or dramatic and intense under a single hard spotlight. Recognizing these variations is the key to mastering light.
Soft Light vs. Hard Light
Soft light is created when light is scattered or diffused before reaching the subject. You can think of it as “gentle” light—it wraps around your subject, softening edges and reducing harsh shadows. Common examples include cloudy days, shaded areas, or window light passing through a curtain. Soft light is often used in portrait photography because it flatters skin and creates a natural, pleasing look.
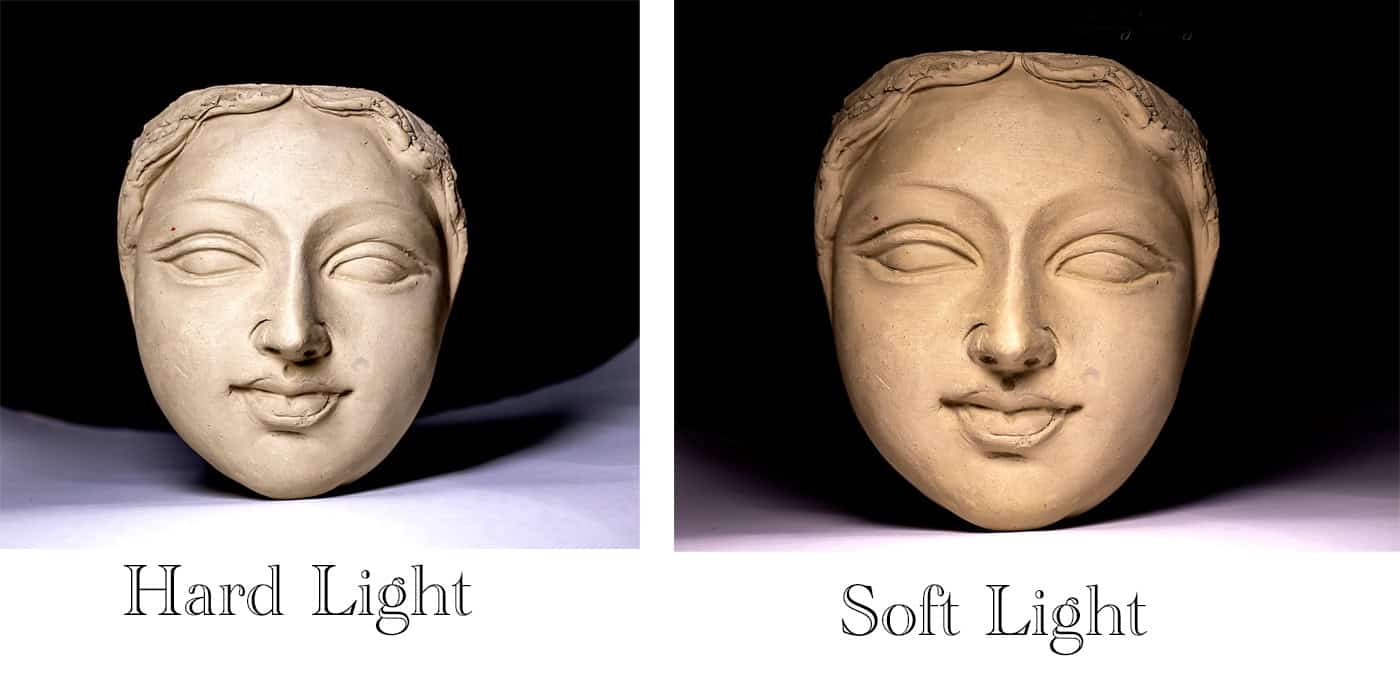
In contrast, hard light produces sharp, defined shadows and strong contrast. It occurs when light comes directly from a small, undiffused source such as the sun at noon, a bare bulb, or an unmodified flash. Hard light can reveal texture and shape in dramatic ways, making it ideal for architectural or black-and-white photography where contrast adds strength.
A useful rule of thumb to remember is that the larger the light source relative to your subject, the softer the light becomes. Moving a light closer increases its apparent size and thus softens shadows; moving it farther away makes the light harsher.
The Direction of Light
While the quality of light affects texture, the direction of light controls depth and mood. The position of your light source relative to your subject can completely change the story your image tells.
- Front Light: When the light source is directly behind the camera, shadows fall away from the viewer. This lighting flattens texture but produces bright, evenly lit results—ideal for products or documentation.
- Side Light: When the light hits the subject from the side, it emphasizes depth and form. You’ll see shadows that sculpt the face or object, creating a three-dimensional look.
- Back Light: This light comes from behind the subject, often creating silhouettes or glowing edges (rim light). It’s powerful for mood-driven storytelling.
- Top Light: Light shining from above can add drama or mystery, commonly used in film noir or artistic portraits.
- Under Light: Lighting from below looks unnatural and eerie—useful in creative or horror-themed shots.
For practice, take a single object like a cup or portrait subject and photograph it from these five lighting directions. You’ll see how the same object transforms in each scenario.
Color Temperature and Its Emotional Power
Every light source has a color temperature, measured in Kelvin (K). It determines whether the light appears warm (orange/yellow) or cool (blue). Understanding color temperature helps you control the emotional tone of your images.

- Morning and evening light (around 3500K–4500K) is warmer and golden. It creates a feeling of coziness, romance, or nostalgia.
- Midday light (around 5500K) is neutral and crisp—good for clear, realistic shots.
- Shade or cloudy light (6500K and above) is cooler, lending a calm or moody atmosphere.
Modern cameras automatically adjust white balance but manually setting it gives you artistic control. For instance, warming up a portrait shot under cloudy skies can add life, while cooling down an image taken at sunset can emphasize serenity. Always remember that light’s color sets the mood as much as composition does.
How to Control Light Quality
Controlling light is the difference between taking a photo and creating one. Even without expensive gear, you can shape light using simple techniques.
- Modify the Light
- Use tools that change how light interacts with your subject:
- Diffusers (softboxes, umbrellas, or even a white bedsheet) spread light and soften shadows.
- Reflectors (white, silver, or gold cards) bounce light into darker areas, filling shadows.
- Flags or black cards block unwanted light, increasing contrast and control.
- Adjust the Source Size
- Bring your light closer to make it appear larger and therefore softer. Move it farther for harder, more directional light. This is one of the simplest ways to control softness.
- Bounce the Light
- Bounce light off nearby walls, ceilings, or white boards. Bouncing enlarges the source and diffuses the light naturally perfect for indoor photography or small studios.
- Combine Multiple Lights:
- Key light: Your main light source.
- Fill light: Reduces shadows caused by the key.
- Rim or background light: Adds separation between subject and background.
Experimenting with these setups builds your understanding of lighting balance and direction.
Practical Assignments to Train Your Eye
Learning light quality is best done by seeing it yourself. Here are some exercises to sharpen your perception and control:
Assignment 1: The Window Portrait
Sit a friend near a window and take three portraits—one facing the window (front light), one side-on (side light), and one with their back to the window (back light). Compare how the light changes the mood and shape of their face.
Assignment 2: DIY Light Modifiers
On a sunny day, photograph an object in direct sunlight. Then, place a white bedsheet between the sun and your subject to diffuse the light. Notice how the shadows soften and details become more pleasing. Use a piece of aluminum foil or a white card as a reflector to fill in the shadow side.
Assignment 3: Color Temperature Study
Photograph the same scene three times—during sunrise, noon, and sunset. Observe how the colors shift from golden to blue and back to red-orange. Adjust your camera’s white balance settings (Daylight, Shade, Cloudy) to understand how it affects the final tone.
Assignment 4: Golden Hour Mood Board
Goal: Understand how color temperature changes emotional tone.
- Go out during the golden hour (just after sunrise or before sunset).
- Photograph the same subject every 5–10 minutes as the light changes.
- Observe how the shadows lengthen and how the color shifts from orange to deep amber.
- Arrange your shots chronologically in a grid — your own “light transition mood board.”
Lesson: You’ll visually grasp how time of day changes light’s emotion.
Assignment 5: Cloud vs. Sunlight
Goal: Compare soft and hard natural light.
- Choose an outdoor subject (a portrait or a tree).
- Photograph it once under bright sun and once under overcast sky.
- Don’t change your position or camera settings except exposure.
- Compare shadow edges, color tone, and skin or surface texture.
Lesson: Overcast light = nature’s softbox. Notice how details change even when brightness stays similar.
Assignment 6: One Light, Many Angles
Goal: Understand direction of light.
- Use a single desk lamp or flashlight.
- Place an object (like a mug, fruit, or face sculpture) on a plain surface.
- Take photos from five angles — front, side, back, top, and below.
- Keep exposure constant.
Lesson: You’ll see how shadow placement completely alters depth and mood.
Assignment 7: Bouncing Light
Goal: Learn to control contrast with reflections.
- Shoot a small object indoors using a side light (window or lamp).
- Place a white card or foil opposite the light to bounce it.
- Compare “with bounce” vs. “without bounce.”
- Then try using a black card instead — see how it deepens contrast.
Lesson: You’ll see how reflectors and flags shape the light ratio between bright and dark areas.
Assignment 8: Candlelight Portrait
Goal: Work with very warm, dim light sources.
- Use one or two candles as your only light source.
- Set your camera to manual mode (high ISO, wide aperture).
- Position your subject close to the flame and experiment with distance.
- Try auto vs. manual white balance to control warmth.
Lesson: Learn how small, warm light sources add intimacy and texture to portraits.
Assignment 9: Mixed Light Challenge
Goal: Identify and balance different color temperatures.
- Shoot indoors with window light + tungsten bulb turned on.
- Observe how the daylight appears blueish while tungsten looks orange.
- Take one shot with auto white balance and another with a custom white balance.
- Correct the color mix in post-processing to achieve natural tones.
Lesson: Understand how to manage mixed lighting situations (common in real-world settings).
Assignment 10: Hard Light Patterns
Goal: Use hard light creatively.
- Take a bright flashlight or bare bulb.
- Shine it through everyday objects like a sieve, lace fabric, or blinds.
- Capture how patterns of light and shadow fall on a wall or subject.
Lesson: Hard light can be artistic when you control it — perfect for storytelling portraits.
Assignment 11: Silhouettes and Backlight
Goal: Control exposure for backlit subjects.
- Position your subject (person, tree, or object) between you and the sun.
- Underexpose slightly to darken the subject while keeping the sky bright.
- Experiment with lens flare by slightly shifting angles.
Lesson: Backlighting adds drama and shape; exposure control determines whether it’s a silhouette or a glowing halo.
Assignment 12: Night Light & Artificial Sources
Goal: Explore different types of man-made light.
- Walk around your neighborhood at night.
- Capture scenes lit by street lamps, neon signs, or car headlights.
- Try different white balances — Tungsten, Fluorescent, Auto.
- Focus on mood: urban, cinematic, or mysterious.
Lesson: You’ll develop sensitivity to color and contrast in low-light environments.
Assignment 13: Shape with Shadow
Goal: Learn to use shadows intentionally.
- Place your subject near a wall and light them from one side.
- Move the light closer, farther, higher, and lower — watch how the shadow grows or shrinks.
- Try composing with both the subject and the shadow included.
Lesson: Shadows are compositional tools, not mistakes — they define space and mood.
Assignment 14: Create a Light Story
Goal: Apply all concepts together.
- Pick a theme — “Morning Routine,” “Loneliness,” or “City Nights.”
- Use light quality (soft/hard, warm/cool, front/side/back) to express emotion in each shot.
- Create a mini 5-photo story using only natural or one artificial light source.
Lesson: This assignment pushes you from technical lighting into emotional lighting — the real art of photography.
Bonus: Reflection Journal
After each assignment:
- Write 2–3 sentences describing what you noticed about the light.
- Note how it changed the mood, texture, or emotion of your shot.
- Keep a small “Light Journal” (digital or paper).
Why it matters: Reflecting helps internalize what you observe — turning practice into instinct. These exercises don’t just improve technique; they train you to recognize light as the language of visual emotion.
Common Mistakes to Avoid
Many photographers struggle with light quality because they overlook its nuances. Some typical mistakes include:
- Focusing only on exposure and ignoring shadow detail or direction.
- Mixing multiple light sources (like daylight and tungsten bulbs), causing color imbalance.
- Shooting under harsh midday sun without using shade or diffusion.
- Forgetting that backgrounds reflect and affect the overall light color.
- By paying attention to these issues, your images will appear more consistent and professionally lit.
Useful Tools and Resources
You don’t need a full studio to master light. A few tools and apps can make learning easier:
- Apps: PhotoPills or SunCalc for planning golden-hour light.
- Affordable gear: A 5-in-1 reflector, softbox, or simple white foam board for bouncing light.
- Books: Light: Science and Magic by Hunter & Biver — an excellent guide to lighting principles.
Practice method: Experiment with desk lamps and paper reflectors indoors. You’ll understand how light behaves before investing in studio gear.
Conclusion
Mastering light quality in photography is a journey of observation, experimentation, and creativity. It’s about learning to see light before you press the shutter. When you understand softness, direction, and color, you gain the power to control the mood, depth, and story within your images.
The difference between a snapshot and a professional photograph often lies in how well the photographer shaped the light. So, take time to observe—watch how morning light touches leaves, how shadows stretch in the evening, and how artificial light alters perception. Once you can read light, you can write with it.
Note: The assignment images are intentionally left blank. Please capture photographs based on the assignments above and email them to parichay@clickstory.in You have one month from the article’s publication date to submit your images. If your photo(s) are selected, they will be published in the assignment section with full credit, including your name and organization. If not, I will publish my own assignment-based images after the deadline. Thank you in advance.