Exposure in Photography
Exposure is one of the fundamental concepts in photography, dictating how light interacts with your camera’s sensor. Understanding exposure is essential for creating stunning images, whether you’re a beginner or a seasoned professional. In this article, we’ll explore the elements of exposure, provide examples, and offer assignments along with useful tips and tricks.
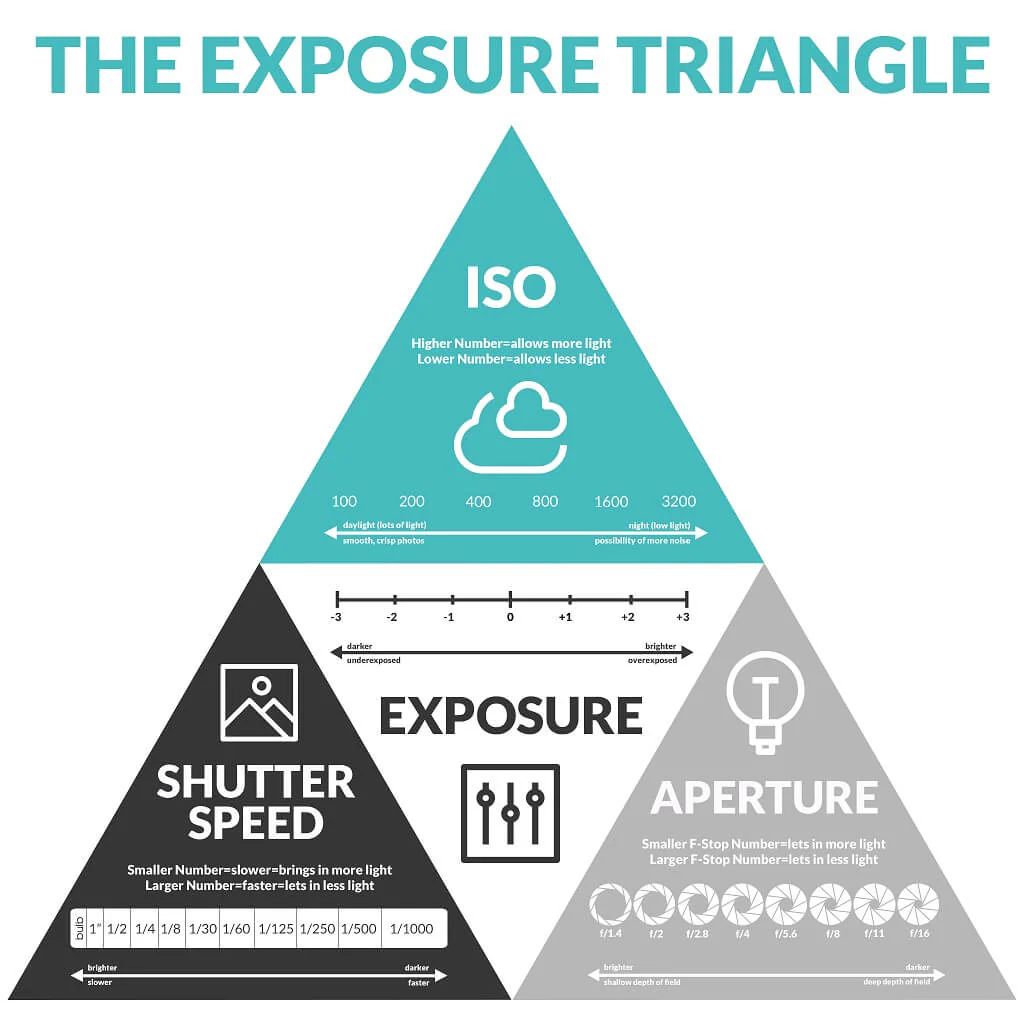
The Exposure Triangle: Shutter Speed, Aperture, and ISO
Exposure in photography is governed by three key elements, collectively known as the Exposure Triangle:
- Shutter Speed: This refers to the duration that the camera’s shutter is open, allowing light to hit the sensor. Faster shutter speeds (e.g., 1/1000s) freeze motion, while slower speeds (e.g., 1/2s) create motion blur. Example: Photographing a hummingbird in flight at 1/1000s will capture the bird in sharp detail, while a slower speed might result in motion blur.
- Aperture: Measured in f-stops, aperture controls the size of the lens opening. A lower f-stop (e.g., f/1.8) results in a larger opening, allowing more light and creating a shallow depth of field. Conversely, a higher f-stop (e.g., f/16) narrows the opening, allowing less light and increasing the depth of field. Example: Shooting a portrait with an aperture of f/1.8 blurs the background, drawing attention to the subject. In landscape photography, an aperture of f/16 keeps both the foreground and background in focus.
- ISO: This measures the sensor’s sensitivity to light. A low ISO (e.g., 100) is ideal for bright conditions, while a higher ISO (e.g., 3200) can be used in low-light situations but may introduce noise. Example: In a dimly lit concert, using ISO 3200 allows you to capture the scene without using a flash, but you may notice some grain in the image.
Balancing the Triangle
Achieving proper exposure involves balancing these three elements. For instance, if you choose to use a fast shutter speed to freeze motion, you may need to open the aperture wider or increase the ISO to allow more light in, ensuring the image is properly exposed.

Practical Assignment: Exposure Triangle Exploration
Assignment 1: The Exposure Triangle Challenge
Objective: Understand the relationship between shutter speed, aperture, and ISO.
Instructions:
- Select a moving subject (like a pet or a friend) in a well-lit area.
- Take three sets of photos:
- Set 1: Use a fast shutter speed (1/1000s), wide aperture (f/2.8), and adjust ISO as necessary.
- Set 2: Use a slow shutter speed (1/30s), narrow aperture (f/16), and adjust ISO.
- Set 3: Vary ISO between low (100) and high (3200) while keeping the shutter speed and aperture consistent.
Reflection: Compare the images to observe how each setting impacts exposure and image quality.
Assignment 2: Creative Exposure Techniques
Objective: Experiment with creative uses of exposure.
Instructions:
- Create a series of images using intentional overexposure and underexposure.
- For overexposure, increase the exposure by 1-2 stops; for underexposure, decrease by the same amount.
- Edit the images post-capture to enhance or correct the exposure.
Reflection: Analyze how the changes affect the mood and storytelling of the images.
Tips and Tricks for Mastering Exposure
- Use Histogram: Always check your camera’s histogram to ensure that your exposure is balanced. A well-distributed histogram should not be heavily skewed to the left (underexposed) or right (overexposed).
- Bracket Your Shots: When uncertain about exposure settings, take multiple shots at different exposures. This technique is known as bracketing and can help you capture the perfect exposure.
- Practice in Manual Mode: Switch to manual mode to gain a better understanding of how each element in the Exposure Triangle affects your images. It allows for more creativity and control.
- Learn from the Pros: Analyze the work of professional photographers. Pay attention to how they manipulate exposure to enhance their subjects and tell stories.
- Utilize Exposure Compensation: If your camera has this feature, use it to adjust the exposure without manually changing each element of the triangle.
- Understand Light Conditions: Recognize different lighting conditions and how they affect your settings. The golden hour, for example, provides soft, warm light that is ideal for photography.
Conclusion
Mastering exposure is vital for any photographer looking to enhance their craft. By understanding the Exposure Triangle and applying the assignments and tips provided, you can take your photography skills to new heights. Remember, practice makes perfect, so keep experimenting with different settings and lighting conditions to find your unique photographic voice.
Feel free to share your experiences and results from the assignments in the comments! Happy shooting!