Photography Ideas #7 – Time Lapse Video
Hi! Friends. How are you? Today I am going to discuss the making of a time-lapse video.
Requirements:
A sturdy tripod
A Subject, model [Biyas from my side]
A good background
How to or the technique behind the making of the time-lapse video.
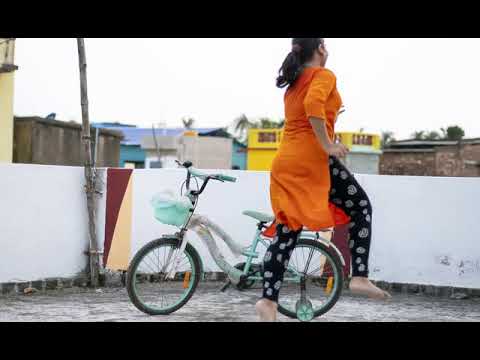
I set my camera on a tripod and choose a composition where my model (Biyas) runs around a bicycle. She was instructed to jump a little when she run 360 degrees against the bicycle. I release the shutter at the time of her jump. Fixed tripod and no movement of the camera are the key concern of making the time-lapse video.
If you are an expert in video editing and your composition demands a long-term project time, say one month or more, you can change the position of the camera.
Time lapse video is for tutorial purposes only. I promise to put two good compositions in my upcoming photography tutorial.
I click a single image file of Biyas’s every jump around the bicycle three times. Save all the files in the computer hard disk drive. There are 130 single shots, and I rename them manually as 1, 2 3……130. I give some selected image files for your ready reference.
I searched a lot on the internet to find a good stable and free software for time lapse video, which can easily stitch the images files, and turn them into a video file. AVI extension based on windows 10 OS.


The links are useful to download the virtual dub software for time lapse video. First, you download virtual dub codec, then virtual dub software. Both are open-source software. Install the virtual dub codec software. Unzip the virtual dub software and double click on the veedub64 file. It will open the video editing window for necessary work. The main window of virtual dub opens up.
- Click on the File menu and select the Open option.
- Choose the folder where your *.jpg or *.jpeg still images are stored.
- Select the first picture only. It automatically creates a link with the other image files invisibly.
- Now go to the Video menu and choose the Filters option.
- Click on Add button and choose to resize (internal) option. Press ok.
- A new window will pop up.
- Choose Letterbox/crop size and enter the value for normal video or HD video. i.e. 1920 x 1080. The same value should be in the absolute (pixels) area. Press ok twice.
- Again, go to the Video menu and choose the compression option.
- Select Xvid MPEG-4 Codec and press the ok button.
- Go to the Video menu and choose the Frame rate option. Select the second option – change frame rate tp [fps] and type an integer value between 15-30. Press the ok button.
- Now click on the File menu and choose to save as AVI.
- Time-Lapse video file is ready by using the still image files.
Download and install the software:
- Virtual Dub Codec:
https://www.xvid.com/download - Virtual dub (for windows) free
http://www.virtualdub.org/download.html
Hope you may like the creative photography ideas for making a time lapse video using the still image files. I am waiting for your awesome composition and time-lapse videos. All the very best.
Update: 2026
METHOD 1: Create Timelapse in Lightroom Classic (Mac/windows)
Lightroom is good if you want to:
- Adjust exposure/color first
- Export as video directly
STEP 1: Import Your Images
- Open Lightroom Classic
- Go to Library Module
- Click Import
- Select the folder containing your images
- Click Import
STEP 2: Edit One Image (Important)
To avoid flicker:
- Go to Develop Module
- Edit the first image (Exposure, Contrast, White Balance, etc.)
- Select that edited image
- Press
Cmd + Shift + C(Copy Settings) - Select all images (
Cmd + A) - Press
Cmd + Shift + V(Paste Settings)
Now all images have identical settings.
STEP 3: Switch to Slideshow Module
- Click Slideshow (top right module panel)
- On the right panel:
- Uncheck Zoom to Fill Frame
- Uncheck Pan & Zoom
- Set Slide Duration = 0.1 sec (for fast timelapse)
- Set Crossfade = 0 sec
STEP 4: Set Frame Rate
In 2026 Lightroom:
- Scroll down to Export Video
- Choose:
- Video Preset: 1080p 24fps (cinematic)
- Or 30fps (normal smooth)
STEP 5: Export
- Click Export Video
- Choose save location
- Click Save
You will get an MP4 timelapse video.
Duration Example
If you have 100 images:
- At 24 fps → ~4 seconds video
- At 30 fps → ~3.3 seconds video
METHOD 2: Create Timelapse in Photoshop (More Control)
Photoshop gives more technical control.
STEP 1: Open Image Sequence
- Open Adobe Photoshop
- Click File → Open
- Select ONLY the first image
- At bottom, check Image Sequence
- Click Open
STEP 2: Choose Frame Rate
Photoshop will ask:
- Frame Rate → Enter:
- 24 (cinematic)
- 30 (standard)
- 60 (very smooth)
Click OK
Now Photoshop creates a video timeline automatically.
STEP 3: Check Timeline
- Go to Window → Timeline
- Ensure it is in Video Timeline Mode
- Press Play to preview
STEP 4: Export Video
- Go to:
File → Export → Render Video - Settings:
- Format: H.264
- Preset: High Quality
- Size: 1920×1080
- Frame Rate: Same as chosen
- Click Render
Final MP4 file is created.
Which One Should You Use?
| Situation | Best Choice |
|---|---|
| Need color correction first | Lightroom |
| Need precise frame rate control | Photoshop |
| Want professional workflow | Premiere Pro |
| Want free simple option | iMovie |
Important Tip (Very Important)
To avoid flickering:
- Total number of images
- Final video duration you want
- Whether images are RAW or JPG


Class sir
Amazing sir
Thank you so much for this awesome tutorial Sir.
Excellent picture