Understanding Histogram in Photography
If the word histogram sounds scary or too mathematical, don’t worry—you’re not alone. Many photographers ignore it at first because it looks complicated. But once you understand it, a histogram becomes one of the most powerful tools to improve your photos.
What Is a Histogram?
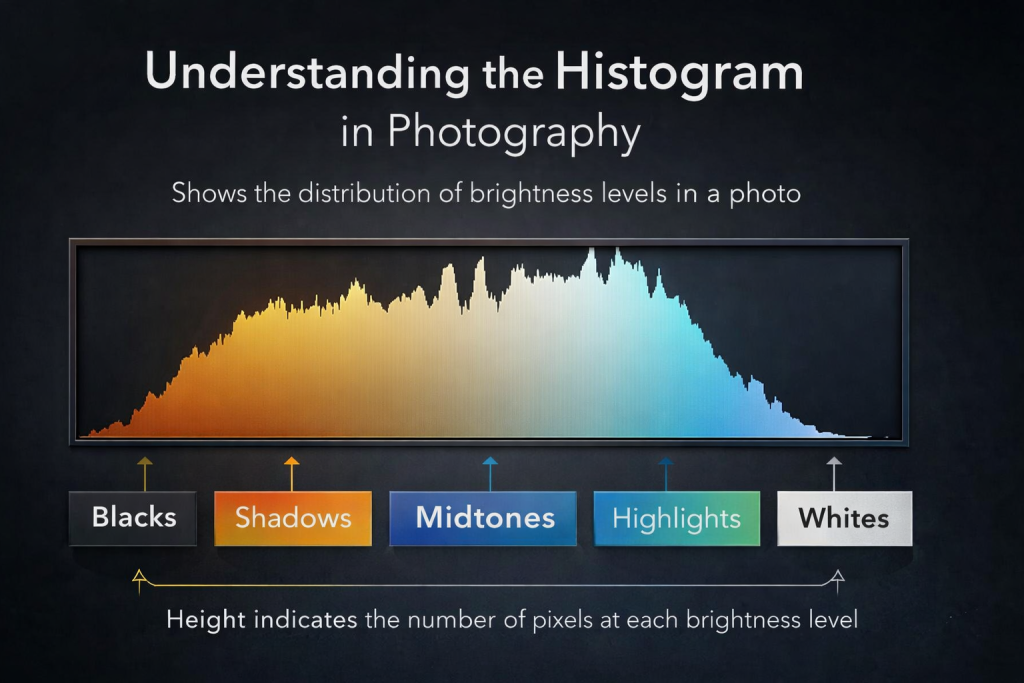
In photography, a histogram is a graph that shows how bright or dark your image is.
Think of it as a visual report of all the pixels in your photo.
- Left side of the graph = dark areas (shadows / blacks)
- Middle = mid-tones (normal brightness, around 18% grey)
- Right side = bright areas (highlights / whites)
The height of the graph shows how many pixels exist at that brightness level.
The taller the peak, the more pixels of that tone are present in the image.
Your camera measures brightness values from 0 to 255:
- 0 = pure black
- 255 = pure white
Each of these values is shown as a very thin bar, all squeezed together—this is why the histogram looks like a continuous mountain instead of separate bars.
What Can We Learn From a Histogram?
A histogram can tell you a lot about your image without even looking at the photo.
Is the Image Well Exposed?
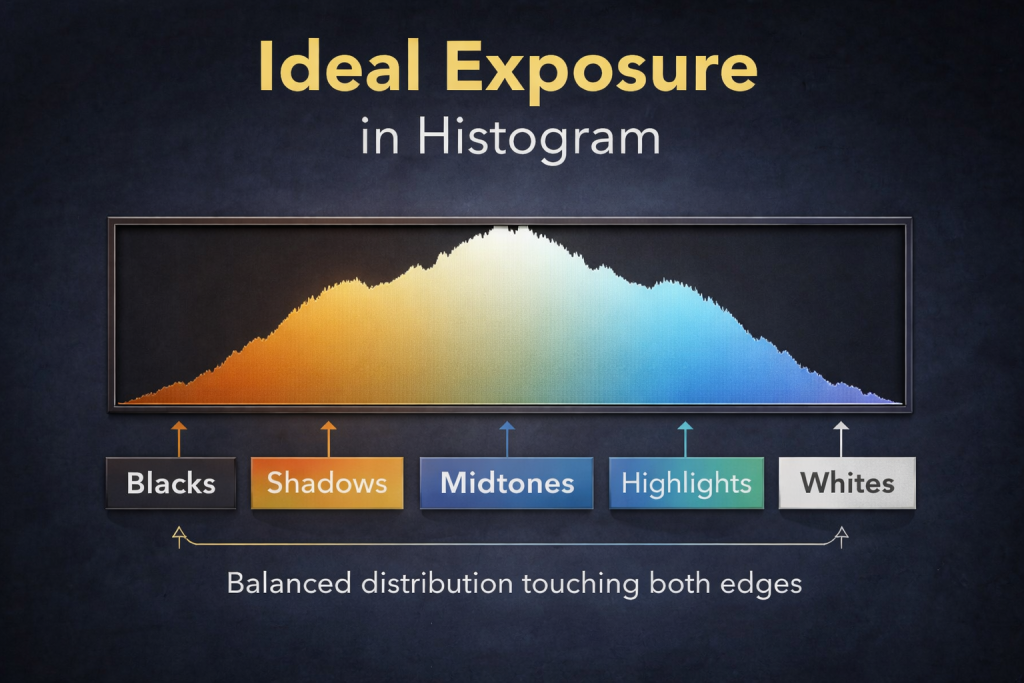
A generally well-exposed image:
- Touches both left and right edges
- Does not heavily pile up on either side
- Often looks like a gentle curve or arch in the middle
However, this is only a general guideline, not a strict rule. Different scenes need different exposures.
When Should You Adjust Exposure?
Gap on the Left Side (Overexposed Image)
If you see a gap on the left, it means:
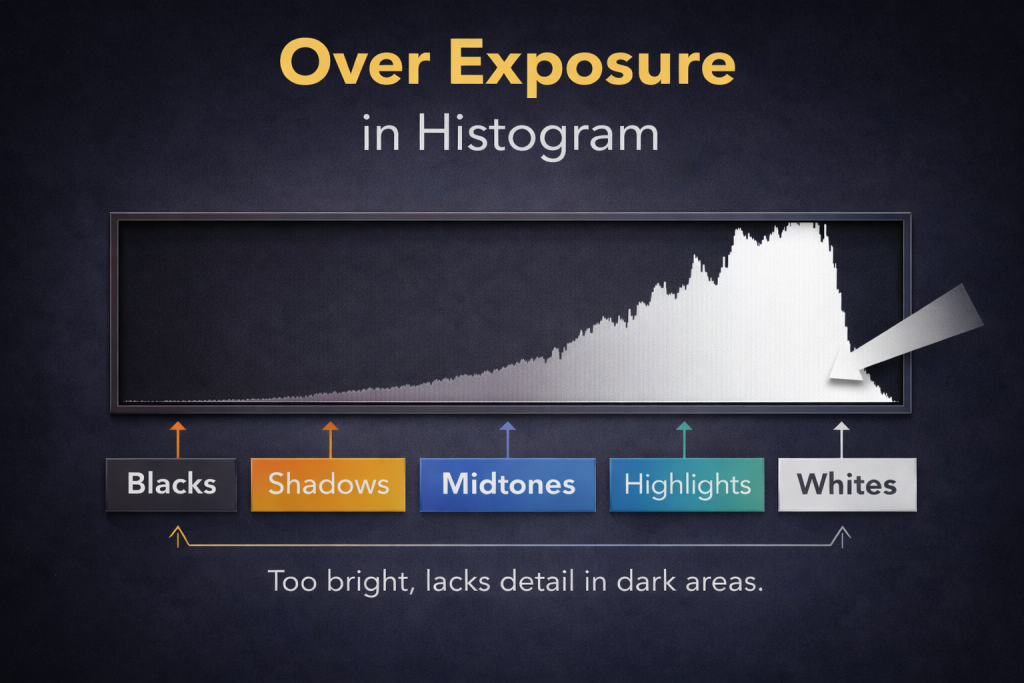
- No true blacks are present
- The image is too bright
- Highlight details may be lost forever
Solution: Reduce exposure and shoot again.
Gap on the Right Side (Underexposed Image)
If you see a gap on the right, it means:
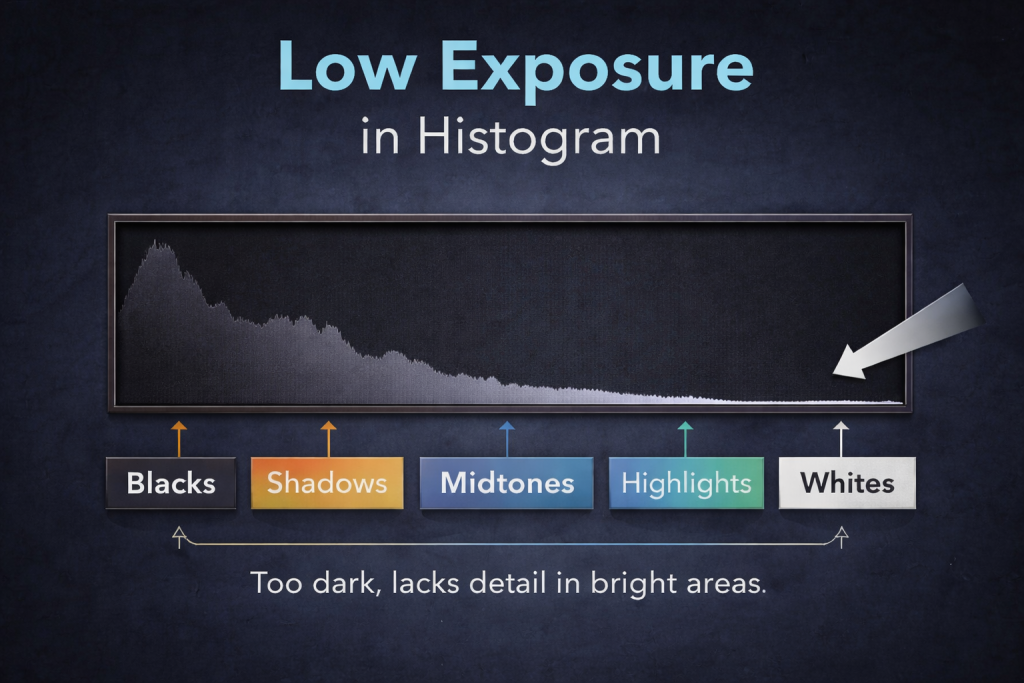
- No true whites are present
- The image is too dark
Solution: Increase exposure until the graph just touches the right edge.
What Is Clipping?
If the histogram spikes up hard against the left or right edge, that’s called clipping.
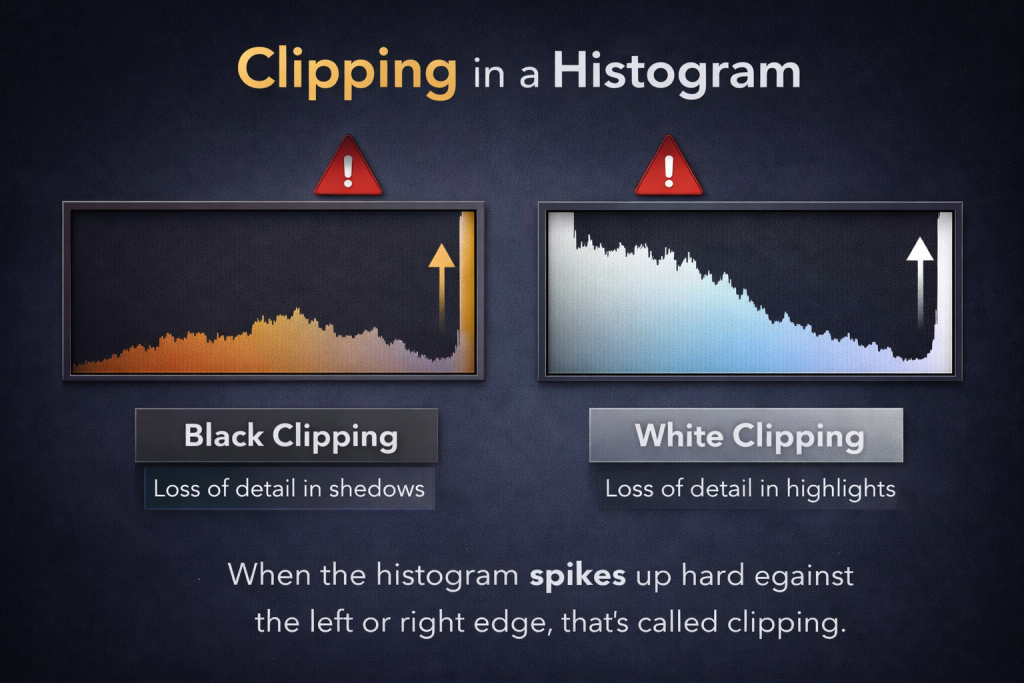
- Left edge clipping = loss of shadow detail
- Right edge clipping = loss of highlight detail
Highlight clipping is usually worse, because blown highlights are very hard (or impossible) to recover later. Shadows are easier to fix in editing.
Best practice:
Expose so the histogram just touches the right edge, without climbing up it. This helps preserve highlight detail while keeping shadows usable.
What About High-Contrast Scenes?
Sometimes, it’s impossible to avoid clipping.
Examples:
- Sunsets
- Bright daylight with deep shadows
- Indoor photos with bright windows
- Indian dance events in artificial lights
In such cases, the histogram may clip on one or both sides. That’s normal. You must decide what detail matters most—highlights or shadows.
The “Blinks” – Your Camera’s Secret Helper
Most DSLR and mirrorless cameras have a feature called Highlight Warning.
When enabled:
- Overexposed areas will blink or flash on the preview screen
- These flashing areas show where highlights are clipped
Photographers often call this feature “the blinks.”
How to Enable It
Nikon users
- Preview an image
- Press the Up or Down button near the OK button
- Stop when highlights start flashing
- Enable “Highlight Warnings” in the menu if needed
Canon users
- Press the Display or Info button while previewing photos
- Turn on highlight warnings in the menu if required
Check your camera manual if you’re unsure—every model is slightly different.
Final Thoughts
A histogram is not something to fear. It’s simply a truthful guide that shows what your camera actually captured.
Instead of trusting only the LCD screen (which can be misleading), use the histogram to:
- Avoid blown highlights
- Improve exposure accuracy
- Capture more usable details
Once you start using it regularly, reading a histogram will feel completely natural and get the image like the following image of histogram. But it is true, mostly in ideal situation of light and shadow.
Remember:
- There is no single “perfect” histogram for every photo.
- A good histogram depends on the scene, mood, and subject.
- Your main goal is to avoid unwanted clipping and keep important details safe—especially in highlights.
- Slight shadow clipping is often acceptable, but blown highlights are usually gone forever.
Use the histogram as a tool, not a rule. Check it, understand it, then decide creatively how you want your image to look. With regular use, reading a histogram will become second nature—and your exposures will improve dramatically.
Trust the histogram. It never lies. Happy shooting.
Frequently Asked Questions (FAQs)
1. What is a histogram in photography?
A histogram is a graph that shows the brightness levels of an image. It tells you how dark, bright, or balanced your photo is by displaying the distribution of pixels from black to white.
2. Why is the histogram important?
The histogram helps you check exposure accurately. The camera screen can be misleading, but the histogram shows the real data captured by your camera, helping you avoid underexposed or overexposed photos.
3. What do the left and right sides of a histogram mean?
- Left side represents shadows and blacks
- Middle shows midtones
- Right side represents highlights and whites
4. What does an ideal histogram look like?
An ideal histogram usually spreads across the full range from left to right without hard spikes at the edges. However, there is no perfect histogram—it depends on the scene and creative intent.
5. What is clipping in a histogram?
Clipping happens when the histogram spikes hard against the left or right edge.
- Left edge clipping = loss of shadow detail
- Right edge clipping = loss of highlight detail
Clipped areas often cannot be recovered in editing.
6. Is highlight clipping worse than shadow clipping?
Yes. Highlight clipping is usually worse because blown highlights lose detail permanently. Shadow details are easier to recover during post-processing.
7. What does an underexposed (low exposure) histogram look like?
In a low exposure image, most of the histogram data is pushed toward the left side, with little or no data on the right. This means the image is too dark.
8. What does an overexposed histogram look like?
In an overexposed image, the histogram is pushed toward the right side, often spiking at the edge. This indicates loss of detail in bright areas.
9. Should the histogram always touch both edges?
Not always. While touching both edges often indicates good exposure, some scenes—like night photos or high-key images—naturally lean toward one side.
10. What are “the blinks” on a camera?
“The blinks” are highlight warnings that flash overexposed areas on your camera screen. They help you identify clipped highlights quickly.
11. Can I rely only on the histogram instead of the LCD screen?
Yes, and it’s recommended. The histogram is more reliable than the LCD screen, especially in bright outdoor conditions.
12. Does the histogram work the same for RAW and JPEG?
The histogram is based on the JPEG preview, even when shooting RAW. However, RAW files usually contain more recoverable detail than what the histogram shows.
13. Do professional photographers use histograms?
Absolutely. Professionals regularly use histograms to ensure accurate exposure, protect highlights, and maintain image quality.
14. Can editing fix a bad histogram?
Editing can help to some extent, but lost details due to clipping cannot be recovered. Getting exposure right in-camera is always best.
15. How can beginners practice using the histogram?
Start by checking the histogram after every shot. Adjust exposure and watch how the graph moves. With practice, reading a histogram becomes automatic.


