Camera basics every beginner needs start with understanding how a camera actually works. Many beginners feel overwhelmed by technical terms, but the truth is simple—every camera, no matter how advanced, follows the same basic principle: capturing light. Once you understand this foundation, choosing the right camera and using it confidently becomes much easier.

How a Camera Works (In Simple Terms)
A camera works by allowing light to enter through the lens and recording that light onto a sensor.

When you press the shutter button:
- Light passes through the lens
- The shutter opens for a brief moment
- The sensor records the image
- The photo is displayed on the screen
That’s it. Everything else—settings, modes, and features—exists only to control how much light enters and how the final image looks.
Types of Cameras You Should Know
There are many kinds of cameras available today, but beginners usually start with one of the following.

1️⃣ DSLR Cameras
DSLR cameras use a mirror system to reflect light into an optical viewfinder.
Why people choose DSLRs:
- Excellent image quality
- Long battery life
- Wide range of lenses
- Strong performance in low light
They are slightly bulky but remain popular among learners who want full manual control.
2️⃣ Mirrorless Cameras
Mirrorless cameras remove the internal mirror, making them lighter and more compact.
Key advantages:
- Smaller and lighter than DSLRs
- Fast autofocus
- Modern features like eye tracking
- Great for both photos and videos
Mirrorless cameras are increasingly popular and a great long-term choice for beginners.
3️⃣ Compact Cameras
Compact cameras, also known as point-and-shoot cameras, are designed for simplicity.
Best for:
- Casual photography
- Travel and everyday use
- Users who don’t want to change lenses
They are easy to use but offer limited creative control compared to DSLRs and mirrorless cameras.
4️⃣ Smartphone Cameras
Smartphone cameras have improved dramatically in recent years.
Why smartphones work well:
- Always available
- Smart processing and AI features
- Perfect for learning composition and lighting
While they have limitations, smartphones are excellent tools for beginners to practice photography fundamentals.
Essential Camera Parts Explained
Knowing the main parts of a camera helps you understand what’s happening when you take a photo.
1️⃣ Sensor
The sensor is the heart of the camera. It captures the light and turns it into an image.

- Larger sensors usually produce better image quality
- Sensor size affects depth of field and low-light performance
2️⃣ Lens
The lens controls how light enters the camera.

- Determines how wide or zoomed your photo looks
- Affects sharpness and background blur
- Different lenses are used for portraits, landscapes, and wildlife
3️⃣ Shutter
The shutter controls how long light reaches the sensor.

- Fast shutter speeds freeze motion
- Slow shutter speeds create motion blur
- Also affects image brightness
4️⃣ Aperture
The aperture is the opening inside a camera lens that controls how much light enters the camera and affects background blur.
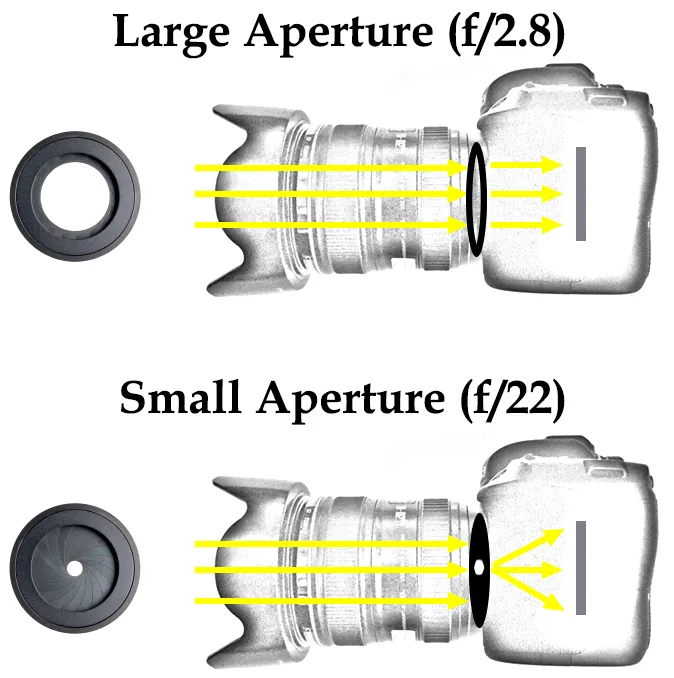
- Controls Light Intake – A wider aperture (f/2.8) lets in more light; a narrower aperture (f/11) lets in less light.
- Affects Background Blur (Depth of Field) – Low f-number creates blurry background; high f-number keeps more of the image sharp.
- Helpful in Low Light – Wide aperture helps capture brighter images in dim conditions.
- Enhances Subject Focus – Ideal for portraits when you want the subject sharp and background soft.
5️⃣ Viewfinder
The viewfinder lets you frame your shot.

- Optical viewfinders are common in DSLRs
- Electronic viewfinders show a digital preview
- Helps you focus on composition without screen glare
6️⃣ LCD Screen
The LCD screen displays:

- Live view while shooting
- Photos after capture
- Camera menus and settings
It’s useful for reviewing images and adjusting settings on the go.
Understanding ISO, Aperture & Shutter Speed
These three settings control how bright or dark your photo looks. Together, they are called the Exposure Triangle.
1️⃣ ISO (Light Sensitivity)
ISO controls how sensitive your camera is to light.
- Low ISO (100–200) → Less light sensitivity → Cleaner image
- High ISO (800–3200+) → More light sensitivity → Brighter image but more grain/noise

Example:
- Outdoor sunny day → Use ISO 100
- Indoor birthday party → Use ISO 800 or higher
Beginner Mistake:
Using very high ISO in daylight → photo becomes grainy.
2️⃣ Aperture (Lens Opening)
Aperture controls how much light enters the lens.

It is written like: f/2.8, f/4, f/8, f/16
- Small number (f/2.8) → More light → Blurry background
- Big number (f/16) → Less light → Everything sharp
Example:
- Portrait photo → Use f/2.8 (blurry background)
- Landscape photo → Use f/11 (everything sharp)
Simple way to remember:
Small f-number = Big opening
Big f-number = Small opening
3️⃣ Shutter Speed (Time)
Shutter speed controls how long the camera sensor sees light.
- Fast shutter (1/1000) → Freezes motion
- Slow shutter (1/10) → Motion blur
Example:
- Sports photography → 1/1000 sec
- Night light trails → 5 seconds
Beginner mistake:
Using slow shutter without tripod → blurry photos.
Basic Camera Settings for Beginners
When you are starting, don’t jump directly into full manual mode.
1️⃣ Auto Mode
Camera decides everything.
Good for complete beginners.
Problem: You don’t learn much.
2️⃣ Aperture Priority (A / Av Mode)
You control aperture.
Camera adjusts shutter speed automatically.
Best for:
- Portraits
- Background blur control
Recommended for beginners.

3️⃣ Shutter Priority (S / Tv Mode)
You control shutter speed.
Camera adjusts aperture.
Best for:
- Sports
- Moving subjects
4️⃣ Manual Mode (M)
You control everything:
ISO + Aperture + Shutter Speed.
Use this when you understand exposure basics.
5️⃣ White Balance
White balance controls color tone.

- Daylight → Natural colors
- Tungsten → Warmer indoor light
- Cloudy → Slightly warm look
Example:
If your indoor photo looks yellow → change white balance.
Focus and Autofocus Modes
Sharp focus makes your photo look professional.

1️⃣ Autofocus (AF)
Camera focuses automatically when you half-press the shutter button.
Good for beginners.
2️⃣ Single Autofocus (AF-S / One Shot)
Camera locks focus once.
Best for:
- Portraits
- Still subjects
Example:
Person standing still → Use AF-S.
3️⃣ Continuous Autofocus (AF-C / AI Servo)
Camera keeps adjusting focus.
Best for:
- Kids running
- Sports
- Wildlife
Example:
Dog running → Use AF-C.
4️⃣ Manual Focus
You turn the focus ring yourself.
Best for:
- Macro photography
- Low light
- Creative shots
Basic Composition Tips
Even perfect camera settings cannot fix bad composition. Composition means how you arrange things in your photo.
1️⃣ Rule of Thirds
Imagine your screen divided into 9 boxes. Place your subject on the lines or intersections.

Example:
Put a person slightly left or right — not center always.
2️⃣ Leading Lines
Use roads, rivers, fences to guide the viewer’s eye. Lines help the viewers to read a photograph.

Example:
Railway tracks leading toward a person.
3️⃣ Framing
Use doors, windows, trees to frame your subject.

Example:
Photograph someone through a window frame.
4️⃣ Keep Background Clean
Check background before clicking.
Example:
Avoid poles or messy objects behind head. If you use latest Adobe Photoshop version you can find options to eliminate the wires, poles etc.
Common Beginner Mistakes
Why Your Photos Look Dark or Blurry?
1️⃣ Shooting Only in Auto Mode
You don’t learn exposure basics.
2️⃣ Ignoring Light
Photography means “writing with light.”
Bad light = bad photo.
Example:
Midday harsh sunlight → strong shadows.
3️⃣ Using Very High ISO Always
Causes grainy images.
4️⃣ Not Holding Camera Steady
Shake = blur.
Tip:
Use both hands and keep elbows close to body.
5️⃣ Not Checking Focus
Always zoom and check if eyes are sharp in portraits.
Note: When you focus the eyes, a green light will lit up in the camera near viewfinder and a beep sound tells you that the subject or a specific part of the subject is in focus.
Final Thoughts
Understanding camera basics removes confusion and builds confidence. You don’t need to master everything at once—start by learning how your camera captures light, explore different camera types, and get familiar with essential parts.
Photography improves fastest when knowledge meets practice. Pick up your camera, experiment, and learn from every shot.


learn so many things. thanks.
The links are really noteworthy. Thank you
ekjon novice er jnyo darun article