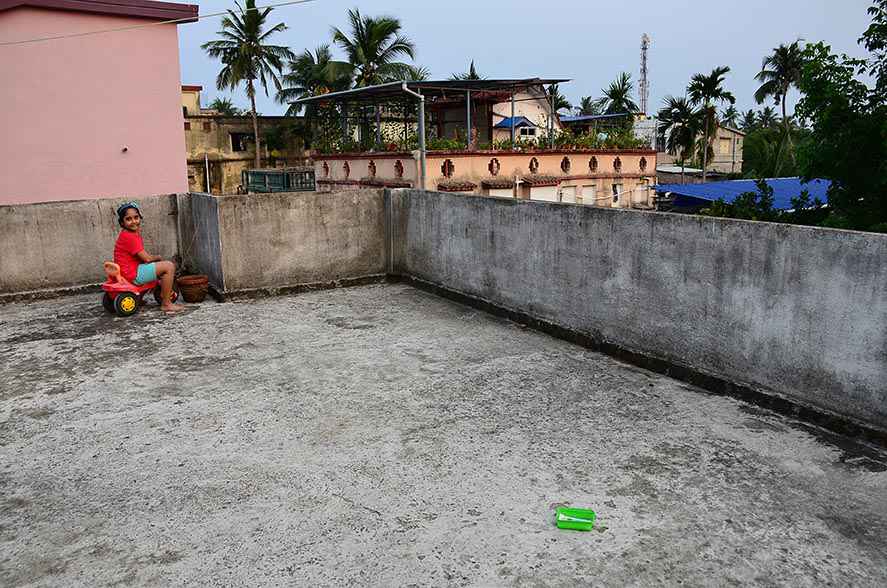
Multiplicity is a term in photography world which means to display same object in various point of a frame. It is also known as clone. In sports photography same process is being maintained with another name “Sequence Photography.” In sports, this technique is very much popular to show the sequence of a gymnast’s performance steps or a skate player’s movement from starting to end in a single frame.
Multiplicity is a technique to merge multiple images in a single frame. This technique is only possible at the time of the postproduction.
I use Photoshop CS6 to complete the technique. It is relatively easy to do the edit during postproduction.
Step by step process:
- Use a tripod and set a location. Lock the camera in tripod and never pan the camera.
- Use wide angle lens e.g. 18mm, 24mm etc.
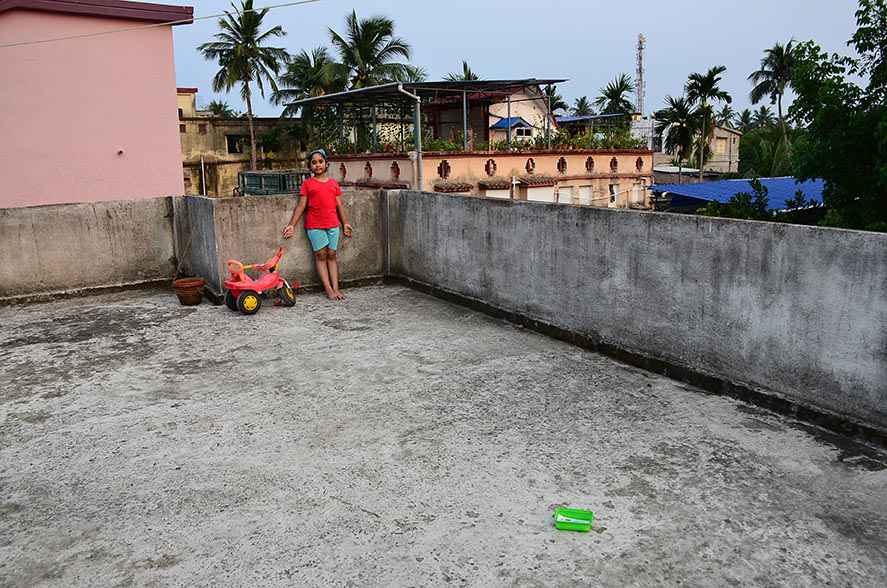
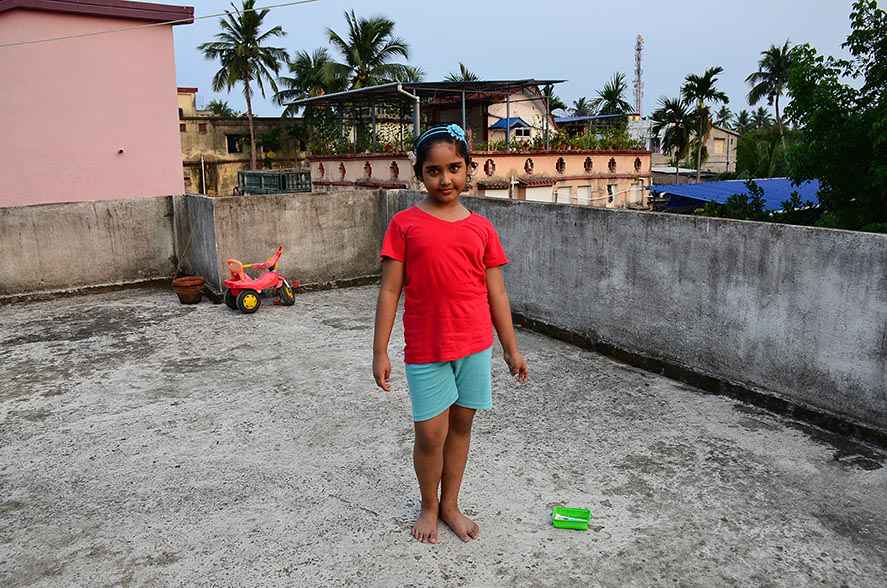
- Calculate the places where your subject will be placed. From the viewfinder locate the places where the subject will stand with various moods or moves. In sports, place the camera in such a place where the optimum situations will be occurred. For example: a man jumps from one cliff to another.
- Switch off VR or IS mode of lens.
- Use narrow aperture like f/8, f/11 subject to light condition for reasonable sharp images.
- Try to use manual focusing system otherwise ‘Aperture Priority’ or ‘Shutter Priority’ mode can be taken care of if the photo artist is agreed to focus the subject automatically (AF).
- Try to calculate how many subjects are flexible enough in a single frame.
- If the subject is in natural light, then try to take images as early as possible because the light is changing each and every second. Photographers not to worry for light changing if the images are taken in indoor with artificial light or using flash.
- Choose odd or even images to avoid the overlapping of subjects.

Post Production
- Dump all the picture files in a computer drive.
- Open Photoshop. Click on the File menu and choose Scripts and select Load files into stack.
- A box will pop up. Select the files and press OK button. If all the pictures are taken using tripod, photo artists can avoid the check box of ‘attempt to automatically align source images.’
- All image files are loaded in Photoshop. Check all the files are loaded in the layer toolbar or not. Add a Layer Mask of each and every image file by selecting every file layer.
- Now select the Mask Layer of the first image. The mask layer is white in colour. So, choose colour as black from the toolbar. Photo artist can find a toggle button to interchange the black and white colour of the two small boxes in the left-hand side toolbar.
- Choose a brush tool and change the size of brush as subject demands.
- Now rub the subject carefully. After complete removal, press control and i key (ctrl + i) from the key board.
- Choose the next mask layer and repeat the steps 5, 6 and 7.
- Choose the last image’s mask layer but put the image file as it is without rubbing and pressing ctrl + i
- Now select Layer menu and click on Flattern Image.
- Save the file.
Hope the tutorial will be useful for your multiplicity or sequence photography’s post production technique.
Thank you for reading my article till the last word.
Update: 2026
Multiplicity / Sequence Photography Tutorial (Photoshop 2026)
🔥 What You Need Before Starting
To make multiplicity successfully, you should have:
✅ Multiple photos of the same background
✅ Same camera angle (tripod is best)
✅ Same lighting
✅ Subject moving step-by-step
✅ Images taken continuously (burst mode is ideal)
🟦 Step 1: Import All Images into Photoshop
Method (Best Way):
- Open Adobe Photoshop 2026
- Click File → Scripts → Load Files into Stack
- Click Browse
- Select all your sequence photos
- Tick Attempt to Automatically Align Source Images (recommended)
- Click OK
📌 Now all your photos will load as separate layers in one file.
🟦 Step 2: Arrange Layers Properly
- Open the Layers Panel
- Rename layers (optional but useful):
- Start
- Mid 1
- Mid 2
- End
- Make sure the base background layer is at the bottom.
📌 Usually the first image is best as the background.
🟦 Step 3: Auto Align Layers (If needed)
Even if you ticked auto align earlier, check once.
- Select all layers (Shift + click)
- Go to Edit → Auto-Align Layers
- Choose Auto
- Click OK
📌 This removes camera shake or tiny movement differences.
🟦 Step 4: Choose Your Main Background Layer
- Select the layer which has the best clean background
- Move it to the bottom (drag down)
This becomes your main base frame.
🟦 Step 5: Add Layer Mask to Every Upper Layer
Now we will reveal only the subject from each image.
- Select the second layer (above background)
- Click Add Layer Mask button (bottom of Layers panel)
Do this for every layer above the background.
📌 Each layer now has a white mask (meaning fully visible).
🟦 Step 6: Hide Everything Except the Subject (Key Step)
Now you will isolate the athlete/skater/gymnast from each frame.
Process:
- Select the layer mask (click on mask thumbnail)
- Press Ctrl + I (Invert mask)
Now the entire layer becomes hidden.
- Select Brush Tool (B)
- Set brush:
- Hardness: 0–20%
- Opacity: 100%
- Flow: 100%
- Set foreground color to White
- Paint over the subject (athlete) on that layer
📌 Only the subject appears, background stays hidden.
🟦 Step 7: Repeat for All Sequence Layers
Now repeat the same steps:
- Select next layer mask
- Ctrl + I (hide all)
- Paint white on the athlete only
Continue until all motion steps appear in the same frame.
📌 At the end, you will see the subject cloned in multiple positions.
🟦 Step 8: Clean the Overlapping Areas (Fix Ghosting)
Sometimes subjects overlap or unwanted objects appear.
To fix:
- Select the layer mask
- Switch brush color to Black
- Paint over unwanted areas
📌 Black hides, White reveals.
🟦 Step 9: Refine Edges (For Realistic Look)
To make it look professional:
- Select the mask
- Go to Properties Panel
- Use:
- Feather: 0.5 to 2 px
- Density: adjust if needed
Or:
- Use Select and Mask for cleaner edges.
🟦 Step 10: Match Lighting and Colors Across Frames
Sometimes each photo has slightly different exposure.
To fix:
- Select a subject layer
- Go to Image → Adjustments → Match Color
- Choose the background layer as reference
Or use:
- Curves
- Levels
- Camera Raw Filter
📌 Make all clones look consistent.
🟦 Step 11: Add Motion Feel (Optional but Pro)
To enhance sports movement:
Add motion blur slightly:
- Duplicate a subject layer (Ctrl + J)
- Go to Filter → Blur → Motion Blur
- Reduce opacity to 10–30%
📌 This gives cinematic movement effect.
🟦 Step 12: Final Retouch and Composition
Now make the image look finished:
✅ Crop properly (Rule of Thirds style)
✅ Remove distractions using Spot Healing Brush
✅ Add contrast (Curves / Levels)
✅ Add sharpening (High Pass filter)
🟦 Step 13: Merge and Export
Once everything looks perfect:
Save editable file:
- File → Save As → PSD
Export final output:
- File → Export → Export As
- Choose:
- JPEG (High quality) for web
- PNG for maximum quality
Best Tips for Perfect Multiplicity (Sequence Photography)
✅ Always shoot from tripod
✅ Keep background unchanged
✅ Use continuous burst mode
✅ Avoid too much overlapping of body positions
✅ Keep enough gap between each movement step
✅ Use a clean background (stadium, wall, sky)
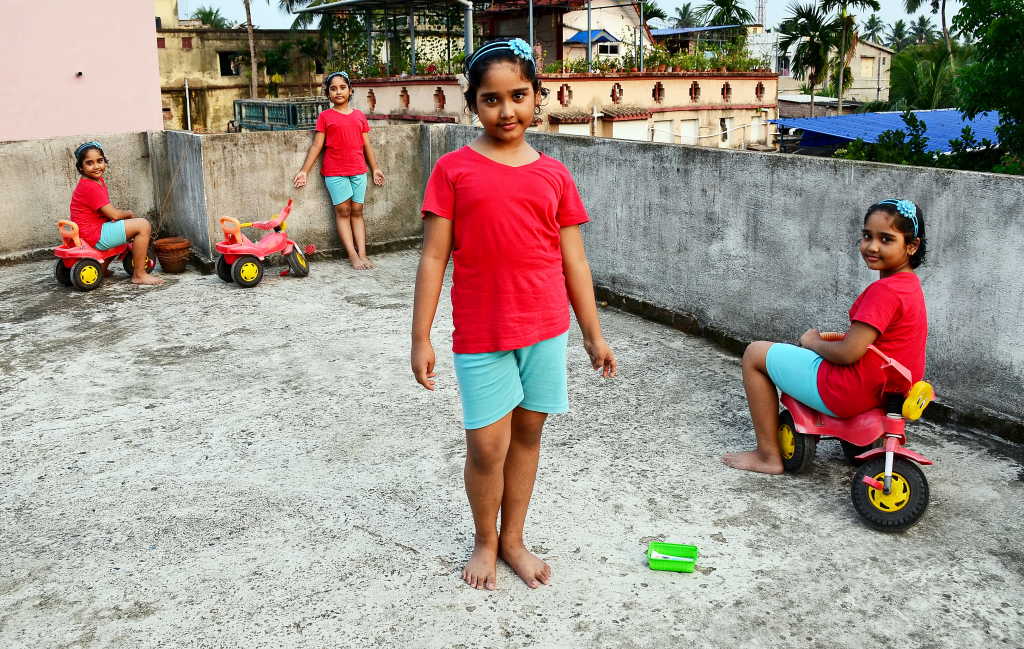
Final Result
After completing these steps, your final image will show:
📌 Same athlete appearing multiple times
📌 Each step of motion captured in one single frame
📌 A perfect “Sequence Photography” sports look


Darun sir.I am proud to be a part of Ulifephoto.Learnt a lot from this article.Thank u sir.