What is Focus in Photography?
Focus means making your main subject sharp and clear in the photo.
When a photo is focused properly, you can clearly see details like:
- eyes of a person
- texture of a flower
- writing on an object
- edges of a building
If focus is not correct, the photo becomes blurred and looks unprofessional.
Photography is the art of capturing moments, emotions, and stories through a camera lens. While lighting, composition, and exposure are important parts of photography, focus is the most essential fundamental element that decides whether an image looks professional or completely useless. Focus simply means making the subject of the photo appear sharp, clear, and detailed, while the background or other areas may remain blurred depending on the photographer’s choice.
In photography, focus is not just a technical setting—it is a creative tool. It helps guide the viewer’s eyes directly to the most important part of the image. A well-focused photograph creates impact, builds attention, and makes the subject stand out strongly. On the other hand, a photo with poor focus can destroy the beauty of the scene, even if everything else is perfect.

Therefore, understanding focus is one of the first and most important steps for anyone who wants to learn fundamental photography.
You can play a lot with exposure before and after taking a picture. Exposure is a combination of ISO, Aperture and Shutter speed. You can manually change these three options or rely on camera’s auto mode. In post processing you can opt for lighter or more contrast in your picture.
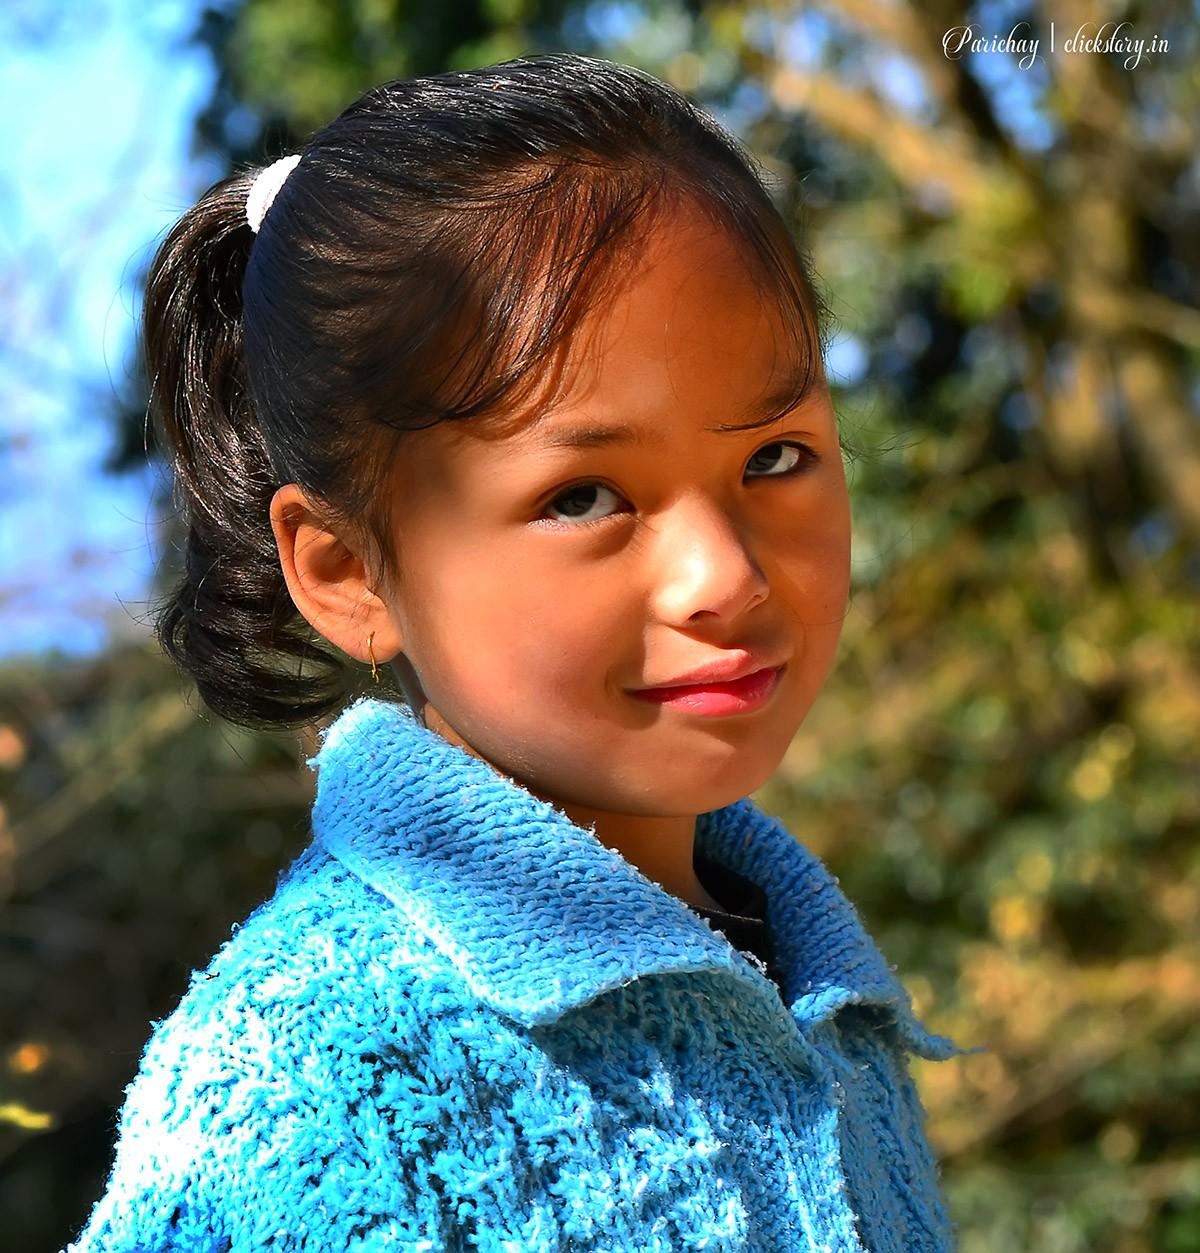
But a shot without focus gives you a reward of :( emoji. As per my observation, whenever you focus a portrait subject, focus on his/her eye. It should be pin sharp. If you want to hear the word ‘WOW’ from your dear one or your clients call you again in their next programme then focus on the portrait eye.
Now the question arises about f/2.8 or f/1.8 etc. and the subject sit at an angle or gives a perfect post for portrait photography (various poses in portrait photography: my next write-up) try to focus nearer eyeball of the subject with respect to the distance of your camera. Even if you click at f/8 or f/11, focus on the eyeball correctly. As a rule, with portraits you are generally quite close to the subject, so the depth of field is reduced.
Face Detection
A recent development in camera is Face Detection. I don’t know the exact advantage of it in portrait photography. Face is 3 dimensional and there is a huge difference between nose tip and ear distance in relation with focus issue. Switch off or disable this option for portrait photography.
A single focus on the nearer eyeball gives your shot more vibrant, dynamic and storytelling.
Types of Focus in Photography
1. Auto Focus (AF)
The camera focuses automatically.
Best for beginners.
2. Manual Focus (MF)
You focus by rotating the lens manually.
Best for macro photography, night photography, and creative shots.
Absolutely! Here are simple and practical tips to focus correctly in both Mobile and DSLR/Mirrorless cameras
How to Focus Correctly in Mobile Photography
1. Tap to Focus
Always tap on the subject (face/object) on your screen.
- The camera will lock focus on that point.
- Best for portraits, products, food shots.
Tip: Tap on the eyes when taking human photos.
2. Use Focus Lock (AE/AF Lock)
Most phones allow focus lock:
- Tap and hold on the subject until AE/AF Lock appears.
- Now you can move slightly without losing focus.
Best for moving subjects like kids, pets, street photography.
3. Clean Your Camera Lens
This is the most ignored tip
- Wipe lens with a soft cloth.
- Dust and fingerprints cause blur.
4. Don’t Zoom Too Much
Digital zoom reduces sharpness.
Instead:
- Move closer physically
- Or crop later
5. Use Portrait Mode Carefully
Portrait mode blurs background artificially.
So, make sure:
- subject is not too far
- lighting is good
Tip: Portrait mode works best in daylight.
How to Focus Correctly in DSLR / Mirrorless Camera
1. Use Single Point Autofocus
Instead of letting the camera decide focus, select one AF point.
Why?
Because camera may focus on background accidentally. Best for portraits and product photography.
2. Focus on the Eyes (Portrait Rule)
For portrait photography:
Always focus on the nearest eye.
Even if the nose is sharp but eyes are blurry, photo looks wrong.
3. Use AF-S and AF-C Modes Properly
Most cameras have two main autofocus modes:
AF-S (Single Autofocus)
- Focus locks once you press shutter halfway.
Best for still subjects (people posing, landscapes, products)
AF-C (Continuous Autofocus)
- Focus keeps adjusting while subject moves.
Best for moving subjects (sports, wildlife, kids running)
4. Use Back Button Focus (Advanced but Easy)
Instead of focusing with shutter button:
- assign focus to back button (AF-ON)
This gives better control and reduces mistakes.
5. Use Manual Focus for Macro and Night
Manual focus is best when autofocus fails.
Use manual focus for:
- macro shots (flowers, insects)
- low light/night photography
- moon shots
Tip: Use zoom-in preview (Live View) to adjust focus accurately.
Common Tips for Both Mobile + DSLR
1. Keep Your Hands Stable
Blur can happen due to shake.
- Hold phone/camera with both hands
- Use a wall or tripod for support
2. Use Good Lighting
Autofocus works better in bright light.
In low light, camera struggles and gives soft focus.
Tip: Face the subject toward light.
3. Don’t Shoot Too Close
Every lens has a minimum focusing distance.
If you’re too close, it won’t focus.
Solution:
- step back slightly
- then zoom/crop
4. Use Burst Mode for Moving Subjects
If subject is moving:
- use burst mode (continuous shooting)
- pick the sharpest image later
What is Depth of Field (DOF)?
Depth of Field means how much of your photo looks sharp (focused) from front to back.
In simple words:
Depth of Field = The focused area in your photo
Some photos have:
- only the subject sharp (background blur)
- everything sharp (subject + background)
That difference is Depth of Field.
Two Types of Depth of Field
1. Shallow Depth of Field (Background Blur)
Only the subject is clear, background becomes blurred.
Example:
- Portrait photography (face clear, background blur)
- Flower photo (flower sharp, background blur)
- Product photo (product sharp, background blur)
Example Scene:
👦 (Boy in focus) + 🌳 (trees blurred behind)
This makes the subject stand out beautifully.
This blur effect is called Bokeh.
2. Deep Depth of Field (Everything Sharp)
Both subject and background are sharp and clear.
Example:
- Landscape photography (mountains + sky + trees all clear)
- Group photos (all people should be sharp)
- Architecture photos (buildings sharp)
Example Scene:
🏔️ mountains + 🌲 trees + ☁️ sky all in focus
This gives a wide, detailed look.
What Controls Background Blur (Depth of Field)?
There are 3 main things:
Aperture (f-number) – MOST IMPORTANT
Aperture is written like:
f/1.8, f/2.8, f/5.6, f/11, f/16
Small f-number = More background blur
f/1.8, f/2.0, f/2.8
Shallow depth of field
Big f-number = Less background blur
f/8, f/11, f/16
Deep depth of field
Easy rule:
f/1.8 = blur background
f/11 = sharp background
Distance Between Subject and Background
If background is far away, blur increases.
Example:
- Person standing near wall → less blur
- Person standing in open field → more blur
More distance = more blur.
Camera Distance from Subject
If you go closer to the subject, blur increases.
Example:
- Close-up flower photo → strong blur
- Far shot of flower → less blur
Closer = more blur.
Real Life Examples (Very Easy)
Example 1: Portrait Photo
You want:
👩 sharp face + 🌳 blurred background
Use:
f/1.8 or Portrait Mode
focus on eyes
subject far from background
Example 2: Landscape Photo
You want:
🏔️ mountains + 🌲 trees + ☁️ sky all sharp
Use:
f/8 to f/16
focus in middle distance
Example 3: Product Photography
You want:
phone sharp + background blur
Use:
f/2.8 or f/3.5
keep product near camera
keep background far
Example 4: Group Photo
You want:
everyone sharp
Use:
f/5.6 to f/11
stand slightly back
focus on middle person
Mobile Phone Depth of Field
Phones create blur using:
- Portrait Mode
- AI depth sensing
But DSLR blur is more natural and professional.
Summary
- Depth of Field is the amount of area in focus.
- Small f-number = blurry background.
- Big f-number = clear background.
Background Blur vs Bokeh (Easy Explanation)
Background Blur = The Effect
Background blur means the background is not sharp.
It looks soft and out of focus.
Example:
A person is sharp, trees behind look blurred. That is background blur.
Bokeh = The Quality/Style of Blur
Bokeh is not just blur.
Bokeh means how beautiful the blur looks, especially light areas.
Example:
In the background you see soft glowing circles like: (streetlights, fairy lights, sunlight). That is bokeh.
Simple Difference in One Line
Background Blur = blurred background
Bokeh = beautiful blur (usually with light circles)
Best Example to Understand
Portrait in a Garden
If the leaves behind are blurred → Background Blur
Portrait with Wedding Lights
If lights become round glowing balls → Bokeh
Why Bokeh Happens?
Bokeh happens when:
- there are small light sources in background (lamps, candles, fairy lights)
- you use wide aperture like f/1.8, f/2.8
- you keep background far away
What Makes Bokeh Good or Bad?
Good Bokeh
- smooth, creamy blur
- round light circles
- soft and pleasing look
Bad Bokeh
- harsh blur
- messy background
- distracting shapes
Good bokeh depends a lot on lens quality.
Quick Final Summary
| Feature | Background Blur | Bokeh |
|---|---|---|
| Meaning | Out of focus background | Beautiful blur style |
| Needs lights? | No | Usually yes |
| Looks like | Soft blur | glowing circles |
| Main use | subject separation | artistic effect |
Strong Bokeh with Mobile Camera
1. Use Portrait Mode (Most Effective)
Most smartphones have Portrait Mode.
How to do it properly:
- Open Portrait Mode
- Tap to focus on subject’s face/object
- Keep the subject 1 to 2 meters away
- Keep background farther away (very important)
If the subject is close and background is far → bokeh becomes strong.
2. Keep Background Lights (Best for Real Bokeh)
To get the classic bokeh circles, you need small lights like:
- street lights
- car headlights
- fairy lights
- candles
- decorative bulbs
Example:
Take a portrait at night with city lights behind.
lights will become glowing balls.
Without lights, you’ll only get blur, not bokeh-style circles.
3. Move Closer to the Subject
This is a powerful trick.
What to do:
- Move closer to your subject
- Tap focus on subject
- Let background stay far
Closer subject = stronger blur.
Example:
Close flower shot → creamy bokeh.
4. Increase Distance Between Subject and Background
This is the secret of professional bokeh.
Do this:
- Subject stands near you
- Background is 10–20 feet away
Example:
Person standing in front of trees:
- near trees = less blur
- far from trees = more blur
5. Use 2x or 3x Lens (If Your Phone Has It)
Many phones have:
- 0.5x (wide)
- 1x (normal)
- 2x / 3x (telephoto)
Use 2x or 3x for portraits.
Telephoto lens gives natural bokeh.
Best for:
- face portraits
- product photos
6. Avoid Wide Lens (0.5x)
Wide angle lenses keep everything in focus.
So, avoid:
0.5x wide lens for bokeh
Use:
1x or 2x
7. Use Manual/Pro Mode (If Available)
Some phones allow manual control.
Settings:
- Use lowest f-number if your phone supports it
- Use close focus
- Keep ISO low for clean bokeh shots
(Not all phones show f-number, but portrait mode simulates it.)
8. Use a Bokeh-Friendly Background
Best backgrounds:
- trees with sunlight
- night lights
- fairy lights
- shiny objects (glass, reflections)
Worst backgrounds:
- plain wall
- messy room
- too close background
9. Use External Portrait Lighting (Bonus Trick)
If you use:
- ring light
- flashlight
- sunlight from one side
Your subject becomes brighter than background.
This makes the bokeh effect look stronger.
Best Realistic Setup for Mobile Bokeh (Perfect Formula)
- Subject 1 meter away from camera
- Background 5–10 meters away
- Use Portrait Mode
- Use 2x lens if available
- Background has lights or sunlight reflections
Result: Strong bokeh like DSLR-style
5 bokeh photo ideas
1. Fairy Lights Portrait (Classic Bokeh)
Setup:
- Hang fairy lights behind the subject (or use decorative lights)
- Use Portrait Mode
- Focus on eyes
Result: glowing light balls behind the face.
Best for: night portraits, romantic shots.
2. Street Light Night Portrait
Setup:
- Take photo in evening/night
- Put subject close to you
- Keep street lights far behind (10–20 meters)
Result: cinematic city bokeh background.
Best for: stylish portrait photography.
3. Flower Close-Up with Sunlight
Setup:
- Find a flower in garden
- Shoot close from 15–30 cm
- Keep background trees/grass far away
Result: creamy natural bokeh with soft colors.
Best for: nature photography.
4. Coffee Cup / Food Shot with Café Lights
Setup:
- Place coffee cup or food on table
- Keep lights or bright objects behind
- Use Portrait Mode (or focus lock)
Result: professional food bokeh photo
Best for: aesthetic content.
5. Glass Bottle / Perfume / Product Shot
Setup:
- Place product near camera
- Put small lights behind (fairy lights or phone flashlight reflections)
- Use 2x lens if possible
Result: luxury product photography bokeh
Best for: product and creative shots.
Bonus Tip:
For strongest bokeh, always remember:
Subject close + background far + lights behind = perfect bokeh

